Applications/Software
- Microsoft Office
- How do I disable Microsoft Office Desktop Alerts?
- How can you open documents created in WordPerfect with MS Word?
- How do I enable special add-in and tools in Excel?
- Inserting a Macromedia flash animation into a Powerpoint presentation
- In excel, how to I add a an external sheet to my current (or new) workbook?
- PowerPoint Preferences / Options
- Shrink PowerPoint Files
- How do I convert a .docx file on a Mac OS X
- How to Print Multiple files in MS Word
- How to Create a Poster in PowerPoint
- How to Import Scans of 35mm Slides into a PowerPoint Presentation
- How to disable auto resize of fonts within body text in PowerPoint
- MS Word Replacing Characters with Line Breaks
- How to merge data from Microsoft Excel into Microsoft Word
- Why can't I open .docx files?
- Enabling Presenter mode in Powerpoint
- Using Equation Editor in Word 2007
- Windows 7/Office 2010 License Activation Issues
- Office 2010 (and Windows 7) Manual Activation
- How do I manually specify a KMS server to activate MS Office 2010
- Microsoft Office Home Use Program
- Excel Tricks
- Help with Microsoft Office Applications
- Microsoft OneNote for OS X
- Previously activated Office 2010 constantly loses activation
- Sharing Office 365 calendar with an iOS device
- Read mode in Microsoft Word
- Change the default save location in Microsoft Office
- Adobe
- Is there an alternative for viewing PDFs other than Adobe Acrobat Reader?
- Repack Adobe Reader for fast install?
- Copying text and images from an Acrobat document
- Can I switch my Adobe licenses between Windows and OS X?
- Uninstalling Adobe Acrobat 8 Professional
- Acrobat crashes when printing
- Download Adobe Flash Player
- Acrobat Tips and Tricks
- Adobe CS4 Help and Training
- Adobe CS5 Help and Training
- After Effects Help and Training
- Adobe AIR Help and Training
- Adobe Audition Help and Training
- Adobe Learning Options
- Adobe Acrobat ETLA
- Adobe Photoshop CS 6 (beta)
- Adobe User Groups in Los Angeles
- Creating calculation fields in Adobe Acrobat Pro
- Lynda.com Adobe Creative Cloud (Preview Modules)
- Removing multiple versions of Adobe Flash
- Making PDFs accessible in Adobe Acrobat
- Adobe Acrobat Name User Login
- Adobe Acrobat 2017 Uninstallation and Adobe Creative Cloud Installation
- In Exchange 2003, how do I force the Global Address List to update?
- Where can I learn how to use statistical packages like Stata, SAS and SPSS
- How can I find out what an error message means?
- Content Management Systems
- Geographic Information Systems
- Wiki Software Alternatives
- What is a simple easy software for implementing SSH on a Windows machine?
- Free image viewer, resizer, photo editor and more!
- Is there an alternative to using Quicktime?
- Are there any free PDF makers available?
- Need alternative media player?
- Screen shot , grab a screen, try this program...
- How to run Eclipse from your USB key?
- LAMS Learning Activity Management System
- SAKAI
- Notepad replacements
- What are some Winzip alternatives for Windows?
- What is Samba?
- Can I connect to Samba using a Mac?
- How to disable the Style Whitelist in Kupu
- uPortal
- Dokeos
- How do I use pivot tables?
- AccessGrid vs. Video conferencing (H.323)
- GIMP Resources
- Has anyone used SurveyMonkey?
- How do I add or move folders in Sakai?
- What is Heat Software (formerly Lumension) and What Does It Do?
- How do I change the nav portlet?
- Is there a way of making the smart folder's contents public while keeping the content's containing folder from appearing to the public?
- Why doesn't wiki in Sakai let me edit?
- Sending very large files
- How to Make Zope Think It's Someone Else
- Second Life Programming
- Institutional Web Calendar Scripts and Info
- Gliffy online diagram editor and publisher
- Online Backup Utility
- Free Secure File Transfer Protocol (SFTP) Clients
- Rubrics
- Zamzar for file conversion
- concatenate tiff files
- How do I create non-printable PDFs?
- Final Cut Pro (FCP) 4.5 and Compressor AGP error
- MATLAB opensource alternatives
- Google Earth Pro
- ArcGIS 9.2 and Windows Vista
- Using LimeSurvey as a Survey Tool
- ArcMap Please wait while Windows installer configures ArcGIS Desktop
- Has anyone tried Omeka?
- How to download Google Applications without Google Updater
- real-time collaborative text editors
- Collaboration Software
- Second Life (SL) and Education
- UCLA Experiences with Second Life
- converting video files on PC
- Free office tools
- Video annotation tools
- Document Annotation Tools
- How to reset user passwords on Wimba
- VMware Fusion - How to set the default virtual machine
- Has anyone tried Diigo?
- How to merge pdf files
- iPad Note Taking Apps
- Synching Calendars Between ICal and Entourage
- Elluminate Live Moderator Tips
- Message notification in Pidgin
- What are the GradeMark and PeerMark features in Turnitin?
- Data visualization software
- Prezi, The Zooming Presentation Editor
- How to Create a Portlet in JIRA
- Travel Express and Java
- I’m looking for a database program to keep track of my contacts, meetings, and to be a “tickler” system to remind me of various due dates
- Crashplan Backup and Restore
- Tools for managing multiple passwords
- Utilizing Dropbox as working directory for Stata (Mac)
- Evernote Tips
- Timeline Generators
- SlideShare
- Software for ethnographic and qualitative data analysis
- Does UCLA have a campus-wide license for an online survey product?
- Are you aware of any departments that have electronic evaluation systems for lectures? Does any one have an existing system that can be purchased or
- EndNote at UCLA
- Mekentosj Papers
- What programs can I use if I want to communicate through video conferencing?
- Are there any convenient scheduling/meeting coordination programs available for us to use?
- Is there any way for me to convert pdf/audio files into a searchable text?
- Are there any general instructions for using general software tools?
- capture data from PDF tables
- Microsoft Sysinternals
- Two Free Academic Software Tools
- Has anyone tried Xerte Online Tookit?
- Instructor unable to play HD video purchased from iTunes
- f.Lux, Auto Brightness
- SensusAccess
- Phone App Desktop Emulators
- How to use Zoom Web Conferencing
- How do I access Turnitin submissions from Summer 2016 and before?
- What is rclone?
- How to login to Skype for Business 2016 for Windows
- Error 45054 iTunes Store
- Transfer Zoom Recording to UCLA Box
Microsoft Office
Excel, PowerPoint, Word, etc.
How do I disable Microsoft Office Desktop Alerts?
If you’re interested in changing the behavior or just outright disabling Microsoft Office Desktop Alerts, like that “new mail” alert for Outlook that pops up out of the taskbar, here’s how:
(dead link – http://office.microsoft.com/en-us/assistance/HP010416051033.aspx)
How can you open documents created in WordPerfect with MS Word?
If you have MS Word 2000 or higher, you’ll be able to open WordPerfect files and if the document was created with WordPerfect 6.0 or later.
To do this, open a blank document in MS Word. Go to the Tools menu and click on Options. Select the General tab and check mark the box that reads “Confirm Conversion at Open.” Then click OK. Open the WordPerfect files and a box will prompt you to choose the conversion. Select WordPerfect 6.×.
Here’s the reference link from Microsoft Tech Support:
http://support.microsoft.com/?kbid=211692
I haven’t tested it, but this site http://www.zamzar.com/ claims to be able to convert WordPerfect to Microsoft Word format.
How do I enable special add-in and tools in Excel?
You can turn on certain tools in Excel such as data analysis tools or equation solving tools from Excel itself.
Once Excel has been installed completely:
Navigate to TOOLs and then Add Ins.
You can check the box next to each free tool offered by Excel for free.
Inserting a Macromedia flash animation into a Powerpoint presentation
One easy way to insert a flash animation into Powerpoint is to install Shyam’s Toolbox. It contains an easy to use Flash Movie Wizard, and lets you insert flash with a couple of simple mouse clicks.
Shyam’s Toolbox download link and instructions:
http://skp.mvps.org/toolbox/download.htm
Note: Make sure that the security level of Powerpoint is set to Medium or lower, or the toolbox will not install.
In excel, how to I add a an external sheet to my current (or new) workbook?
You need to open both workbooks (or whatever workbook you want to copy from and to…)
activate the workbook to copy from, select the sheet(s) to copy and
click on > Edit >Move or Copy Sheet > Create a Copy
(if you dont click on create a copy… it’ll move it!)
and nominate the workbook to copy to from the pull down menu.
tada!
When does this work?
A user asks “I have 3 sheets on 3 diff seperate files, and I want to consolidate them into one workbook….”
tada!
PowerPoint Preferences / Options
Microsoft PowerPoint sets a large amount of default preferences which may not be in the best long term interest of user.
To access these settings, open PowerPoint and go to “Tools” > “Options…”. Mac Office users can go to “PowerPoint” > “Preferences”.
“Allow Fast Saves” – Turn off, per Microsoft. Future versions of MS Office do not have the Fast Save option.
“Save Auto-Recover Info Every” – 3 to 5 minutes is recommended.
“Save PowerPoint Files as” – ‘PowerPoint 97-2003 & 95 Presentation’ is recommended to best facilitate file transfer between users and collaborators.
Similar settings are advised in other Microsoft Office products.
Shrink PowerPoint Files
Problem
Pictures added to PowerPoint are added in a non-optimized form. Consequently, large images added to PowerPoint result in a large file size.
Solution
In Microsoft Office XP/2002/2003, use the “compress pictures” feature. Mac Office does NOT have this feature (grmph).
Open PowerPoint, go to View (menu) > Toolbars (submenu) > Picture (menu item). On the resultant toolbar, click the picture icon with four arrows pointing inward. In the “compress pictures” windows set as needed.
- N O T E <<*
Users have been known to keep original images in PowerPoint for later extraction and insertion into Word for publication documents. Thus, encourage and inform users to plan accordingly in advance.
How do I convert a .docx file on a Mac OS X
By default, Office 2007 saves documents in a new XML format (.docx). Please follow the link below to download a widget that allows users to convert files straight from the MAC OS X desktop.
Have fun!
• • •
For best compatibility across versions of Microsoft Office, it is best to change the default file format to NOT save as Office XML.
Microsoft’s official converter from pre-MacOffice 2008 versions is Open XML File Format Converter for Mac :
http://go.microsoft.com/fwlink/?LinkId=164915
How to Print Multiple files in MS Word
This link explains the process: Tech-Recipes (Warning: has ads)
Note: To select multiple files click the first file, and then shift click the last file and all consecutive files will be highlighted. To selected individual files ctrl click the desired files.
The following advice was found on that page:
Word makes it easy to print several files at once. The user does not even need to open them first.
(This sends the files straight to the printer without allowing you to adjust your printer settings.)
1. Click the File Menu
2. Select Open
3. After the open window displays, select the files you wish to print.
4. Right click on one of the selected files to open the context menu
5. Left click Print from the context menu.
This is perfect when your boss wants last month’s reports printed NOW!
How to Create a Poster in PowerPoint
To create a poster in PowerPoint, design one “slide” with its page size set to the size of your poster. Any color scheme that offers good contrast between foreground and background is acceptable, although you may find that white or light colored backgrounds with dark text work best.
1. From the File menu go to:
- New Presentation: Choose a Blank slide layout
- Page Setup: Select “Custom” from the “Slides sized for:” drop-down box and enter values for page Width and Height. If your desired poster size is less than 56 inches in its longest dimension, enter the actual final dimensions. If your desired poster size is 56 inches or greater in its longest dimension, enter Width and Height values at one-half final size. Then scale your file at the printer to achieve the final poster dimensions. For example, if your desired final size is 48 inches by 72 inches, set your PowerPoint page to 24 inches by 36 inches.
2. To add text:
- New text – Select PowerPoint’s Text Box tool and type in your text
- Existing text – From Microsoft Word, “Copy” and “Paste Special as Unformatted Text” into your PowerPoint document. Then apply text formatting as needed.
- When adjusting horizontal positioning of text strings, always use tabs or justification buttons. Using spaces can cause text alignment problems because the size of a space is not consistent from system to system.
- If your file uses any unusual fonts, you may need to supply the font files in order to correctly print the poster.
3. To add tables or graphs:
- To insert tables or graphs from Microsoft Word or Excel, select the Insert menu, point to Insert:Object, and click on the appropriate application. Alternatively, you can “Copy” the table or graph to the clipboard and “Paste Special as Picture”.
- Tables can be easily constructed within PowerPoint using tabs. The program includes left, right, center, and decimal justification tabs on the text ruler.
- For graphic objects from non-Microsoft Office applications use Save As or Export to create an EPS file from that application. You can then insert the file into your PowerPoint document. On the Insert menu point to Insert:Picture and click on From File…
4. To add scanned images:
- Scanned images should have a resolution of 150ppi at their final printed size on the poster
- Avoid compressed file formats like JPEG
- Use RGB mode for color images or Grayscale for B&W images
- Images to be imported should be in EPS or TIFF format
- Add images to your poster using Insert:Picture:From File…
- Avoid adding images by using “cut & paste”
5. Save and submit your file for printing as a PowerPoint presentation (.ppt file).
This information was originally posted on the now defunct UCLA Photographic Services Website.
Submitted by George Helfand george@lunaimaging.com, formerly with UCLA Photographic Services.
How to Import Scans of 35mm Slides into a PowerPoint Presentation
- Older versions of PowerPoint cannot rotate imported scans. If you are using an older PowerPoint version, you’ll need to use image manipulation software to correct any pictures that are not properly oriented, before attempting to bring them into your presentation.
- Open a blank slide in a new or existing PowerPoint presentation. Make sure the Slides Sized for choice list (in Page Setup under the File menu) is set to 35mm Slide, if you want the imported scan to fill the slide area exactly.
- Drop down the Insert menu in PowerPoint and select Picture:From File. In the resulting dialog box, navigate to the desired picture-containing directory. Choose a picture file and click the Insert button.
- To prevent unwanted cropping, the imported scan must fit within the slide area. Position the picture by clicking and dragging somewhere within the picture area. Scale the picture by clicking and dragging on a corner handle. If necessary, you can use PowerPoint’s zoom tool to view the entire picture without having to scroll.
- If the imported scan does not fill the slide area, you can change the slide’s background color using the Format:Background command. Selecting “Black” as the background color will make the picture appear to float on the projection screen.
This information was originally posted on the now defunct UCLA Photographic Services Website.
Submitted by George Helfand george@lunaimaging.com, formerly with UCLA Photographic Services.
How to disable auto resize of fonts within body text in PowerPoint
By default, PowerPoint will automatically adjust the font size of your body text on each slide depending on the amount of text. This can create inconsistent font sizes for each slide if one slide’s body text only has a few lines of text and another slide’s body text has much more. To disable this feature:
MS Word Replacing Characters with Line Breaks
You can use the Find and Replace in MS Word to replace any characters with a Line Break or other special characters or properties (i.e. creating a page break, em dash, column break, etc.) by using the Find and Replace with “Special” function.
…
Microsoft Word has long had the ability to find & replace non-standard and non-displayable characters:
Special characters you can use with Find and Replace in Word
–or–
WD: Control Codes to Use with Find and Replace
How to merge data from Microsoft Excel into Microsoft Word
“In addition to the features and functions of Excel that make your database useful, you can also use the database to merge information into Word for large mailings. This means that you will not have to duplicate information you already have in your Excel database to perform a mail merge.”
http://www.uwec.edu/Help/Word03/MM-withxls.htm
Why can't I open .docx files?
For those of you who have inadvertently been sent a Microsoft Word document in the new .docx (x for xml) format and can’t open it in your older version of Microsoft Word, this N.Y. Times Personal Tech article
has the explanation and some alternatives.
Enabling Presenter mode in Powerpoint
Microsoft Powerpoint supports notes with each slide, yet the default slideshow view on most Powerpoint installations is a standard slideshow only, which hides the notes from the presenter.
The Mac versions seem to be the notable exception in that more of them default to “Presenter” mode for slideshows, which shows the Powerpoint slides only on the external display and the slides w/timer, forward/back filmstrip of slides, and the slide notes on the computer display.
To enable this in Microsoft Office 2003’s Powerpoint:
http://office.microsoft.com/en-us/powerpoint/HA010565471033.aspx
Ensure the projector is connected first and active, and set to clone the display.
- In PowerPoint, on the Slide Show menu, click Set Up Show.
- Under Multiple monitors, select the Show Presenter View check box.
- In the Display slide show on list, click the monitor you want the slide show presentation to appear on.
To enable this in Microsoft Office 2007’s Powerpoint, it is almost identical:
http://office.microsoft.com/en-us/powerpoint/HA100673831033.aspx
Using Equation Editor in Word 2007
Microsoft Office 2007 has a new “ribbon” to replace conventional menus, and a new Equation Editor in Microsoft Word.
To use the old Equation Editor 3.0 if you need easier access to advanced functions, per MTU:
https://help.we.mtu.edu/index.php/Equation_Editor_in_Word_2007
The workaround is to continue to use Equation Editor 3.0, instead of the new equation function. To do this, ignore the equation icon that appears in Word 2007’s ribbon bar under Insert, Symbols, Equation. Instead, choose Insert, Text, Object, Microsoft Equation 3.0. This will give you the equation editing interface that is familiar from previous versions. In the general access computing labs and classrooms, an equation icon has been added to the “Quick Access Toolbar” that appears in the upper left of the Word 2007 window. This is a shortcut to the old Equation 3.0 function which is the recommended method of creating and editing equations at this time. -——
If you wish to use the old Equation Editor frequently, you can place a button for it in the Quick Access Toolbar adjacent to the new round Office button. From the same link as above:
1. Recording the Macro:1. Open Word and click on the View Tab2. In the Macros group, click the Macros button and choose Record Macro3. In the resulting Dialog name your macro EquationEditor and choose All Documents (Normal.dotm), under Store Macro in4. Click OK to begin recording5. Click the Insert Tab in Word’s Ribbon6. Click the button labeled Object, located in the Text Group to open the Insert Object Window.7. Click on Microsoft Equation 3.0 and click OK.8. This will open Equation editor.9. Click anywhere on the Word document to return to normal display of the Word Ribbon and then click on the View tab.10. Click on the Macros button and choose Stop Recording.11. The Macro has been recorded.2. Adding your recorded macro to Word’s Quick Access Toolbar: The Quick Access Toolbar located in the upper-left portion of the Word window, is a customizable toolbar into which you can place buttons for your frequently used commands and of course, macros.
- Adding your newly created macro to the Quick Access Toolbar:
- Right-click on the Quick Access Toolbar and choose, Customize Quick Access Toolbar… to open the customization dialog.
- From the pull-down menu labeled Choose commands from: select Macros.
- Click once on the macro name Normal.NewMacros.EquationEditor.
- Click the Add button.
- Optional: You can click the Modify button to apply an icon of your choice to this button.
- Click OK.
- You now have the macro button for Equation Editor located in the Quick Access Toolbar. Any time you wish to insert an equation at the cursor simply click the button in the Quick Access Toolbar and Equation Editor will open ready for you to begin typing your equation.
-——
Windows 7/Office 2010 License Activation Issues
If you are experiencing problems with clients connecting to the campus KMS servers and you have confirmed that your DNS has been setup properly, you can manually force activation of a license.
HSSEAS has posted instructions.
Office 2010 (and Windows 7) Manual Activation
For manual activation of Office 2010 and Windows 7 through the campus KMS server:
http://www.seasnet.ucla.edu/software/software-download/frequently-asked-questions/mcca-licenses
How do I manually specify a KMS server to activate MS Office 2010
1. Launch a command window with elevated privileges.
◦Type cmd in the search bar to locate the command window.
◦Right click on cmd and click Run as administrator from the context menu, or select cmd and hit CTRL-SHIFT-ENTER on the keyboard.
◦Click Yes at the User Account Control prompt to open the command window with elevated privileges.
2. At the command prompt, type
cd \Program Files\Microsoft Office\Office14\
◦If running 32 bit Office 2010 on 64 bit Windows, type
cd \Program Files (x86)\Microsoft Office\Office14\
3. Run this command to manually specify the KMS activation server.
cscript ospp.vbs /sethst:kms.softwarecentral.ucla.edu
4. Run this command to activate Office with the KMS server:
cscript ospp.vbs /act
Microsoft Office Home Use Program
The Microsoft Home Use Program allows employees at eligible companies to buy an annual subscription of Microsoft 365 Family or Microsoft 365 Personal at a discount for use on personal devices.
https://www.microsoft.com/en-us/home-use-program
Excel Tricks
-
How to Use INDEX+MATCH With
Multiple Criteria in 5 Easy Steps (includes Excel 2016) - How To Use Index/Match, The One Microsoft Excel Trick That Separates The Gurus From The Interns
- The First 8 Excel Tricks You Have To Learn On The Way To Becoming A Master
Help with Microsoft Office Applications
Does anyone know if there is a campus group that provides assistance with setting up a database in Access or who can answer questions? Lynda and Google have been my friends, but now I need human help. :-)
Microsoft OneNote for OS X
Microsoft is now offering OneNote for OS X 10.9 as a free download—
- Office Blogs, http://blogs.office.com/2014/03/17/onenote-now-on-mac-free-everywhere-and-service-powered/
Early thoughts—
- http://arstechnica.com/apple/2014/03/new-free-onenote-for-os-x-is-a-preview-of-the-next-office-for-mac-apps/
- http://www.infoworld.com/d/applications/microsoft-launches-free-onenote-mac-some-pieces-missing-238516
Should anyone have input on their experiences with the product, feel free to link them here
Previously activated Office 2010 constantly loses activation
In some cases, a previously activated Microsoft Office 2010 installation may lose its activation.
Reapply the MAK does not help as it loses activation immediately thereafter. Querying the Office 2010 activation status confirms it is activated, then activation is loss without explanation. Conventional methods as described via the Microsoft Technet forum link below do not work.
In this situation, the Office Software Protection Platform Service may have a corrupt tokens.dat and cache.dat which needs to be removed and the MAK re-entered.
- Type in services.msc in the search box and stop the service called Office Software Protection Platform
- Go to C:\ProgramData\Microsoft\OfficeSoftwareProtectionPlatform and rename tokens.dat to tokens.old
- Go to C:\ProgramData\Microsoft\OfficeSoftwareProtectionPlatform\Cache and rename cache.dat to cache.old
- Restart the computer and open any Office program. You’ll be asked to retype your product key and then restart again. Again open any Office program and you may have to type in the key one more time. It will then ask you to activate online and you’re good to go.
http://helpdeskgeek.com/office-tips/fix-office-2010-cannot-verify-license-error-message/
Sharing Office 365 calendar with an iOS device
https://thepracticalsysadmin.com/add-office-365-calendars-to-google-calendar/
Beware! Depending on the platform, you might import the current calendar rather than subscribe to it.
To subscribe, you want to copy the long url rather than “share” it.
Subscribe to ICS calendar in iOS
To get a calendar subscription, you need to subscribe as described here.
https://www.imore.com/how-subscribe-calendars-your-iphone-or-ipad
This procedure worked for me using the .ics link (rather than the .html link) on iOS 11.4.1
Read mode in Microsoft Word
Some users have reported issues that documents they could previously edit in Word are no longer editable.
After checking document security options and finding no security applied that would prevent editing, it turns out the document had somehow defaulted to opening in Read Mode.
From the ribbon, go to View , then Edit Document .
Once the normal editing tools are restored, the View ribbon will show the usual viewing options on the left side, which usually comprise: Read Mode, Print Layout, Web Layout, as well as Outline and Draft.
Change the default save location in Microsoft Office
To customize the default save location in Microsoft Office. This may be particularly useful in later versions of Microsoft Office as the default location is often changes from a user’s local Documents folder (inside My Computer) to Onedrive (Microsoft OneDrive), which may be confusing to users who do not realize their default save location has changed.
Steps:
- Open the Office application where you want to change the default save location.
- Click on Options (usually at bottom-left)
- Click on Save (left-hand column)
- In the Save documents section (Word)/Save workbooks section (Excel)/Save presentations section (PowerPoint), please check the box for Save to Computer by default.
- Verify the Default local file location is set to the user’s preferred location.
- Hit ok to save your changes.
https://support.centrestack.com/hc/en-us/articles/360034998913-How-to-change-the-default-save-location-to-a-custom-path-in-Office-365-2016
https://support.microsoft.com/en-us/office/customize-the-save-experience-in-office-786200a7-f5f2-4d26-a3ae-b78c60dd5d3b
Adobe
Acrobat, Photoshop, etc.
Is there an alternative for viewing PDFs other than Adobe Acrobat Reader?
Foxit Reader is a free, simple alternative to Adobe Acrobat Reader.
https://www.foxitsoftware.com/pdf-reader/
Repack Adobe Reader for fast install?
Want to repack the adobe reader exe into an MSI for faster deployment?
1. Downloaded the full file AdbeRdr70_enu_full.exe, unchecked the boxes Yahoo toolbar and Photoshop Album 2.0.
2. Run the file AdbeRdr70_enu_full.exe and after the file had been extracted in PROGRAMFILESFOLDER\Adobe\Acrobat 7.0\Setup Files\RdrBig\ENU, i Copied the files to another location and canceld the installation (c:\ar7\iso)
3. Create a Administrative installation by running msiexec /A “c:\ar7\iso\Adobe Reader 7.0.msi” then is ask where to put the files, I choosed c:\ar7\Repack.
4. Now you can create a mst file to modify your package, What I did that can be useful is on the Component EULA_Accept_Registry_R removed the condition EULA_ACCEPT=“YES”
tada…
Copying text and images from an Acrobat document
Acrobat Reader has 3 main tools, the hand tool (on by default), the select tool and the snapshot tool.
- Most are familiar with the hand tool, which allows you to move the document around on the screen and other basic operations.
- The select tool allows the user to select text in the PDF and copy it to the clipboard.
- The snapshot tool allows the user to drag a box around a selection of the PDF and copy it to the clipboard as an image.
NOTE PDF security allows the creator of the document to disallow these tools, which results in buttons being “grayed out”.
Can I switch my Adobe licenses between Windows and OS X?
With the growth of “switchers” now that intel macs have been out, a lot of people are curious about being able to use their windows licenses for mac products. While you cannot use the same license code for the same product on multiple platforms (e.g. Photoshop on Windows for Photoshop on the Mac), you can call in and have it changed over!
Details are here, and I’ve found Adobe to be very prompt and helpful in getting an activation code for their CS3 trial.
Uninstalling Adobe Acrobat 8 Professional
To properly remove a damaged Adobe Acrobat 8 Professional installation (e.g. you’ve installed Adobe Creative Suite 3 Web Premium on a system that already has Acrobat 8 Pro installed, and you want to reclaim the 1GB of space from the other Acrobat 8 installation), Adobe has the following link:
http://kb.adobe.com/selfservice/viewContent.do?externalId=kb400658&sliceId=1
This includes options to keep or discard the existing product activation.
Acrobat crashes when printing
PDFs load fine in Adobe Acrobat 8 or Adobe Acrobat 9, but when you try to print a PDF, Acrobat crashes.
If you are running Windows Vista, you get the:
“xxxxx Application has stopped working: Windows Can Check online for a solution to the problem.
Check online for a solution and close the program
Close the program
where xxxxx is Adobe Reader, Adobe Acrobat Professional, etc…
A check of the problem details (for example, Acrobat 9 Professional) will show two of the following items or similar:
Application Name: Acrobat.exe
Fault Module Name: GDI32.dll
Or similar, and most of the time you will see a PDF Printer Missing or similar error.
In many cases but not all the steps below will fix the problem; please note that if you are using XP x64 or Vista x64, it is recommended to upgrade to Acrobat 9 if you are running an earlier version to help resolve some printing issues:
http://www.adobeforums.com/webx/.3bc48c88
Adobe PDF Printer Missing Fix – Adobe Acrobat 8.1 – Vista
1. Type “C:\Windows\inf” into the search box on the start menu.
2. Locate the INFCACHE.1 file and right-click it and select Properties.
3. On the INFCACHE.1 Properties window tab to the “Security” tab and click the “Edit” button to change permissions on this file.
4. On the Permissions for INFCACHE.1 window click the “Add” button.
5. On the Select Users or Groups window click the “Advanced” button.
6. A new Select Users or Groups window will open and then click the “Find Now” button.
7. The search results are sorted alphabetically; locate the username you logon to Windows with and then double-click.
8. Under the “Enter the objects names to select…” you should see something like this YOURCOMPUTERNAME\Yourusername
9. Now click the OK button.
10. You will now return to the Permissions for INFCACHE.1 window.
11. Under the Permissions for Yourusername you need to tick “Full Control” under the Allow column. Click the “Apply” button and then the “OK” button.
12. You will be prompted with a “Windows Security” window, just click the “Yes” button and continue.
13. Delete the INFCACHE.1 file.
14. Restart your computer.
15. Open Adobe Acrobat 8.1
16. Locate the “Help” menu item and click “Repair Acrobat Installation”
17. Restart if requested to do so. --
Download Adobe Flash Player
To download and install Adobe Flash, please visit: http://www.get.adobe.com/flashplayer/
Reference: http://helpx.adobe.com/flash-player/kb/installation-problems-flash-player-windows.html#main-pars_header http://www.adobe.com/products/flashplayer/distribution3.html
Acrobat Tips and Tricks
Lynda.com offers many easy-to-follow courses on using Acrobat products. Please see the following links to get help on various Acrobat software. You just need your UCLA logon to access the courses. To login, please visit: https://shib.lynda.com/Shibboleth.sso/InCommon?providerId=urn:mace:incommon:ucla.edu&target=https://shib.lynda.com/InCommon.
After you have logged in:
To learn “how to get started” and additional tips and tricks with using Acrobat, please visit: http://www.lynda.com/home/ViewCourses.aspx?lpk0=13
Courses on Acrobat 3D: http://www.lynda.com/home/ViewCourses.aspx?lpk0=247
Courses on Acrobat 9: http://www.lynda.com/home/ViewCourses.aspx?lpk0=374
Courses on Acrobat Connect: http://www.lynda.com/home/ViewCourses.aspx?lpk0=225
Adobe CS4 Help and Training
Lynda.com offers many easy-to-follow courses on using Adobe CS4 products. Please see the following link to get help on various Adobe CS4 software, such as Photoshop, Illustrator, Contribute, InDesign, etc. You just need your UCLA logon to access the courses. To login, please visit: https://shib.lynda.com/Shibboleth.sso/InCommon?providerId=urn:mace:incommon:ucla.edu&target=https://shib.lynda.com/InCommon.
After you have logged in:
http://www.lynda.com/home/ViewCourses.aspx?lpk0=362
Adobe CS5 Help and Training
Lynda.com offers many easy-to-follow courses on using Adobe CS5 products. Please see the following link to get help on various Adobe CS5 software, such as Photoshop, Illustrator, Contribute, InDesign, etc. You just need your UCLA logon to access the courses. To login, please visit: https://shib.lynda.com/Shibboleth.sso/InCommon?providerId=urn:mace:incommon:ucla.edu&target=https://shib.lynda.com/InCommon.
After you have logged in:
http://www.lynda.com/home/ViewCourses.aspx?lpk0=803
After Effects Help and Training
Lynda.com offers many easy-to-follow courses on using Adobe After Effects. Please see the following link to get help on After Effects. You just need your UCLA logon to access the courses. To login, please visit: https://shib.lynda.com/Shibboleth.sso/InCommon?providerId=urn:mace:incommon:ucla.edu&target=https://shib.lynda.com/InCommon.
After you have logged in:
http://www.lynda.com/home/ViewCourses.aspx?lpk0=331
Adobe AIR Help and Training
Lynda.com offers many easy-to-follow courses on using Adobe AIR. Please see the following link to get help on AIR. You just need your UCLA logon to access the courses. To login, please visit: https://shib.lynda.com/Shibboleth.sso/InCommon?providerId=urn:mace:incommon:ucla.edu&target=https://shib.lynda.com/InCommon.
After you have logged in:
http://www.lynda.com/home/ViewCourses.aspx?lpk0=351
Adobe Audition Help and Training
Lynda.com offers many easy-to-follow courses on using Adobe Audition. Please see the following link to get help on Audition. You just need your UCLA logon to access the courses. To login, please visit: https://shib.lynda.com/Shibboleth.sso/InCommon?providerId=urn:mace:incommon:ucla.edu&target=https://shib.lynda.com/InCommon.
After you have logged in:
http://www.lynda.com/home/ViewCourses.aspx?lpk0=207
Adobe Learning Options
Adobe offers a number of resources to enahnce the user experience including:
- Adobe TV Link – http://tv.adobe.com/
- Adobe Certification/Curriculum – http://edexchange.adobe.com/pages/dbb70fc57a
-
Adobe Education Exchange – connect with other educators to see how they are using Adobe tools:
http://edexchange.adobe.com/pages/home - Acrobat.com – free service includes ConnectNow – www.acrobat.com
- Adobe Flash Player Admin Guide – http://www.adobe.com/content/dam/Adobe/en/devnet/flash/articles/flash_player_admin_guide/flash_player_admin_guide.pdf
see also, LearnIT / Lynda.com and Safari Proquest Books Online
Adobe Acrobat ETLA
UC has an agreement for the Adobe Acrobat *Enterprise Term License Agreement * (ETLA) program. The ETLA agreement provides annual Acrobat licenses for whole departments only that include: updates and upgrades for the current agreement term, pricing based upon number of faculty and administrative staff FTE in the department, the ability to install on new computers mid-year at no additional cost, lab computer installations included at no additional cost, and work at home rights for eligible faculty and staff for work-related purposes. Please contact Software Central for eligible buy in dates if your department is interested in participating in this agreement. Further information can be found at https://softwarecentral.ucla.edu/acrobat-etla.
Adobe Photoshop CS 6 (beta)
Adobe CS6 suite is due out soon — June 2012.
Adobe Photoshop CS6 Beta can be downloaded and previewed at:
Adobe Photoshop CS6 Beta download window expires 3 May 2012, although beta copies will continue to function for several more weeks.
see also,
- http://www.pcworld.com/article/252339/adobe_photoshop_cs6_beta_previews_new_features.html
- http://www.engadget.com/2012/03/22/adobe-photoshop-cs6-beta/
- http://www.theverge.com/2012/5/2/2995159/adobe-photoshop-cs6-beta-end-may-3rd
Adobe User Groups in Los Angeles
Adobe user groups meet in various spots, and are good for contacts, freelance prospects, and staying abreast of developments:
- AILA — Adobe Illustrator Los Angeles; http://aila.groups.adobe.com/
- ddLA — Digital Designers – Los Angeles; http://ddla.groups.adobe.com/
- DMA/LA — Digital Media Artists / Los Angeles; http://www.dmala.org/
- LAdobe — Los Angeles Adobe User Group; http://groups.adobe.com/group/53
- LADIG — Los Angeles Digital Imaging Group; http://ladig.groups.adobe.com/
- LAPUG — Los Angeles Photoshop User Group; http://groups.adobe.com/group/336
- LAWPG Los Angeles — LA Web Professionals Group; http://lawpg.groups.adobe.com/
- Los Angeles InDesign User Group; http://www.indesignusergroup.com/chapters/losangeles/
Creating calculation fields in Adobe Acrobat Pro
Steps:
1. Create the basic form structure in Adobe Acrobat Pro
2. Double-click the location in which you wish to add the calculation. There will be a pop-up box that says “Text Field Properties.”
3. Select the “Calculate” tab. This will convert the field into a calculation field.
4. Enable “Value is the (option) of the following fields” if this field is intended to be the product of other fields. You can choose options between sum, product, average, minimum and maximum.
5. Enable “Simplified Field Notation” if this field is to be a complex calculation using standard math symbols and grouping.
6. Enable the notation, using field names as operands. For example, (Field_1+Field_2)/Field_3
7. Enable “Custom Calculation Script” to create complex calculation script in JavaScript.
For more information, visit http://acrobatusers.com/tutorials/print/how-to-do-not-so-simple-form-calculations
You can also visit www.lynda.com for a vast variety of tutorials and guides to almost all topics and software (Adobe Acrobat included) available. UCLA students, staff, and facult get FREE access to 1538 courses and 85,000 tutorials. Definitely take advantage of this great resource that’s available only to our exclusive UCLA members.
Lynda.com Adobe Creative Cloud (Preview Modules)
In May 2013, Adobe announced they will discontinue the popular retail offering of their Creative Suite product line. Future efforts will be focused on their Creative Cloud offering—
Adobe offers a 30-day, full feature trial for the suite—
To better understand the offerings, Lynda.com has several ~1 hour modules about specific products (free for UCLA associates with a UCLA ID via www.LearnIt.ucla.edu) :
- Up and Running with Adobe Creative Cloud (longer overview module)
Removing multiple versions of Adobe Flash
Multiple versions of Adobe Flash may show in some browsers.
Firefox as an example:
This may be fixed by removing older versions of the plugin in the Flash player installation folder (NPSWF32) and possibly (re)install the latest Flash player.
- (32 bit Windows) C:\Windows\System32\Macromed\Flash\
- (64 bit Windows) C:\Windows\SysWOW64\Macromed\Flash\
Making PDFs accessible in Adobe Acrobat
Getting started
This write up is not meant to be the official way to make PDFs accessible. We encourage you to visit the Disabilities Computing Program (DCP) and check out their workshops held throughout the year. This article will cover two types of PDFs:
- If you created the PDF from a word processor
- If you scanned a page into a PDF
If you created the PDF from a word processor
Regardless what word processor the PDF was generated from, you should have a PDF that has its text recognized, so it can be read through most screen readers. But just in case:
- Open the PDF in Adobe Acrobat
- Click on the Tools tab or use the Find your tool here search box and search for Accessibility
- Click on the Accessibility button
- A menu for Accessibility should open up to the right of the document, click on Full Check, then click on the Start Checking button in the window that opens
- Review the Accessibility Checker report that opens to the left of the document
- Click and expand each heading to review the full report
- Right clicking on the items will tell you if you need to resolve the issue
- Save the PDF
If you scanned a page into a PDF
This use case is if you received a scanned document as a PDF and the text has not been recognized (or OCR).
- Open the PDF in Adobe Acrobat
- Click on the Tools tab or search for Action Wizard
- Click on the Action Wizard button
- A menu for Action Wizard should open up to the right of the document, click on Make Accessible, then click on the Start button
- You may need to correct some issues before the document can be scanned, for example, if the title or author of the document is missing
- Select the primary language of the document, but set Output as “Searchable Image” and Downsample To “600dpi”.
- Leave the Accessibility Checker Options as is, then click the Start checking button
- Review the Accessibility Checker report that opens to the left of the document
- Click and expand each heading to review the full report
- Right clicking on the items will tell you if you need to resolve the issue
- Save the PDF
This will help you make your PDF accessible to screen readers, but you will still need to manually review the reports and resolve the issue. We highly encourage you to reach out to the DCP office if you have any questions or concerns: https://dcp.ucla.edu/staff/
Adobe Acrobat Name User Login
If you are signed out of Adobe Acrobat 2019 or are login in for the first time please follow these steps
1)To access Adobe Acrobat, first look for your application on your computer. In the search bar located on the left-hand side of your taskbar, next to the Windows button, type the name of the app.
2) Once you find the application, then open it and at the top of the taskbar click on Help and the on Sign In.
3) Once you click on the Sign in button, it could take a few seconds before the pop up appears. Click on Sign In at the bottom.
4) Type @ucla.edu or UCLA email address. And click Continue.
5) The last step will be entering your UCLA Logon ID. Then you should be logged in.
These steps need to be repeated every 90 days.
Reference: https://softwarecentral.ucla.edu/adobe-named-user-licensing
Adobe Acrobat 2017 Uninstallation and Adobe Creative Cloud Installation
To migrate from an older version of Adobe Acrobat to the Adobe Creative Cloud please follow these steps:
Please note this guide references Acrobat 2017; you may have a different, older version installed.
Adobe Acrobat Uninstallation Instructions:
First you will need to uninstall Adobe Acrobat 2017 from your devices. Please remember to save any unsaved work because your computer will need to be restarted.
If you are a Windows user:
Windows: To uninstall Adobe Acrobat 2017:
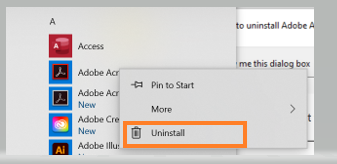
3.) You will be automatically prompted to Programs and Features. You will then right click on Adobe Acrobat.
2017 and click uninstall. This example shows Adobe Acrobat DC.

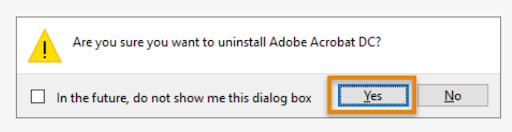
4.) The following dialogue box will appear. Click on “Yes” and it will restart your computer.
Once Adobe Acrobat 2017 has been uninstalled and your computer rebooted. Please scroll down to the instructions to access Adobe Creative Cloud.
If you are a Mac OS X user:
OS X: to uninstall Adobe Acrobat 2017:
1.) On the Applications folder in Finder (OS X) search for Acrobat Uninstaller under Adobe
Acrobat 2017.

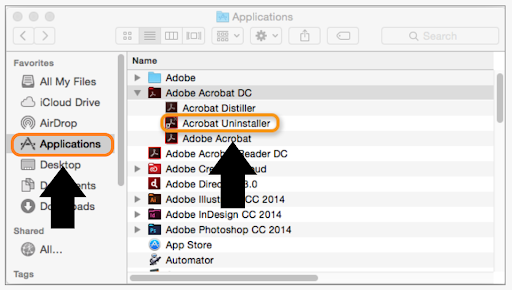
2.) Select Adobe Acrobat and click “Open.”

3.) Click on “Ok” to remove Adobe Acrobat 2017.

Adobe Creative Cloud Installation Instructions:
https://www.it.ucla.edu/support-training/tutorials/adobe-creative-cloud-installation-instructions
After you finish step 12 in UCLA IT Services’ linked Adobe Creative Cloud Installation Instructions above. Follow the instructions below to install the application onto your computer.
1.) On a Windows computer go to “Start” on the taskbar and search for Adobe Creative
Cloud. On a Mac computer go to the Mac Applications folder and search for Adobe
Creative Cloud.
2.) Open the application and you should be prompted to all the applications.
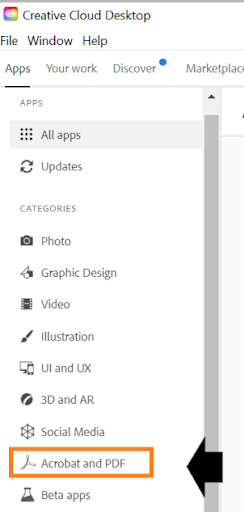
3.) Once you locate Adobe Acrobat DC, click on “Install” and it will begin to install. When the installation is complete under Installed. On Acrobat DC, click open and the app will open.

Adobe Acrobat installation is complete: Note you can also find Adobe Acrobat through the Start Menu (Windows) or Finder (OS X).
References:
https://helpx.adobe.com/download-install/kb/uninstall-reinstall-acrobat.html
List of Previous Acrobat Versions:
https://en.wikipedia.org/wiki/Adobe_Acrobat_version_history#Acrobat
In Exchange 2003, how do I force the Global Address List to update?
Log-into the Front End or Back End.
Open System Manager in Exchange.
Expand Recipients.
Click on Offline Address List.
Right click on Default Offline Address List and click on Rebuild. At prompt click OK.
If you are using Exchange Cached Mode: you can download the new GAL (Outlook – Send/Receive – small black triangle – Download Address Book)
Where can I learn how to use statistical packages like Stata, SAS and SPSS
You can visit the UCLA ATS statistical computing web site at http://www.ats.ucla.edu/stat/ . That site has numerous pages about SAS, Stata, SPSS, as well as specialized packages like HLM, MPlus and SUDAAN. There are pages at all levels, from the Starter Kit pages that help you get started, to online Seminars (with movies).
For UCLA researchers (e.g. faculty, graduate students working on publications or dissertations), you can learn about the statistical consulting services at http://www.ats.ucla.edu/stat/services.htm . Unfortunately, such services are not offered for homework, class projects, or other class related questions.
How can I find out what an error message means?
Unfortunately many programs give unhelpful error messages. Here are some strategies to help find out what they mean, with the best one last.
- browse the index of the manual (definitely best if there is a manual)
- search in the program’s online help
- browse in the program’s online help index
- search in Google (or any other search engine) for the error message in quotes, or using key words from the error.
Content Management Systems
Content Management Systems (CMS) are web programs that make it easier to add and update content on web sites. Instead of learning HTML, FTP and web server commands, once a CMS is set up and a template “look” is defined, others can usually add material very easily without learning any of the above.
-
In Use at UCLA
- Plone – OID, SSC, and several other departments looking into it.
- Vignette – the business side of the campus is moving to Vignette
- Drupal (http://drupal.org) – this currently supports the Semel Institute www.semel.ucla.edu, and uses Organic Groups to host 60+ center and program sites; School of Public Affairs www.publicaffairs.ucla.edu; the UCLA Family Commons (www.uclacommons.com).
- Joomla – CDH is moving all of its forty Department, Center, Lab, and Conference websites over to the Joomla CMS.
- Krang (http://krang.sourceforge.net/) – open-source for UCLA Magazine Online (http://magazine.ucla.edu), and soon UCLA Today (http://today.ucla.edu) and UCLA.edu Spotlight (http://spotlight.ucla.edu)
- RedDot (http://www.reddot.com/) – currently used with the Library site (http://www2.library.ucla.edu/)
- UCLA International Institute – Custom-built CMS using ASP and SQL Server. Developed to allow multiple visual templates for individual centers and programs while maintaining content in a centralized database to allow various strategies to syndicate content.
- UCLA Happenings – Custom-built CMS using PHP and MySQL. RSS syndication to My.UCLA, etc.
- WordPress (http://wordpress.org/) – blogging (http://magazine.ucla.edu/sundance2008/, http://magazine.ucla.edu/oscars2008/, http://spotlight.ucla.edu/tanzania/)
-
List of open source content management systems
- I thought this list of open source content management systems might be of interest to those managing web servers. It is not exhaustive, Mhonarc (http://www.mhonarc.org) is not listed and maybe one of your favorite tools isn’t either. Nevertheless, it’s a good first approximation of the field… http://www.la-grange.net/cms – Jose L. Hales-Garcia
- http://www.opensourcecms.com/
- http://www.cmsmatrix.org/
-
Web Apps
- Dokuwiki http://wiki.splitbrain.org/wiki:dokuwiki
- Electronic Edge http://eledge.sourceforge.net/
- Joomla – http://joomla.org/
- Midgard (PHP) http://www.midgard-project.org/
- MovableType (Perl/PHP, MySQL) http://www.movabletype.org/ – Used for sustaining http://www.sustain.ucla.edu/
- Mysource (PHP,Mysql) http://mysource.squiz.net/
- NEWS (enhanced wiki cms) http://www.cheeky.house.cx/cgi-bin/nemowiki.pl?NEWS
- Open CMS http://www.opencms.org
- Open Conf http://www.zakongroup.com/technology/openconf.shtml
- OSCOM http://www.oscom.org Open Source Content Management Org.
- PloneResources – OID is using it.
- Post Nuke http://www.postnuke.com/
- Textpattern http://www.textpattern.com/
- Tiki (wiki and PHP) http://tikiwiki.sourceforge.net/
- Wyona http://www.wyona.org/
- http://www.nait.ab.ca/digilearn/
- http://www.drupal.org/ Useful for blogging and content management
- Comparisons
-
Reading
- Article on University use of CMSs http://www.case.org/currents/2003/mayjune/stoner.cfm
- Article on Open Source CMS http://techupdate.zdnet.com/techupdate/stories/main/0,14179,2914017,00.html has links to try out many CMSs.
- http://www.cmsreview.com/
- http://cms-list.org/
- CMS Watch.com http://www.cmswatch.com/
- http://www.gerrymcgovern.com/nt/2003/nt_2003_03_03_cms.htm
- http://www.usask.ca/web_project/uwebd/content_management_faq.html
- http://www.usask.ca/web_project/uwebd/links/tools/content_management/
- Electronic Edge http://eledge.sourceforge.net/
- [Making a Better CMS – Jeffrey Veen:http://www.adaptivepath.com/publications/essays/archives/000365.php]
- Midgard (PHP) http://www.midgard-project.org/
- Mysource (PHP,Mysql) http://mysource.squiz.net/
- NEWS (enhanced wiki cms) http://www.cheeky.house.cx/cgi-bin/nemowiki.pl?NEWS
- Open CMS http://www.opencms.org
- Post Nuke http://www.postnuke.com/
- Tiki (wiki and PHP) http://tikiwiki.sourceforge.net/
- Wyona http://www.wyona.org/
- http://www.nait.ab.ca/digilearn/
- http://www.drupal.org/ Useful for blogging and content management
- Penn State example http://live.psu.edu/index.php?sec=vs&story=2550
- [Why Content Management Fails – Jeffrey Veen:http://www.adaptivepath.com/publications/essays/archives/000315.php]
-
Groups to Watch
- http://www.socialtext.com/
- OSCOM http://www.oscom.org Open Source Content Management Org.
- At this point, MIT OCW is monitoring six: Zope, Red Hat, Midgard, OpenACS, OpenCMS, and Bricolage. By 2004, most experts agree that one CMS provider will become the clear, open source leader in this industry sector. MIT OCW will track the progress of key open-source CMS providers during this accelerated maturation.
-
Commercial Solutions
- http://www.estrada-onstage.com/
- MIT OCW senior management, working with the Sapient Corp., developed a short-list of vendors, and the individual vendors gave presentations to the team. In the end, MIT OCW selected a commercial CMS, Microsoft Content Management System 2002. The reasons for the choice of Microsoft 2002 were manifold: Microsoft made a serious commitment to the MIT OCW project, the total cost of ownership of Microsoft CMS 2002 was significantly lower than the other vendors in consideration, and the Microsoft product offered a high-level of usability for the end-users, MIT OCW’s faculty liaisons and MIT’s faculty.
July 2, 2004 at 10:26: SoEditor — great WYSIWYG editor, available for free in the lite version — http://www.siteobjects.com/pages/soeditor.cfm. Works with ColdFusion, .Net.
January 4, 2006 at 09:11: Jim Williamson (OID): I’d like to comment on two of the links above. I was the project lead on OID’s implementation of Plone and take exception to Jeffrey Veen’s two articles on the troubles with CMSes. Obviously, individual cases differ, but Veen’s blanket statements (“Most open source content management software is useless.”) don’t always fit.
Here are my comments:
First, the “Why CMS Fail” article:
- We kept the staff informed of what we were planning to do through formal meetings with managers and informal discussions with staff so when we introduced Plone, they were aware of what direction the website was going. Thus, the statement, “It�s foolhardy to unveil a mammoth, nine-month project to an unsuspecting user community and expect adoption” did not apply in our case.
- We were answering a problem voiced by many people in the organization, not just management. OID staff disliked the website, felt the editing process was unwieldily and broken; Plone fixed that for us.
- The article has a basis that we could not afford: “Over and over I�ve heard the same complaint about these projects, ‘Turns out, after all the budget and time we spent, we really didn�t need a content management system at all. We just needed some editors.’” OID could not afford to hire an editor and a team of writers to go out to the various units and generate web content.
Second, the “Making a Better CMS” article; answering the main bullet points of the article:
- Was Plone easy to install? It could have been easier; we purposely chose a more complex path (like integration with Apache, etc.)
- Was Plone easy? Yes. Some users “got it” without any training at all.
- Our documentation was both “fact-based” and “feature descriptive”
- Plone does separate admin from content management
- Public should not be able to log in: whatever; the author has got a bug about this.
- Jargon is everywhere: whatever.
- Plone is flexible — we don’t have columns
- CSS? Our Plone site looks nothing like Plone OOTB.
Despite our ignorance of Mr. Veen’s positions, we managed to use common sense and technical sweat to roll out a VERY successful CMS to our staff. Plone has met all our needs and has performed very well; it is flexible, powerful, and customizable. Best of all, staff and our top management love Plone and how it empowers them. We have received numerous comments on how happy they are with the choice.
This article was originally posted on the UCLA Programmers Wiki.
Geographic Information Systems
Geographic Information Systems (GIS) are systems for connecting data to maps. This might involve mapping drive-by-shootings or murals across Los Angeles, or U.S. Congress voting patterns by state. There are many GIS systems available, although I believe ESRI’s ARCinfo is site licensed at UCLA. Google Maps and the programming interface they released have boosted popular interest in GIS.
Remote sensing is closely connected to GIS, although the tools used are slightly different. UCLA licenses ENVI and IDL from RSI.
- http://www.gis.com/
- http://www.esri.com/
- http://www.rsinc.com/
- http://www.manifold.net/
- UCLA Geographic Information Systems (GIS) Resource Center
- UCLA GIS mailing list
- UCLA Site License with ESRI and 2006-07 Order Form
- GIS Jobs Clearinghouse
- http://gislounge.com/
- http://del.icio.us/tag/mapping – a collection of shared bookmarks all using the tag “mapping”
There is interest in forming sort of a UCLA GIS users group to do some or all of the following. Contact Brian Won in Geography if you’re interested.
- grab interested Geog Grad students to meet weekly (or more
often) - work on GIS projects together
- store and share notes
- search for ArcGIS Tutorials and link them from the wiki
- invite guest speakers
- compare project notes
Wiki Software Alternatives
Looking for the best Wiki software?
- http://www.wikimatrix.org/ – compare wiki features and requirements side by side. Try the Wizard, it lets you pick wikis by language, database/flatfile, commercial/open source.
Here are some notes and recommendations I saw on the uwebd listserv.
- “Try Confluence. http://www.atlassian.com/ It’s an enterprise wiki. Very nice. A free alternative is: MediaWiki. http://www.mediawiki.org/wiki/MediaWiki
- “I’ve been using TiddlyWiki for the last ten months in my lab. It’s free, and available at http://www.tiddlywiki.com. I would highly recommend it. You can also read more about its ongoing development at Google groups: http://groups.google.com/group/TiddlyWiki The only downside is that it’s not as IE-friendly, and favors Firefox (which is fine by me because my audience and I primarily use Linux)”
- http://www.oddmuse.org/ “is easy to set up and use”
- http://wikicities.com/
- http://www.wikispaces.com/
- http://wiki.splitbrain.org/wiki:dokuwiki DokuWiki is a standards compliant, simple to use Wiki, mainly aimed at creating documentation of any kind.
- http://www.squidoo.com/university-wiki/ A site where you can obtain free wiki for your school.
This article was originally posted on the UCLA Programmers Wiki by Aaron Proctor.
What would be nice is to have UCLA experience documented here:--
Prof. Jeffrey Lewis, Poli Sci
- MoinMoin http://moinmoin.wikiwikiweb.de/ – in Python – likes it very much
- Trac – “is a category killer for open source software development wiki/bug tracker, connected to Subversion area”
- Twiki http://twiki.org/ – used it for several years with student programmers, but couldn’t figure out how to use it to create many, small wikis for committees, small teams, etc.
- Cluster Wiki – from back of Bo Leuf/Ward Cunningham book The Wiki Way but heavily modified for our purposes. Has been good for having many (around 30) wikis, but still doesn’t scale because it’s Perl CGI with no database, and though we could use ModPerl, I’d rather not. Haven’t tied it into ISIS yet because I’m still looking for a faster one that scales better.
What is a simple easy software for implementing SSH on a Windows machine?
OpenSSH is a simple, free solution for Windows machines to implement SSH. OpenSSH can be downloaded at:
http://sshwindows.sourceforge.net/download/
OpenSSH, once set up uses NTFS permission security settings and can be used for domain and local accounts.
Once installed, OpenSSH comes with an easy guide to set up users, domain and local, and also to set the home directory.
Another easy-to-use alternative is PuTTY
I have been using the non-commercial download from ssh.com.
“SSH Secure Shell Client”.
Frequently I use the tunneling feature for X-windows when I am logged in to our linux cluster or other unix machines (you need a Windows X server)
http://www.ssh.com/support/downloads/secureshellwks/non-commercial.html
Free image viewer, resizer, photo editor and more!
Need something small, easy to use, and pretty robust? Use Irfanview! I used to suggest this to many students who needed a quick and easy yet robust image editing program. Sure Microsoft Image Viewer can do things, but… I like variety!
It even supports RAW file format (which is nicely supported in Photoshop CS2, but hey… who wants to pay that much eh?)
Now, they also have plugins, that allow for alot of neat things.
http://www.irfanview.com/plugins.htm
What graphic formats does it support?
http://www.irfanview.com/main_formats.htm
Is there an alternative to using Quicktime?
Sure, try downloading the Quicktime Alternative here:
QuickTime Alternative
Or google QuickTime Alternative
Are there any free PDF makers available?
CutePDF
I tend to like to post documents in PDF is because not everyone has MS Word on their computers (i.e. Mac users).
Students can download a free PDF reader (the most common one is Adobe Reader) and have access to the documents. CutePDF is like Adobe Acrobat, except it’s a free. To get this software go to this site:
http://www.cutepdf.com/Products/CutePDF/writer.asp
Download both the exe file to CutePDF and the Ghostscript converter (there are two links off to the side, one reads “Free Download” and the other reads “Free Converter,” you’ll need both).
After you’ve successfully install both programs, simply go to the document you would like to convert, then go to the File menu at the top of the document and select Print. On the drop down menu, where it reads “Printer Name,” select the option for CutePDF and then hit “print.” A window will pop up asking you to save the document, I like to save my documents to my desktop first before I organize it away. Once you selected where you want to save it, the document should start to convert to PDF, when it is done, a PDF version of your document will pop up.
Also, two good links,
http://www.primopdf.com/
http://www.foxitsoftware.com/pdf/rd_intro.php
Another option (for those who are unable to install software on their current PC) is to use one of the free web-based PDF creation sites such as http://www.gobcl.com. The only problem with this one is that it only supports the following document types for free:
Docs — DOC,PPT, XLS, RTF, PPS, HTML, TXT, PUB
Images — JPG, GIF, TIFF, WMF, BMP, PNG, EMF
Here’s another free PDF Creator (that you can download for your PC). http://sourceforge.net/project/showfiles.php?group_id=57796
While it’s not free, Adobe Acrobat Standard/Professional is available for departments at deep discounts through the UCLA vendor TRC. TRC also offers “concurrent” licenses for Adobe products, which allows a license to be installed on multiple machines so long as the number of active instances at any given time does not exceed the number of licenses.
Check ATS’ Software Central (click Additional Software) for current specifics.
PDF Online is an online site where you can create PDF’s without having to download any software
http://www.pdfonline.com/
Need alternative media player?
= Audio, Video etc… pretty robust.
udp rtp dvd scvd mpeg avi ogg mp4 etc etc and the list goes on…
http://www.free-codecs.com/download/QuickTime_Alternative.htm
Media Player Classic, often bundled with Quicktime Alternative, is also quite good.
Screen shot , grab a screen, try this program...
http://www.gadwin.com/printscreen/?prnscr
A full installation of Gadwin PrintScreen requires 1 megabyte of hard drive space.
Woot!
How to run Eclipse from your USB key?
Having a runnable copy of Eclipse on your USB drive is very handy. Here is how to set up Eclipse + JDT on your USB key. It assumes that your USB key is inserted as F:
Prepare Eclipse
- Download Eclipse Platform and JDT from http://www.eclipse.org/
- Extract the content of the two files to the directory “F:\Eclipse”
Prepare JDK
- You have to have Java Development Kit (JDK) installed on your computer first. Get JDK from http://java.sun.com
- Suppose JDK is installed at “C:\JDK”, copy the content of the directory “C:\JDK” to the directory “F:\JDK”
Create a start-up batch file
You could type the following commands every time you want to start Eclipse, or (highly recommended!) save the following commands to the file “F:\eslipse.bat”. Then you just need to double-click this file to start Eclipse.
@echo off
set JAVA_HOME=“\JDK”
set ECLIPSE_HOME=“\Eclipse”
set PATH=%JAVA_HOME%\bin;%PATH%
ECLIPSE_HOME\eclipse.exe
Done
LAMS Learning Activity Management System
-
LAMS Learning Activity Management System
- http://www.lamsinternational.com/
- LAMS Integrations http://www.lamsfoundation.org/integration/
SAKAI
-
SAKAI
- SAKAI Project http://www.sakaiproject.org/
- SAKAI Project Prospectus (email from Fred Beshears) http://www.sscnet.ucla.edu/cms/index.pl?EmailMsg0314
- Video Conference 12 Jan 2004 http://ets.berkeley.edu/etstandards/sakai/
- Feb 2004 SAKAI Developers Workshop Notes
- FCET RFP
- Rose Rocchio’s Conference Report
- SakaiQuestions
- SakaiSites
- List of Implementation Sites as of 4/26/06 – Excel Spreadsheet
Notepad replacements
If Notepad (that comes with Windows) is not a good enough text editor for you, you can try the following:
- Programmer’s Notepad (freeware)
- UltraEdit (shareware)
- Notepad++ (freeware)
- Notepad2 (freeware)
What are some Winzip alternatives for Windows?
7-zip is a free alternative to Winzip and offers a variety of options for compressing files.
7-Zip can compress and uncompress file extensions such as 7z, zip, gzip, and tar.
7-Zip can uncompress files with file extensions such as rar, iso, cab, deb, and nsis.
7-Zip has support for x64 and 32-bit Windows machines.
http://www.7-zip.org/
WinRar is another alternative but is not free. WinRar can decompress file extensions such as rar, zip, rar, and iso.
http://www.rarlab.com/index.htm
What is Samba?
As the front page at samba.org says, “Samba is an Open Source/Free Software suite that provides seamless file and print services to SMB/CIFS clients.” Samba is freely available, unlike other SMB/CIFS implementations, and allows for interoperability between Linux/Unix servers and Windows-based clients. (stolen from http://us4.samba.org/samba/what_is_samba.html)
Samba is a server that allows you to map from your computer to storage appliances (I.E. webspace) and work within the space as if you were working on your own computer (this includes printing, editing, dragging from your destop and dropping into the storage space). Here’s a quick tutorial about how to access SSC’s Unix server with Samba: http://www.sscnet.ucla.edu/classweb/help/samba/samba.html
If you’re using Samba off campus, you might need to run a UCLA VPN client prior to connecting.
Samba connection is not just limited to PC’s! Check out this article: https://kb.ucla.edu/link/344
Can I connect to Samba using a Mac?
Yes you can! To connect to Samba on your Mac, be sure you’re not clicked on any applications (so it should say Finder next to the Apple menu). Then go to “Go” menu and select the option “Connect to Server.” In the “Address,” type in smb://www.servername/username and hit “connect.” For example, if my user name is “test,” I would type in smb://www.sscnet.ucla.edu/test. A window should pop up, the Domain is SSC. Be sure Samba is installed and an account and password has been created for you (double check with your Unix/Linux admin). Samba runs a bit slow sometimes (this all depends on your connection speed and if you’re plugged directly into your internet or if you’re working off a wireless network). But you should have access to the folder as if you were working on a PC.
How to disable the Style Whitelist in Kupu
Kupu is the default WYSIWYG editor that ships with Plone 2.1.×.
By default, Kupu does not allow the use of inline styles.
For example, if you have some HTML as follows:
<div style="width:20px; background-color: #CCCCCC;"> Content Here </div>
Kupu replaces it with:
<div>Content Here</div>
The current method to allow inline style elements such as “width” and “background-color” require you to manually enter it in the Style Whitelist in Kupu’s preferences. However, if you want to allow the use of all inline styles you need to modify kupucontentfilters.js
In the ZMI, go to your Plone Instance. Customize the file /portal_skins/kupu/kupucontentfilters.js and remove the following function call:
if (val) {var styles = val.split(/; */);for (var i = styles.length; i >= 0; i—) if (styles[i]) {var parts = /^([^:]+): (.)$/.exec(styles[i]);var name = parts1.toLowerCase();if (validation.styleWhitelist[name]) {styles[i] = name+’: ’+parts2;} else {styles.splice(i,1); // delete}}if (styles[styles.length-1]) styles.push(’’);val = styles.join(’; ’).strip();}uPortal
uPortal is a free, sharable portal under development by institutions of higher-education. This group sees an institutional portal as an abridged and customized version of the institutional Web presence… a “pocket-sized” version of the campus Web. Portal technology adds “customization” and “community” to the campus Web presence. Customization allows each user to define a unique and personal view of the campus Web. Community tools, such as chat, forums, survey, and so on, build relationships among campus constituencies. uPortal is an open-standard effort using Java, XML, JSP and J2EE. http://www.uportal.org/
Dokeos
Dokeos http://www.dokeos.com/ Dokeos is an Open Source elearning and course management web application translated in 31 languages and helping more than 1.000 organisations worldwide to manage learning and collaboration activities.
How do I use pivot tables?
The Pivot Table is powerful, but mysterious tool found in MS Excel that is similar to the “crosstab” analysis found in many powerful statistics programs. With pivot tables, you can create reports that sort and finds descriptive statistics (count, maximum, minimum, average, etc) of your data broken down by categories and also allow you to quickly restrict those statistics to particular subsets of your data.
To create a pivot table, open the workbook with your data. Use variable or column names in your dataset, as they help you organize your pivot table. Go to the Data menu and click on Pivot Table and PivotChart Report. The PivotTable and PivotChart Wizard should pop up, you will be asked to enter in a range you want to compare in your pivot table. I found it easiest to select the columns using your mouse, instead of entering in the range (it makes it easier deciding what data you want to compare). After you’ve selected your data, click next.
Although some prefer to hit “finish” to go straight to the “blank” pivot table on an Excel worksheet, it is probably easier at this point to first click on the “layout” button, which takes you to a page that allows you to set which variables you’ll use for your tables’ row, column, “page”, and data cells. The row and column variables are probably pretty straightforward, but the page and data cells are a bit more complex. Your page variables are dragged to the blank space to the upper left of your blank table layout and basically allow you to “filter” the data shown in your pivot table. For example, if you were doing a pivot table comparing educational attainment and presidential party vote, putting a party ID variable up in the page would then allow you to quickly restrict your table to just Republicans (or just Democrats). In terms of the data displayed, most variables revert to a “count” statistic when dragged onto the data field, but simply double-clicking them in the layout menu allows you to select from a variety of descriptive statistics.
Once your pivot table is generated, you can easily change these settings again by clicking on the pivot table and using the floating pivot table toolbar’s wizard button, which takes you back to the wizard. You can also drag variables directly off of this floating toolbar and into the pivot table. You can also choose options such as hiding specific values or grouping data (particularly helpful for generating month/year summaries of things like daily observations) by right-clicking on the relevant parts of your pivot table to access those settings.
It’s also sometimes helpful to copy and paste an entire pivot table (just select all the columns containing pivot table data and copy and paste them) to allow you to build up a series of different pivot tables showing results of interest.
Here’s a useful site with pictures to guide you through: http://www.cpearson.com/excel/pivots.htm
AccessGrid vs. Video conferencing (H.323)
Access Grid a solution to collaboration?
Access Grid is a open source and completely free software solution for your computers to enable remote video, audio, and application collaboration via a data network. Many university and research facilities are currently using this technology to enhance their ability to collaborate with each other and with people from all over the world. I was asked clarify the differences between Acess Grid and conventional video conferencing and the following is a excerpt from my email reponse:
“I want to clarify that Internet2 is simply a very large network pipe that is capable of transmitting at very fast data rates. Internet2 is simply the transport mechanism for collaborative technologies such as videoconference and Access Grid.
The advantages of conventional videoconferencing (h.323) are:
1. More accessible : Many university and corporations have these units already in place
2. Simpler to setup : Modern videoconference equipment have become appliances that you can simply hookup to a monitor
3. Proven technology : H.323, H.264 are standards
4. Can be better in quality : If new VC technology is used, along with higher bandwidth ( > 768KB/sec)
5. Audio quality will be higher due to on-board echo cancellation technologies and more advanced codecs that can handle full duplex audio.
The disadvantages of conventional videoconference are:
1. Can be expensive : Average price for simple setups are be around 4000.00
2. Multi-point conferences are not readily accessible unless you have or know someone that has a MCU (Multi-point controller), MCU can be very expensive (10K or more)
Videoconference resource: http://www.videnet.gatech.edu/cookbook.en/
—
The advantages of Access Grid Video conferencing are:
1. Cost substantially less : it requires only a computer, microphone, capture card, and camera. The software is free. Cost of everything else can be alot less depending on how you implement the video capture (via USB camera or via capture card)
2. Massive Multiple Point connection : Up to 20 different locations can be involved in a single event, Briding service is essential free.
3. Universities and research facilities have adopted AG : Many are getting grants to build AG nodes.
The disadvantages of Access Grid are:
1. Compatibility : Free technology have bugs and configuration of systems might require more time and effort, hardware and software compatibility are a concern
2. Can be more complex to setup : requires more technical support, large venue rooms will require more complex equipment
3. Accessibility will be limited to sites that have AG setup
AG resources: http://www.accessgrid.org , http://www.accessgrid.org/software
Setting up a AG can be easy and simple. I currently have one setup using only a Logitech USB Webcam, a PC, and USB headset with Microphone. If you would like to setup something similar to what I’ve done, I can definitely help in that matter.
Hope this clarify some of your questions regarding these two collaborative technologies. Let me know if you have any questions.
jimsuo@ucla.edu
Jimmy Suo"
GIMP Resources
GIMP is an open source alternative to image editors like Photoshop and Fireworks. GIMP began originally as a Linux photo editor, but due to its powerful abilities and relative ease of use, it was quickly ported to more popular platforms like Windows and MacOS. Although Adobe Photoshop is by far the most popular image editor, it comes at a price. GIMP offers a similar featureset as Photoshop with the added virtue of being open source. This has several advantages, the most obvious being that GIMP is completely free since it is licenced under the GPL (General Public License). In addition, there is no need to wait for new versions of software for new functionality: because the source is public, GIMP is constantly being improved, and new features are added everyday. To find out more information, or to try GIMP yourself, go to the project homepage at www.gimp.org
- Introduction to GIMP image editing tool with simple demos By Ryan Boudreaux
- GIMP User Group
- Other GIMP articles in UCLA Knowledgebase
- Collection of GIMP links on del.icio.us
For those who are Photoshop inclined and don’t want to go through learning a whole new program, a programmer named Scott Moschella has created a conversion pack for GIMP called GIMPShop which mimics the Photoshop interface in GIMP.
Has anyone used SurveyMonkey?
SurveyMonkey seems like a nice fit for recommending to a prof for
his project and I was wondering if anyone had any experience with it.
Positive and negative comments would be appreciated.
- http://www.surveymonkey.com
- Technique for customizing URLs to track individual users
- KB article on Surveys, including SurveyMonkey: https://kb.ucla.edu/link/124
Scott Gruber, International Studies
I’m a fan of surveymonkey.com. I’ve used it for two surveys and it works
great for any survey needs. The ability to offer multiple ways to share
the survey (link in web page, link for email, popup window) with your
audience is a plus point. I also like the exportablity of the data
results.
No faster way to get a survey up and running that I’ve run across. I’d
recommend it.
Annelie Rugg, Center for Digital Humanities
I don’t have any “production” experience with Survey Monkey, but I tried
setting up a survey about Ecampus to send to our instructors and came
across some limitations in the free version that made it awkward:
1) You can’t get the data exported out unless you use the paid version
2) You’re limited to, I think, 10 questions per survey in the limited
version.
I seem to recall (but this may not be right) that you also couldn’t
create questions that allowed the responder to click “all that apply”;
it was either one or another answer, but not several among many.
Instead, I went with phpESP, which I think is open-source. We have it
set up on our admin server (Linux box) and it worked very well.--
Tom Phelan, Social Sciences Computing
I also used survey Monkey very successfully. It is very
flexible and provides for very easy creation of complex survey formats.
For a free survey tool, it’s pretty neat. I just tested out SurveyMonkey and it looks like SurveyMonkey can give the complete data for each respondent. Infact, it also records anonymous users and users who are signed in; if other students have signed for SurveyMonkey and log in prior to filling out their classmate’s survey, their login will be captured and returned to the user. The complete data for each respondent is available in the “View Summary” option.--
Rebecca Dean, GSR at the Center for the Study of Women
I have used SurveyMonkey for several online surveys and it is both great for creating surveys and collecting data. The filter feature is especially useful in processing results, and adding logic to your survey couldn’t be easier. I have cut and pasted many of the graphs and tables directly into reports. As long as you structure your survey well, you can really play with the data.
It is unfortunate how little is available under the free version. By upgrading to pro you will expereince its full potential. Printing for paper prototyping is also nice. I will update once our survey is completed.
How do I add or move folders in Sakai?
Here is how to add a folder in Sakai (assuming you’ve successfully logged in and are looking at the site to which you want to add a folder):
1. Click Resources in the lefthand tools menu.
2. In the main Resources window, under Actions, click Add next to “[Your-site-name] Resources”.
3. In the Add Item(s) window from the Add Item Type drop-down menu (where it says “File Upload”), select Empty Folder.
3a. You must give the empty folder a title, and optionally give it a description.
3b. If you want the public (i.e. anyone, not just members of the site) to be able to access the items in this folder, check the box next to “Display to non-members (publicly viewable)”. Otherwise, leave unchecked and only site members will be able to see the folder.
3c. Click the leftward pointing triangle next to Optional Properties if you
want to input additional information about the Folder (e.g. dates, authorship, etc.). (FYI, in Sakai v.2.2 and later, there is a Search feature that will enable you to locate your folders and files by searching this “Optional Properties” metadata if you specify it.)
4. Click Add to add the folder. You should now see it appear in the list of items at the main level of Resources for your site.
5. To add files or subfolders into the newly created folder, click Add next to the folder name.
6. You can also move folders and files around by clicking the check box(es) next to the relevant items you want to move, then clicking the “Move Checked” link near the top of the window.
Note: these instructions were written for Sakai v2.1.x, so some commands or locations of items may have changed slightly in later versions.
What is Heat Software (formerly Lumension) and What Does It Do?
Heat Endpoint Managememt and Security Suite allows department IT personnel to proactively manage threats by automating the collection, analysis and delivery of computer software patches throughout their department.
In order to support compliance with the campus Minimum Security Standards for Networked Devices (UCLA Policy 401 http://www.adminpolicies.ucla.edu/APP/Number/401.0), this agreement is centrally funded and is available for use by all UCLA departments at no cost.
For complete details on the agreement as well as download access to the products, please visit the Software Central web site at: www.softwarecentral.ucla.edu .
How do I change the nav portlet?
What I want to do: Change the navigation portlet so that only the current top folder and its contents appear.
The fix:
Go to the ZMI in Plone.
Go to portal_properties → navtree_properties
Uncheck “includeTop”
Put the “topLevel” equal to 1.
Source: Plone Users mailing list archives http://lists.plone.org/pipermail/ui/2006-July/000349.html
Someone also posted a howto in the Plone forums: http://plone.org/documentation/how-to/creating-a-flat-nagivation-portlet
Is there a way of making the smart folder's contents public while keeping the content's containing folder from appearing to the public?
What you can do is create a folder called “events”. Then what I like to do is restrict the addable types to this folder so that users can only add events to this folder. To do this, click on “add item” from the action tabs when you are logged in Plone. At the bottom, select “restrict” to restrict only events.
You can the keep this folder as a “Public Draft” and then in
select “Filter on workflow state” and select “Published”. Now only published items will appear within your navigation portlet while your smart folder will be published.
Also by restricting addable types you can control where users can add events. This way you don’t have events being added all over your entire Plone site.
Why doesn't wiki in Sakai let me edit?
In UCLA’s Sakai Pilot, it’s not enough to install the Wiki tool and assume that those with Maintain privileges will be able to edit pages.
To give those privileges, a Sakai Administrator needs to do the following:
- in Sakai, go to the appropriate site
- click on Wiki and you should see these links: Home View Edit Info History Search
- click on Info, which should show you “Page Permissions by role” and at this point you can make sure that the maintainers don’t already have the correct permissions.
- instead of checkboxing here, go down to the SAVE button and next to it click on"you may edit site permissions"
- now, give maintainers Update Admin Super Admin privileges (Note, not sure whether all of these privileges are required. Please update this if you learn differently.)
- click SAVE button
Note: It’s up to you if you’d also like to give these privileges to those site members with access privileges, not just those with maintain privileges.
Sending very large files
How can I send a 50-megabyte file to a friend since it’s way too big for an e-mail attachment?
Many e-mail systems limit file attachments to no more that 5 or 10 megabytes in size.
Some services let you transfer files up to one size for free, and larger for a fee. Here are some of the more popular options. A more complete list can be found at http://en.wikipedia.org/wiki/Comparison_of_file_hosting_services.
- Dropbox is software that syncs your files online and across your computers. – Up to 2GB free, can pay for up to 100GB.
- drop.io – Simple real-time sharing, collaboration, and presentation
- Mozy.com – 2 GB of 100% free backup space. Unlimited backup $4.95/mo.
- http://www.pando.com has free and paid versions of its software for transferring files and works with both Windows and Macintosh systems. You can send files up to a gigabyte in size free. More with $5-a-month plan.
- http://www.yousendit.com lets you send files of up to 100 megabytes free or files up to two gigabytes in size with the company’s $5-a-month service.
- http://dropsend.com/ $0 to $100/mo. options for 250mb to 250gb, respectively
- http://www.senduit.com/ lets you send files that expire up to a week. 100MB limit.
- http://www.mailbigfile.com/ $0 for up to 512mb, no registration required. File is available up to 3 days or 3 downloads.
- http://www.JustBeamIt.com requires no registration, has no file size limit and allows only direct PC to PC transfers; the files don’t reside on the intermediary server.
- http://pogoplug.com allows you to inexpensively connect your own storage to cloud
- http://www.crashplan.com is a backup and sync service that can also backup your data to other computers on your network or across the Internet.
Some free or inexpensive online file-storage services let you mark certain files for sharing.
- https://skydrive.live.com
- https://drive.google.com
- https://wetransfer.com
- http://www.xdrive.com
- http://www.ibackup.com
- http://www.filesanywhere.com
- http://www.apple.com/dotmac/ – Apple’s .Mac service also has a Public folder option
(This is in part a summary of a N.Y. Times article ‘Sending Giant Files’ By J. D. BIERSDORFER – February 8, 2007 )
Other resources listing services:
- Six Free Online Storage Services
- A comparison of file hosters @ wikipedia
- List of online file storage services @ listible
How to Make Zope Think It's Someone Else
“All HTTP servers identify themselves. Here’s how to change Zope’s default identity.
If you have a Zope 2.8.1 instance with Plone installed, and look at the HTTP headers, which anyone can do, you will see something like this:
Server: Zope/(Zope 2.8.1-final, python 2.3.5, freebsd4) ZServer/1.1 Plone/Unknown
Now this gives a lot of information out to the general public, including potential attackers. What if a security issue comes out for Zope 2.8.1 and you don’t hear about it or upgrade? An attacker could simply write a script to check for servers that identify themselves as Zope 2.8.1 and potentially exploit your Zope application, causing untold problems."
For a full how-to, go here:
http://highspeedrails.com/Support/Howto/changeZopeIdent/
Second Life Programming
- Using the Linden Scripting Language – The Linden Scripting Language (LSL) lets you add behaviors and interactivity to objects inside Second Life – article in Doctor Dobb’s Journal
- Linden Scripting Language Reference
_Found on http://Slashdot.org _
Institutional Web Calendar Scripts and Info
Can anyone recommend an institutional web calendar that will run in a LAMP environment?
- UNL Event Publisher
- VT Calendar http://vtcalendar.sourceforge.net/
- Examination of how to communicate events for an educational institution http://groups.sims.berkeley.edu/EventCalendar/
Taken from uwebd mailing list
Gliffy online diagram editor and publisher
Gliffy (http://www.gliffy.com) is a service that provides diagram creation, editing, and publishing all in an online environment.
Summary
The online software utilizes a drag and drop format of various various clip art, pointer, and labeling elements to a workspace where one can assemble a flow chart or diagram. This can either be published to the web for viewing in blogs, wikis, and other types of domains, or can be left open for people to see and then edit. It can also be saved as a picture file to one’s computer.
Visual
- text boxes
- block, diamond, circle, and other geometric elements
- arrows, pointers, paths
- technical clip art such as CPUs, servers, hubs
- floorplan clip art
- upload your own images
Sharing
- invite other users to be collaborators on your diagram
- save diagrams to Gliffy servers to be accessed any time or place
Reviews
- http://blog.brodzinski.com/2007/03/gliffy-review.html
- http://www.ultrasaurus.com/sarahblog/archives/000280.html
- http://www.solutionwatch.com/329/gliffy-draw-and-share-diagrams-online/
- http://news.com.com/8301-10784_3-6088621-7.html
Online Backup Utility
Mozy is an online backsite that offers 2GB of free backup space. For pricing above that see http://mozy.com/home/pricing/. Additional features include:
- Incremental backups
- Open and locked file support
- In-Windows Explorer restore
- Support for files greater than 3 GB
- Automatic Microsoft Outlook file detection and backup
- Mac OS X support
- Encrypted file transfer
- Encrypted files on the server
- Private encryption key option
- Unlimited Backup
You may want to check with someone in IT policy if you are backing up sensitive (e.g. FERPA) information on a third party server. ^^
BackBlaze is another online backup service that provides unlimited storage for a monthly/yearly/biyearly fee. It backs up almost all files (with a few exceptions like system files, application files and time machine files — see its website for details) on your local drives as well as external drives (but not network drives).
Free Secure File Transfer Protocol (SFTP) Clients
Free SFTP Clients
For security reasons, SSC has switched to SFTP (Secure File Transfer Protocol). The following is a list of SFTP clients that are free for download, for Mac and Windows.
SSH Secure Shell – http://computing.sscnet.ucla.edu/public/security/ssh.aspx
Free for download hosted by SSC.
The SSH Secure Shell for Workstation Windows client does not have any special hardware or software requirements. Any computer capable of running a current version of the Microsoft Windows operating system (Windows 95 (OSR2.1), Windows 98 or 98 SE, Windows Me, Windows NT 4 (with Service Pack 5 or 6 installed), Windows 2000 (with Service Pack 1 or 2 installed), or Windows XP), and equipped with a functional connection to a remote host computer can be used.
Filezilla – http://sourceforge.net/projects/filezilla/
Free for download.
FileZilla is a fast FTP and SFTP client for Windows users. Operating System: 32-bit MS Windows (NT/2000/XP), Win2K, WinXP
CuteFTP Mac Pro – http://www.bol.ucla.edu/software/mac/cuteftp/
Free for download hosted by Bruin Online.
Cute FTP Mac is Tiger (Mac OSX 10.4) ready, has a multi-threaded thin “Metal” (Cocoa) interface, powerful automation features, and strong security for protecting your FTP sessions. Login and transfer files using Secure Shell 2 (SFTP) or Secure Socket Layer (SSL) protocols.
CuteFTP Pro – http://www.cuteftp.com/cuteftppro/
The Windows option for CuteFTP Pro is not free for download (you to purchase the software via link above) but it does support many industry standard protocols including FTP, FTPS, HTTP, HTTPS and SSH.
SecureFX – http://www.vandyke.com/products/securefx/
This is a reliable secure FTP software for windows. SecureFX is not free.
CoreFTP – http://www.coreftp.com/
Fast and reliable SFTP/FTP software. It’s available for free download.
MacFuse – http://code.google.com/p/macfuse/
MacFUSE implements a mechanism that makes it possible to implement a fully functional file system in a user-space program on Mac OS X (10.4 and above). SSHFS is one of the popular plug-ins for MacFuse which connects securely to SSH servers from the Finder.
MacFusion – http://www.sccs.swarthmore.edu/users/08/mgorbach/MacFusionWeb/
MacFusion is a beta plugin for MacFuse that brings a simple GUI for SSH/(S)FTP connections.
Fugu – http://rsug.itd.umich.edu/software/fugu/
Fugu is a graphical frontend to the commandline Secure File Transfer application (SFTP). Fugu is available under a BSD-style license.
CyberDuck – http://cyberduck.ch/
Cyberduck is an open source FTP and SFTP (SSH Secure File Transfer) browser licenced under the GPL with an easy to use interface, integration with external editors and support for many Mac OS X system technologies such as Spotlight, Bonjour, the Keychain and AppleScript.
Mac OS X’s built-in SFTP – http://www.apple.com/macosx/features/security/
Mac OS X features networking security standards already bundled with the system including OpenSSH. You can access SFTP from the Terminal application (found in /Applications/Utilities). For more information see Apple’s security page or the manual page for SFTP
WinSCP – http://winscp.net
WinSCP is a free, open source SCP and SFTP client for Windows.
Rubrics
Produced by Reazon Systems, Inc., rCampus.com is an online resource for students and faculty. Rubric is one of the website’s free tools.
Through this feature, instructors can design rubrics online. Like traditional hard copy rubrics, they are constructed by the instructor to provide a detailed breakdown of how students and/or the students’ work will be evaluated. However, with the Rubric software, instructors can increase the ease and speed in designing and executing a rubric.
Designing the Rubric
Through the Rubric Studio, instructors can create new rubrics, modify existing rubrics, or use existing rubrics to design new files. Instructors can also look through rubrics posted by their peers in the Rubric Gallery in order to help construct their own grading standards.
Building a Community
The Rubric Gallery is a public catalog of rubrics organized by subject and type. Here, instructors can share their files to help others build or improve their own rubrics. Posting a rubric in the gallery is optional. (See below for details)
Grading Made Easier and Faster
As instructors, it can be incredibly time consuming grading the work produced by an entire class of students. Through Rubric, instructors simply have to click on boxes and input numbers. Rubric does the math. This allows instructors to focus more attention on the students rather than the grades.
Collecting Data
With increasing pressure to record and measure student performance, Rubric makes it easier for instructors to collect and analyze pieces of data. Instructors can compare student performance to see if they need to invest more time on a certain subject. They can also test objectives by examining student performance over time.
Student Reaction
Through rubrics, students know exactly what they will be evaluated on, which gives them a better understanding of instructor and class expectations.
Further Details
The software is free for registered members who agree to share their rubrics with others. Registration is free for students and faculty.
Further information
A Case Study
Rubrics Website
Zamzar for file conversion
- Message from Mike Franks (14 Apr 2007):
This site claims to do conversion of document, image, music and video formats, for free. I haven’t tried it but someone on another (non-UCLA) list, said he had used it for months converting docs between .doc and .pdf and “never had problems with loss of formatting.” It sounded too good to be true, just for PDF conversions, but the website says video, audio and image formats can be converted as well. Let me know if you try it out. Thanks,
- Response from Huan Wang (18 Apr 2007):
I tried converting DOC to PDF, WMV to MOV, and GIF to JPG. All seemed to work well. Files are uploaded on-line (it is also OK to upload an URL to the file), and links to the converted file are sent to the requester via e-mail. When the requester gets the email depends on the file size and whether the server is busy or not. I tried it this morning, and it took me 2-5 mins to get the email per request. Multiple files can be done at a time as a batch. Files uploaded can be up to 100MB in size per request. Below is the list of the file types they can convert from and to:
http://www.zamzar.com/conversionTypes.php
concatenate tiff files
How can I create a multi-page TIFF file?
On OS/X it looks like tiffutil can do that. http://developer.apple.com/documentation/Darwin/Reference/ManPages/man1/tiffutil.1.html
On Windows, TiffCombine costs $50 but has Trial version. http://www.topshareware.com/TiffCombine-download-35950.htm
If you have any experience with these or other solutions, please add them here.
How do I create non-printable PDFs?
If you have Adobe Professional, you can create non-printable pdfs by:
- Open your PDF document.
- Click on Document menu at the top of the page and select Security, then select “Show Security Settings for this Document.”
- A dialog box should open up, click on the Security tab.
- In the Security tab, click on the drop down box at the top and select the “Password Security” option.
- A new dialog box should pop up that reads “Password Security – Settings,” check the Compatibility option and make sure it is set to “Acrobat 5.0 or later.”
- In the Password Security – Settings box, go to the third header titled “Permissions” and check the check box next to “Use a password to restrict printing and editing of the document and its security settings.” Then enter in a password (don’t worry so much about the password, this just means if someone has Adobe Professional and tries to edit the document settings, he/she will be blocked from doing so unless he/she enters in the password). Next under the “Printing Allowed” option, click on the drop down menu and select “None.”
- Once you’re done, hit okay, a window will pop up to re-enter your password to confirm the password.
- Save your file to activate the security settings.
Final Cut Pro (FCP) 4.5 and Compressor AGP error
For those that get the “This software requires” AGP card error when running Final Cut on a machine that has a PCI-Expresss video card instead of AGP, there’s a really easy fix:
- Go to Applications folder
- Right click on Final Cut Pro HD, choose Show Package Contents
(on the mac hold down the control key and click on the application) - Double click on Contents folder
- Open up “info.plist” with TextEdit or any other text editor
- Search for “AGP” and replace it with “PCI”
(there should only be one instance) - Save the file, close it, and try running Final Cut once again.
You may get the same erorr when running Compressor, follow the same steps to fix it. Right click on the Compressor icon in Applications, then replace “AGP” with “PCI” in the plist file.
MATLAB opensource alternatives
This Slashdot article describes the release of version 3.0 of Octave. Afterwards there are some links from the article and a quick search of Octave versus Matlab.
“GNU Octave is a free numerical computing environment highly compatible with the MATLAB language. After 11 years of development since version 2.0, stable version 3.0 released yesterday. This version is interesting because unlike other free or semi-free MATLAB competitors like Scilab, specific compatibility with MATLAB code is a design goal. This has manifested itself in goodies like better support for MATLAB’s Handle Graphics, a syntax closer to MATLAB’s own for many functions, and many functions from the sister project Octave-Forge ported to the core Octave project for an enriched functionality closer to the toolboxes provided by MATLAB. GUI development is underway, but still no JIT compiling, which is a show-stopper for Octave newbies coming from MATLAB with unvectorized code.”
- http://www.octave.org/
- http://www.mathworks.com/matlab
- http://www.gnu.org/software/octave/NEWS-3.html
- http://www.scilab.org/ – Scilab is another opensource alternative to Matlab
- Matlab/Octave Tutorial
- http://macresearch.org/octave_a_free_matlab_clone_and_a_bit_more
- Octave vs Scilab
- http://www.nabble.com/differences-matlab-vs-octave-p10400382.html
If you have any experience or opinions to share, please add them here. Thanks
Google Earth Pro
Google Earth Pro
January 2015:
Google Earth Pro is now free to all.
http://google-latlong.blogspot.com/2015/01/google-earth-pro-is-now-free.html
http://www.google.com/earth/download/gep/agree.html
Key: GEPFREE
end update
This article is part of a series on choropleth mapping, to see other solutions, please visit the introduction here.
After participating on the Google Earth Community Forum, many users suggested that for educational purposes, Google Earth Pro will provide easy to use GIS and text data file import. Google Earth Pro normally retails for $400 however, Google has continued the Google Earth Education Initiative Program, which gives away Google Earth Pro grants for educational entities. I have contacted Debra Kettmann to see if SSC can obtain Google Earth Pro for educational use. This is a speculative play because there is little public documentation on Google Earth Pro, but the Educational part of the Community Forum suggests that it is essentially the standard version of Google Earth with additional data management functionality. I will keep an eye on this program and see what Debra responds.
Over Winter break, Google responded to my initial request to join the Google Earth Pro for Education Project. While I have played around a bit with the free trial of Google Earth Pro, it still has features like importing tabular data that are still locked in the trial. Google has offered the free use of Google Earth Pro for free for use in curriculums at UCLA. They have requested that we submit an application before we are given the full copy for evaluation.
ArcGIS 9.2 and Windows Vista
The original ArcGIS 9.2 distribution— including the one at UCLA Software Central— is not properly compatible with Windows Vista.
Per ESRI:
http://support.esri.com/index.cfm?fa=knowledgebase.techarticles.articleShow&d=34020
You will need to follow the instructions posted here:
http://downloads.esri.com/support/TechArticles/Installing_ArcInfo_Workstation_92_on_Vista.zip
This includes “Update Microsoft System Files” built into the installation DVD of ArcInfo Workstation 9.2 to run under Windows Vista.
However, upgrading to ArcGIS 9.2 Service Pack 4 or later is required for proper (albeit flawed) Windows Vista support.
After installing ArcGIS Desktop 9.2, you should download SP5 from here, via the ArcInfo Desktop link, then the ArcGIS 9.2 Service Pack 5 link:
http://support.esri.com/index.cfm?fa=downloads.patchesServicePacks.gateway
(direct link below; may not work:
http://support.esri.com/index.cfm?fa=downloads.patchesServicePacks.viewPatch&PID=15&MetaID=1377 )
And install the elements you need. Most basic installations will need:
- ArcGIS Desktop (ArcInfo, ArcEditor, ArcView)
ArcGISDesktop92sp5.msp 178 MB - ArcGIS Desktop Help updates
ArcGISDesktopHelp92sp5.msp 383 MB - ArcGIS Tutorial Data (not updated since SP4)
Tutorial92sp4.msp 4 MB
Flaws known with ArcGIS 9.2SP4 and Vista:
http://downloads.esri.com/support/TechArticles/DT92sp4andWindowsVista.zip
Using LimeSurvey as a Survey Tool
We were in search of a good survey tool, and after some research came upon LimeSurvey (www.limesurvey.org). We found it extremely easy to set up and use and allowed for professional surveys with features commonly found in commercial products.
The following lists its main features:
- Unlimited number of surveys at the same time
- Unlimited number of questions in a survey (only limited by your database)
- Unlimited number of participants to a survey
- Multi-Lingual Surveys
- User-Management
- 20 different question types with more to come
- Creation of a printable survey version
- Ability to set conditions for questions depending on earlier answers (branching the survey)
- Re-usable editable answer sets
- Ready-made importable questions
- Assessment surveys
- Anonymous and Not-Anonymous survey
- Open and closed group of participant surveys
- Optional public registration for surveys
- Sending of invitations, reminders and tokens by email
- Option for participants to buffer answers to continue survey at a later time
- Cookie or session based surveys
- Template editor for creating your own page layout (CSS based!)
- Extended and user-friendly administration interface
- Back-office data entry possibility
- Survey expiry dates for automation
- Enhanced import and export functions to text, CSV and MS Excel format
- Basic statistical and graphical analysis with export facility
The installation requires a PHP/MySQL server. Installation is very easy. A quick summary of the steps are:
1) unzip the files to the directory you want
2) set read/write permissions to the tmp and template directories
3) edit the config.php file to point to your MySQL database
You can find the complete manual (including an installation guide) here:
http://docs.limesurvey.org/tiki-index.php
The only issue we encountered is that you need to enable the Multibyte string extension in PHP.
ArcMap Please wait while Windows installer configures ArcGIS Desktop
Problem:-——-
Running ArcMap always causes the Windows Installer to launch and reconfigure ArcGIS desktop.
Repeatedly clicking cancel when this comes up will eventually get ArcMap to load.
This happens in ArcGIS 9.2 including SP4.
Solution:-———
http://support.esri.com/index.cfm?fa=knowledgebase.techarticles.articleShow&d=33358
Step 1: Verify problem
—
1. Click Start > Run.
2. Type ‘eventvwr’.
3. Select Applications.
4. Look for entries with ‘MsiInstaller’ under the Source column.
Double-click on the entry with ‘MsiInstaller’ and the following error message displays: “Detection of product ‘{1F34839E-4826-4B64-B1B3-42E5AE8DEC5A}’, feature ‘MicrosoftMsms’, component ‘{303994BA-6487-47AE-AF1D-7AF6088EEBDB}’ failed. The resource ‘C:\WINDOWS\WinSxS\x86_Microsoft.MSXML2_6bd6b9abf345378f_4.20.9818.0_x-ww_8ff50c5d\msxml4.dll’ does not exist.”
This indicates that MSXML4.dll is missing— this file is required by ArcGIS Desktop.
Step 2: Repair
—
- Open Windows Explorer and browse to C:\WINDOWS\WinSxS\x86_Microsoft.MSXML2_6bd6b9abf345378f_4.20.9818.0_x-ww_8ff50c5d.
- If the directory cannot be found, proceed to the next step. If the directory exists, delete it and proceed to the next step.
- Open a Web browser and go to the Microsoft link in Related Information below.
- Download and install MSXML 4 Service Pack 2: download msxml.msi only, if you have already downloaded this, download it again.
MSXML4 SP2 link: http://www.microsoft.com/downloads/details.aspx?familyid=3144b72b-b4f2-46da-b4b6-c5d7485f2b42
Step 3: Verify
—
Run ArcMap again and verify it works.
Has anyone tried Omeka?
Has anyone tried Omeka? It’s a PHP/MySQL based, open-source web platform for publishing collections and exhibitions online. Designed for cultural institutions, enthusiasts, and educators, Omeka is easy to install and modify and facilitates community-building around collections and exhibits.
Discovered via Internet Scout Report
Please add your experiences or comments or alternatives here. Thanks
OCLC Research to Host TAI CHI Omeka Webinar on 8 December at 10 a.m. PST – Omeka features a “five-minute setup” that makes launching an online exhibition as easy as launching a blog. Designed with non-IT specialists in mind, it allows users to focus on content and interpretation rather than programming. It brings Web 2.0 technologies and approaches to academic and cultural Web sites to foster user interaction and participation. It also makes top-shelf design easy with a simple and flexible operating system. Omeka’s robust open-source developer and user communities underwrite its stability and sustainability.
In this free webinar, Sheila Brennan, Omeka End User Outreach Coordinator and Senior Digital History Associate at the Center for History and New Media (CHNM), will provide an overview of Omeka. Dave Lester, Omeka Developer Outreach Coordinator and Developer at CHNM, will provide more technical aspects of the Omeka software.
There’s at least one instance of Omeka at UCLA. http://uclawce.ats.ucla.edu/ It’s hosted at ATS and was used in a class taught by Josh Sternfeld.
- Good review of Omeka, with a use case, in D-Lib: http://www.dlib.org/dlib/march10/kucsma/03kucsma.html
- http://www.nytimes.com/external/readwriteweb/2010/10/28/28readwriteweb-omeka-launches-a-hosted-platform-to-move-mu-34659.html
How to download Google Applications without Google Updater
Most Google applications now, such as Google Earth and Picasa, now may only be downloaded and installed via Google updater.
If you find the presence of an additional application (Google Updater) to be intrusive or a potential security risk as many of us do, Google does offer its applications without Google Updater bundled. As Google Updater checks for patches and updates to multiple applications including non-Google ones such as Firefox, Skype, and Acrobat Reader, particularly in sensitive environments where you need additional version control, that may be an additional reason to avoid Google Updater.
The link below contains direct links to Google Applications without Google Updater.
http://www.google.com/support/pack/bin/answer.py?hl=en&answer=32610
- Google Desktop: http://desktop.google.com/index.html?rd=f
- Google Earth: http://dl.google.com/earth/client/advanced/current/googleearthwin.exe
- Google Talk: http://www.google.com/talk/
- Google Toolbar: http://toolbar.google.com/service/tbdl?hl=en&tbdata=T4
- Picasa: http://picasa.google.com
- Adobe Reader: http://www.adobe.com/products/acrobat/readstep2.html
- Mozilla Firefox: http://www.mozilla.com
- RealPlayer: http://www.real.com
- Skype: http://skype.com/
real-time collaborative text editors
Multiple people editing a document at the same time seems impossible, but now there are three different tools for doing that.
- EtherPad
- Google Docs – “allows simultaneous editing that’s not in real time. Rather, each save pushes a copy to other active editors, but you can’t see each other type or delete.” – from Comparison of EtherPad and SubEthaEdit.
- SubEthaEdit
Please add comments here:
- I switched to a Mac partly to use SubEthaEdit, then didn’t need it enough to buy it. Didn’t know Google Docs could do this, but EtherPad, which I just heard about, seems easy enough to show and use right away in a meeting. Check out the 90 second EtherPad video. – Mike Franks 11-19-08
Collaboration Software
- Top 10 Web Collaboration Tools – By Kevin Purdy on October 4, 2009 at 3:00 AM
- Collaboration software short summary and links – taken from UCSC Mailing List by Harry Mangalam, UCI – “I requested and received a lot of input about ‘collaboration software’, a term that covers a lot of area. It’s a bit late, but I wrote up a summary of links I found along the way, what people wrote in to say, and a bit of my own experiences. This has been gathered together in a bulletin board post. Please feel free to expand, comment or correct.”
- Best Online Collaboration Tools 2009 – Robin Good’s Collaborative Map – This mindmap lists a plethora of online collaboration tools in various categories. The information can be exported to rtf for free without a mindmeister account.
Second Life (SL) and Education
Second Life (SL) is a 3D virtual world developed by the Linden Labs. Basic accounts are free and provide you with an avatar. Once you have an avatar, you need to download SL software and go through orientation. See system requirements: secondlife.com/
All objects in this virtual world are created and owned by the “residents,” for their own use, or for sale or free distribution to others within SL. Many businesses operate within SL, utilizing “Linden dollars,” with a floating currency rate of about US$1 to L$265 at present. At this time objects created in SL and SL avatars cannot be transported out of SL for other uses or for use in other virtual worlds.
There are many different uses for virtual worlds, including teaching, learning and research, as well as entertainment of various kinds. A number of academic institutions have established sites in SL, with some offering courses, and others conducting research using simulations (sims) that could be costly or not worthwhile developing in real life (RL). Companies such as IBM offer employee training and meetings for their international workforce in SL, some on private islands. Many organizations have established sites and some hold meetings and conferences in this virtual world. The New Media Consortium (NMC) has a number of islands and offers areas at a discount to NMC member institutions whose faculty wish to teach classes in SL. NMC also offers help in the way of teaching tools for SL use.
Libraries and librarians are quite active in SL. The Digital Library Federation (DLF) has an island in SL (Entropia) where 2008/2009 Mellon Seminars in Digital Humanities are streamed with a live video feed. UCLA has a small library in Cybrary City http://slurl.com/secondlife/Cybrary%20City/231/110/24/. Some UCLA classes have been meeting inside and just outside the UCLA Library in SL. Contact Esther Grassian if you would like more information and a tour of this library or other libraries in SL: estherg@library.ucla.edu
Many articles and some books have been published on SL and other virtual worlds, as well as immersive learning. Some “machinima” (videos taken by avatars within a virtual world) are available on the SL web site; many others are available on YouTube, and slide shows on the topic are available on slideshare.net. Here are some publications you may want to look over:
Au, Wagner James. 2008. The making of Second Life. New York: Collins.
College Library: GV1469.25.S425 A9 2008
Bruns, Axel. 2008. Blogs, Wikipedia, Second Life and Beyond.
YRL: ZA4482 .B78 2008
Conklin, Megan S. 2007. “101 Uses for Second Life in the College Classroom.”
http://facstaff.elon.edu/mconklin/pubs/glshandout.pdf
Grassian, Esther. 2007. “Second Life for CLA [California Library Association].”
http://www.slideshare.net/estherg/second-life-for-cla
Grassian, Esther and Rhonda B. Trueman. 2007. “Stumbling, Bumbling, Teleporting and Flying: Librarian Avatars in Second Life.” Reference Services Review 35(1):84-89.
Note: UCLA Library licensed journal. Search the UCLA Library Catalog under journal title: Reference Services Review.
http://catalog.library.ucla.edu
Grassian, Esther, Rhonda B. Trueman and Patrice Clemson. 2007. “Stumbling, Bumbling, Teleporting and Flying: Librarian Avatars in Second Life: Selected Bibliography.” Reference Services Review 35(1):90-97.
Note: UCLA Library licensed journal. Search the UCLA Library Catalog under journal title: Reference Services Review.
http://catalog.library.ucla.edu
Guest, Tim. 2007. Second Lives. London: Hutchinson.
SRLF: GV1469.17.S63 G84 2007
Harrison, Denise. 2009. Real-Life Teaching in a Virtual World. from Campus Technology
Harrison, Denise. 2009. Second Life: Engaging Virtual Campuses. from Campus Technology
Ludlow, Peter. 2007. The Second Life Herald: the Virtual Tabloid That Witnessed the Dawn of the Metaverse. Cambridge, MA: MIT Press.
College Library: GV1469.25.S425 L83 2007
Rampersad, Tara. 2007. Making Your Mark in Second Life: Business, Land and Money.
UCLA Library licensed online book. GV1469.25.S425
Search the UCLA Library Catalog under keyword: Rampersad Making Mark
http://catalog.library.ucla.edu
Rymaszewski, Michael, et al. 2007. Second Life: the Official Guide. Indianapolis, IN: Wiley.
v3image. 2007. A Beginner’s Guide to Second Life. Las Vegas, NV: ArcheBooks Publishing, Inc.
Virtual Worlds and Libraries: Librarians and Educators in Second Life and Other Multi-User Virtual Environments, edited by Lori Bell and Rhonda B. Trueman. 2008. Medford, N.J.: Information Today, Inc.
YRL: Z678.83.S53 V57 2008
UCLA Experiences with Second Life
In order to give a feel for what people at UCLA are doing with Second Life, this article has been created. Please add anything you think appropriate. And please mention it to any instructors, grad students, or staff that use Second Life in their teaching or research.
2/18/09 Esther Grassian: I was so busy today, as we had a discussion and tour of the Stanford Library island in SL.72 people rsvp’d for it from various parts of the country and the world, and so many showed up that we couldn’t get them all into the Digital Library Federation’s island (Entropia). So we all went over to the Stanford island—there were about 60 avatars there. It was a great discussion and tour! They’re doing some amazing things there. I have a copy of the transcript, but am not sure everyone would want to read through it.The Mellon Seminars in Digital Humanities are continuing to be streamed live into Entropia, with the next one scheduled for March 9th, 2-5 pm SLT/PST. Contact Esther Grassian for more information on any of this: estherg@library.ucla.edu--
converting video files on PC
We have Handbrake on PCs, but the current version has some limitations when used on the PC platform: 1) Its performance is not stable; it crashes quite a lot; 2) it cannot covert files to .wmv; 3) although it can covert a file to .avi, we have to be very careful with the codecs; otherwise, it won’t play unless extra codecs are installed, and the output file is often huge; 4) it has difficulty converting .flv (format used by YouTube and other on-line video) to formats other than .avi.
WinFF is able to conquer all these problems, and it works with .vob (for DVDs) as well. The process is fast, and it allows batch processing. WinFF (http://winff.org/html/index_html), like Handbrake on PC, cannot handle copyright protected DVD, though.
With that said, if we want to convert the whole video file to another format (esp. .avi or .wmv) when working on PC, the workflow is as follows:
Preparation (for on-line video)
- Download the online video (.flv) from YouTube (or other websites) with the Firefox add-on, DownloadHelp ( http://www.downloadhelper.net/).
Processing
- Use WinFF (http://winff.org/html/index_html) to convert the files. If the output files are .avi or .wmv, they can be edited in Windows Movie Maker, or used for PPT on PC.
If we only want a small portion of an on-line video or a DVD when working on PC, the workflow is as follows.
Preparation (for on-line video)
- Download the online video (.flv) from YouTube (or other websites) with the Firefox add-on, DownloadHelp ( http://www.downloadhelper.net/).
Processing
- Use MPEG Streamclip (http://www.squared5.com/) to extract the portion we want.
- If MPEG Streamclip refuses to cooperate (like asking for extra codecs), either find out and download the codecs or just use WinFF (http://winff.org/html/index_html) to convert the whole file first, and then trim down the file in Windows Movie Maker or other software.
The instructions above apply to both support people and end-users (instructors, TAs, and students). End-users can do the processing themselves if they prefer to. And everything is free =)
Free office tools
If you are looking for web based and free tools for word processing, power point, database creation, and spreadsheets here are some tools to explore.
Zoho www.zoho.com provides a wide range of basic office tools as well as options for managing email, taking notes, creating wikis, and project management.
OpenOffice www.openoffice.org provides tools that are quite similar to those available with Microsoft Office and it has a nice feature for handling images and designs.
Other similar tools?
I have found Google Docs http://docs.google.com/ very useful esp. if your working with people in different locations.
Video annotation tools
- Web application.
- Free to use.
- Only annotates videos on YouTube. You can only annotate videos you have uploaded, while others can see the annotation.
- Text annotation (“text bubbles” or notes), highlight part of the screen.
- All annotations are editable.
2. Project Pad
- Free to download on the website; open source under GPL.
- Seems to use Java and Flash; stated requirements include Java, Flash and Quicktime.
- Standalone (as a Java Servlet-based Web application) or as a part of Sakai
- Shows timeline. Annotates with text. Does not look like you can draw on the screen.
3. Vertox
- Made by the Concordia Digital History Lab of Concordia University of Montreal, Canada.
- “Open source”; license unknown.
- Requires “Firefox 2.0 browser and QuickTime Player for Mac or Windows; Java Runtime Environment (Windows only); Zotero, a Firefox extension”.
- Supports “all QuickTime-compatible audio-video formats”.
- Annotates local video files
- Annotates with text, tags, time ranges.
4. Video Annotation and Reference System
- Seems to be tailored towards a particlar application (annotating videos recorded by unmanned vehicles under the ocean).
- Open source; GPL
- Java-based
- Not much info available. Seems to let you annotate your own video file in a standalone application.
- Not free (“$30 for academic license”); no trial version available.
6. BubblePLY
- Web application.
- Free to use.
- All users can create “Bubbles” (annotated videos); registered (free) users can edit their own Bubbles.
- Annotates remote videos (e.g. those on YouTube) by pasting the URL.
- Annotates with text, drawing, subtitle, pre-defined clipart, uploaded image file.
7. VideoANT
- Web application.
- Free to use.
- Source: YouTube video
- Annotate with time point marker and text
8. Video Annotation through CCLE
- Web application
- Need a CCLE Moodle site
- Annotates videos from YouTube and the UCLA TV News Archive
- Annotates with text tags and events, as well as geolocation
9. vatic
- Web application
- Free
- Crowdsource video annotation to Amazon’s Mechanical Turk
10. frametrail
- Open source, but you will have to host the software
- Annotate with text overlays, images or interactive maps
Document Annotation Tools
Are there good enough tools for annotating documents and sharing those annotations that are easy enough to use that students might actually read things online for classes?
I don’t know, but here are some possibilities:
- http://a.nnotate.com (web-based free and paid service) “A.nnotate lets you easily add notes and comments to PDFs (and other types of document including MS Word, Powerpoint and Excel). It runs in most common browsers and there is no software to install so it is the ideal tool for helping individuals and groups manage and collaborate on their documents. Users do not need to install any plug-ins like Acrobat or Adobe reader as A.nnotate simply runs in the browser. Once you have uploaded a document you can invite any number of annotators to view it and add their comments – there is no extra charge for annotating users.”
- http://www.awesomehighlighter.com/ highlight web pages and share with short url
- “As of Acrobat 7, it is possible to save a PDF file so that Acrobat’s Comments features are also available in the Reader. This needs to be done on a file-by-file basis, in Acrobat (definitely Professional, possibly also Standard). So if a client sends you a PDF requesting comments added in Acrobat, you can ask him to send you the file again, with comments enabled for Reader. The Acrobat command for this is in the Comments menu.” source
- http://www.diigo.com/ highlight web pages and share or keep them private, other features too.
- http://www.docu-track.com/home/prod_user/PDF-XChange_Tools/pdfx_viewer (Windows only?)
- The Acrobat Pro site licensing is pretty inexpensive if that will meet faculty/staff needs.
- High-end users (with a Tablet for example) may prefer PDF Annotator, which costs $69 but may have academic discounts. http://www.ograhl.com/en/pdfannotator
- Any others? Any experience with any of these?
How to reset user passwords on Wimba
For Users:
If you have forgotten your password, click on the “Forgot your password?” link on the Wimba login page:
http://ucla.horizonwimba.com/ucla/login
Your password will be sent to you via email.
The login email address will be the email address you had on file at the time Wimba gathered the data from the registrar. Wimba will only grab the email address once, so even if you update your address with the registrar, the Wimba login email address will not change. If you don’t know which email address to use, contact your department’s ITC for help:
http://www.humnet.ucla.edu/itc/
For Administrators:
To manually change a user’s Wimba password, go to the main Wimba login page:
http://ucla.horizonwimba.com/ucla/login
Login as administrator (ITCs should use their ITC email address)
Click on the ‘Administration’ tab at the top (if you do not see this tab, this means you need to gain administrator access)
Click on ‘Users and groups’
You can search for the user by first name, last name, or email address.
Click on the ‘Edit’ icon to the right of the user.
Here you can edit the user’s information, as well as change the password.
The user can re-change their password once they log in and click on ‘My Manager’ and then ‘Edit my profile’
More help on Wimba: http://www.international.ucla.edu/languages/technology/article.asp?parentid=26796
VMware Fusion - How to set the default virtual machine
If you have more than one virutal machine and you want a particular vm to launch as default, choose from menu bar – Window/Virtual Machine Library. And then click on the circled star (turns orange) of the vm machine you want to launch as the default vm machine. You’re done!
Has anyone tried Diigo?
Has anyone heard of or used Diigo? http://www.diigo.com/ It claims to be a “Web Highlighter and Sticky Notes, Online Bookmarking and Annotation, Personal Learning Network.” And they have special Educator Accounts
I ran across it in this Educause Quarterly article Engaging Students with Engaging Tools by Ed Webb. It’s mentioned several times and the idea of being able to highlight text within articles you bookmark for a group sounds very interesting. I haven’t tried it yet, though a Google search on “diigo education” found some interesting articles.
- Another article about Diigo is here: http://digitalresearchtools.pbworks.com/diigo
- Comparison of Diigo and Delicious – July 30, 2010
- Diigo Educator Accounts – They have some nice class setup and privacy features for instructors.
Please add your experiences or comments or alternatives here. Thanks
Jan. 6, 2011 – With the announcement that Yahoo would be dropping Delicious, I went looking for alternatives and am now trying Diigo. I like that it imports from Delicious, and you can keep them in synch, and the annotation feature. – Mike Franks
How to merge pdf files
I’ve only tried the first one, but for those who don’t have a Mac, I added some other links.
- How to merge PDF files with Preview in Leopard
- Merge PDF Documents Easily and for Free using MergePDF.net
- article about mergepdf.net
- How to merge PDF files using full version of Adobe Acrobat
iPad Note Taking Apps
Here are some recommended student note-taking apps for the iPad. And possibly, the 3rd and 4th ones could be used by instructors in grading papers, or students could use them to annotate course readings.
- http://www.coursenotesapp.com/
- http://audiotoriumapp.com/
- http://tnerd.com/2010/03/17/padnotes-app-for-ipad-lets-you-scribble-draw-write-and-even-more-on-your-ipad/ – Not sure if this one has arrived yet.
- iAnnotate PDF and Aji PDF Service for Mac or Windows
- GoodReader annotates PDFs and can link to many cloud services like dropbox, goggle docs, WebDAV servers, etc.
- Pogo iPhone Stylus
- Evernote for iPad: http://www.evernote.com/about/download/ipad.php (I already use this on my Mac for notekeeping any autosyncing to any computer. Love it! Free! -Annelie)
- Sundry Notes: http://sundrynotes.com/ (<—added by albert)
- free
- keyboard input, touch based drawing
- math and other graphing symbols
- pdf and web page attachment
- voice recording!!
- seems very promising – downloaded a week ago. there has been one update so far. lots of imporvements, suggesting that the developer is actively working on the app.
Synching Calendars Between ICal and Entourage
Synching calendars between ICal and Entourage
Entourage’s support of Sync Services keeps confusing many users: while the contacts in Entourage show up just fine in Address Book, a number of problems appear with Entourage’s calendar and iCal. A number of users have been creating their calendar entries in iCal and are surprised to discover that, even though they have enabled calendar synching in Entourage’s preferences, nothing seems to be happening. However, this is not the case; Entourage’s calendar does sync to iCal, and vice-versa, but the user needs to understand how this complex mechanism works.
First of all, a crucial distinction needs to be made between the different ways in which Entourage and iCal handle calendars: iCal supports multiple calendars, Entourage does not (except for Exchange). And while Entourage supports categories, iCal makes use of the previously mentioned different calendars to categorise appointments and tasks. This difference is crucial to a proper understanding of why synching does not work the way most users would expect it to work. Categories and calendars are not identical, which is why it is not immediately possible to sync categories in Entourage with calendars in iCal. Instead, the following scenario applies to both Entourage 2004 and 2008:
When you enable Sync Services in Entourage’s preferences (see screenshot above), a new calendar called “Entourage” is created in iCal (see screenshot below). All the items that are in Entourage’s calendar are synched to that calendar; create a new item in Entourage, and it shows up in the “Entourage” calendar in iCal. Similarly, if you use iCal and want the new events that you create to show up in Entourage as well, you will have to make sure that any new item is part of the “Entourage” calendar.
WARNING! If you decide to delete the “Entourage” calendar in iCal, be very, very careful! You will not get any supplementary warnings other than the standard dialogue, and if you do not pay attention, you will have deleted all your Entourage calendar events and to do items in one fell swoop. Do not delete the “Entourage” calendar in iCal unless you are absolutely sure what you are doing!
There are a number of drawbacks to this implementation of Sync Services: Entourage’s categories allow the user to make organisational distinctions which simply disappear when these calendar events are viewed in iCal’s “Entourage” calendar. Similarly, you cannot have calendar events that belong to two calendars at once in iCal, which means that you have to choose between using iCal’s convenient, colourised multiple calendars or the restrictive, monolithic “Entourage” calendar. This restriction is quite noticeable when you sync your iCal calendars with a portable device, such as mobile phones, Palm pilots, iPods or iPhones: iSync and iTunes allow you choose which calendars to sync with your mobile device, but if you use Entourage, there’s only one iCal calendar to choose from, namely “Entourage”. In other words, you only have two choices: either sync all your calendar and to do items, or none at all.
This restriction makes using iCal and Entourage simultaneously rather uncomfortable; sure, it is very convenient to have a built-in feature in Entourage that allows the user to sync his or her calendar with mobile devices, but at the same time, the current implementation is quite rough around the edges and does not allow for any subtleties. An ideal solution, in my opinion, would be a preference in Entourage that would allow the user to associate categories with iCal calendars. In other words, if you categorise an item in Entourage as “Work”, it would show up in the “Work” calendar in iCal, and so on. Such an implementation of Sync Services does not seem to be impossible, but in order to get Microsoft to look into this solution, we will need to get as many users as possible to complain about the current implementation by clicking on “Send Feedback on Entourage” inside Entourage’s Help menu and suggesting alternatives, such as the one mentioned above.
Elluminate Live Moderator Tips
The following list is an ongoing collection of tips and best practices collected by the UCLA Elluminate user community
- It is helpful if the presenter repeats questions before answering them
- If the moderator has dual monitors only the primary monitor can be shared/displayed
- Participant profiles can be hidden from within the Elluminate session tools
- The whiteboard shouldn’t be used for higher resolution presentations, its better to use application sharing with Powerpoint natively
- Group editing is best done via application sharing of Word rather than with the Whiteboard as it can be awkward to edit the whiteboard text.
- For application sharing users have found Firefox to be preferable to IE or Safari
- Presenter or primary source of the webinar should be on a wired connection (not wireless) if possible.
- If possible, setup teleconferencing as a backup option for users without microphones. Elluminate is compatible with UCLA’s Copper Conferencing service.
- Using the Web Tour tool within Elluminate and browsing to YouTube is a good way to playback video or audio clips for your webinar audience.
- You can remap the push to talk button to something easier to use with one hand like CTRL+TAB. Go to Tools, Preferences, General, Hotkeys and modify the Press/Release Talk button.
Thank you to all that attended the UCLA Elluminate Best Practices session on Tuesday, June 15th, 2010. Here are the resources from the session for your reference. If you did not get a chance to attend live, here is the link to View the Elluminate Live! recording of the session.
This is a link to the Elluminate v10 Sneak Peek webinar:
https://sas.elluminate.com/site/external/launch/play.jnlp?sid=45&psid=2010-06-10.1046.C.B1A9CCFA1C6F3FE07FB3F4502206C4.vcr
Elluminate Main Training Page:
http://www.elluminate.com/Services/Training/?id=70/
Elluminate v9.7 moderator resource training documents. Elluminate has broken out each feature for you and provided short videos walking you through the feature and quick reference guides with screen shots and step by step instructions on how to use the feature:
http://www.elluminate.com/Services/Training/Product_Training_Resources/Moderator_Guides_for_V9.5+/?id=377
Click on this link to sign up for FREE live online training sessions to learn how to use each feature in Elluminate. Check back frequently and take these sessions as often as you like, for FREE:
https://sas.elluminate.com/site/external/event/schedule?etn=training&eef=1
Click on the link below to access Ellluminate’s self help support portal where you can search the knowledgebase for FAQ’s and downloads, start a live chat, submit a ticket or call toll free 24/7:
http://support.elluminate.com/ics/support/default.asp?deptID=2653
Interested in networking with colleagues and fellow students across campus and the world? Click on this link to visit LearnCentral, Elluminate’s new social learning network where educators can connect with peers, share content, build portfolios, access resources and attend events. Sign up and receive a free vRoom, your very own Elluminate VO to use for life:
http://www.learncentral.org/
Amber Goularte, our Elluminate Customer Success Manager, holds virtual office on Wednesdays between 11 AM and 1 PM PDT at
https://sas.elluminate.com/m.jnlp?sid=39&password=M.FA123FFCE45FD3C5D9C23C99D3DC2A
Amber is available to answer your Elluminate questions during this time or please feel free to email her anytime at amberg@elluminate.com with any questions regarding Elluminate.
Message notification in Pidgin
Pidgin ships with a message notification plugin, but it is not enabled by default. To make the taskbar item flash when a new message comes in:
- Go to Tools → Plugins and check “Message Notification”.
- Select “Message Notification”. When the item is highlighed , click on “Configure Plugin” button
- Under “Notify For”, check all three boxes: “IM windows”, “Chat windows” and “Focused windows”. Leave “Only when someone says your username” unchecked.
- Also check “Flash window”.
- Under “Notification Methods”, check “Flash window”.
- Click on “Close” button.
What are the GradeMark and PeerMark features in Turnitin?
As of Fall 2016, Turnitin can be used exclusively through CCLE. For assistance using the service through CCLE, please contact your local CCLE support group or submit a ticket for assistance.
UCLA has added access to the GradeMark and PeerMark features in addition to the current OriginalityCheck from Turnitin. These features (collectively known as WriteCycle) are ready for immediate use.
GradeMark allows for completely paperless grading of submitted work. Professors and/or TAs are able to easily add provided comments or customized comments to papers which students are then able to access directly through Turnitin after the designated post date.
Features & Benefits
- 100% Paperless System
- Real Time Grading & Mark-up
- Faster Than Traditional Grading
- Standardized Editing Marks
- Assess Students Over Time
- Fully Customizable Rubrics
- Works With All Subjects
- Share Rubrics & Editing Marks
http://my.ucla.edu/turnitin/GradeMark_manual.pdf
PeerMark allows instructors to create an assignment through which students are able to review the work of their classmates. Instructors are given the flexibility to either assign specific groups manually, allow the students to select work to review or have the system randomly assign papers to review. Students would then be given access to see the comments left by their classmates.
Features & Benefits
- Automatic Paper Distribution
- Optional Anonymous Reviews
- Contextual Review Marks
- Assessment Metrics
- Students Learn From Each Other
- Students Become More Engaged In Course Material
- Helps Students Understand Core Course Material
- Accessible Anytime, Anywhere
http://my.ucla.edu/turnitin/PeerMark_manual.pdf
Data visualization software
Here is a list of software and other tools that can be used for data visualization. Feel free to add others and comment on your experience with any of them.
- http://selection.datavisualization.ch/ – Selected tools
- Many Eyes – Cf. related article on this tool in the knowledgebase. https://kb.ucla.edu/link/1012
- Tableau Public
- Google Visualization API Reference
- Programming languages designed for visualization: My current favorite here is Processing http://processing.org/ . Processing code runs on top of Java, so it can run standalone or as an applet in the browser. A significant subset of Processing has been ported to JavaScript http://processingjs.org/ so you can write visualization code that runs in HTML 5 browsers.
- Programming libraries designed for visualization: While there are options for just about any programming language you can think of, I am particularly impressed by two JavaScript libraries: the JavaScript InfoVis Toolkit and Protovis – either one will help you create powerful interactive visualizations that run in the browser.
- Infogram – they provide templates, you add the data.
- 30 Simple Tools For Data Visualization – Gavin McLeod – April 17, 2014
- Introducing Charted – A new way to share data – Charted is a way of sharing graphs. I’m a big fan of using monitoring tools for business metrics, but exposing that data can be hard. Charted looks a great bridge to get other people interested in data. (added Dec. 1. 2014)
- Chart and image gallery: 30+ free tools for data visualization and analysis – ComputerWorld March 26, 2015
- A Tool for Instant Data Visualizations – April 9, 2015
- The 14 best data visualization tools – April 21, 2015
- 13 Free Data Visualization Tools by Vikas Lalwani – Aug. 12, 2016
- Sizzle Analytics – Create visualizations with this free tool by simply uploading data as a CSV (Comma Separated Variable) file, then select what variables to measure and what kind of graph you want. You can create graphs that allow others to select variables themselves. – Nov. 4, 2016
- Google Data Studio Free in U.S. – Feb. 2, 2017
Prezi, The Zooming Presentation Editor
Prezi: The Zooming Presentation Editor
An Assessment of the Online Presentation Tool
Jack Bishop, Ph.D.
Instructional Technologist
UCLA Office of Instructional Development
Whether using presentation software or online tools, the basic concept of a presentation is to share pertinent and useful information, usually in one direction – from the presenter to the audience. Although PowerPoint has become the standard presentation software in use at universities, there are many others to choose from including a few online tools. One such tool I would like to examine is Prezi – The Zooming Presentation Editor. Right away the title of the website gave me apprehension. Zooming? I couldn’t wait to dig in. The web site continued with grandiose claims like: “Create Amazing Presentations Live and on the Web,” and “create stunning presentations with Prezi.” When you click on the introductory video on the home page we are told that presentations are used to share ideas, introduce work, or as a tool of persuasion. The video then continues, “But, what used to be a great opportunity has turned into a dreadful experience for you and your audience. The reason? Boring presentations. That’s where Prezi comes in.” Hmm. According to information display guru Edward Tufte, “If your presentations are boring, it’s your content, so get new content” (Tufte 2008). However, the trend has been to not get better content, but to add more of the bells and whistles that come with PowerPoint in an attempt to make boring content more “amazing” and “stunning.” This is a fatal error. Flying text, zooming words, spinning images and sound effects all add distractions to the information being conveyed by the presentation. Proven best practices dictate that motion on the slides in a presentation should be reserved for demonstrating a specific movement pertinent to the lesson at hand. It is a waste of everyone’s time to sit through a presentation laden with animated text that is bouncing, spinning or zooming. Waiting for the animation to settle so everyone can read it can be a great time waster. If you have three animations on each slide and each animation takes 1 second that’s 3 seconds of wasted time per slide. If the presentation is 20 slides long, you have wasted 60 seconds (or a minute) on unnecessary “phluff.” This does not take into account the amount of distraction and anxiety such animation can cause in your audience.
What is Prezi?
Prezi is a web-based presentation tool (in the Flash format) that uses a single “canvas” as opposed to a presentation composed of separate slides. You insert the text, images, videos or any other objects onto a single “infinite” canvas then they can be grouped together into “frames.” The canvas becomes a sort of map of ideas on which presenters zoom in and out. The presenter can then define the pathway through the map – zooming on objects, text and media in any order they wish. In this sense Prezi describes itself as being “non-linear.” As Prezi moves between ideas, it automatically zooms out, spins the canvas, then zooms back into the next idea. If you are using the free version “freemium” you build the presentation in the web browser and then you must save it on the Prezi web site. To use it in the classroom, you must log in to the Prezi site and use it from there. If you purchase the Prezi Pro license you are able to create the presentation in the browser window, then download it for use without an Internet connection.
The Prezi workspace, as mentioned, is an “infinite” single canvas rather than a series of individual slides. When you add an idea it is essentially the same as creating your first slide. As you add ideas (slides) you create a path that navigates between them by zooming out of the first idea, spinning the canvas and then zooming back in on the second idea.
There are two main tools used for creating Prezis: the Bubble menu, and the Zebra. According to the Prezi website there are only six steps to take, and “in just a few minutes, you’ll be set to create a stunning presentation!” Let us look at those steps.
1. Double-click anywhere to write – By double-clicking the canvas a text box appears into
which you can enter your text
2. Zoom in to develop your ideas – “Once you have added your ideas to the canvas as
text, you can zoom in to these ideas to develop them and add more text.”
3. Use the Zebra for structure and size – When you click on a text box you
see what Prezi calls the Zebra Transformation Tool. Clicking on the
center of the Zebra allows you to move it around the canvas. You can
size and scale the text by clicking on the inner rings, and by clicking on
the outer ring you can rotate the text.
4. Add images from Insert on the Bubble menu – Click the insert bubble
and choose from files, youtube and three shape tools: arrow, thin line,
thick line
5. Create your storyline – the storyline is created by using the sequence tool (highlighted in
yellow in the image below) to move between ideas.
6. Click “Show” on the Bubble menu to present
To see a Prezi in action, please go to: http://prezi.com/explore/. What you will see is everything a good presentation is not. There will be incessant zooming in on ideas, re-zooming to smaller text, spinning to the next idea then zooming in on it, more spinning, zooming, etc., etc. The result has a disorienting effect on many viewers who find the zooming and spinning to be unnecessary and redundant. In the end all Prezi does is zoom in on, and spin between, ideas. Slideshows created by Powerpoint, Keynote or other slideware are far more elegant, and versatile, and If you want to zoom you can, it is not mandatory.
Prezi is also prone to several issues that make it even less desirable as a main presentation ware. Prezi is prone to “clogging” a condition by which Prezi loses your information and does not zoom smoothly. This problem is so common that it bears the name “Prezi Zoomed Away.” Prezi is a zoomable space, where every text, image and object has a size besides a horizontal and vertical position on the canvas. When you enlarge, scale down or move an object these coordinates are recalculated. Unfortunately, there are technical limitations on how many digits these calculated numbers can have.
When a prezi reaches these technical limitations, it starts to behave erratically. This happens when the horizontal or vertical distance between two objects, or the size difference between the smallest and the largest object is too big. Since it is relatively easy to zoom deep into a prezi and place an object there, usually it is the size difference (and not the horizontal or vertical position) which is causing the problem.
There are no such limits or restrictions with slideware, and you will never have your materials disappear and you will not have to go through 7 steps to retrieve it. There are several other troublesome issues with Prezi.
Here is a short list of those issues:
1. Cutting and pasting text in Prezi does not work with keyboard shortcuts in MAC OSX
when using Chrome or Opera
2. Accented characters do not work in Google Chrome
3. It is not possible to edit right to left scripts
4. When uploading images the JPG must be configured a certain way or there will be
problems because Prezi cannot accept progressive JPGs
5. If you click on “Send to back” or “Bring forward” multiple times in a quick sequence,
the object moved may fade away completely. Reloading your prezi solves this
6. URLs (links in the presentation) other than those beginning with http will not get
converted to live links
7. For links to become live, you “sometimes” have to save and refresh the presentation
8. If your content is too small you may experience a jerky movement to the
presentation. To fix this you must go back and resize everything on the canvas.
9. It is currently not possible to load a PDF in Prezi Desktop, the offline editor
10. Creating a prezi in the Prezi Desktop Editor with images that are not supported in
the online editor may be possible. If you upload such a prezi from Prezi Desktop,
these images will not be visible online (a download bubble may show up instead)
You will experience none of these problems when using slideware. I find it incredible how far people will go out of their way to avoid learning to use PowerPoint correctly and effectively. Slideware, when done properly, is far more effective and memorable as a teaching aid than swirling canvases and zooming text.
In conclusion, Prezi does little to create “stunning” presentations. (Perhaps dizzying is a more accurate term). Prezi offers nothing to help you with the content of your presentation and only provides a mechanism to zoom in and away from individual ideas. In other words, Prezi adds a lot of “PowerPoint Phluff” (Tufte 2008) to hide the fact that the material and the presenter are boring. Although Prezi is being mentioned more and more on campus these days, my advice is to steer clear of any program that claims to make your presentations amazing and stunning without addressing the most important feature of the presentation – the content.
For anyone wishing to learn to use PowerPoint properly as an effective teaching aid, please contact me at: jbishop@oid.ucla or call 310-794-9726.
Tufte, Edward. 2008. “Presenting Data and Information: A One-Day Course Taught by Edward Tufte,” at the
Sheraton Hotel Universal City, Los Angeles CA. Aug.12.
How to Create a Portlet in JIRA
1. Sign on to JIRA. (https://jira.ats.ucla.edu/)
2. Turn configure on.

3. Click on Add a Portlet.
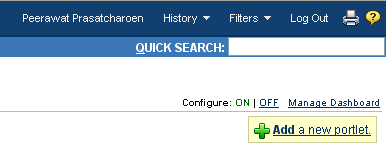
4. Find Show Saved Filter click on it.

5. Click on Add.
6. Click select filter.
7. Pick the filter you want to add to your home page (ie: On PROD, On STAGE, On TEST, etc)
8. Click on Save.
9. After saving, turn configure off.

Travel Express and Java
As of May 20, 2011 Travel Express or at least the System Administration Tool/Geac 6.5 Expense Managment only runs on Java versions 6 Update 15 and lower. Older versions of the Java Runtime Environment can be downloaded here.
I’m looking for a database program to keep track of my contacts, meetings, and to be a “tickler” system to remind me of various due dates
Outlook is pretty good. :) Actually, I’ve not seen anything that I like better than Outlook (in an Exchange environment). And it syncs to just about every device. I’d love to hear of something better at task management though!
hmm…that’s a thought. Simple and cheap. What about Access or Bento? Anyone out there use either one?
what about Evernote? Has anyone tried this before? http://www.evernote.com/about/home.php
It seems that there’s a Business Contact Manager plug-in for Outlook that may be helpful. Otherwise, the default Outlook features may be adequate including the ability to link Contacts to Tasks, set Reminders (some of which work on my smartphone), and broad use of Categories for tagging.
Google Apps ecosystem can do such, Gmail and Google Calendar. Two www.LearnIT.ucla.edu modules on the topic covering things as:
The two modules:
- Gmail Essential Training, http://www.lynda.com/Gmail-tutorials/Essential-Training/77961-2.html
- Google Calendar Essential Training, http://www.lynda.com/Google-Calendar-tutorials/Essential-Training/77959-2.html
Crashplan Backup and Restore
Crashplan Backup Guide
17 May 2011, v0.1
Brian J. Won – brian@ssc.ucla.edu
Using Crashplan 3.03, Windows 7 Enterprise x64 SP1
For local backup on to an external harddisk directly connected to the user’s computer.
Backup:
After downloading and installing Crashplan from http://www.crashplan.com/
Important: go to Windows Explorer/My Computer, pick out your backup drive, and create a folder for backups on it. Crashplan does not let you create new folders within its interface at that step.
First, from the Backup Screen in Crashplan, select which folders to backup. Go down to Files, which will display your current account username (in this case, test), and hit “change.”
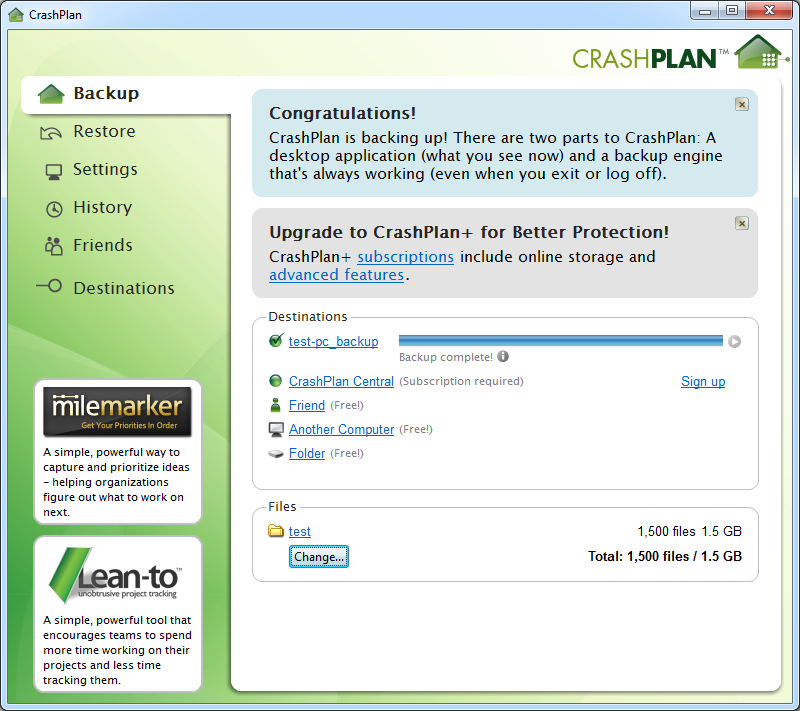
By default, Crashplan will backup the entire user directory. The user may check and uncheck additional directories as you see fit.
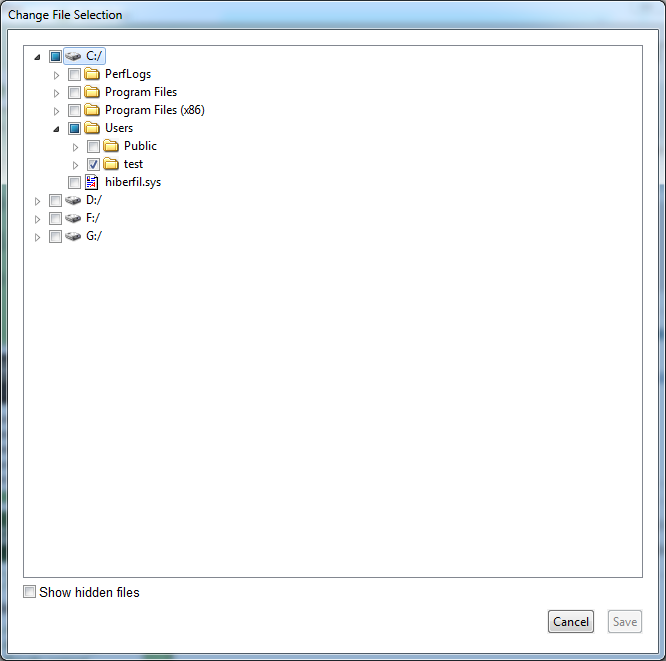
The user should remember that the arrows can expand the directory tree and allow more specific choices to be made.

After saving changes, hit save. (or “cancel” if no changes were made).
Crashplan will then go back to the Backup screen and we can start the backup process.
We will pick Folder as a destination.
Select a destination folder under How to back up to a local folder, step 1:
Then pick a directory—in this particular example, the external disk we are using is drive G: (Seagate FreeAgent GoFlex). It will probably be different on the end-user’s system.
Important: go to Windows Explorer/My Computer, pick out your backup drive, and create a folder for backups on it. Crashplan does not let you create new folders within its interface at this step.
We will select test-pc_backup on drive G: that we created previously, then hit Ok.
The backup screen will reappear confirming your selection.
Then go to step 3—Select a Folder and click Start Backup.
This will start the backup process.
After (or before) a backup is done, the Settings can be changed as needed.
Most users will be interested in going to the Backup tab under this menu (Settings) to adjust the backup frequency.
Crashplan by default backs up once a day, everyday (Always run), this can be changed to a more or less frequent periodic backup/scheduled backup under Backup will run to Between specified times, which can be adjusted as needed by the user.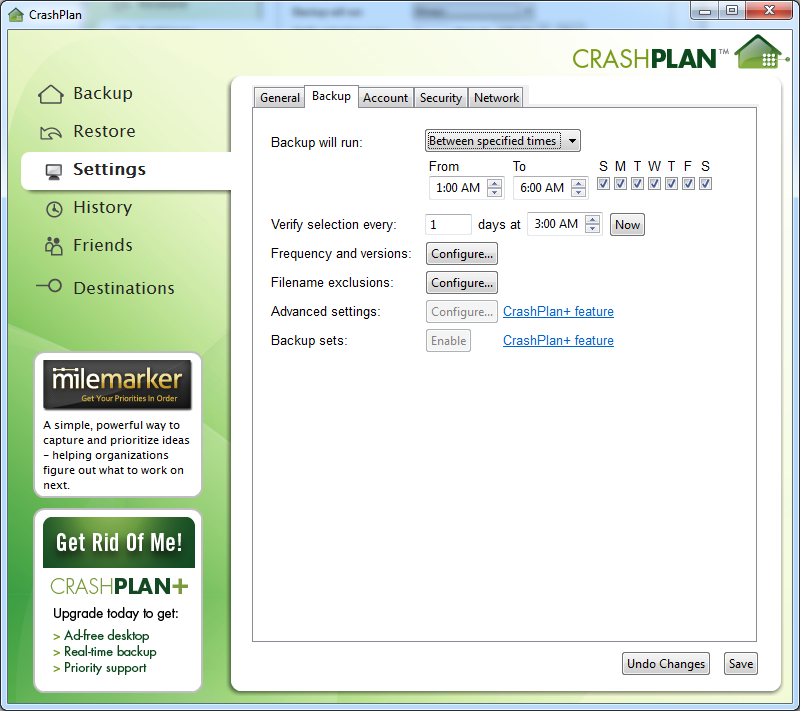
Additional adjustments can be made as necessary.
To force a backup to run now, at the Backup screen next to destinations, hit the “play” button next to backup – below the blue progress bar will change from “next backup in xx hours” to Backup now, and it will run a backup now.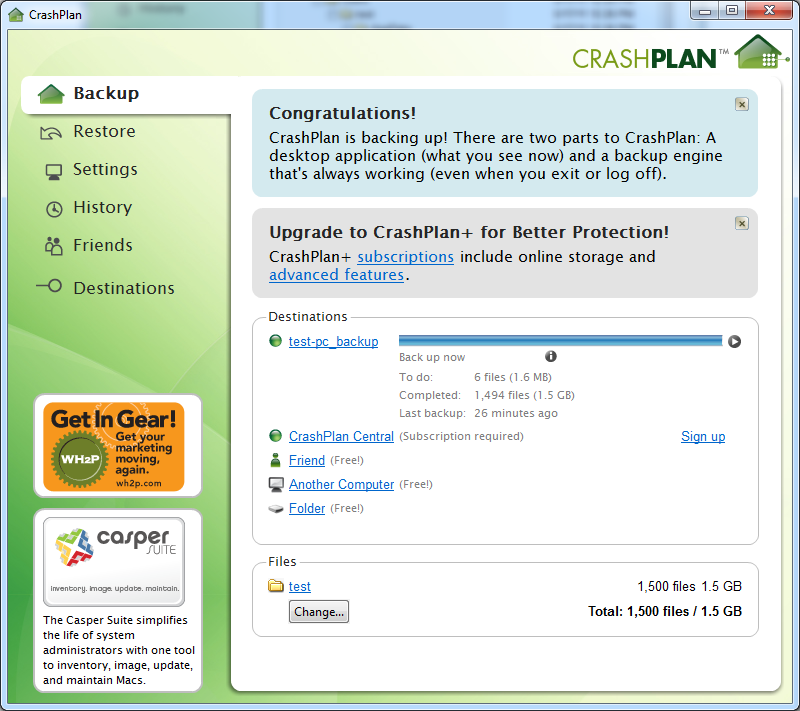
Vs. the normal screen after a backup has been run and it is waiting idle.
Restore:
To access restore, click on the Restore selection on the left-hand menu.
If you wish to select a specific file, go to the top right search box Find files to restore by name or select from list below and type in your desired file—in this case, originalnotes.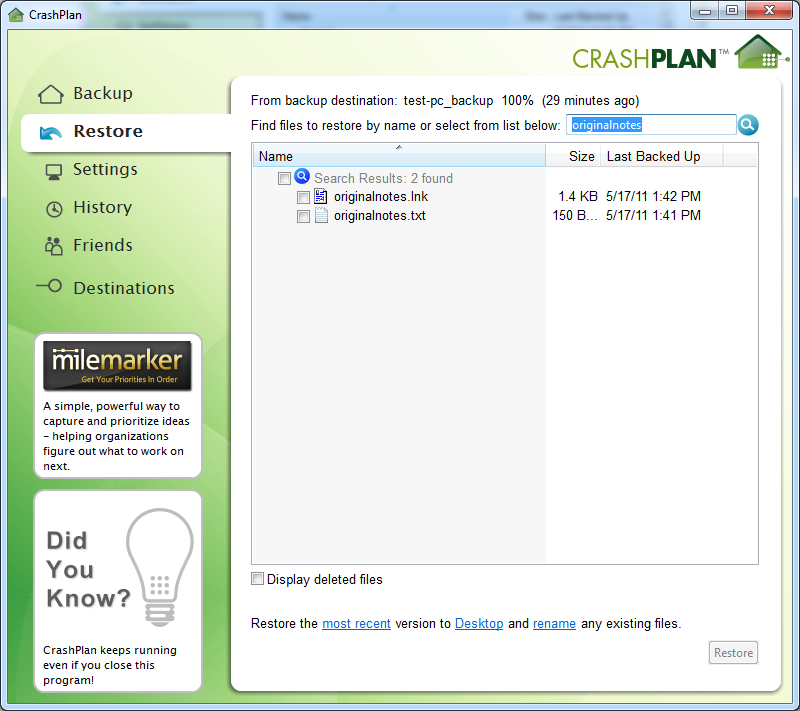
Check the desired file and by default, it will restore it to the Desktop. You may click on the Desktop link at the bottom to change where to restore to— to the desktop, the original location, or to a desired folder.
Default: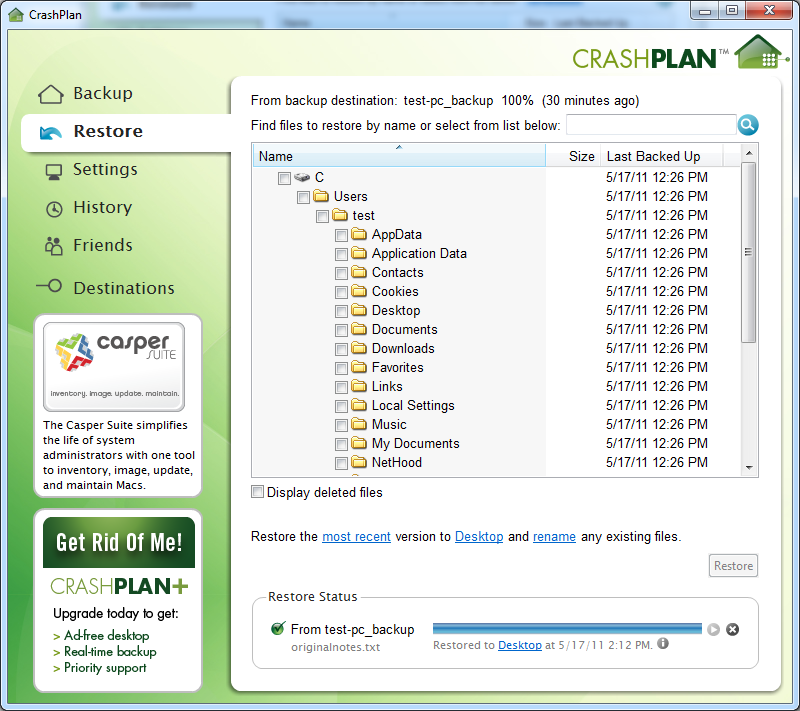
After clicking, twice, on the desktop in blue: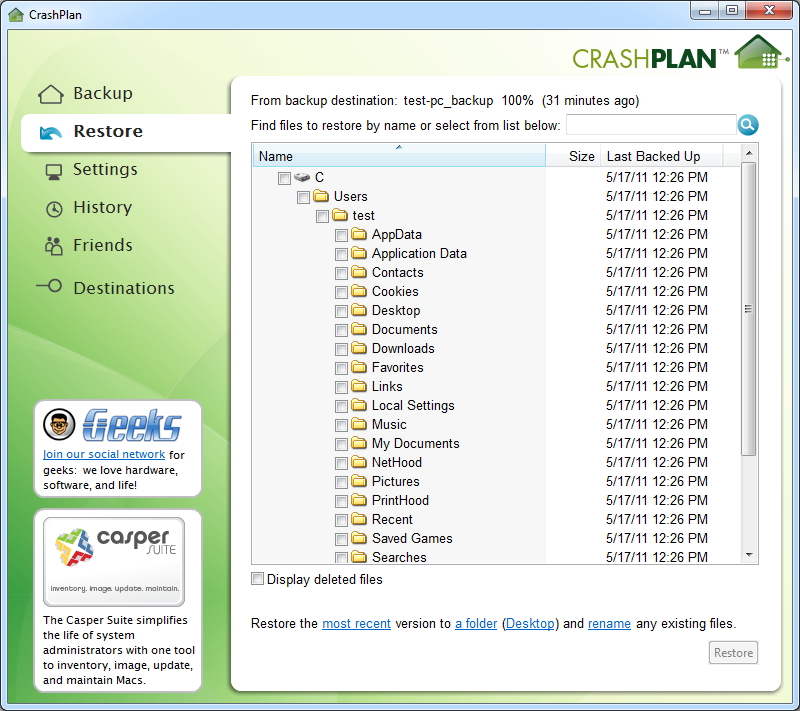
Then hit Restore when done.
It will then report done at the bottom of the screen.
Your restore is now complete.
Tools for managing multiple passwords
Passwords should not be stored in cleartext
Local
- 1Password – https://agilebits.com/onepassword
- IronKey – https://www.ironkey.com/news/verisign-ironkey-otp-password-service
- KeyPass – http://keepass.info/
- PasswordSafe – http://passwordsafe.sourceforge.net/
-
Hosted
- LastPass – Best used with two-factor authentication, such as YubiKey, Google Authenticator, or other option (http://twofactorauth.org/)
- Note: There always a possibility of a breach of the vendor
-
Password managers heavily rely upon a long and strong master password. One suggestion is to use an algorithm to create unique passwords based upon the site name or some other criteria. A tactic to consider is the use of a pass phrase versus password, as such emphasizes the length. Some good examples can be found at:
- http://www.dc214.org/notes/july2005/Mnemonic-Password-Algorithms.pdf
- http://www.seas.ucla.edu/security/passwords.html
Utilizing Dropbox as working directory for Stata (Mac)
When working with Stata, you must set a working directory for your programs.
Typing cd tells you what the current working directory is. This directory is where Stata
will look for data to use or change or save a log file. By default, Stata uses
/Users/username/Documents or /Users/username/Applications/Stata. You can change the working directory by using the command cd or Go to File ➡ Change Working Directory.
Most likely, when choosing to use Dropbox as your default working directory, you are accessing data files from various machines. If you are manually editing your programs to access data from your Dropbox directory, you can prepend the path with ~\Dropbox\ and then your folder path, ex. ~\Dropbox\YourDataFolder . This will ensure that the working directory will always look for your Dropbox installation folder path, regardless of your home path name (since they may differ between machines).
Evernote Tips
After using Evernote for 14 months, I finally asked some colleagues if it was possible to search for the checkmark boxes in a note. It turns out that, and some amazing things are very easy. Here’s the tip of the iceberg, and some links to more tips and the programmers documention with more details.
- How to get your Kindle highlights into Evernote
- search Evernote for unchecked boxes with “todo:false” You can tell you got it right because the small "Viewed … " text to changes to show “with todo filters Unfinished.” “todo:true:* will find the notes with checked boxes.
- search of resource:image/* will find notes with images in them.
- Right clicking text lets you encrypt it if you want, complete with pass phrase. Then you can search “encryption: to find notes with encrypted text.
- http://nerdgap.com/31-evernote-tricks-for-newbies-who-want-to-be-ninjas/ has some very useful searches.
- http://evernote.tumblr.com/ – I particularly like the tip using screenshots of complicated settings screens, for future reference.
- Evernote Resources You May Not Know About
- Evernote API Overview – Search Grammar is where we found the checkmarks search.
- Taggy for Evernote Taggy makes your Evernote tags function as you want them to: hierarchically.
- A Google search on “Evernote tricks” will find a lot more.
Timeline Generators
Please add comments if you are familiar with any of these timeline creation tools.
- Tiki-Toki: Online Timeline Creation Tool Timeline Creation Tool by Casey Miles | Posted March 31st, 2014 and http://www.tiki-toki.com/
- The Thinking Behind WNYC’s Vertical Timeline
- http://propublica.github.io/timeline-setter/
- http://www.dipity.com/ – also written up several years ago in https://kb.ucla.edu/link/1076
- http://timeglider.com/ (formerly Mnemograph) – Flash based, but they’re moving to Javascript. Also written up several years ago in https://kb.ucla.edu/link/1076
- http://xtimeline.com/ – “is a free web-based timeline. Easily create and share timelines with pictures and videos.”
- http://www.timetoast.com/ – Timetoast allows people to create interactive timelines, which they can share anywhere on the web. Anyone can join Timetoast and start creating and sharing their own timelines, all they need is a valid email address. It’s completely free!
- http://www.timelinemaker.com/ $$, 7 day free trial – WIndows only.
- http://www.beedocs.com/ $$, Mac, iOS – 3D timelines, web publishing, fullscreen presentation, multimedia integration
- Timeline.js – open source Javascript Timeline creator
- Using Google Spreadsheets with Timelines – Duke University Libraries – April 17, 2014
- This blog post http://www.mguhlin.org/2011/09/timeline-web-sites.html was the start of this kb article.
- http://www.squidoo.com/how-to-make-a-timeline – has a nice list of resources
SlideShare
Uploaded presentations can be embedded into a webpage. The service tracks views of the presentation. The service has free and pay versions.
see also,
http://www.slideshare.net/about
Software for ethnographic and qualitative data analysis
Dedoose is a software tool developed by UCLA faculty, Thomas Weisner and Eli Lieber for use in mixed methods research. It is web based, allows for collaboration, has a suite of visual tools, supports text analysis and the datasets can be imported and exported to other qualitative software, Excel, or other statistical packages. There is a 30 day free trial version available.
Here is a link to a webinar demo held at UCLA’s Young Research Library on July 24, 2013. Presenter is Eli Lieber.
To sign up for a (free) upcoming demo,
see this Dedoose blog …
Does UCLA have a campus-wide license for an online survey product?
Yes, please visit https://softwarecentral.ucla.edu/survey-monkey for information on the SurveyMonkey agreement at UCLA.
Are you aware of any departments that have electronic evaluation systems for lectures? Does any one have an existing system that can be purchased or
I don’t know if any departments are enrolled in the service, but I have used the free trial version of Survey on the Spot with great results. It works well on all smartphone platforms and its reporting features are fairly robust. www.surveyonthespot.com
If you’re looking for a generic “audience response” system there are several in use on campus including hardware solutions from Interwrite and Turning Point. There’s also a software only solution from http://www.polleverywhere.com. I’ve additionally heard that someone is writing a polling solution for our CCLE system that should be ready very soon.
Some faculty have expressed an interest in common use systems such as iClicker: http://www.iclicker.com/products/webclicker/. At this time, am not aware of a department which has made a commitment to integration it to their LMS.
UCLA’s OID offers options for incorporating technology into instruction: http://www.oid.ucla.edu/faculty/iti
EndNote at UCLA
UCLA Biomedical Library has references and specialists available for Endnote at:
Endnote is available for UCLA departments at Software Central:
https://softwarecentral.ucla.edu/endnote
Mekentosj Papers
Called the “iTunes for PDFs”, Mekentosj Papers has been found to be useful for organizing PDFs for researchers. Formerly Mac OS X only, it is now available for Windows and on iOS devices —
What programs can I use if I want to communicate through video conferencing?
There are many options available for you including, but not limited to, Elluminate, Skype, Lync, and Live Meeting.
Elluminate: Elluminate Live! was a web conferencing program developed by Elluminate Inc. Elluminate “rented out” virtual rooms or vSpaces where virtual schools and businesses can hold classes and meetings. Elluminate has been acquired by Blackboard Inc. While Elluminate is primarily designed and used for educational purposes, it is also used by training organizations and corporations. K12 Inc., Desire2learn and several other schools and businesses use Elluminate live as part of their curriculum and meetings.
For more information on Elluminate, refer to: http://www.elluminate.com/Services/Training/Elluminate_Live!/?id=418
Skype: Skype is a proprietary Voice over IP service and software application. The service allows users to communicate with peers by voice using a microphone, video by using a webcam, and instant messaging over the Internet. Phone calls may be placed to recipients on the traditional telephone networks. Calls to other users within the Skype service are free of charge, while calls to landline telephones and mobile phones are charged via a debit-based user account system. Skype has also become popular for its additional features, including file transfer, and videoconferencing. Competitors include SIP and H.323-based services, such as Linphone and Google Voice.
For more information on Skype, refer to: http://beta.skype.com/en/
Lync: Microsoft Lync is an enterprise-ready unified communications platform. Lync connects people everywhere, on Windows 8 and other devices, as part of their everyday productivity experience. Lync provides a consistent, single client experience for presence, instant messaging, voice, video and a great meeting experience. Lync 2013 users can connect to anyone on Skype, enabling rich communication with hundreds of millions of people around the world
For more information on Lync, refer to: http://lync.microsoft.com/en-us/what-is-lync/Pages/what-is-lync.aspx
Live Meeting: Microsoft Office Live Meeting is a commercial subscription-based web conferencing service operated by Microsoft. Live Meeting includes software that is installed on client PCs, and uses a central server for all clients to connect to. Currently, those servers are under the control of Microsoft, however, Microsoft also produces Microsoft Lync Server , which is an enterprise conferencing server product.
For more information on Live Meeting, refer to: http://office.microsoft.com/en-us/live-meeting-help/demo-microsoft-office-live-meeting-HA010240323.aspx
Are there any convenient scheduling/meeting coordination programs available for us to use?
Some popular online resources available are Doodle, Outlook, and Evite.
Doodle: Doodle radically simplifies the process of scheduling events, whether they’re board or team meetings, dinners with friends, reunions, weekend trips, or anything else. This smart assistant saves time for millions of people worldwide, and in the end, it brings people together. Doodle is free and doesn’t require registration by either the initiator or the participants of a meeting poll.
More information on Doodle can be found here: http://www.doodle.com/about/about.html
Outlook: More exciting and connected than ever before, Microsoft Outlook 2010 is the most powerful way to stay in touch with the people and information you care about most. See updates from your favorite social networking sites right within Outlook, and enjoy improved email and calendaring tools that make your world more fluid, organized, and fun. You can conveniently and efficiently schedule appointments, share your calendar, and manage your schedules.
More information on Outlook can be found here: http://office.microsoft.com/en-us/outlook/
Evite: With more than 22 million registered users and over 25,000 invitations sent each hour, Evite is the top online invitation and social planning website. Evite invitations are free to send and receive. So you save on stamps — and trees — while freeing yourself up from keeping lists and making phone calls to organize your events.
More information on Evite can be found here: http://new.evite.com/content/about_us
Is there any way for me to convert pdf/audio files into a searchable text?
You can easily do this on Adobe Acrobat. Follow these steps:
1. Open Adobe Acrobat. Go to the “File” in the drop down menu and select “Open.” Open the desired PDF file that you intend to have indexed and searched and select “Open.” Make sure that the first page displays in the Adobe Acrobat work area.
2. Go to “Tools” on the right and choose the option that says “Recognize Text.”
3. Select PDF Output Style “Searchable Image” and click “OK.”
4. Hit “Save” and save the document once the conversion process is complete. Save the PDF as a new name so you have both new and original documents available.
As a reference, you can also look here: http://www.ehow.com/how_5084267_make-pdf-searchable.html
PDF files that have audio or video files mixed into them cannot be converted to have recognizable text. It is not possible to guarantee an exact reproducibility with embedded objects such as movie or sound.
For a more detailed explanation, refer to: http://www.epa.gov/records/faqs/pdfa.htm#q8
Are there any general instructions for using general software tools?
Both www.learnit.ucla.edu and www.kb.ucla.edu both have a wide variety of guides and tips for diverse collection of general software tools.
When seeking an overview of a software package in Lynda.com, try the “fundamentals” or “up and running” version of the software. By skimming the course module’s table of contents, one can quickly ascertain the level of the material and its applicability. Related, a module’s transcript tab can allow one to peruse a module’s exact dialog to target on precise sections of interest. Two monitor arrangements can be handy to view a video on one monitor, and extra information (transcript or program the module concerns) on the second monitor.
capture data from PDF tables
Upload a PDF, get back tabular CSV data.
EDIT:
I just used this application with great success to convert the data from old instructor evaluations into csv form. It took some jury-rigging to get the output into the form that I wanted for this reason: Tabula only selects one table at a time, so if you want info from multiple tables on the same sheet, you need to do that yourself. I stitched my data together using R and it seems to be doing okay. Feel free to email me with questions: eitan.arom@gmail.com
Microsoft Sysinternals
Microsoft’s SysInternals suite is a great, free addition to an IT Professionals USB flash drive—
These tools are in continued development, and include features for Windows 8. The author is fond of saying (& accurately), “When in doubt, use process explorer”
More information—
- Mark Russinovich’s blog, http://blogs.technet.com/b/markrussinovich/
- Windows Sysinternals Administrator’s Reference, http://technet.microsoft.com/en-us/sysinternals/hh290819
- Windows Internals, http://technet.microsoft.com/en-us/sysinternals/bb963901 .(not the same as the above, rather a great book on a different topic area)
Two Free Academic Software Tools
1) Docear (pronounced “dog ear”)
Academic Literature Suite of Applications
“Docear is the complete solution for searching, organizing and creating academic literature such as assignments, theses, books and research papers. Just as an office suite bundles the applications essential to the professional environment, Docear integrates the essential applications of a researcher. These include an academic search engine, file manager, PDF reader*, mind mapping and note taking tool, reference manager, paper drafting, and word processor*. While the components are integrated, they are still replaceable so that if you don’t like Docear’s reference manager, you can simply use another one.
“Docear has two unique features that no other currently available tools offer. Firstly, Docear lets you import PDF annotations (including bookmarks, comments and highlighted text). This allows a document’s most important information can be easily organized. If more information is required than the bookmark or comment itself provides, Docear can open the PDF on the page the bookmarks points to. Secondly, all information is structured in a mind map which we believe to be much more effective and efficient than a simple list or social tags.”
2) Freeplane
Free mind mapping and knowledge management software
http://freeplane.sourceforge.net/wiki/index.php/Main_Page
“Freeplane is a free and open source software application that supports thinking, sharing information and getting things done at work, in school and at home. The core of the software is tools for mind mapping (also known as concept mapping or information mapping) and using mapped information. Freeplane runs on any operating system that has a current version of Java installed. It can be run locally or portably from removable storage like a USB drive.”
These separate projects have tight integration: http://www.docear.org/faqs/what-has-docear-to-do-with-freeplane/
Has anyone tried Xerte Online Tookit?
Has anyone tried “Xerte Online Toolkit?”http://www.xerte.org.uk/ It’s a tool for making it easy to create learning objects in either Flash or HTML. “Xerte allows authors with no programming skills to build elearning activities through a simple browser interface. Authors use a wizard to enter text, media and interactions into a range of template pages. There are nine types of interaction available including multiple choice, gap fill, open answer, hotspot and diagram labelling.” – Xerte – Maybe something you’re looking for…
- http://www.kineo.com/authoring-tools/xerte-open-source-tool-review.html
- http://blogs.it.ox.ac.uk/adamweblearn/2011/08/xerte-content-authoring-tool/
- Moodle Xerte Online Toolkit Links Filter
I’m wondering if it’s worth installing on a server and testing it out. Any comments?
Instructor unable to play HD video purchased from iTunes
Scenario
An instructor has their laptop connected to a projector in a classroom, and tried to play an HD video that they purchased in iTunes. iTunes displays an error saying it cannot play the video.
Why
The video purchased in iTunes is subject to HDCP – High-bandwidth Digital Content Protection. Basically it’s an encrypted signal to prevent copying, and every piece of of equipment in the signal chain must support HDCP for it to work. If iTunes and the OS detect that you are using a non-digital (eg. VGA connection) or non-compatible equipment, it won’t play the video.
This KB article explains more: support.apple.com/kb/ts3354
Solutions
Download the SD version
Although HD is usually downloaded first, the individual should be able to look back at their purchase history and download the SD version. Instructions on accessing your purchase history: support.apple.com/kb/HT2727
Similarly, a DVD-ripped copy will also be playable.
Purchase an HD Fury dongle
While expensive ($250+), this piece of equipment will convert a digital signal into analog (HDMI to VGA) and allow the video to play. It simply needs to be connected between the computer and the video cable.
www.hdfury.com/
Upgrade your room
Buy new equipment and redesign your space to be all-digital so that all pieces of the signal chain support HDCP.
f.Lux, Auto Brightness
Quoting, " f.lux makes your computer screen look like the room you’re in, all the time. When the sun sets, it makes your computer look like your indoor lights. In the morning, it makes things look like sunlight again."
“Tell f.lux what kind of lighting you have, and where you live. Then forget about it. f.lux will do the rest, automatically.”
It is available for Windows, OS X, and Linux. There are not official iOS or Android versions at this time.
Free download at—
There are additional possibilities with Philips’ hue lighting and *ambilight*—
Reviews—
- http://lifehacker.com/f-lux-updates-with-new-color-modes-temperatures-hotke-1446295425
- http://sleepjunkies.com/tools/flux-app-review/
- http://www.pcworld.com/article/2056895/review-f-lux-makes-your-computer-usable-at-night.html
- http://www.pcworld.com/article/238611/flux.html
Android alternatives—
- Twilight, https://play.google.com/store/apps/details?id=com.urbandroid.lux
- Lux, https://play.google.com/store/apps/details?id=com.vito.lux&hl=en
- Eazy Eyez, https://play.google.com/store/apps/details?id=com.palmerin.easyeyezfree
SensusAccess
DCP/OIT has licensed the SensusAccess online file conversion service. Sensus combines a series of file conversion tools & unifies them in a web form interface. Specify the source file & desired format, and it emails you the result. It converts one file at a time, but the process is quite painless.
It does the “traditional” file conversions: Word to PDF, PDF to HTML or ePub, etc. They also include many choices that can help disability access: synthetic speech, braille output formats, optical character recognition of JPG and some other image types. It doesn’t remove the need to author accessible documents, but gives end users a great deal of flexibility to read in their preferred format. Some routines, like the PDF>Word module make intelligent guesses and (usually) produce documents with improved structure.
We are gauging interest in making this a long term viable service for the campus. If there are a bunch of files and want them all in the same format, or would like to listen to some documents during your commute, please give it a try. Or, come up with a use case we haven’t thought of!
Find out more and start converting files at:
See also:
- Sample best practices, http://scribe.stanford.edu/bestpractices.html
- Homepage, http://www.sensusaccess.com/
(Thanks to Patrick Burke for this! )
Phone App Desktop Emulators
Anyone familiar with desktop emulators for smartphone apps? These are applications to run phone apps on your desktop. I need to preview a smartphone app that our office might adopt that is unfortunately only compatible an Android Phone or the newest iPhone, which I don’t have. Anyone familiar with desktop emulators?
How to use Zoom Web Conferencing
Zoom can be used for online meetings, webinars, and other web conferencing activities.
Anyone can join a Zoom meeting without an account, so it is ideal for connecting with participants outside of UCLA. A Zoom meeting supports up to 50 participants. The Zoom software client is available on major operating systems and mobile devices, and can be run from off-campus.
UCLA’s Zoom account is managed by the Office of Instructional Development (OID). The software is incorporated into CCLE, and any department that is part of CCLE (including the Library) can utilize it.
Support for and access to Blackboard Collaborate has ended on June 30, 2015. Its replacement is Zoom.
- Go to https://ucla.zoom.us and click on Sign In
- Authenticate with your UCLA Logon ID
“I already signed in with my UCLA email”
If you try to sign into Zoom at the UCLA site (link above) and receive an error message to ‘Contact Software Central to enable your account’, that means you have likely created an account at the Zoom public instance and need to terminate that account before you can create your account on the UCLA Zoom instance. Please terminate your account from the Zoom public instance (directions below) and then you will be able to create an account at the UCLA instance.
https://support.zoom.us/hc/en-us/articles/201363243-How-Do-I-Terminate-My-Account
How do I access Turnitin submissions from Summer 2016 and before?
If you used Turnitin through MyUCLA, you will need to login to https://turnitin.com/ to access old student submissions. UCLA has created Turnitin accounts for instructors so you will be able to access Turnitin.com by resetting your password.
- Go to https://turnitin.com/
- Click Login in the upper right hand corner
- Click Reset password
- Enter your UCLA email address (official email address in the UCLA directory) and last name
- Answer the Security question or click Forgot your answer? to receive a password reset email.
- Once you have reset your password, log into Turnitin.com to view your past assignments.
(thanks to Peter Blase for directing me to this information)
What is rclone?
Rclone is a command line program to sync files and directories to and from various cloud file sharing and cloud storage services. At this time, Box.com is not a supported service, but a feature request has been submitted (link from 04/2015).
see also, http://rclone.org/ and https://github.com/ncw/rclone
How to login to Skype for Business 2016 for Windows
This document provides a step-by-step set of instructions on how to login to Skype for Business 2016 for Windows as provided by IT Services, Enterprise Messaging.
- Enter your email address and click Sign In.
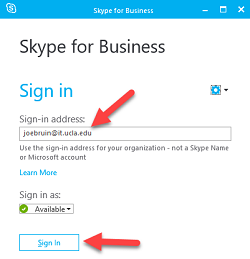
- Click Sign in with another account.
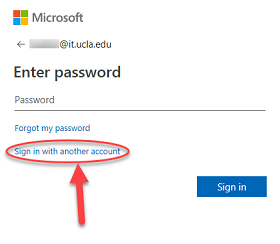
- Enter your email (Enterprise Messaging) username, use the format “username @ ad.ucla.edu”. This is the same username you would use to access Outlook Web.
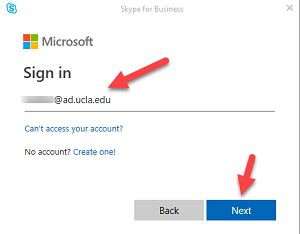
- You may see a dialog box similar to the one below. Select Work or school account.
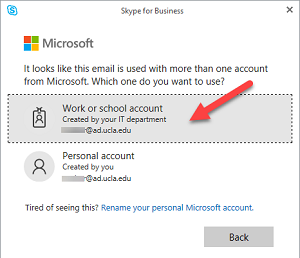
- Wait while the browser loads the login windows.
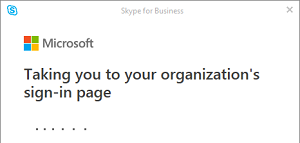
- Enter your email (Enterprise Messaging) password and click Sign in.
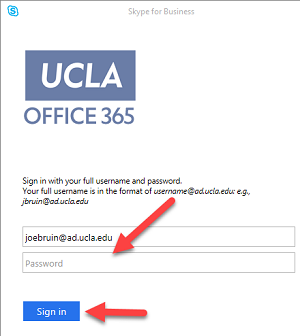
You are now ready to use Skype for Business 2016 for Windows.
NOTE: If you receive a dialog box similar to the one below, check the Always trust this server box and click Connect.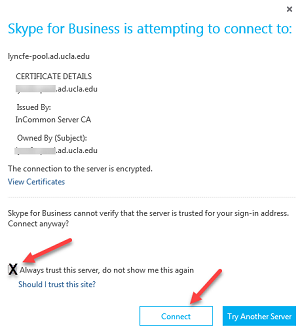
Error 45054 iTunes Store
If you get -45054 error in the iTunes Store, on either a MAC or PC
https://support.apple.com/en-us/HT204649?&cid=acs::fm-itunes_HT204649
Also, you may need to log into www.apple.com and delete the signed in device that is having the problem.
Transfer Zoom Recording to UCLA Box
To download Zoom Recordings and Upload to UCLA Box please follow these steps below:
1) If you will have to login into UCLA Zoom Video Conferencing. Use the link below and login using your UCLA Logon.
2)Once logged in. On the menu to the left hand side click on Recordings.
3)Once there click on the recording you would like to download and click on More and then Download.
4)Once downloaded to your computer. Save it where you would like to store it on your personal computer.
In order to upload your Recordings to UCLA Box please follow these steps:
1) Login into UCLA Box. Use the following link and sign in with your UCLA Logon .
2) Once logged into UCLA Box. At the top right corner click on Upload.
3)You will have an option of uploading a File or Folder. Click on your preference.
4)Located your downloaded recording that you saved to your computer. Once you upload the file (or Folder) it will appear in the Files or Folder section.
5)If you want your recording to be uploaded to a specific location select the folder and follow the same instructions as shown above. For instance, I want to save my recording in Michelle’s Files Folder, so I click on it. And followed the same instructions.
6)The link below will show you how to share files uploaded onto UCLA Box.
https://support.box.com/hc/en-us/articles/360043697094-Creating-Shared-Links
Reference:
https://support.zoom.us/hc/en-us/articles/203741855-Cloud-recording