Development
- What are Moodle context levels?
- Moodle MySQL Queries
- UCLA Git Walkthrough (for Moodle)
- UCLA Moodle Workflow Analysis (using GIT)
- Moodle needs certain Shibboleth attributes
- Common Moodle programming mistakes
- Moodle 2.0 Development
What are Moodle context levels?
If you’re programming with Moodle, you probably want to stick with the APIs, but if you’re trying to track things down through the database, knowing what context levels mean can be important. Until my colleague from CLICC found this, all I know was that 50 meant course.
Defined, at least in Moodle 1.7, in /moodle/lib/accesslib.php
// context definitionsdefine('CONTEXT_SYSTEM', 10);define('CONTEXT_PERSONAL', 20);define('CONTEXT_USER', 30);define('CONTEXT_COURSECAT', 40);define('CONTEXT_COURSE', 50);define('CONTEXT_GROUP', 60);define('CONTEXT_MODULE', 70);define('CONTEXT_BLOCK', 80);
Moodle MySQL Queries
Here are some Moodle MySQL Queries that are useful for generating activity statistics:
From http://blog.weber.k12.ut.us/jreeve/some-simple-mysql-queries-for-moodle/
Find the most popular activities:
SELECT COUNT(l.id) hits, moduleFROM mdl_log lWHERE module != 'login' AND module != 'course' AND module != 'role'GROUP BY moduleORDER BY hits DESC
Find the most active users over the past 7 days
(change the “604800″ to the number of the appropriate number of seconds if you want to adjust this interval):
SELECT COUNT(l.id) hits, l.userid, u.username, u.firstname, u.lastnameFROM mdl_log l INNER JOIN mdl_user u ON l.userid = u.idWHERE l.time > UNIX_TIMESTAMP(NOW()) - 604800GROUP BY l.useridORDER BY hits DESC
Find the most active courses:
(You may need to change the second line to FROM mdl_log l INNER JOIN mdl_course c ON l.course = c.id AND c.id != ‘1′ to omit home page hits)
SELECT COUNT(l.id) hits, l.course courseId, c.fullname coursenameFROM mdl_log l INNER JOIN mdl_course c ON l.course = c.idGROUP BY courseIdORDER BY hits DESC
Some custom written ones:
Find the number of resources per course:
SELECT COUNT(l.id) count, l.course, c.fullname coursenameFROM mdl_resource l INNER JOIN mdl_course c on l.course = c.idGROUP BY courseORDER BY count DESC
UCLA Git Walkthrough (for Moodle)
Very basic guide how to get GIT set up on Windows or OSX.
Documentation:
Setting up the Environment
- Windows: http://help.github.com/win-set-up-git/
- Mac OSX: http://help.github.com/mac-set-up-git/
- Linux: http://help.github.com/linux-set-up-git/
Configure Line Endings
- In order to avoid issues with line endings when cloning on to Windows machines, follow the directions here: Dealing with line endings
Setting up Git global configs
Before making commits, it is useful to add your name and email:
git config --global user.name "Your Name"git config --global user.email "Your email address"
Set these git config settings
git config --global push.default current // only push current branch to remote and set upstreamgit config --global core.ignorecase false // makes sure that git is case sensitivegit config --global pull.rebase true // rebase by default when doing a pull
If you want to connect to github without SSH you need a token:
- Follow the directions here: Email and Github Tokens
Setting up your Github repository:
Clone the repository
- With Github Token
- git clone https://YOUR_GITHUB_USERNAME@github.com/ucla/moodle.git ./YOUR_LOCAL_MOODLE_FOLDER/
- With SSH RSA-key
- git clone git@github.com:ucla/moodle.git ./YOUR_LOCAL_MOODLE_FOLDER/
Work on a new feature/patch/test/update
Our workflow is similar to the workflow mentioned in this article: http://nvie.com/posts/a-successful-git-branching-model/
Name your git branch using our naming convention:
- type/jira ticket-short description
- The type, for now, should either be:
- feature (something that has never existed before or an improvement to a current feature)
- patch (a bug fix, can either come from internal or external sources)
- tests (For Behat or PHPunit only branches)
- update (reserved for core Moodle version and external plugin updates)
git checkout mastergit pull origin mastergit submodule update --init --recursivegit checkout -b <type>/CCLE-<JIRA ticket number>-<shorten ticket description>- Repeat the following steps as necessary:
- change file(s) -git commit -a -m "CCLE-#### - A useful short comment summarizing what you did."
git push -u origin <branch_name>- Merge task onto TEST
git checkout developmentgit pull origin developmentgit merge --no-ff <branch_name>git push origin development
If you run into merge conflicts when merging to development or it’s been a while since your development branch has been branched off of master, run the following command on your working branch:
git rebase origin/master
At this point, there could be more than one feature that is being tested! Once a feature/patch has passed testing, then merge it to the rc branch.
Creating rc branch
git checkout mastergit checkout -b origin/<release_number>-rc- Now merge in several branches with fixes/features that passed review
git merge --no-ff <feature_branch_name>git push -u origin <release_number>-rc
Once rc is ready, merge it into master so it can go to prod
The numbers M.m.v.rr should be the same as the numbers for the RC branch.
git checkout mastergit merge --no-ff origin/<release_number>-rc -m "Release <release_number>-gm: Description of what was in this release/use JIRA version description"git push origin mastergit tag M.m.v.rr-gm -m "Release <release_number>-gm: Description of what was in this release/use JIRA version description"git push origin M.m.v.rr-gm
Start On PROD machine ONLY
The numbers M.m.v.rr should be the same as the numbers for the RC branch.
git fetchgit checkout M.m.v.rr-gmgit submodule update --init --recursive- Validate things are working…
- Finished with release cycle!
End On PROD machine ONLY
Performing a hotpatch
git checkout mastergit pullgit merge --no-ff patch/<branch_name>git push origin
Start On PROD machine ONLY
Make sure you are root user and in the Moodle directory
git fetchgit checkout master && git pullgit submodule update --init --recursive- Validate things are working…
- Finished with hotpatch
End On PROD machine ONLY
Upgrading to new version from Moodle.org
git checkout -b update/M.m.vgit remote add core https://github.com/moodle/moodle.gitgit fetch core-
git merge -Xtheirs -m "CCLE-<ticket> - Upgrade to Moodle M.m.v" <version tag>- Might first want to try without the -Xtheirs if upgrading between minor versions.
- Resolve conflicts
git add <conflicted_file>- If needed, continue the merge
- Finish the pull.
- Push to development, test on TEST, push to STAGE then release on PROD.
- Be sure to notate the new RC and GM tags with the updated Moodle version M.m.v.00
- To upgrade to a major release of Moodle, follow the instructions in this guide: http://tjhunt.blogspot.com/2014/01/moving-ou-moodle-code-to-moodle-261.html
UCLA Moodle Workflow Analysis (using GIT)
Summary
Here at UCLA, the team that runs the main campus Moodle installation has decided to move to GIT from SVN. The primary motivation behind this move is that Moodle.org is moving to GIT. It makes sense for us to move because GIT is a distributed VCS, and it will make it easier to stay in sync with Moodle.org.
One hurdle that we are trying to overcome is how to fit GIT into our internal development workflow. As it stands now, SVN nicely fits into our workflow. Let me explain why.
In our workflow, we create feature branches to do most of our development. After the feature is completed, it gets “svn merged” into a develop/test branch. At any given time the resources we have doing testing and development fluctuate. There is no guarantee that the first feature merged into the develop branch will get tested first.
Finally, once a feature is tested, it gets “svn merged” into stage. Testing happens once again there, again in no given order. Once testing is completed on the feature it gets merged into the master, or trunk branch.
SVN merge works nicely because when you do the merge, you can choose either a specific revision, or a range of revisions.
Now onto GIT. GIT appears to work a bit differently. When you do a merge in GIT, you are merging the entire history of a branch up to the changeset specified. GIT does not support merges in the same way that SVN does. I’ve come up with a list of 5 options to accomplish the same, or similar thing in GIT.
Option 2 represents GIT’s equivalent to what we currently do in SVN, but I’m not looking to copy our SVN workflow just for the sake of keeping things the same. I want to do things the “right” way in GIT.
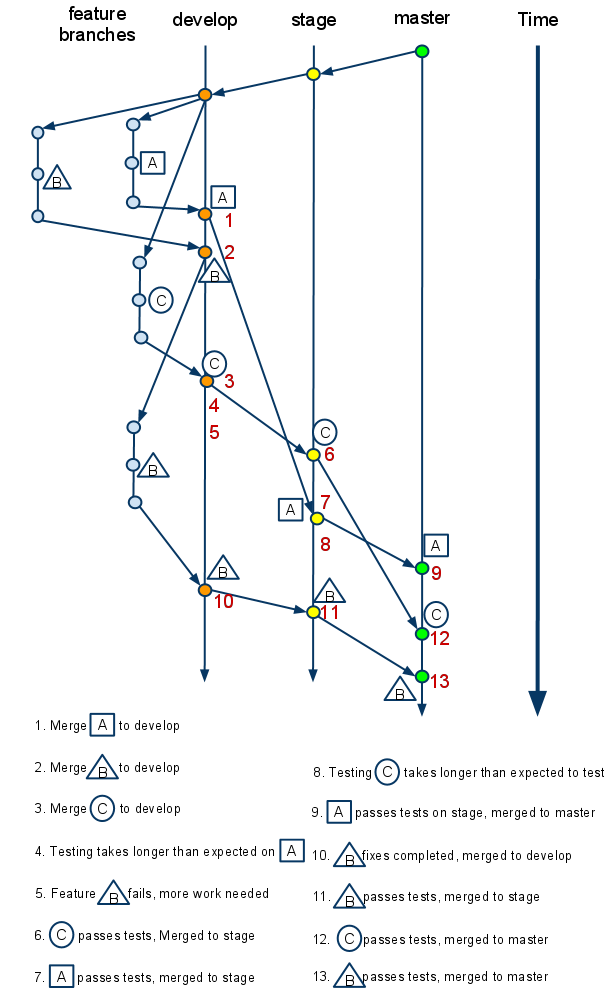
Proposed workflows to accomplish what is illustrated in the diagram:
Option 1
git merge from a feature branch to develop, then from feature branch to stage, and finally from feature branch to master as the feature graduates its way through the workflow.
What the history would look like on develop/stage/master:
*a37658bd merged in public/private| \| *a7785c10 another granular commit| *7f545188 added more text| *2bca593b added some text to a file|/Option 2
git merge —squash from the feature branch to develop. Subsequent merges can then be cherry-picked as the feature graduates its way through the workflow. This would be the GIT equivalent to SVN merges.
What the history would look like on develop/stage/master:
*4d4a0da8 merged …*a37658bd merged in public/private*d9484311 merged …Option 3
git merge cherry-pick each revision from the feature branch to develop. Then continue to use git cherry-pick to merge features to stage and master as they graduate through the workflow.
What the history would look like on develop/stage/master:
*4d4a0da8 did something else unrelated to the below code*a7785c10 another granular commit*7f545188 added more text*2bca593b added some text to a file*4d4a0da8 did another thing unrelated to the above codeOption 4
Do normal merges from feature branch to develop. Then to merge something to stage:
git branch tempbranch {last commit desired}git rebase --onto stage {earliest commit that you DON'T want included as part of the merge} tempbranch
What the history would look like on develop/stage/master:
*4d4a0da8 did something else unrelated to the below code*a7785c10 another granular commit*7f545188 added more text*2bca593b added some text to a file*4d4a0da8 did another thing unrelated to the above codeOption 5
Do normal merges from feature branch to develop. Then to merge something to stage:
git format-patch {earliest commit that you DON'T want included as part of the merge}..{last commit you want merged}git am *.patch
What the history would look like on develop/stage/master:
*4d4a0da8 did something else unrelated to the below code*a7785c10 another granular commit*7f545188 added more text*2bca593b added some text to a file*4d4a0da8 did another thing unrelated to the above codeNotes and observations
Option1
- Merges always originate from each feature branch
- Feature branches stick around in origin for a long time
Option2
- Squash all merges into a single commit.
- This is exactly how SVN behaves.
- Feature branches would have to stay around forever unless you are ok with losing all the history contained within them.
Option3
- Feature branches are merged like normal, then you do cherry-picks to merge features up as they graduate to the next branch.
- History is preserved in the first develop branch, but then gets lost in the subsequent branches.
- This would be come nearly impossible to manage as you are having to manually cherry pick potentially hundreds of commits each time a feature or two pass on one of the earlier branches.
Option4
- History of the branching is preserved on TEST
- Once things get merged to stage and master, all history gets flattened
- A little more complicated to perform basic merges than some of the other methods.
Option5
- Results in same history as option 4
- Little easier to use than option 4
Appendix: Full list of commands
Option 1 Option2 Option3 1.
- git checkout develop
- git merge A
- git branch -d A
- git push origin develop
- git checkout develop
- git merge —squash A
- git commit -m “merging feature A to develop”
- git branch -d A
- git push origin develop
- git checkout develop
- git merge A
- git branch -d A
- git push origin develop
2.
- git checkout develop
- git merge B
- git branch -d B
- git push origin develop
- git checkout develop
- git merge —squash B
- git commit -m “merging feature B to develop”
- git branch -d B
- git push origin develop
- git checkout develop
- git merge B
- git branch -d B
- git push origin develop
3.
- git checkout develop
- git merge C
- git branch -d C
- git push origin develop
- git checkout develop
- git merge —squash C
- git commit -m “merging feature C to develop”
- git branch -d C
- git push origin develop
- git checkout develop
- git merge C
- git branch -d C
- git push origin develop
5.
- git checkout develop
- git checkout B
start working on code
- git checkout develop
- git checkout B
start working on code
- git checkout develop
- git checkout B
start working on code
6.
- git checkout stage
- git merge C
- git push origin stage
- git checkout stage
- git cherry-pick {revision from 3}
- git commit -m “merging feature C to stage”
- git push origin stage
- git checkout stage
- git cherry-pick {revisions in C}
- git commit -m “merging feature C to stage”
- git push origin stage
7.
- git checkout stage
- git merge A
- git push origin stage
- git checkout stage
- git cherry-pick {revision from 1}
- git commit -m “merging feature A to stage”
- git push origin stage
- git checkout stage
- git cherry-pick {revisions in A}
- git commit -m “merging feature A to stage”
- git push origin stage
9.
- git checkout master
- git merge A
- git push origin master
- git push origin :A
- git checkout master
- git cherry-pick {revision from 7}
- git commit -m “merging feature A to master”
- git push origin master
- git checkout master
- ggit cherry-pick {revisions in A}
- git commit -m “merging feature A to master”
- git push origin master
10.
- git checkout develop
- git merge B
- git branch -d B
- git push origin develop
- git checkout develop
- git merge —squash B
- git commit -m “merging feature B to develop”
- git branch -d B
- git push origin develop
- git checkout develop
- git merge —squash B
- git commit -m “merging feature B to develop”
- git branch -d B
- git push origin develop
11.
- git checkout stage
- git merge B
- git push origin stage
- git checkout stage
- git cherry-pick {revision from 10}
- git commit -m “merging feature B to stage”
- git push origin stage
- git checkout stage
- git cherry-pick {revisions in B}
- git commit -m “merging feature B to stage”
- git push origin stage
12.
- git checkout master
- git merge C
- git push origin master
- git push origin :C
- git checkout master
- git cherry-pick {revision from 6}
- git commit -m “merging feature C to master”
- git push origin master
- git checkout master
- git cherry-pick {revisions in C}
- git commit -m “merging feature C to master”
- git push origin master
13.
- git checkout master
- git merge B
- git push origin master
- git push origin :B
- git checkout master
- git cherry-pick {revision from 11}
- git commit -m “merging feature C to master”
- git push origin master
- git checkout master
- git cherry-pick {revisions in B}
- git commit -m “merging feature C to master”
- git push origin master
Moodle needs certain Shibboleth attributes
This article may be very old. Please reach out to local support staff if you have questions.
When logging into the http://ccle.ucla.edu (Moodle) site through the UCLA Login option, if you see one of these error messages, see the explanation and instructions below:
Official Email Missing
Moodle needs certain Shibboleth attributes which are not present in your case. The attributes are: ‘HTTP_SHIB_EDUPERSONPPN’ (‘yourID@ucla.edu’), ‘HTTP_SHIB_GIVENNAME’ (‘YOURFIRSTNAME’), ‘HTTP_SHIB_CN’ (‘YOURLASTNAME’) and ‘HTTP_SHIB_UCLAOFFICIALEMAIL’ (’’)
Please contact the webmaster of this server or your Identity Provider. You are not logged in. (comes from moodle/root/auth/shibboleth/lib.php)
In this case, everything is there except the UCLAOFFICIALEMAIL. Unfortunately, Moodle requires that.
What to do for users who get this message: If nothing appears in the parentheses after ‘HTTP_SHIB_UCLAOFFICIALEMAIL’, that means the system does not currently have an official email for the student. The student should logon to www.ursa.ucla.edu to setup his/her official email designation. It may then take until the next day for that information to propagate to the system and allow you to log in.
Note to students concurrently enrolled through UCLA Extension: If your UCLA Logon ID is not working, the problem may be that CTS hasn’t activated your Bruin Online (BOL) services because they have not yet received your enrollment paperwork proving your UCLA affiliation. Once your BOL services are activated, your @ucla.edu address will get pushed into the Enterprise Directory, which will enable successful login to CCLE through Shibbleth using UCLA Logon ID. To expedite this happening, the student should visit the BOL help desk with their concurrent enrollment paperwork (including the receipt showing concurrent enrollment) to have all services activated.
Here is an explanation from AIS of the issues involved:
“There are several emails which qualify to be official email – BOL email, Work email, LAW school email, Anderson school email, Other Student email (URSA).
When one of the emails is first added we designate that as Official automatically, because there would be no other eligible email for this person at that time. Subsequently there may be other eligible emails added to the entry. When an email is deleted by the authority (for ex, Anderson school sends a delete request for Anderson email for a person) we check if Anderson email has been designated as Official for this entry; If yes we delete Official also. It does not make sense to keep it Official when the underlying source email itself is deleted.
Next time an email is added to the entry, if there is already another email, we won’t designate the newly added email as Official simply because we wouldn’t know which one to designate as Official.
URSA allows students and former students to re-designate their official email. For employees who were never students here, we were expecting ODMP to provide the functionality, which hasn’t come along so far.
The solution in that case if you are an employee is to contact AIS and ask them to help you designate one of your email addresses as UCLAOFFICIALEMAIL.
Moodle didn’t receive any user attributes
You seem to be Shibboleth authenticated but Moodle didn’t receive any user attributes. Please check that your Identity Provider releases the necessary attributes (‘HTTP_SHIB_EDUPERSONPPN’, ‘HTTP_SHIB_GIVENNAME’, ‘HTTP_SHIB_CN’ and ‘HTTP_SHIB_UCLAOFFICIALEMAIL’) to the Service Provider Moodle is running on or inform the webmaster of this server. (comes from moodle/root/auth/shibboleth/index.php )
In this case, there could be three explanations that we know of:
- System-wide problem. If no one else can login, the UCLA Shibboleth Identity Provider could be down or having problems. Contact AIS Help Desk at 66951.
- Individual problem. We’ve had one case where someone’s BOL EMAIL address was not in the correct Enterprise Directory database and until it was added, this person couldn’t log into CCLE. Contact Warren Leung at IT Services, if you suspect this could be the problem.
- Intermittent problem. If you usually can login to CCLE and now you can’t, try closing your web browser completely (to clear the cookies) and then try logging in again. Or, try a different machine.
A test process to capture information at each step and send to the appropriate people.
See also: Authentication Expired
Common Moodle programming mistakes
Feel free to add to this list.
Error handling of get_records() and its variants (e.g. get_records_sql())
A common usage of these functions is like this:
$records = get_records() or my_error_handler();...
The problem is, if the query is executed successfully but matches no records, get_records() returns false, the same as if there is an error. That triggers the error handling mechanism and might not be what you want.
Since get_records() and its variants cannot tell between these two cases, use them only if you are intentionally not checking for error or if you want to treat the case of no matched record as an error too. For other cases, use get_recordset() or its variants. These functions return an ADORecordSet object (if there is no error) or false (if there is an error).
Result of get_records_sql()
get_records_sql() returns an array if there is at least one record. The function uses the first column of the record set as the key of the result array.
If the SELECT statement only queries one table, and the first column is a primary key (e.g. id), the function returns every row in the record set without problem. If the SELECT joins multiple tables, or if the first column in the statement is not a primary, the function only returns some of the rows in the record set, i.e. for each unique value of the first column, only the last record containing that value. In such case, you should use get_recordset_sql() instead. get_recordset_sql() returns an array that has consecutive keys starting with 0, and the keys are independent of the values in the result set. This way, all records are present in the result array.
Moodle 2.0 Development
Since Moodle 2.0 brings major changes, this page extends on https://kb.ucla.edu/link/766 with specific Moodle 2.0 docs and other resources.
- http://docs.moodle.org/en/Moodle_2.0_release_notes
- http://docs.moodle.org/en/Development:Migrating_contrib_code_to_2.0
- http://docs.moodle.org/en/Moodle_2.0_release_notes#For_developers:_API_changes
- http://docs.moodle.org/en/Category:Moodle_2.0 (there are a total of 275 pages here)
- http://docs.moodle.org/en/Development:Using_jQuery_with_Moodle_2.0
- http://docs.moodle.org/en/Administration_FAQ (many useful tips)
- http://docs.moodle.org/en/Development:New_enrolments_in_2.0 (huge changes)
Jira and Moodle 2.0 Development, document, Jira_Setup_for_Moodle_2_v3.doc
Deprecated
- PARAM_CLEAN eliminated
- no longer using stripslashes or addslashes