CCLE and Moodle
- Development
- Moodle needs certain Shibboleth attributes
- What are Moodle context levels?
- Moodle MySQL Queries
- Common Moodle programming mistakes
- Moodle 2.0 Development
- UCLA Git Walkthrough (for Moodle)
- UCLA Moodle Workflow Analysis (using GIT)
- Social Science ClassWeb Roster Emails
- Moodle auto-login guests
- How to hide a site in Moodle
- What happens in Moodle if two people try and edit a wiki page at the same time?
- Does Moodle allow multiple login options at same time, e.g. Shibboleth and another?
- Moodle auto-enrollment techniques
- Can I change the format of a Moodle site after it's been created and used awhile?
- In Moodle what are the advantages of the different site formats?
- In Moodle is teacher the right default role when you want everyone in the site to be able to have full write privileges?
- In Moodle can we make a site show up publicly, but not show its list of members?
- In Moodle, how do we direct people to hidden sites?
- In Moodle can we have nested metacourses?
- Does Moodle let us store local data about students and classes?
- In a Moodle wiki is there a way to double space a numeric list?
- In Moodle what controls the assignment of role to a new subscriber?
- Does Moodle scan files for viruses on upload?
- Interviews with Martin Dougiamas, Moodle Architect
- How do you use Shibboleth in Moodle?
- Moodle online Help for end-users
- In Moodle, can we add our own Resource Parameters to be sent along with links?
- What does the Email activated option in Edit profile do?
- Can Moodle store uploaded files on another server?
- Are Moodle blog entries limited to a certain length?
- In Moodle, where are the summaries going when you create a web page?
- How to have students "Sign" an Agreement before using Moodle
- Good sources of information on Moodle
- How to add a syllabus to Moodle
- How to add a link to a Moodle class site
- How to add and use a discussion board in Moodle
- What is Moodle Reset Function?
- How do Forums (aka Discussion Boards) function in Moodle?
- Posting Syllabus for Social Sciences Class Websites
- How to share a file among multiple courses in Moodle?
- In Moodle, why is a particular page blank or incomplete?
- Questions about developing content for UCLA's CCLE Website
- How to Change 'Topic Outline' on Class Page
- How to Remove Icons in Moodle
- In Moodle, which roles appear as participants and which don't?
- How are files handled in Moodle, WebCT and Sakai?
- Problems with Moodle non-UCLA Special Cases
- How do I add someone as a guest to a Moodle site?
- Creating CCLE (Moodle) logins for users without a UCLA Common Login ID
- How to create a new UCLA user in Moodle
- Creating a checklist for students in Moodle
- Can Moodle display course summary in the outline?
- Custom Moodle Format to Display Class Title and Summary
- How to Create a New Course Format in Moodle
- Moodle Switch Roles Tool
- How do I login as a user in Moodle (for troubleshooting purposes)?
- Modifying Roles in Moodle
- Finding the correct SRS # for class website creation requests:
- Moodle Meta/Child Site Gradebook Behavior
- Blogs in Moodle
- CCLE-Moodle: What to try if users can't login
- Student enrollment and Add/drop behaviors in CCLE/Moodle
- Moodle Language Settings
- Moodle Groups and Force Subscription
- Moodle Auto-Linking
- Moodle Quiz cutoff time
- Utilities to convert CSV files or tab-delimited text to Moodle Glossary XML
- Import resources/activities from one Moodle site to another
- Creating Groups in Moodle
- Using Forums
- How to enable access to your CCLE/Moodle course
- How to remove participants from a Moodle course site
- Requesting a collaboration site on Moodle (CCLE)
- Turn off Global Events
- Special Cases Login
- Finding the Moodle Version
- Creating CCLE (Moodle) logins for Senior Scholars
- How to put Video Furnace movies on a CCLE/Moodle site
- Requesting a test site on Moodle (CCLE)
- Requesting a course site on Moodle (CCLE)
- Instructional sites vs. collaborative sites on CCLE/Moodle
- How to Add a Wimba Voice Tool in CCLE Moodle
- How to crosslist two already existing courses on CCLE
- How to Change your CCLE Moodle Email Address
- backup/restore a Moodle course
- How to sort students in moodle grade
- Crosslisting pre-existing courses
- How do I reuse a questionnaire from another quarter in CCLE Moodle?
- CCLE (Moodle) Status Page
- How to clean up postings in the Moodle forums
- How are wikis being used in teaching?
- Moodle Books
- Missing Announcements or News Forum in MOODLE
- How is the Turnitin service activated and TA access granted in MyUCLA?
- Moodle module backup and restore
- Restoring a Moodle Collaboration Site from Archive to Production
- I am installing Moodle locally on a Mac. When I go to run install.php I get error 500 message.
- How do I Add a Student to a Cross-listed Course?
- Deploying CCLE Front Page Activities Based on Role
- Useful Things Instructors can do with Roles
- Conversion Tools for Moodle Quiz (or Glossary)
- Using the Database module to create an image gallery in CCLE/Moodle
- Notes on restoring deleted Moodle Forum
- Using the text editor in CCLE with iOS devices (iPad, iPhone)
- Moodle Keynote - July 2011
- How to use the Javascript template in Moodles Database Activity Module
- Alternate Colors in Table in a Database Activity
- Linking database information through JavaScript template in Moodle Database Activity Module
- Does CCLE have a survey function? If so, where in CCLE can I find the function? Thanks!
- CCLE Feedback activity
- Two Turnitin IDs for one user
- How to accept late submissions into a PeerMark assignment in Turnitin
Development
Moodle needs certain Shibboleth attributes
This article may be very old. Please reach out to local support staff if you have questions.
When logging into the http://ccle.ucla.edu (Moodle) site through the UCLA Login option, if you see one of these error messages, see the explanation and instructions below:
Official Email Missing
Moodle needs certain Shibboleth attributes which are not present in your case. The attributes are: ‘HTTP_SHIB_EDUPERSONPPN’ (‘yourID@ucla.edu’), ‘HTTP_SHIB_GIVENNAME’ (‘YOURFIRSTNAME’), ‘HTTP_SHIB_CN’ (‘YOURLASTNAME’) and ‘HTTP_SHIB_UCLAOFFICIALEMAIL’ (’’)
Please contact the webmaster of this server or your Identity Provider. You are not logged in. (comes from moodle/root/auth/shibboleth/lib.php)
In this case, everything is there except the UCLAOFFICIALEMAIL. Unfortunately, Moodle requires that.
What to do for users who get this message: If nothing appears in the parentheses after ‘HTTP_SHIB_UCLAOFFICIALEMAIL’, that means the system does not currently have an official email for the student. The student should logon to www.ursa.ucla.edu to setup his/her official email designation. It may then take until the next day for that information to propagate to the system and allow you to log in.
Note to students concurrently enrolled through UCLA Extension: If your UCLA Logon ID is not working, the problem may be that CTS hasn’t activated your Bruin Online (BOL) services because they have not yet received your enrollment paperwork proving your UCLA affiliation. Once your BOL services are activated, your @ucla.edu address will get pushed into the Enterprise Directory, which will enable successful login to CCLE through Shibbleth using UCLA Logon ID. To expedite this happening, the student should visit the BOL help desk with their concurrent enrollment paperwork (including the receipt showing concurrent enrollment) to have all services activated.
Here is an explanation from AIS of the issues involved:
“There are several emails which qualify to be official email – BOL email, Work email, LAW school email, Anderson school email, Other Student email (URSA).
When one of the emails is first added we designate that as Official automatically, because there would be no other eligible email for this person at that time. Subsequently there may be other eligible emails added to the entry. When an email is deleted by the authority (for ex, Anderson school sends a delete request for Anderson email for a person) we check if Anderson email has been designated as Official for this entry; If yes we delete Official also. It does not make sense to keep it Official when the underlying source email itself is deleted.
Next time an email is added to the entry, if there is already another email, we won’t designate the newly added email as Official simply because we wouldn’t know which one to designate as Official.
URSA allows students and former students to re-designate their official email. For employees who were never students here, we were expecting ODMP to provide the functionality, which hasn’t come along so far.
The solution in that case if you are an employee is to contact AIS and ask them to help you designate one of your email addresses as UCLAOFFICIALEMAIL.
Moodle didn’t receive any user attributes
You seem to be Shibboleth authenticated but Moodle didn’t receive any user attributes. Please check that your Identity Provider releases the necessary attributes (‘HTTP_SHIB_EDUPERSONPPN’, ‘HTTP_SHIB_GIVENNAME’, ‘HTTP_SHIB_CN’ and ‘HTTP_SHIB_UCLAOFFICIALEMAIL’) to the Service Provider Moodle is running on or inform the webmaster of this server. (comes from moodle/root/auth/shibboleth/index.php )
In this case, there could be three explanations that we know of:
- System-wide problem. If no one else can login, the UCLA Shibboleth Identity Provider could be down or having problems. Contact AIS Help Desk at 66951.
- Individual problem. We’ve had one case where someone’s BOL EMAIL address was not in the correct Enterprise Directory database and until it was added, this person couldn’t log into CCLE. Contact Warren Leung at IT Services, if you suspect this could be the problem.
- Intermittent problem. If you usually can login to CCLE and now you can’t, try closing your web browser completely (to clear the cookies) and then try logging in again. Or, try a different machine.
A test process to capture information at each step and send to the appropriate people.
See also: Authentication Expired
What are Moodle context levels?
If you’re programming with Moodle, you probably want to stick with the APIs, but if you’re trying to track things down through the database, knowing what context levels mean can be important. Until my colleague from CLICC found this, all I know was that 50 meant course.
Defined, at least in Moodle 1.7, in /moodle/lib/accesslib.php
// context definitionsdefine('CONTEXT_SYSTEM', 10);define('CONTEXT_PERSONAL', 20);define('CONTEXT_USER', 30);define('CONTEXT_COURSECAT', 40);define('CONTEXT_COURSE', 50);define('CONTEXT_GROUP', 60);define('CONTEXT_MODULE', 70);define('CONTEXT_BLOCK', 80);
Moodle MySQL Queries
Here are some Moodle MySQL Queries that are useful for generating activity statistics:
From http://blog.weber.k12.ut.us/jreeve/some-simple-mysql-queries-for-moodle/
Find the most popular activities:
SELECT COUNT(l.id) hits, moduleFROM mdl_log lWHERE module != 'login' AND module != 'course' AND module != 'role'GROUP BY moduleORDER BY hits DESC
Find the most active users over the past 7 days
(change the “604800″ to the number of the appropriate number of seconds if you want to adjust this interval):
SELECT COUNT(l.id) hits, l.userid, u.username, u.firstname, u.lastnameFROM mdl_log l INNER JOIN mdl_user u ON l.userid = u.idWHERE l.time > UNIX_TIMESTAMP(NOW()) - 604800GROUP BY l.useridORDER BY hits DESC
Find the most active courses:
(You may need to change the second line to FROM mdl_log l INNER JOIN mdl_course c ON l.course = c.id AND c.id != ‘1′ to omit home page hits)
SELECT COUNT(l.id) hits, l.course courseId, c.fullname coursenameFROM mdl_log l INNER JOIN mdl_course c ON l.course = c.idGROUP BY courseIdORDER BY hits DESC
Some custom written ones:
Find the number of resources per course:
SELECT COUNT(l.id) count, l.course, c.fullname coursenameFROM mdl_resource l INNER JOIN mdl_course c on l.course = c.idGROUP BY courseORDER BY count DESC
Common Moodle programming mistakes
Feel free to add to this list.
Error handling of get_records() and its variants (e.g. get_records_sql())
A common usage of these functions is like this:
$records = get_records() or my_error_handler();...
The problem is, if the query is executed successfully but matches no records, get_records() returns false, the same as if there is an error. That triggers the error handling mechanism and might not be what you want.
Since get_records() and its variants cannot tell between these two cases, use them only if you are intentionally not checking for error or if you want to treat the case of no matched record as an error too. For other cases, use get_recordset() or its variants. These functions return an ADORecordSet object (if there is no error) or false (if there is an error).
Result of get_records_sql()
get_records_sql() returns an array if there is at least one record. The function uses the first column of the record set as the key of the result array.
If the SELECT statement only queries one table, and the first column is a primary key (e.g. id), the function returns every row in the record set without problem. If the SELECT joins multiple tables, or if the first column in the statement is not a primary, the function only returns some of the rows in the record set, i.e. for each unique value of the first column, only the last record containing that value. In such case, you should use get_recordset_sql() instead. get_recordset_sql() returns an array that has consecutive keys starting with 0, and the keys are independent of the values in the result set. This way, all records are present in the result array.
Moodle 2.0 Development
Since Moodle 2.0 brings major changes, this page extends on https://kb.ucla.edu/link/766 with specific Moodle 2.0 docs and other resources.
- http://docs.moodle.org/en/Moodle_2.0_release_notes
- http://docs.moodle.org/en/Development:Migrating_contrib_code_to_2.0
- http://docs.moodle.org/en/Moodle_2.0_release_notes#For_developers:_API_changes
- http://docs.moodle.org/en/Category:Moodle_2.0 (there are a total of 275 pages here)
- http://docs.moodle.org/en/Development:Using_jQuery_with_Moodle_2.0
- http://docs.moodle.org/en/Administration_FAQ (many useful tips)
- http://docs.moodle.org/en/Development:New_enrolments_in_2.0 (huge changes)
Jira and Moodle 2.0 Development, document, Jira_Setup_for_Moodle_2_v3.doc
Deprecated
- PARAM_CLEAN eliminated
- no longer using stripslashes or addslashes
UCLA Git Walkthrough (for Moodle)
Very basic guide how to get GIT set up on Windows or OSX.
Documentation:
Setting up the Environment
- Windows: http://help.github.com/win-set-up-git/
- Mac OSX: http://help.github.com/mac-set-up-git/
- Linux: http://help.github.com/linux-set-up-git/
Configure Line Endings
- In order to avoid issues with line endings when cloning on to Windows machines, follow the directions here: Dealing with line endings
Setting up Git global configs
Before making commits, it is useful to add your name and email:
git config --global user.name "Your Name"git config --global user.email "Your email address"
Set these git config settings
git config --global push.default current // only push current branch to remote and set upstreamgit config --global core.ignorecase false // makes sure that git is case sensitivegit config --global pull.rebase true // rebase by default when doing a pull
If you want to connect to github without SSH you need a token:
- Follow the directions here: Email and Github Tokens
Setting up your Github repository:
Clone the repository
- With Github Token
- git clone https://YOUR_GITHUB_USERNAME@github.com/ucla/moodle.git ./YOUR_LOCAL_MOODLE_FOLDER/
- With SSH RSA-key
- git clone git@github.com:ucla/moodle.git ./YOUR_LOCAL_MOODLE_FOLDER/
Work on a new feature/patch/test/update
Our workflow is similar to the workflow mentioned in this article: http://nvie.com/posts/a-successful-git-branching-model/
Name your git branch using our naming convention:
- type/jira ticket-short description
- The type, for now, should either be:
- feature (something that has never existed before or an improvement to a current feature)
- patch (a bug fix, can either come from internal or external sources)
- tests (For Behat or PHPunit only branches)
- update (reserved for core Moodle version and external plugin updates)
git checkout mastergit pull origin mastergit submodule update --init --recursivegit checkout -b <type>/CCLE-<JIRA ticket number>-<shorten ticket description>- Repeat the following steps as necessary:
- change file(s) -git commit -a -m "CCLE-#### - A useful short comment summarizing what you did."
git push -u origin <branch_name>- Merge task onto TEST
git checkout developmentgit pull origin developmentgit merge --no-ff <branch_name>git push origin development
If you run into merge conflicts when merging to development or it’s been a while since your development branch has been branched off of master, run the following command on your working branch:
git rebase origin/master
At this point, there could be more than one feature that is being tested! Once a feature/patch has passed testing, then merge it to the rc branch.
Creating rc branch
git checkout mastergit checkout -b origin/<release_number>-rc- Now merge in several branches with fixes/features that passed review
git merge --no-ff <feature_branch_name>git push -u origin <release_number>-rc
Once rc is ready, merge it into master so it can go to prod
The numbers M.m.v.rr should be the same as the numbers for the RC branch.
git checkout mastergit merge --no-ff origin/<release_number>-rc -m "Release <release_number>-gm: Description of what was in this release/use JIRA version description"git push origin mastergit tag M.m.v.rr-gm -m "Release <release_number>-gm: Description of what was in this release/use JIRA version description"git push origin M.m.v.rr-gm
Start On PROD machine ONLY
The numbers M.m.v.rr should be the same as the numbers for the RC branch.
git fetchgit checkout M.m.v.rr-gmgit submodule update --init --recursive- Validate things are working…
- Finished with release cycle!
End On PROD machine ONLY
Performing a hotpatch
git checkout mastergit pullgit merge --no-ff patch/<branch_name>git push origin
Start On PROD machine ONLY
Make sure you are root user and in the Moodle directory
git fetchgit checkout master && git pullgit submodule update --init --recursive- Validate things are working…
- Finished with hotpatch
End On PROD machine ONLY
Upgrading to new version from Moodle.org
git checkout -b update/M.m.vgit remote add core https://github.com/moodle/moodle.gitgit fetch core-
git merge -Xtheirs -m "CCLE-<ticket> - Upgrade to Moodle M.m.v" <version tag>- Might first want to try without the -Xtheirs if upgrading between minor versions.
- Resolve conflicts
git add <conflicted_file>- If needed, continue the merge
- Finish the pull.
- Push to development, test on TEST, push to STAGE then release on PROD.
- Be sure to notate the new RC and GM tags with the updated Moodle version M.m.v.00
- To upgrade to a major release of Moodle, follow the instructions in this guide: http://tjhunt.blogspot.com/2014/01/moving-ou-moodle-code-to-moodle-261.html
UCLA Moodle Workflow Analysis (using GIT)
Summary
Here at UCLA, the team that runs the main campus Moodle installation has decided to move to GIT from SVN. The primary motivation behind this move is that Moodle.org is moving to GIT. It makes sense for us to move because GIT is a distributed VCS, and it will make it easier to stay in sync with Moodle.org.
One hurdle that we are trying to overcome is how to fit GIT into our internal development workflow. As it stands now, SVN nicely fits into our workflow. Let me explain why.
In our workflow, we create feature branches to do most of our development. After the feature is completed, it gets “svn merged” into a develop/test branch. At any given time the resources we have doing testing and development fluctuate. There is no guarantee that the first feature merged into the develop branch will get tested first.
Finally, once a feature is tested, it gets “svn merged” into stage. Testing happens once again there, again in no given order. Once testing is completed on the feature it gets merged into the master, or trunk branch.
SVN merge works nicely because when you do the merge, you can choose either a specific revision, or a range of revisions.
Now onto GIT. GIT appears to work a bit differently. When you do a merge in GIT, you are merging the entire history of a branch up to the changeset specified. GIT does not support merges in the same way that SVN does. I’ve come up with a list of 5 options to accomplish the same, or similar thing in GIT.
Option 2 represents GIT’s equivalent to what we currently do in SVN, but I’m not looking to copy our SVN workflow just for the sake of keeping things the same. I want to do things the “right” way in GIT.
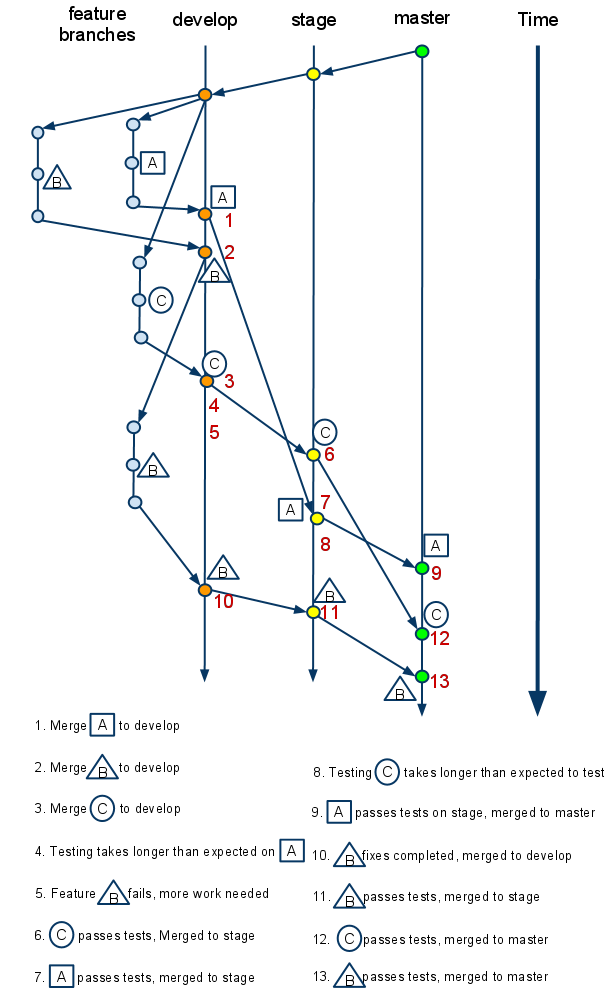
Proposed workflows to accomplish what is illustrated in the diagram:
Option 1
git merge from a feature branch to develop, then from feature branch to stage, and finally from feature branch to master as the feature graduates its way through the workflow.
What the history would look like on develop/stage/master:
*a37658bd merged in public/private| \| *a7785c10 another granular commit| *7f545188 added more text| *2bca593b added some text to a file|/Option 2
git merge —squash from the feature branch to develop. Subsequent merges can then be cherry-picked as the feature graduates its way through the workflow. This would be the GIT equivalent to SVN merges.
What the history would look like on develop/stage/master:
*4d4a0da8 merged …*a37658bd merged in public/private*d9484311 merged …Option 3
git merge cherry-pick each revision from the feature branch to develop. Then continue to use git cherry-pick to merge features to stage and master as they graduate through the workflow.
What the history would look like on develop/stage/master:
*4d4a0da8 did something else unrelated to the below code*a7785c10 another granular commit*7f545188 added more text*2bca593b added some text to a file*4d4a0da8 did another thing unrelated to the above codeOption 4
Do normal merges from feature branch to develop. Then to merge something to stage:
git branch tempbranch {last commit desired}git rebase --onto stage {earliest commit that you DON'T want included as part of the merge} tempbranch
What the history would look like on develop/stage/master:
*4d4a0da8 did something else unrelated to the below code*a7785c10 another granular commit*7f545188 added more text*2bca593b added some text to a file*4d4a0da8 did another thing unrelated to the above codeOption 5
Do normal merges from feature branch to develop. Then to merge something to stage:
git format-patch {earliest commit that you DON'T want included as part of the merge}..{last commit you want merged}git am *.patch
What the history would look like on develop/stage/master:
*4d4a0da8 did something else unrelated to the below code*a7785c10 another granular commit*7f545188 added more text*2bca593b added some text to a file*4d4a0da8 did another thing unrelated to the above codeNotes and observations
Option1
- Merges always originate from each feature branch
- Feature branches stick around in origin for a long time
Option2
- Squash all merges into a single commit.
- This is exactly how SVN behaves.
- Feature branches would have to stay around forever unless you are ok with losing all the history contained within them.
Option3
- Feature branches are merged like normal, then you do cherry-picks to merge features up as they graduate to the next branch.
- History is preserved in the first develop branch, but then gets lost in the subsequent branches.
- This would be come nearly impossible to manage as you are having to manually cherry pick potentially hundreds of commits each time a feature or two pass on one of the earlier branches.
Option4
- History of the branching is preserved on TEST
- Once things get merged to stage and master, all history gets flattened
- A little more complicated to perform basic merges than some of the other methods.
Option5
- Results in same history as option 4
- Little easier to use than option 4
Appendix: Full list of commands
Option 1 Option2 Option3 1.
- git checkout develop
- git merge A
- git branch -d A
- git push origin develop
- git checkout develop
- git merge —squash A
- git commit -m “merging feature A to develop”
- git branch -d A
- git push origin develop
- git checkout develop
- git merge A
- git branch -d A
- git push origin develop
2.
- git checkout develop
- git merge B
- git branch -d B
- git push origin develop
- git checkout develop
- git merge —squash B
- git commit -m “merging feature B to develop”
- git branch -d B
- git push origin develop
- git checkout develop
- git merge B
- git branch -d B
- git push origin develop
3.
- git checkout develop
- git merge C
- git branch -d C
- git push origin develop
- git checkout develop
- git merge —squash C
- git commit -m “merging feature C to develop”
- git branch -d C
- git push origin develop
- git checkout develop
- git merge C
- git branch -d C
- git push origin develop
5.
- git checkout develop
- git checkout B
start working on code
- git checkout develop
- git checkout B
start working on code
- git checkout develop
- git checkout B
start working on code
6.
- git checkout stage
- git merge C
- git push origin stage
- git checkout stage
- git cherry-pick {revision from 3}
- git commit -m “merging feature C to stage”
- git push origin stage
- git checkout stage
- git cherry-pick {revisions in C}
- git commit -m “merging feature C to stage”
- git push origin stage
7.
- git checkout stage
- git merge A
- git push origin stage
- git checkout stage
- git cherry-pick {revision from 1}
- git commit -m “merging feature A to stage”
- git push origin stage
- git checkout stage
- git cherry-pick {revisions in A}
- git commit -m “merging feature A to stage”
- git push origin stage
9.
- git checkout master
- git merge A
- git push origin master
- git push origin :A
- git checkout master
- git cherry-pick {revision from 7}
- git commit -m “merging feature A to master”
- git push origin master
- git checkout master
- ggit cherry-pick {revisions in A}
- git commit -m “merging feature A to master”
- git push origin master
10.
- git checkout develop
- git merge B
- git branch -d B
- git push origin develop
- git checkout develop
- git merge —squash B
- git commit -m “merging feature B to develop”
- git branch -d B
- git push origin develop
- git checkout develop
- git merge —squash B
- git commit -m “merging feature B to develop”
- git branch -d B
- git push origin develop
11.
- git checkout stage
- git merge B
- git push origin stage
- git checkout stage
- git cherry-pick {revision from 10}
- git commit -m “merging feature B to stage”
- git push origin stage
- git checkout stage
- git cherry-pick {revisions in B}
- git commit -m “merging feature B to stage”
- git push origin stage
12.
- git checkout master
- git merge C
- git push origin master
- git push origin :C
- git checkout master
- git cherry-pick {revision from 6}
- git commit -m “merging feature C to master”
- git push origin master
- git checkout master
- git cherry-pick {revisions in C}
- git commit -m “merging feature C to master”
- git push origin master
13.
- git checkout master
- git merge B
- git push origin master
- git push origin :B
- git checkout master
- git cherry-pick {revision from 11}
- git commit -m “merging feature C to master”
- git push origin master
- git checkout master
- git cherry-pick {revisions in B}
- git commit -m “merging feature C to master”
- git push origin master
Social Science ClassWeb Roster Emails
https://moodle2.sscnet.ucla.edu/docs/Email_students_through_CCLE
Moodle auto-login guests
Normally public Moodle sites are public in the sense that you have to login as GUEST, with no password or registration required. You just click on the LOGIN AS GUEST button and get into the site.
But the setting below allows you to automatically treat visitors as GUESTS, with no LOGIN AS GUEST button.
The setting is called ‘auto-login guests’ and is located under:
Administration > Users > Permissions > User Policies
The description for the ‘auto-login guests’ setting is:
Should visitors be logged in as guests automatically when entering courses with guest access?
This appears to be a global setting, and needs to be changed by the Administrator.
Thanks to Jose Hales-Garcia for finding this answer.
How to hide a site in Moodle
If you don’t want a Moodle site/course to be visible at all, then the not-too intuitive setting you need is called “Availability.”
The setting is located under: Administration > Settings and at least in version 1.7 has only two settings:
- This course is available to students
- This course is not available to students
The popup help says:
This option allows you to “hide” your course completely.
It will not appear on any course listings, except to teachers of the course and administrators.
Even if students try to access the course URL directly, they will not be allowed to enter.
What happens in Moodle if two people try and edit a wiki page at the same time?
In Moodle 1.7 if someone is editing a wiki page when you go into edit it, you get an error message like this:
This page is being edited by Annelie Chapman. They began editing at Friday, 5 January 2007, 12:29 PM and still have the window open as of Friday, 5 January 2007, 12:29 PM.
You need to wait for them to finish before you can edit this page.
You can override this user’s lock, but doing so may cause them to lose their changes! Please take care.
Note, this is the behavior of the default wiki, based on erfurt wiki. Not sure how the other wikis Moodle has will behave.
Does Moodle allow multiple login options at same time, e.g. Shibboleth and another?
According to this Shibboleth README file in Moodle 1.7 yes, you can use Shibboleth and another login option, though users will have to use one or the other, not both.
You can use Shibboleth AND another authentication method (it was tested with
manual login). So, if there are a few users that don’t have a Shibboleth
login, you could create manual accounts for them and they could use the manual
login. For other authentication methods you first have to configure them and
then set Shibboleth as your authentication method. Users can log in only via one
authentication method unless they have two accounts in Moodle.
Shibboleth dual login with custom login page-——————————————————————————————————————-
Of course you can create a dual login page that better fits your needs. For this
to work, you have to set up the two authentication methods (e.g. ‘Manual’ and
‘Shibboleth’) and specify an alternate login link to your own dual login page.
On that page you basically need a link to the Shibboleth-protected page
(‘/auth/shibboleth/index.php’) for the Shibboleth login and a
form that sends ‘username’ and ‘password’ to moodle/login/index.php.
Consult the Moodle documentation for further instructions and requirements.
I wonder if you can have three or four possible login methods?
This link may not describe working code. I couldn’t tell. But I’m leaving it here in case it relates. http://docs.moodle.org/en/Multi_Authentication
Moodle auto-enrollment techniques
To clarify the question, we’re looking for ways that large Moodle installations get their class roster data into Moodle in as close to real-time as possible. Answers could include links to discussions of this topic or documentation specific to this.
There are a number of ways to enroll large number of students in Moodle sites. They are called Enrollment Plugins.
I’ll give the example we use over at the Grad School of Ed. It may not be the most efficient but it gets the job done. We are looking into LDAP Enrollment to see if it will actually make things easier.
We obtain course information from the Registrars office and from that we import them into their courses via the “”http://docs.moodle.org/en/Upload_users">Upload Users."
Moodle Links
Moodle LDAP Enrollment
Moodle LDAP Enrollment HOWTO Forum
Can I change the format of a Moodle site after it's been created and used awhile?
According to “Using Moodle” by Jason Cole it is ok to switch a Moodle site’s format after it’s in use. In 1.7 I only experimented with a very small site with only one topic, but it didn’t lose anything as I switched between Topic, Weekly, Social and then back to Topic format.
In Moodle what are the advantages of the different site formats?
When setting up a Moodle site, you have to pick a site format. Here is a quick description of the main choices.
-
Weekly
- Pick this and set it for the number of weeks in your class, and it will create a list of weeks down the center block of the site main page with the week dates calculated from the class start date. You can post materials and activities week by week.
-
Topics
- If your class material is is better arranged as a collection of topics, then pick the Topic format and set the number of topics you want. You can add more later. As in Weekly format, it will create a list of spaces for topics down the central block of the site main page. You can add materials and activities in each topic area. You can also indent materials and create an outline format within a topic. This might be preferred for non-course uses of Moodle.
- We use the Topics formats the most for our research and community Moodle sites at the Grad School of Education. Since most projects go on well beyond the 10 weeks of a quarter this better suits their needs. The same applies to the community Moodle sites we manage.
-
Social
- In the Social format, the central block of the Moodle site is reserved for the Forum, or discussion area. It’s not clear to me whether materials and activities can be added. Does anyone else know?
- Materials and activities cant be added. We had few professors in Education who wanted the social format and used the Moodle site as a supplemental to the their class for that purpose. You can add attachments in the forum posts, but thats really the only way to add materials in any way.
In Moodle is teacher the right default role when you want everyone in the site to be able to have full write privileges?
To clarify the question, what is the minimum role you can assign as a default for a site that will let the participants add material (and activities) to the site? Do they need to be Course Creator, or is Teacher enough. Or is there a lower role that would still give them rights to add content and activities?
Since Moodle 1.7 allows for extensive role setting I think the question doesnt’ really matter. You can set explicitly what you want each of those roles to mean as well as create your own.
See In Moodle what is the difference between a Course Creator and a Teacher in terms of permissions?
In Moodle can we make a site show up publicly, but not show its list of members?
To clarify, on http://ccle.ucla.edu why does Sysop not show members and Integration subgroup does?
The individual names listed under the course name are the Teachers you set for the course, not the students.
In Moodle 1.6 while in the specific course you can change the actual role name of the teacher to whatever you choose. To do this, choose Teachers (or whatever term you choose for Teachers) in the Administration block. After adding Teachers you can change the role name to Professor, TA, Reader, etc. You also can choose the order of the list of teachers. The options are 1 thru 8 and “Hide”. If you choose “Hide” then that particular teacher will not show up under the course name. You can choose to “Hide” all of the teachers.
If you want a way to list courses on the front page without the Teacher or Administrator listed with them, see below. One is with CSS, and the other is coming in Moodle 1.8.
- Ways to hide instructors and admins from course listings (Registration required)
In Moodle, how do we direct people to hidden sites?
Please answer this if you can, and then retag it. Thanks
To clarify the question, if we make the site “not available to students” then it’s not going to show up on the list of available sites, or sites that can be enrolled in. Is there any way to let the people we want subscribe to it know where it is? (Give URL with Enrolment key?)
In Moodle 1.6 there is no way to allow a student to view a course that is hidden. I tried to override the “View hidden courses” permission in Moodle 1.7 for a specific course and that didn’t work. I would think that it should.
In both cases if you have the student has the url they still will not able to access the site. They will be notified that the course is not currently available to students.
In Moodle can we have nested metacourses?
The question is whether a metacourse can have a metacourse underneath it. And at least with a quick test in Moodle 1.7 the answer is no. The course settings question: “Is this a meta course?” does not allow a choice. Instead it says. “No – This course is already part of a meta course.”
What is interesting is that a course CAN belong to two different metacourses. Look at Scenario 2 in this Moodle Metacourses Documentation.
Does Moodle let us store local data about students and classes?
Please answer this if you can, and then retag it. Thanks
To clarify the question, does Moodle have some sort of provision for storing extra data about students and courses and possibly other things like departments, crosslisted and joined classes, etc?
For example, Moodle does have a Course ID Number field, where we could store our university 9 digit course number (SRS#). But what if we want to store the Registrar’s Subject Area and alphanumeric coursenumber as well?
Another example, the university login system may give us 3 or 4 different types of identifying field for a person, depending on their relationship to the university (UID, PPID, LOGIN_NAME, other university ID via Shibboleth). Ideally we need to be able to store them all. How have other schools handled this?
Several years later…
It seems that the Moodle developer community encourages you to create your own tables using Moodle’s naming convention and using XMLDB to make sure their schema resides in the code base and can be easily added to other sites.
In a Moodle wiki is there a way to double space a numeric list?
To clarify the question, in the default Moodle 1.7 Wiki (based on Erfurt Wiki), numeric lists seem to only work if they are single space. If you put a line between them, then they restart each list item with 1. This Knowledgebase wiki-like formatting has the same problem
Single space numeric list.
- should be one.
- should be two.
- should be three.
Double space numeric list.
- should be one.
- should be two.
- should be three.
In Moodle when creating numbered listed using the html editor just hitting return will give you a singled spaced numeric list. However, to get double spaced lists you need to hold down shift, hit return twice and then return again (sans the shift key).
- should be one : return
- should be two : return
- should be three : shift-return shift-return return
- should be four : shift-return shift-return return
- should be five
In Moodle what controls the assignment of role to a new subscriber?
To clarify the question, what controls the assignment of role to a new subscriber (e.g. why are some people assigned the role of Teacher in some sites, and others the role of Course Creator in other sites)?
In Moodle 1.6 all users are considered guests who can self enroll into courses that are set to allow for course enrollment. There are some restrictions. A new subscriber can enroll in a course that is set to “course enrollable” and has an enrollment set only if they have the set enrollment key, which we utilize at the Grad School of Education. If no enrollment key is set than any subscriber can enroll in the course. A subscriber can only be a “Teacher” if they have been assigned the role of “Teacher” in a course, either by the course creator or by another teacher in the same course.
In Moodle 1.7 you can set this explicitly. I don’t recall ever coming across an explicit setting for this in 1.6. In the Site Administration; Users > Permissions > User Policies. Here you set;
- Role for Visitors
- Default role for all users
- Default role for users in a course
- Auto-login guests
- Hide user fields
You can also set the default role for a subscriber when creating a specific course. The option is a dropdown menu labeled “Default role.”
Does Moodle scan files for viruses on upload?
To avoid the risk that an uploaded file in a Moodle site might have a virus which could spread to the computer of a student who downloaded and ran it (e.g. a Microsoft Word file with a virus) many learning management systems at UCLA (Engineering and Social Sciences and others?) currently scan uploaded files for viruses.
According to this Moodle Forum posting by Martin Dougiamas (moodle chief architect), Moodle does as well:
“Moodle 1.5 works together with ClamAV (an open source anti-virus program for Linux) to scan all incoming files (at the time they are uploaded) for known viruses (this includes assignments, attachments, etc etc)” – http://moodle.org/mod/forum/discuss.php?d=14903 (Registration required)
This doesn’t happen automatically on a simple Moodle install though. You need to both install Clam AV http://www.clamav.net/ and configure Moodle to use it.
- Site Administration
- Security
- Anti-virus
- Then answer these questions:
- Use clam AV on uploaded files (checkbox)
- clam AV path
- Quarantine directory
- On clam AV failure – choose one
- Treat Files As OK
- Treat Files As Viruses
Interviews with Martin Dougiamas, Moodle Architect
In my attempts to start “thinking in Moodle” I thought it might be interesting to search for interviews with the originator and guiding hand of Moodle, Martin Dougiamas. Here’s what I’ve found so far.
- 19 Oct 2006 http://edtechlive.wikispaces.com/Recordings+List (not direct link, need to look for Dougiamas on list)
- 9 Nov 2005 http://technosavvy.org/?p=329 or http://techtalk.sde.idaho.gov/mod/resource/view.php?inpopup=true&id=250
I haven’t listened to these yet, so if you do, please add the length, and any summary of each here, if you can. Of course, please add any others you find.
How do you use Shibboleth in Moodle?
Please answer this if you can, and then retag it. Thanks
To clarify the question, Shibboleth (link to entry in KB) is an Internet2 Middleware system to allow us allow login from different schools. What does it take to run this with Moodle? There is a Shibboleth Module, but where is it and what else is needed? Is a special version of Apache (version 2) required?
This looks like a step-by-step guide of how to use Shibboleth in Moodle:
http://moodle.org/mod/forum/discuss.php?d=20426
Moodle online Help for end-users
Here are links to various sites offering online Help for using Moodle: Feel free to add to the list and/or comment on the quality of the ones already here.
In Moodle, can we add our own Resource Parameters to be sent along with links?
Please answer this if you can, and then retag it as Moodle. Thanks
To clarify the question, a very nice feature of Moodle 1.7 (perhaps earlier) is that when you add a link to a site, you can specify that you want certain Moodle Parameters to be sent along with that link on the URL. The fields you can send include the list below. This question is whether or not you can include any other variables that we might need such as UCLA subject, course number, section, SRS#, etc.
- User
- id
- Username
- Password
- ID number
- First name
- Surname
- Full name
- Email address
- ICQ number
- Phone 1
- Phone 2
- Institution
- Department
- Address
- City/town
- Timezone
- Web page
- Course
- id
- Full name
- Short name
- Course ID number
- Summary
- Format
- Your word for Teacher
- Your word for Teachers
- Your word for Student
- Your word for Students
- Miscellaneous
- Preferred language
- Full site name
- Server URL (http://ccle.ucla.edu)
- Time
- Encrypted code
What does the Email activated option in Edit profile do?
According to the Moodle docs (http://docs.moodle.org/en/Edit_profile#Email_activated ):
“One can either enable or disable emails being sent to an address. Note that if this is disabled, students will not receive any mail whatsoever from the site.”
Can Moodle store uploaded files on another server?
To clarify the question. It is not clear if the Moodle easily allows the set-up to be changed so that any image (or files uploaded) can be put on another server. We might want to do this for particular types of files, such as movies or audio clips.
Yes you can. The Moodle dataroot is set in the configuration page. The dataroot is the location you want all Moodle data to be saved; course information, users info, etc. As long as the server Moodle is on itself has as connection to the other servers you want to use then its possible.
For instance if you have a media server connected to your webserver then you can set your rootdata to “/Volumes/media/folder_name.” You will need to make sure that this directory should be readable AND WRITEABLE by the web server user, but it should not be accessible directly via the web. On a PC you would just need to map the drive (‘C:\media/folder_name’).
Another way to do it would be to use symbolic links to reference locations other than the one set for the dataroot in the Moodle configuration file.
My example:
We have some media files that a professor wanted to use in Moodle. The audio files far exceed the file limit we set for the site, as well as we didn’t want the files in the Moodle dataroot, since its restricted to all except a specific user. So the files are uploaded to another location.
A symbolic link was created in the Moodle dataroot, /moodle_instance/moodle_data/9/files and /moodle_instance/moodle_data/9/ipodcast
The folders “files” and “ipodcast” are symbolic links to other locations, no way related to Moodle. But when the files are uploaded into those locations, the files show up in Moodle for that course and can be referenced for Resources.
Are Moodle blog entries limited to a certain length?
Is there a limit to individual blog posting size? When I posted a longish blog (5-6 paragraphs) it only shows the first couple, with no link to anything else. But when I go back to edit mode, the whole thing is there. (Update: Turns out it was breaking at a unlabelled URL. Labelling it solved the problem.)
I did some searching and there was a very long thread about why and why not limit blog and comment entries. There doesn’t seem to be one at present.
I was able to create a 3120-word entry by copying and pasting something from the web. I had no problem viewing this blog entry as myself or my test student user.
In Moodle, where are the summaries going when you create a web page?
Under adding resources, when adding a web page, there is a summary field, but it never seems to display after you submit it. Is it a theme decision to ignore them?
When you create a resource or activity there is a summary option for the item you are creating. That summary will always display from the Resources page within the course, while some items allow for the summary to display in a framed page, depending on the resource. The Web Page resource will not display that information on the same page it opens up, however it will display on the Resources page. If you choose to have resources open in a “New Window.” Then that summary will appear in the background window (the main window), while your Resource opens in a new window.
To get to the Resources page, there is a link in the Activities block. If the Activities block is not on the course page you can add it once you are an logged in as an Admin or have Teacher rights in a course.
You can also access the Resources page by going to a resource and then tracing back using the bread crumbs; Site >> Course Short Name >> Resources.
How to have students "Sign" an Agreement before using Moodle
If it were necessary to have everyone sign or click through an agreement before starting Moodle, then this Moodle Forum discussion seems to show how it can be done. Registration Required.
Good sources of information on Moodle
- go to http://moodle.org and register to get a login ID. No charge. That will get you into some of the links below.
- once you’ve logged in, edit your profile, at least to say that you’re at UCLA, which dept. and what systems you’re familiar with.
- go to Free Support link on Moodle Main Page and click on Resources and look through the sample sites, etc.
- Also look at Glossaries.
- go back to Free Support link on Moodle Main Page and click on Forums and look through the long list and see what interests you. Then go in to the ones that interest you and click Subscribe to This Forum near the top right. That will send you email whenever anyone posts there. You can change it to Digest format if you want to have fewer emails.
- when you find a posting that sounds knowledgeable, click on the name and read the profile to see where they’re coming from. You can also see their other postings.
- Search the Forums, as well as browse them. And then feel free to post a question if you want.
- https://kb.ucla.edu/link/879
- https://kb.ucla.edu/link/766
- Also, look at our Knowledgebase Moodle Unanswered
and Moodle Answered
questions and see what you want to add, or can answer. - There is also a Bug Tracker (Jira, like Sakai) http://tracker.moodle.org/secure/Dashboard.jspa
- And a PHP Programmer’s Cross Reference of the latest version.
How to add a syllabus to Moodle
How to add a syllabus into Moodle
If uploading a file as your syllabus:
- In the Administration block or in the top right corner, click “Turn editing on”
- On the Add a resource… drop-down menu in the Syllabus block, choose Link to file or website.
- In the Name textbox, enter the name of the syllabus as you wish it to appear on the class page.
- Beneath the Location textbox, click on the Choose or upload a file button.
- In the Files window, select a file from your existing files list by clicking on Choose to the right of the file name , or add a new file as follows:
- Click on the Upload a file button.
- In the next window, click on the Choose file button to browse for a file on your computer.
- Locate the file on your hard drive, and click Choose or Open.
- The name of the selected file should now appear in the Upload a file window. Click on the Upload this file button.
- In the Files window, choose the newly uploaded file by clicking on Choose to the right of the file name.
- After choosing the file, you will return to the Link to a file or web site screen. Scroll to the bottom of the screen and click on the Save changes button.
If editing a web page:
You can use a web page right in Moodle for your syllabus.
- In the Administration block or in the top right corner, click "Turn editing on "
- In the Syllabus block, choose “Compose a webpage” from the Add a resource… drop-down menu.
- In the Name textbox, enter the name of the syllabus as you wish it to appear on the class page.
- In the Summary textbox, enter a brief summary of the syllabus as you wish it to appear on the Resources page.
- In the Full Text textbox, enter the text of your syllabus. On IE and Firefox, you can use the web editing tools to format your syllabus.
Written by Andrew Miller and JWW
How to add a link to a Moodle class site
How to add links to outside web sites from within a Moodle class website:
- First, go to either the public or private site for your class, depending on whether or not you want this:
- visible to the whole world, or
- restricted to students enrolled in your class
- In the Adminstration block or in the top right corner, click on the Turn editing on link.
- On the Add a resource… drop-down menu in the Important Links block, choose Link to file or website.
- After the Link to a file or web site page loads, enter the name of the link as you wish it to appear on the class page in the Name textbox, .
- In the Location textbox, enter the full address of the web site to which you want to link. If you do not know the web address, you can use the Search for web page button to locate the page in a browser. Then copy and paste the address into the Location textbox.
- Scroll to the bottom of the screen and click on the Save changes button.
Adapted from version written by Andrew Miller
How to add and use a discussion board in Moodle
How to add and use a discussion board (aka Forum) in a Moodle class site.
How to add a discussion board:
- Go to the private version of your class site.
- In the Adminstration block or in the top right corner, click on the Turn editing on link.
- On the Add a activity… drop-down menu in the Discussion Boards block, choose Forum.
- On the Adding a new Forum page, enter the name of the forum as you wish it to appear on the class page in the Forum name textbox.
- Choose the type of discussion board from the pull-down menu next to Forum type. Standard forum for general use is the default type, and it will most resemble the discussion board tool on Ecampus. For brief descriptions of the other types available, click on the Yellow Question Mark Icon to the right of the pull-down menu.
- In the Forum introduction textbox describe the purpose of the discussion board.
- You will probably want to use the default settings for the remaining options on the Adding a new Forum page. To learn more about each option, click on the Yellow Question Mark Icon.
- Click the Save changes button at the bottom of the page to create the discussion board.
- A new page will load displaying the description of the discussion board you provided in step 5. The discussion board must have a discussion topic before it can be used, so click on the Add a new discussion topic button.
- Fill in the Subject textbox with a brief title describing the theme of the discussion. Write a question or a comment in the Message field.
- Next to Subscription, select whether or not you would like to receive e-mail copies of all messages posted to the discussion board.
- Click the Post to forum button at the bottom of the page when you are done composing your message.
--
How to use an existing discussion board:
- Click on the name of the discussion board in the Discussion Boards block.
- On the next page, you can choose either to start a new discussion thread by clicking on the Add a new discussion topic button as discussed in steps 8-11 above or to contribute to an existing discussion by clicking on the name of the discussion listed under the Discussion column.
- By clicking on the name of an existing discussion, the messages in that board will then load in your browser. To reply to a message, click on the Reply link.
- Type your reply in the Message field.
- Next to Subscription, select whether or not you would like to receive e-mail copies of all messages posted to the discussion board.
- Click the Post to forum button at the bottom of the page when you are done composing your message.
Adapted from version by Andrew Miller.
What is Moodle Reset Function?
What does the Reset function in the Administration menu do?
From Mary Parke, Instructional Designer, De Anza College:
“The reset function allows you to remove all user data from a course and reset it’s start date each term – to “refresh it” one might say (content stays and makes it ready for new users). In 1.6.x it allowed you to choose which data to delete from discussion forums. So, it doesn’t surprise me that it defaulted in 1.8 to resetting roles of the instructor. What I would do is reset the course and then manually reset the instructor’s role."
See also:
Note: Use with caution. One of the Alpha test instructors clicked it and her role was switched from teacher to student.
How do Forums (aka Discussion Boards) function in Moodle?
Forums are divided into two main categories: General forums and Learning forums (forums for specific parts of class, ie: weekly, topic, etc)
There are 4 different forum types:
1) single simple discussions- single topic on one page, useful for short focused discussions
2) standard forum for general use- open forum
3) each person posts one discussion- each person can post ONE new discussion topic, but everyone can reply to them (sounds like a blog)
4) Q and A- only teachers can pose a question in the initial post, students can reply with an answer, but will not see other students’ replies until they have replied to the posting first (much like SSC’s Homework Board)
There are 4 ways teachers can restrict students actions in forums
1) Discussion and replies are allowed
2) No discussion, but replies are allowed
3) No discussions, no replies (Moodle sites says this is useful for the News Forum when you only want teachers to post new items that appear on the course main page)
4) You can also restrict student’s to posting between certain dates
Subscribing to a Forum
When a teacher subscribes to a forum, the they will be emailed copies of every post 30 mins after the post is written, but can usually choose to unsubscribe. The 30 mins time limit is changeable, but by default, Moodle gives the teacher 30 mins to change what a student has just posted before it is emailed out to the group.
There is a function the teacher can set to force subscribe everyone. When setting up the forum, the teacher can choose “Yes, initially,” which will subscribe all the students initially then they can unsubscribe or “Yes, forever,” which will force subscribe all the students and disallow them from unsubscribing.
From Moodle 1.6+ the “Subscription not allowed” setting prevents students from subscribing to a forum, and only teachers can choose to be subscribed.
Tracking
If “read tracking” on, users can track and read unread messages in forums and discussions (3 settings: Optional, On, and Off).
Attachments
Yes, attachments can also be limited to a certain file size (restriction set by teacher)
Viewing discussions in forums
Forums can be displayed 4 different ways:
1) Display replies flat, with oldest first
2) Display replies flat, with newest first
3) Display replies in threaded form- only the post starting the discussion will be displayed, replies are reduced to headlines
4) Display replies in nested form- all posts are in full form, replies will be reduced to headlines
Allowing forum posts to be rated
Any user can rate each other’s posts.
Any ratings given in the forum are recorded in the gradebook.
You can select whether you want students to see only their own ratings or everyone else’s as well.
Can a Moodle Forum allow anonymous postings?
Good question. It looks like students will need to have their names displayed (might be important for subscription and ratings), so anonymous postings are probably not allowed.
These instructions were created by Caroline Tam and added to the knowledgebase by Stacey Rosborough
Posting Syllabus for Social Sciences Class Websites
- Click Turning Editing On
- Click on the “Syllabus” section in the course menu navigation to the left of the site
- Click “Add syllabus”
- If possible, we recommend making the syllabus available to the UCLA Community or to the general public. This way, students shopping for your class will be able to see the syllabus before enrolling
- Upload your syllabus
- A preview syllabus means this is an excerpt and it will change, students will see a notice when they view the syllabus.
- Click Save changes
How to share a file among multiple courses in Moodle?
There are two ways to do it:
- Place them in the “site files” area. It looks like only the administrator can do this. Also, the file will be viewable by everyone (i.e. don’t put sensitive data there).
- Use the myFiles module to share the file. (However, someone in the discussion noted that his/her installation failed.)
- Create a metacourse and associate the courses with this metacourse. Then make the file accessible to this metacourse.
See the discussion titled “how to share files between courses” at Moodle’s forum for more details. (Note that the participants agreed that these are not good solutions.)
In Moodle, why is a particular page blank or incomplete?
Does this happen when trying to open a PDF resource?
This issue may occur when a user tries to open a PDF resource due to an incompatibility between Moodle and the Adobe Reader plugin on some of the most recent browsers. Generally speaking, refreshing the window (clicking the Refresh/Reload button, or pressing F5) will eventually bring up the PDF, though sometimes it takes two or three tries. This quickly becomes annoying to the user. To resolve the problem, select the “Force download” option in the resource settings when posting a PDF.
We also recommend updating your browser and Adobe Reader plugin to the latest version in order to optimize compatibility.
If this is not a PDF display issue, it may indicate that an error has occurred when Moodle is trying to display a page. Please let you system administrator know about the problem.
(Details for system admins: Depending on the server’s configuration, PHP might hide error messages. If this is the case, when an error in a PHP script occurs, PHP might choose to not display anything, resulting in a blank page.
Usually, PHP should not display error messages in a web page for security reasons. However, there are exceptions, e.g. when you are debugging a web page.
To globally enable error messag display, put these in your php.ini file:
display_errors = On
error_reporting = E_ERROR
To enable that for a single PHP script, put these at the beginning of the script:
ini_set(‘display_errors’, 1);
error_reporting(E_ERROR);
See the Moodle FAQ for details.)
Questions about developing content for UCLA's CCLE Website
-
What skills do I need to write webpages for UCLA’s CCLE site?:
TBD -
Will someone review my changes? What if I need help?:
TBD -
Are my changes owned by me? Will anyone make changes to my content without telling me?:
TBD -
Is UCLA free to distribute my content to other entities?:
If you develop a specialized section of code for Moodle and it gets used, then it should be released under the GPL (derivative work of Moodle). Content added to pages (such as course materials) do not fall under the GPL. TBD. Also see the Terms of Use -
I would like to make a webpage for the CCLE, that depends on a newer version of one of the moodle libraries, or adding some additional software to the system. Can I do that?:
TBD -
Who can see the content of my webpages? What if I need to put in confidential information in the webpages, such as passwords or security information?:
CCLE private pages are available to enrolled students, other teachers of the class (if there are more than one), administrators, and guests (when enabled). The private site is where you should store the protected data. Passwords in general shouldn’t be made widely available. What the private site was designed for is materials that only enrollees in the class should view, such as practice tests, homework solutions, and other class materials. -
Can I make changes to content someone else has submitted?:
TBD -
My changes might affect someone else. Who will contact them?:
TBD -
Someone else’s changes affected my content. Who will contact them?:
TBD
How to Change 'Topic Outline' on Class Page
This is a description of the location of code that should be changed in order to remove the ‘Topic Outline’ header of the class page a replace it with The class name and info. This information is for Moodle v1.7 found at http://xref.moodle.org. The code pertaining to this issue is consistent with 1.8 (line 105)
The files that need to be changed are:
- course/format/topic/format.php
- course/format/weeks/format.php
- course/format/weekscss/format.php
- course/format/lams/format.php
The first step is to located and/or remove the ‘Topic Outline’ (or corresponding header):
- (Line 81) print_heading_block(get_string(‘topicoutline’), ‘outline’);
- (Line 67) print_heading_block(get_string(‘weeklyoutline’), ‘outline’);
- (Line 96) print_heading_block(get_string(‘weeklyoutline’), ‘outline’);
- (Line 76) print_heading_block(get_string(‘lamsoutline’,‘lams’), ‘outline’);
The next is to move the $thissection declaration further up in the code to the previous location of Header. This is located on the following lines:
- Lines 98-99
- Lines 84-85
- Lines 112-113
- Lines 93-94
The last part is to move the summary division up to the original location of the header (but after the $thissection declaration). Summary division refers to everything inside the <div class=“summary”> block:
- Lines 106-116
- Lines 92-101
- Lines 123-132
- Lines 102-111
After searching the Moodle Forums (moodle.org) I found several posts about this that were less invasive.
- http://moodle.org/mod/forum/discuss.php?d=32553
- This suggests changing the language settings, however this causes a site wide change and could not be class independant.
- http://moodle.org/mod/forum/discuss.php?d=60325
- This proposes a CSS method of removal of Topic Outline, but does not give a way to put class info in its place.
- http://moodle.org/mod/forum/discuss.php?d=61110
- This gives instructions on the exact php changes needed on format.php
- http://moodle.org/mod/forum/discuss.php?d=55009
- This is a similar solution to the first. It make a site wide change.
How to Remove Icons in Moodle
This article is about removing Icons from the course formats page (when displaying the course page) for Moodle 1.7. The code referenced can be found at xref.moodle.org. The lack of a icon switch variable still exists in version 1.8 (found at http://moodle.cvs.sourceforge.net/moodle/moodle/course/lib.php?view=markup at line 1392).
The file being edited is course/lib.php and the function is print_section().
The code for displaying the image is on lines 1163-1167:
echo ‘<img src="’.$icon.‘"’.
’ class=“activityicon” alt=“‘.$mod->modfullname.’” />‘.
’ <a title="’.$mod->modfullname.‘" ’.$linkcss.’ ‘.$extra.
’ href="’.$CFG->wwwroot.‘/mod/’.$mod->modname.‘/view.php?id=’.$mod->id.‘“>’.
$instancename.‘</a>’;
The definition for $icon is on lines 1142-1146:
if (!empty($modinfo[$modnumber]->icon)) {
$icon = “$CFG->pixpath/”.urldecode($modinfo[$modnumber]->icon);
} else {
$icon = “$CFG->modpixpath/$mod->modname/icon.gif”;
}
One approach is to point $icon to a spacer image if icons are disabled. Although this loads an unecessary image, it is a simple a quick solution. In addition line 1149 already loads a spacer image with a function call to print_spacer().
A search of the Moodle Forums resulted in a few related article that might be a better alternative than changing the php:
- http://moodle.org/mod/forum/discuss.php?d=50708
- This describes how to resize the icons with CSS. It could potentially be used to remove the icons as well.
- http://moodle.org/mod/forum/discuss.php?d=46350
- This describes how to remove icons in the “main menu” and “course menu”.
- http://moodle.org/mod/forum/discuss.php?d=31095
- This hides the “key icon”. It proposes a transparent image.
In Moodle, which roles appear as participants and which don't?
In Moodle 1.7 it seems that admins don’t show up as participants in individual Moodle sites. WRONG. They shouldn’t but they do as well. See the note from Ricardo Garcia below. Are there any other roles that hide that way? Is it something we can turn on for a given role?
One use case we’re trying to solve is that we need to give dept. webtechs permissions to view, edit and update and assign roles to their class sites, but we don’t want all their names showing up in the Participants list and confusing the instructor.
Answer: The reason the admins don’t show up as participants in individual Moodle sites is because of their permission Capabilities/moodle/site:doanything. Documentation of this permission can be found here.
As of 04-05-07 the documentation states:
- This allows a user to execute all actions in Moodle in the given context (normally the whole Moodle system). This is a special capability intended for admins, since it overrides all other capability settings.
- This also allows a user to browse every course without being required to enrol and without being listed as a course participant.
However, this is not exactly what we’re looking for because it does not allow a user to be hidden from the Participants list and have limited actions.
An identical feature request to our own was recently posted in the Moodle foums.
A possible workaround which is available in later versions (1.8) involves the usage of hidden assignments. To hide a user, click the “Hidden assignments” check box before adding them to the existing users list. They will not show up as participants unless the user viewing them has the capability viewhiddenassigns. Both teachers and admins have this capability. If we want teachers to not see these hidden users, we have to remove their viewhiddenassigns capability.
Ricardo’s research: This is the target of the “People” block from when you click on the page. Here is a link to compare the version in CCLE with the newest version in the 1.7 branch).
There are three subsequent attempts to fix this problem (1.142.2.1, 1.142.2.5, 1.142.2.8), as well as one more to hide hidden roles (1.142.2.11).
How are files handled in Moodle, WebCT and Sakai?
In Moodle
Only instructors can access a complete view of a course site’s files in Administration > Files. There is no personal file space for student users (unless the student attaches or posts files to a designated activity, e.g. Forum, Assignment). In theory, this means Instructors can use the site to store all their course-related files, including those they don’t want students to see or download.
ALERT FOR INSTRUCTORS! As of this writing (Moodle 1.8.2, November 2007), enrolled Students who know the name of a specific file on the site, or who have access to cached file URLs, can access those files if they can guess or recapture the URL of the course file — even if there is no visible link to that file on the course page!
So, for example, The file path of any file on the CCLE server is http://ccle.ucla.edu/file.php/[course id]/[folder name]/file name. For example, the course id for the ITC test site (http://ccle.ucla.edu/course/view.php?id=6 , which can be found by right-clicking the course title on the ccle site and looking into the Properties) is 6, and there is a file called “first.pdf†in the File area, and the file’s path is http://ccle.ucla.edu/file.php/6/first.pdf.
Also, files used for quizzes, assignment, and other activities are usually put under the folder of “moddataâ€, and course backup files are under the folder of “backupdataâ€. So if a students knows the folder name and the file name, it’d be easy for that student to get access to the file, no matter the folder itself is hidden or not on the course page.
Here are the relevant Jira tickets:
- Jira for CCLE: http://jira.ats.ucla.edu/browse/CCLE-304
- Moodle Tracker: http://tracker.moodle.org/browse/MDL-10701
- Moodle.org Forum discussion: http://moodle.org/mod/forum/discuss.php?d=77059
Recommendations to prevent students accessing hidden files:
- A way to prevent unwanted discovery of your hidden files. Make a directory with an odd/unguessable name, then put any files that are to be hidden from students in there and though the students might predict the filename (e.g. midterm, final, etc.) they won’t know the directory name.
- Don’t change the name of any folder in Files that is created by the Moodle system. If you set up an activity (quiz, assignment,forum, wiki, etc.), and students upload a file in that activity (say, assignment, or an attached file with the forum post), the system creates automatically a folder named “moddata” in the “Files” area, and all the files uploaded via the Moodle activities are stored there. If the instructor changes the name of that folder, neither the instructor nor the students will be able to get access to the uploaded files via the activity any more. For example, attachments with forum posts will disappear, and the number of submitted assignments will become “0”. Furthermore, the system will create another folder named “moddata”, and new uploaded files will go there instead.
In WebCT
Only instructors can access the MyFiles area. There is no personal file space on the WebCT server for student users (unless files are attached or posted to a designated tool, e.g. Discussion Board, Assignment, Student Presentations, Student Homepages). What this means: Instructors can use the site to store all their course-related files, including those they don’t want students to see or download, because only instructors(designers) have access to them. This means, for example, that Word and Powerpoint originals can be stored on the site along with the PDFs and HTML galleries that are meant for student view. Thus, instructors can use the WebCT or Moodle system to store ALL their course files.
In Sakai
Every user has a MyWorkspace area to store their private files. What this means: Instructors can store all course-related files, including those they don’t want students to see or download, in their own MyWorkspace area. But, they must keep the originals and files they don’t want students to see in MyWorkspace — they can only add the PDFs and HTML galleries of original Word and PPT docs to the sites themselves, where students can view them. Thus, instructors can use the Sakai system to store ALL their course files, but must be careful to store hidden files in MyWorkspace only. Students can also store course-related (or other!) files in their MyWorkspace area.
Problems with Moodle non-UCLA Special Cases
This is a list of the problems that we are currently aware of with special case enrollments in Moodle classes where the person does not have a UCLA Login and can log into My.UCLA (use ISIS). And who can add them? Instructors, TAs, Admins?
Problems
- they won’t show up in My.UCLA
- Gradebook
- Roster (download or view)
- Email to class won’t include them
- BruinCard photo won’t show up in roster
- The drop/unenroll process won’t be the same as for Registrar data-driven enrollments
- May not have access to BOL VPN, which affects:
- Library Electronic Reserves
- Library Licensed Content
- OID Video Furnace
- CLICC Software Shortcut (Citrix) won’t show if they’re not on UCLA IP, give message
- Wireless won’t work
- UCLA Login (ISIS) won’t work (by definition)
- Can’t login to CLICC Labs
Types of Special Cases
- Extension Students (they show up on SRWeb and Rosters, but they show up much later and we’re not sure of their login abilities.
- they can login to CLICC Lab
- not sure about ISIS
- not sure about BOL VPN
- Senior Scholars
- Community Scholars (only SPA)
- student auditors
- guest lecturers
- Rand and other research centers
Potential Solutions
- Senior Scholars have an agreement with BOL where they can get a BOL ID but what does that mean? Can these BOL IDs be given full privileges. Currently they don’t have UIDs.
- Could Moodle be programmed to accept PPID or UCLA LOGON ID in lieu of UID?
- For instructor to see all students, go to my.ucla gradebook and Moodle Assign Roles, look at Student – UCLA
- Could My.UCLA accept Moodle Special Cases data feed?
How do I add someone as a guest to a Moodle site?
There are various ways to add someone as a guest to a Moodle site. This article will cover the following topics in the context of using the CCLE:
- Adding a specific user with a UCLA Logon ID as a guest to a Moodle site
- Adding a specific user without a UCLA Logon ID as a guest to a Moodle site
See also In Moodle, how do I add participants to a site?
1. Adding a specific user with a UCLA Logon ID as a guest to a Moodle site
- You must be logged into Moodle with admin, course creator, instructor, or project lead permissions.
- Administration
- Assign Roles
- Click “Course Auditor – UCLA”, “Course Guest – UCLA”, or “Project Guest – UCLA” depending on what role you want to assign to this new guest.
- From the Potential Users list on the right, click the name of the person you want to add as a guest participant, then click the leftward arrow to add him/her to the “existing users” list.
If the name doesn’t appear in the list of Potential Users, you need to ask the person to log once into the CCLE system so s/he becomes a Potential User, then come back and add him/her.
2. Adding a specific user without a UCLA Logon ID as a guest to a Moodle site
- Follow the instructions for How to create a special case (local) login in Moodle
- Once the local (special case) login has been created, follow the steps from 2, above (Adding a specific user with a UCLA Logon ID as a guest to a Moodle site).
Creating CCLE (Moodle) logins for users without a UCLA Common Login ID
A UCLA account must be created for those users who need access to a private Moodle site and don’t have a UCLA Common Logon ID. (Cf. How do I know if I have a UCLA Common Logon ID?)
The first step in creating a special case account is to sign up for a UCLA Logon ID.
Steps to create a UCLA Logon ID:
- Go to http://ccle.ucla.edu.
- Click on the “login” link in the far upper-right of the webpage.
- In the “Useful Links” box, select “Sign up for a UCLA Logon ID”.
- Complete the sign-up procedure.
- Once you have the logon, you need to log into http://ccle.ucla.edu at least once as this will make an entry into the CCLE system.
- Then, someone with rights can follow the steps in the link below.
- To also add this new account to an existing Moodle site, see In Moodle how do I add participants to a site?
If you are a Senior Scholar, please refer to this article: Creating CCLE Moodle Logins for Senior Scholars for more information.
Feel free to update this for clarity or to link to other groups that need special instructions. This article was taken from the procedure worked out for the Senior Scholars Program.
How to create a new UCLA user in Moodle
UCLA Moodle accounts are automatically created when someone first logs into the CCLE site via the UCLA Login. But if you want to set up someone’s UCLA account in advance, follow the steps below.
Note: You need the following information about the user to pre-create his/her UCLA Moodle account:
- UCLA Login (usually same as BruinOnline ID)
- First and last name
- The same email address that the user has specified as “official”, either on URSA (for students) or by the Department (for faculty and staff). Note that this may not necessarily be the same as his/her BOL email address.
Steps to create a UCLA user account:
- Log in as administrator to the CCLE/Moodle system.
- Site Administration
- Users
- Accounts
- Add a new user
- Press the “Advanced” button
- In the “Edit profile screen:”
- Username: put in their UCLA Logon ID This should be in the form joebruin@ucla.edu
- Change authentication method to Shibboleth
- Password: Moodle requires that you enter one, so just enter some dummy text (e.g. password). This won’t have any effect on their UCLA Logon password, which is what they’ll use to log in.
- Enter a First Name, Surname and Email address.
- Enter a city (Los Angeles) and country (U.S.A.) – these are required
- Email activated: Make sure it’s “This email address is enabled”.
- The rest of the settings are optional, and the user can modify them later if need be.
- Click “Update profile” to save the new account.
- Go ahead and assign this account to the sites you want them to have access to. When they login with their UCLA Logon ID and password they’ll automatically be linked to those sites.
- To also add this new account to an existing Moodle site, see In Moodle how do I add participants to a site?
Creating a checklist for students in Moodle
This very creative solution showed up on one of the Moodle Forums, so I’m copying it in here.
Question:
I need to make a checklist for one of my activities, does anyone have any suggestions? I envision it to be a list where my students can go into the checklist and check off what they have completed and take note of what they have left to do.
Answer:
How about a quiz? One multiple choice question with multiple answers allowed for your to-do list, and one or more text questions with (with dummy answers) for notes. Allow students multiple attempts at the quiz. You can use feedback on answers to give encouragement, reminders for the next stage, etc.
You will need to be sure to:
Have “shuffle Questions” set to “no”
Have “Shuffle within Question” set to “no”
Have “Attempts Allowed” set to “unlimited attempts”
Have “Each attempt builds on the last” set to “yes”
Here’s the link to the Moodle.org forum thread where this was found as well as the very interesting Tips and Tricks Forum. Login as Guest if you just want to read, or register and login to post to the forum. You can also subscribe to the forum to get emailed when there are new postings.
Can Moodle display course summary in the outline?
Currently course summary can be filled out as a block and displayed on the side of the page. Is it possible to display it in the main body section? In the topics outline view the area I am refering to is under the title ‘Topic Outline’.
Possible solutions:
- Make, instead of a block, a resource. To do this make a class that extends resource_base and overloads the necessary member function.
- Add another type of label that specifically displays the course summary.
- Add a specialized formats.php file that would display the required information.
Custom Moodle Format to Display Class Title and Summary
Question:
How can we display course information such as the title and summary without entering the information by hand? We are able to have this information automatically entered in the class settings, but also want it to appear in the topic view of the course.
Answer:
In order to display the title and summary of the course in the course view, a new format.php should be developed. This has the benefit of providing exactly what is needed, however the downside is that it is UCLA specific.
To simplify the process this will be mainly based of the topics format (/course/format/topics/format.php). The lines that are of importance are 96-116.
To solve the summary display issue:
- replace
echo format_text($thissection->summary, FORMAT_HTML, $summaryformatoptions); - with something similar to line 29 of /blocks/course_summary/block_course_summary.php
format_text($COURSE->summary, FORMAT_HTML, $options);
To solve the Topic Outline header:
- replace line 81 of /course/format/topics/format.php with something that prints the course name.
How to Create a New Course Format in Moodle
In order to alter the course display, we found it necessary to create a new course format. More information regarding what we wanted to change can be found here. The process for creating a new course format is detailed below.
To create a new course view, it is best to duplicate another view and then make your modifications. The course formats can be found at /course/format. Each directory in here is a course format. To create a new one, duplicate a directory and rename it to whatever you want. The directory should contain one to three of these files:
format.php – This file is what actually formats the page. Most editing and customization will occur here.
config.php – OPTIONAL This file contains the default block layout configuration. Default blocks are the blocks that show up for a course when it is created under this view. Note that the default block layout is only used when first creating the course, not when switching between views of an already created course. The names of the block directories are separated by commas. The blocks will be located on the left column. At the location where you want the following blocks to display on the right instead of the left, separate with a colon instead of a comma. After the single colon, continue separating the block names with commas.
ajax.php – OPTIONAL This is a config file that simply enables/disables ajax on the page. If the course format you are duplicating contains this file, there is no need to edit it.
In order to provide a nice name for your course format to show up in the settings area, we have to edit a language file.
Edit /lang/en_utf8/moodle.php and add the line
$string['format<Directory Name>'] = '<Format Name>';
where you replace <Directory Name> with the directory name of your new course format and <Format Name> with the name you want your course format to show up as in the settings area.
Moodle Switch Roles Tool
Moodle has a feature called “switch role” which allows users with enough access to choose other legacy roles (the Moodle default roles) and to view the site from the point of view of these other roles.
Basics of Switching Roles
The switch roles function allows a user with the capability moodle/role:switchroles to switch their view to that of another role. Switching to such a role is performed through a pull-down menu in the upper right corner of Moodle which is visible only to those with the capability.
Switching Roles in Depth
Moodle documentation states: "New roles may not be tested using the “Switch role to…” feature." By this, it seems to imply that in actuality only the Teacher, Non-editing Teacher, Student, and Guest can accurately be tested with switch as others may include capabilities not properly reassigned when switching.
Q: Why doesn’t “Switch role to..” within a course seem to work properly for a Course Creator?
A: This feature is intended for Teachers assigned at the course level. Users assigned at “higher” contexts should not expect reliable results from this function.
* —Moodle FAQ*
Because of added capabilities for the Course Creator and Administrator roles, when changing capabilities and then reassigning them through Switch, they may not all carry over correctly. Petr Skoda writes: “We should not allow admin to switch roles, because it can not work properly and also document the potential problems when user has other roles assigned above the course context because they might produce unexpected results.” (MDL-8841 & tracker.moodle.org) Some examples of where get load_all_capabilitites() fails to switch over correctly from admin: Activity Report, Restrict Activity Modules, and Assign Roles control.
How do I login as a user in Moodle (for troubleshooting purposes)?
If you’re an administrator to a Moodle class site, you can actually login in as a user to duplicate the error the user is experiencing. You won’t need Moodle wide admin access, just admin access to the course (note, only admins can do this function, not course creator, not instructor).
- As the admin, go to the participants list.
- Click on the drop down menu for “User list” on the right hand side and select “more detail.”
- Locate the user you want to login as. By the person’s name, there should be a list of option on the right hand side, select the link for “login as…” and volia, you are now logged in as that user.
When you’re done, just log out as that user and Moodle will return you to your original login.
As you’re logged in as a user, just remember you’re actually logged in as that user. For example, if I’m the administrator to CCLE 101 and I decided to login as Jane Bruin, any activities I perform while I am logged in as Jane Bruin will be recorder as Jane Bruin. (it won’t say posted by Jane Bruin on behalf of the administrator). So if you do any test postings or uploads, remember to remove them afterwards.
Modifying Roles in Moodle
Sometimes roles set at the site-level may not properly work because they are over-riden by a system-level setting. For example, see the following exchange on the Moodle forums:
Q: “I’m using Moodle 1.8. I went to Users → Permissions → Define roles and for both teacher and non-editing teachers I turned Access all groups to prevent. However, when I log on as a teacher and go to Grades > Admin, within the course, I still see everyones grade.”
A: “Assuming you are on 1.7 or later: On the Admin screen, go to Users → Permissions → Define roles, and on the Teacher and Non-editing teacher roles, switch the ‘Access all groups’ capability from ‘Allow’ to ‘Not set’.”
Finding the correct SRS # for class website creation requests:
To get the SRS number for a course:
- Go to https://sa.ucla.edu/ro/Public/SOC (You can get there from www.registrar.ucla.edu and clicking on Schedule of Classes).
- Find the course for which you want the SRS#. Click on the section or info icon to view the class details page.
- The ID number is the SRS# for the corresponding course.
- An example of the number is 142042200, which is the number that is needed to create the course website for the lecture.
A file containing only the SRS numbers for the courses that need to be created should be saved as a .txt file in Notepad. Class website creators need the SRS number for the primary activity portion of any class websites that are being created.
Moodle Meta/Child Site Gradebook Behavior
Do gradebook grades propagate from meta course sites back to their respective child course sites?
When a student takes a quiz in the metasite, it appears that grades are reported to the gradebook of the meta-site but not reported to the children sites.
Background:
In Moodle 1.8.x, when courses are ‘crosslisted’ such that there is a meta course with one or more children courses, the enrollees of the child courses can access all the content of the meta. The meta course is populated with all the students of the child courses. Enrollees of the child courses access content for that course website as they normally do.
Test Setup:
Meta course (Ted’s meta)
-Child site (Ted’s child 1), containing ‘janebruin’ as a student
-Child site (Ted’s child 2), containing ‘joebruin’ as a student
Actions:
1. Assigned the children courses to the Meta course.
2. Confirmed that the students are enrolled in the Meta course.
3. As an instructor, created and assigned a quiz in the Meta course.
4. Logged in as ‘janebruin’ and ‘joebruin’ and submitted quiz attempts.
Results:
5. Checked gradebook of Meta site. Saw that ‘joebruin’ and ‘janebruin’ grades are reported.
6. Checked gradebook of Child sites. Saw message ‘no grades have been reported’
Blogs in Moodle
Martin Dougiamas, founder of Moodle, explains how blogs work in Moodle:
“Firstly, I want blogs to be well-integrated in the Moodle experience. I do not want to just bolt on Simpblog or WordPress. Most standalone blogs have comments because there is no other way for readers to discuss things (one assumes they don’t have blogs). In Moodle though we already have lots of ways for discussions to happen, and everyone has a blog.
“So what I’m trying to do is extract the part of of what makes Blogs unique (ongoing unstructured public reflection) and make that work well first, then carefully link it in with the other tools in Moodle. It’s much harder to take features away than add them carefully.
“Firstly, there is a big conceptual overlap between a blog and a forum. See this listing of all the discussions you’ve started – it looks suspiciously like a blog. I am convinced that if we allow blogs to effectively be like user-centered forums that a lot of important discussion will float out the blogs (which are not course-based) and make “keeping up” with a particular course very difficult."
The full discussion can be found at: http://moodle.org/mod/forum/discuss.php?d=44830
CCLE-Moodle: What to try if users can't login
This article may be very old. Please reach out to local support staff if you have questions.
This article is directed at Moodle support staff.
Moodle users need to authenticate using UCLA’s Shibboleth service. If there is a problem in the authentication chain, users will not be able to login. Since there is a number of steps in the chain of applications behind the CCLE, the problem could be caused by any one of a number of steps. Below is a test process; the goal is to capture information at each step and send it to the appropriate people.
Specific Use Cases are highlighted here: https://kb.ucla.edu/link/834
Test Process
- PROD (Production http://ccle.ucla.edu)
1. Try logging into PROD yourself
- This will tell you if the problem is with the individual user’s account or is more wide-spread
2. Try logging into MyUCLA
- This will tell you if Shibboleth service is working correctly and if the problem is specific to PROD
3. Try logging into Moodle with a local account, such as an Admin account or the janebruin test account
- This will tell you if Moodle is partially working correctly
4. If the user is logged into PROD successfully, but sees a warning that they need an email address listed, please note the UCLA logon.
5. If the user is logged into PROD successfully, but their name is not displayed correctly, please ask the user to log into https://ccle.ucla.edu/auth/shibboleth/shib_test.php and ask the user to copy the text.
Who do I send the information to?
Immediately send all the information to both:
1. CCLE Local Support
2. IT Support Center (help@it.ucla.edu)
Ideally, the e-mail will include details of the problem with supporting information such as error messages, date and time, and/or in which system (i.e., CCLE) the error occurred.
Caution: Even after this testing, the results may not be clear. In a recent episode, testers were not able to log into PROD or DEV, yet were able to confirm Shibboleth was working with WhoAmI? (The issue turned out to be a secondary Shibboleth server not acting properly.)
Other Links
On Shibboleth: https://kb.ucla.edu/link/298
Shibboleth Use Cases: https://kb.ucla.edu/link/834
Student enrollment and Add/drop behaviors in CCLE/Moodle
When do students get access to the CCLE class sites?
The moment the students are officially enrolled in the class, they will have access to the CCLE class sites. However, there might be a slight delay in syncing the roster to the class sites. If this happens, please encourage the students to click on the “Need Help” button located in the upper right hand corner of the CCLE sites (for both the Shared System and the SSC Systems) and submit a trouble ticket. Our helpdesks can check on the roster sync for the student.
Are wait-listed students given access to CCLE class sites?
Yes, students are officially listed on the wait-list will have access to the class sites. Students who are not on the wait-list, awaiting a PTE number, or auditing the class will not have access to the class site. They will need to ask their instructor for an invitation (from the class site) in order to access the site.
Do concurrently enrolled students through UCLA Extensions (UNEX Students) have access to the CCLE class sites?
Yes, however, UNEX students will need to have completed the necessary paperwork and paid for their tuition in order to be added to the class site roster.
How do I know what the enrollment codes are for my students?
Below are the codes that will appear next to the regularly enrolled UCLA and UNEX Student in the instructor’s official Registrar roster:
Regular Students
E: Enrolled
D: Dropped
W: Wait List
H: Held
UNEX Students
P: Pending
A: Approved
C: Cancelled
Moodle Language Settings
Moodle’s language display is controlled by the interaction of two settings: (1) the “Preferred language” in the user’s profile, and (2) “Force language” in the settings for each individual course. The course setting overrides the user’s preferred language. Currently there are only three choices of language available: Deutsch (de), English (us), and English (en).
“English (en_us)” is the default profile setting. Our course template is set as “Do not force” language, meaning that the individual profile setting applies, so the current settings result in U.S. English unless the user decides to change it in his or her own profile.
Note that this takes care of spelling “enroll” the American way, but “Uncategorised” in the Gradebook is spelled the British way even in English (en_us) module.
Moodle Groups and Force Subscription
There is some confusion regarding the interplay between forum settings on Moodle. In one place you can set up a forum using group mode (which can be used to send messages to separate groups), but another setting “Forces all members to subscribe.”
The question is, if I use group mode in my forum and set the forum to force all members to subscribe, will the message only go out to a selected group?
We found this answer:
“Let me clarify confusion about Force subscription. Subscription is the feature that sends ALL posts from a forum to ALL course users. It does not recognize groups. ALL posts in a forum go to ALL course users, always. There is NO way for a group to receive via email ONLY the posts of others in his/her group.
This means that forums must be checked manually be students, since they will not be receiving email notification of a new forum post.
“So, if you are using Separate Groups in a Forum, set Force everyone to be subscribed to ‘Subscriptions not allowed’.” (from http://moodle.org/mod/forum/discuss.php?d=26282)
Thanks to Elaine Blakeman for the help on this topic.
Moodle Auto-Linking
The Moodle course management system has a feature called “Resource Name Auto-Linking” which as its name indicates, allows Moodle to automatically recognize and create links between site resources. That is, if a user creates a web page titled “Moodle Feature Set” and then in another Moodle web page has a sentence reading, “There are many options in the Moodle feature set,” the system will automatically highlight the common text with a surrounding light-gray box and create a hyperlink between the two documents.
Sometimes, however, due to a server-side caching mechanism, users may find confusing behavior, especially with hidden items.
- If, however, an item is visible prior to the creation of the linking text, the text is auto-linked.
- If the item is subsequently hidden, the text remains auto-linked, but (properly) displays a message saying the item is not available.
Note that if a link to a previously-hidden item does not immediately work correctly, it should self-correct and with time the links to accessible content will appear. Moodle keeps a cache of pages in order to deliver content faster, so sometimes a number of requests need to go to a page before it refreshes and the links become active. Refreshing the browser a half-dozen times or trying a different browser should trigger the cache to refresh, but in actual use, as students access the page, this should clear up very quickly.
Additionally, the Moodle administration lists multiple modules creating auto-links: Resource Names Auto-linking, Glossary Auto-linking, Database Auto-linking, Wiki Page Auto-linking, and Activity Names Auto-linking. None of these offer additional settings, however within the Glossary, the professor has the option of turning off auto-linking at the course level.
It is also possible to override auto-linking on individual items in the WYSIWYG editor by selecting the text and choosing the “Prevent automatic linking” button (which looks like a chain link with a red X through it). This adds a <span class="nolink">…</span> code around the selected text and prevents auto-linking from applying.
Moodle Quiz cutoff time
What does the cutoff time for a Moodle Quiz control?
The Cutoff time prevents both starting a quiz and submitting an already-started quiz once that time is past. Instructors can check the unsubmitted saved answers and the answers are checked against the correct answers, but no grade is given (it looks like instructors can’t manually override it) and students cannot check their answers. If the cutoff time comes while students are taking the quiz, a warning message appears and once the cutoff time has passed, they cannot submit their answers.
This is what happened when I started a quiz before the cut-off time but didn’t submit it when the time was up:
First, I got a warning saying “The quiz is closing. You should submit your answers nowâ€. Then, when I clicked on the submit button two minutes past the due time, I got this message, “Sorry, the quiz is not availableâ€. When I checked the test results, I found that if the quiz was delivered in multiple pages with “submit†for each page, all the results that had been submitted before the timeout were saved.
Utilities to convert CSV files or tab-delimited text to Moodle Glossary XML
glossaryXMLconverter
glossaryXMLconverter is a GUI utility program for Mac OS X 10.5 Leopard (does not run on 10.4 Tiger). This can convert CSV files (encoded in ASCII or UTF-8) from Apple’s Numbers or Google Spreadsheet to an XML file that Moodle Glossary Tool can import. It also accepts drag&drop of these files and drag&drop of the selected MS Excel cells. Concept (1st column) and Definition (2nd) are necessary, but Category (3rd) and Keyword (4th) are optional. Read the included Read Me file for more information.
glossaryXMLconverter.html
glossaryXMLconverter.html is an HTML page with Javascript and should work on most of web browsers (tested on IE and Firefox on Windows and Safari, Firefox, and Camino on Mac OS X). This converts tab-delimited text (copied/pasted from Excel, Apple’s Numbers, text editors, etc.) to XML that can be imported to Moodle Glossary Tool. Concept (1st column) and Definition (2nd) are necessary, but Category (3rd) and Keyword (4th) are optional. A user needs to copy&paste the generated XML code to a text editor file and save it. If the input text includes non-ASCII characters, the file should be saved with UTF-8 encoding (Unicode).
Currently, these are available on Moodle.org forum on Glossary and downloadable from the following link (you need to login as yourself or as a guest to the site).
glossaryXMLconverter + glossaryXMLconverter.html
http://moodle.org/mod/forum/discuss.php?d=79120#p394626
glossaryXMLconverer.html ONLY
http://moodle.org/mod/forum/discuss.php?d=91224#p404192
Import resources/activities from one Moodle site to another
If you would like to reuse resources or activities from another course you’ve taught or are teaching, you can use the IMPORT function in the Administration block.
Important notes
1. Both the source and destination courses need to sit on the same server.
2. Section headers (topics) are not properly imported. Workaround this is to substitute labels for descriptive text or graphics as labels are counted as resources.
3. User data won’t be imported. For example, when importing a forum from a past course, no forum posts will come through. If the import function doesn’t meet your needs, contact your local support people to use the backup/restore process instead.
Steps for doing Import
1. Go to the course website you’d like to import to (i.e., New course site)
2. Click ‘Import’ in the Administration menu
3. Select the course you’d like to import from. You have three options here. You can choose from the courses you’ve taught (Click ‘Use this course’) or search it by typing the course title (Click ‘Search courses’).
4. Click ‘Continue’ (Uncheck the materials you don’t want to import)
5. Click ‘Continue’ until the process is over
6. Check if any links are broken. Video Furnace links normally expire after one quarter. If you want to keep using the videos, make a request to OID
(http://www.oid.ucla.edu/spotlight/oid/videofurnace)
7. Check the content of each imported item. If you encounter any problems, please contact your local support people to use the backup/restore process instead.
For local support:
When users report broken links with Import, there could be two reasons: 1)The relevant files don’t get imported; 2) even when all the files are imported, the links need to be re-established. Try the following:
1. Go to Administration→Files on the source course. The default view is the course_materials folder. Download all the relevant files (e.g. images) and then upload them to the same folder structure on the destination.
2. If it still doesn’t solve all the problems, edit each resource where links are broken. In the HTML editor, toggle (<>) HTML codes, locate the problematic href and manually fix the file path.
More info on section headers (topic) problem here: http://tracker.moodle.org/browse/MDL-8848
Creating Groups in Moodle
In the Administration block you have a link called Groups. Groups are useful for breaking down a course with a lot of students (i.e., participants) into manageable subsections. These subsections or groups could correspond to sections of your course, which may be led by different Teaching Assistants. Groups may be helpful when using Forums because they will allow you to communicate with students based on the group to which they are assigned. When you click on the Groups link in the Admin block, you will see the following screen:


. . . and then name your group and add an optional description:

You may proceed by clicking the button “Create Group” and add the participants to the group manually. Be aware that if you have a lot of participants or are creating multiple groups, this may be time consuming.

An alternative is to enter an enrollment key (this is similar to a password) in the corresponding field in the screen above, and then you should give this enrollment key to all the students/participants you wish to be in this group. Finally, instruct the students to login to the course site with this enrollment key as soon as possible, and they will automatically be filtered into this group. Repeat this procedure if you are establishing multiple groups. Naturally, this method can be more efficient for you, the instructor, but does rely on the conscientious cooperation of the students.
Using Forums
A Forum is essentially a bulletin board or discussion board. You may have multiple Forums on your Moodle course site, and within each Forum you may have multiple discussion topics. Replies to the original discussion topic, which is the first post to the discussion, or to subsequent reply will appear “threaded” (indented to show which reply belongs to which post). You may have noticed that one Forum is set up for your course automatically: it is called “Announcements,” and you can use it to communicate with the entire class. While a participant can always access a Forum on the course web site, you may also decide to have posts emailed to the participants.
To add a Forum, pull down the “Add an activity” menu and select “Forum.” You’ll be taken to the following screen.


How to enable access to your CCLE/Moodle course
For TAs and instructors using the campus-wide ccle system at ccle.ucla.edu, this article no longer applies. See Inviting users to join a class (https://docs.ccle.ucla.edu/w/Invite_users_to_join_my_class)
This article explains how someone with the role of “instructor” can enable any CCLE user to gain access to a CCLE/Moodle course site, essentially by enrolling him- or herself in your site.
- Log into your site with instructor or higher permissions.
- Click on the “Settings” link in the Administration block.
- Scroll down to the “Enrollments” section and be sure the setting for “Course enrollable” is set to Yes.
- Scroll down to the section labeled “Availability” in the next window.
- Make sure “Availability” is set to “This course is available to students.” This ensures that the course appears in the list of courses in the CCLE (Moodle) portal at http://ccle.ucla.edu
- Enter a password in the field labeled “Enrollment key.” If you want to make your site enrollable without any key, leave this field empty.
You may also want to change the setting for “Default role,” since this is the level of permissions someone will acquire when they use the enrollment key to join the site. Usually, “Site default (Student)” is what you want for those who should be able to interact with the site, but not modify the contents that appear on it. However, if you want anyone who enrolls with an enrollment key to be able to modify the site as an instructor, change the setting for “Default role” to “instructor”.
Provide the enrollment key to whomever you wish to grant access to your course.
How to remove participants from a Moodle course site
This article explains how an instructor (or someone with a higher level of access) can remove a participant from a CCLE/Moodle course site. The participant removed will subsequently not appear in the list of participants and will no longer have access to the course site.
Instead of clicking the “Participants” link in the block labeled “People,” go to the “Administration” block and click “Assign roles.”

Proceed as though you’re granting a new person access to your course site by clicking on the link corresponding to a particular level of access. In this case, you should click the level of access that the participant to be removed already has. By and large, this will be student-level access, so click “Student.”

In the next screen you’ll see a list of participants in a block on the left who have this level of access. In the block on the right, you’ll probably see the note “There are too many potential users to show” (because all users within the CCLE system would be listed here and the list would be excessively long).

Highlight the participant you wish to remove and the click on the black arrow between the two blocks that points to the right. When you’re done, the participant will no longer appear in the list of participants on the left.

NOTE: On instructional CCLE/Moodle sites, enrollment is automatic for students officially registered for the course, and the CCLE system updates at regular intervals based on data from the Registrar. Therefore, if you remove a participant who still appears in the Registrar’s database as registered for the course, the CCLE system will restore this student’s access (putting his name back in the list of participants) once the automatic update has run.
Requesting a collaboration site on Moodle (CCLE)
Anyone from a unit that has opted into CCLE and who has a CCLE account (UCLA Logon ID or special-case login) can request a collaboration site on CCLE. If you don’t have a UCLA Logon ID, you can go to https://accounts.iam.ucla.edu to create one.
To request a collaboration site if you DON’T already have an “instructor” or higher role on another CCLE site: email the following information to ccle@ucla.edu, and someone with administrator access will handle your request:
- your name, your email address, and your home department/unit
- the purpose of the collaboration site you are requesting
- the name you want to call the site
- the name of the person or people who should have “instructor” level permissions to administer the site
To request a collaboration site if you DO already have an “instructor” or higher role on another CCLE site:
- Log into CCLE from http://ccle.ucla.edu (click Login in the upper righthand corner). The login account you use is the one whose email will receive the notification of the site being built.
- Go to http://ccle.ucla.edu/course/request.php. If you don’t have this link handy, you can always get to this request form by clicking on the “Request Collaboration Site” link listed in the Main Menu on the main CCLE landing page (ccle.ucla.edu).
- Scroll to the bottom of the Collaboration Site FAQ section and click on the “Submit Collaboration Site Request” button;
- In the Collaboration Site request screen, enter the required information: Site full name, Site short name, a brief description of the site’s purpose and your reason(s) for wanting to create the site on the CCLE. You don’t need to enter an enrollment key unless you know you’ll need it.
- Click “Request Site.” The system will display a message confirming your request and letting you know when you can expect to receive email notification of the creation of your site. Click “Continue.”
The system returns you to a new, empty course request screen to request another site. If you don’t want to request another site, click the Home button to return to the CCLE portal.
The site request will need approval by someone with system-wide CCLE administrative access and, once approved, will be placed in whatever category they determine to be most appropriate. (Feel free to suggest what category you’d like the site to be listed under when you type your “Reasons for wanting the course” in the course request screen.) The system will email you when the site is approved and built. The email address used is the one associated with whatever CCLE account you used when you make the request.
Note to Sys Admins: Sites requested by the (built-in Moodle) Course Request function appear to those with sitewide administrators access ONLY. To access pending collaboration site requests go to: Administration >
Courses > Add/edit courses > (scroll down and click the button): Courses pending approval.
In some cases, the CCLE Incident Group (CIG) may need to vote on the appropriateness of the site. This may occur in the following situations:
1. if it’s from a unit not yet opted in, or
2. the unit is opted in, but no support contributor from the unit has been identified.
Turn off Global Events
If you find the Calendar Global Events or Upcoming Events distracting, you can easily turn them off by using one of the following methods:
From Upcoming Events Block:
1. Click on one of the events.
2. Locate the text link ‘Global events’ to the far right of the screen.
3. Click on ‘Global Events’ (The act of clicking on the text will turn off the Global Events.)
NOTE: It is possible that after turning off Global Events, you will not see a large, blank space with the text “There are no upcoming events,” but rather a list of “Course Events.” This is the default view if Global Events are hidden and there are Course Events in the calendar.
From within the Calendar itself:
1. Click on the “Global Events”link in the top right corner of the page. (Beside the link is the icon of an open eye with a green background.)

2. The global events displayed in a list on the left half of the page will disappear. (Notice that the icon next to the “Global Events” link looks like a closed eyelid. This indicates that global events are hidden from view. You can click this link again to make them visible.)
From the Calendar Block:
1. Click on the text ‘Global Events’ located directly below the Calendar.
2. Moodle will display a message, click ‘Continue’.
3. You will be redirected to the CCLE Main Page (You will have to find your course again.)
4. Inside your course, the Global Events will not be visible. (The closed eye icon appears next to global events indicating they are hidden.)
Note: An instructor cannot turn off Global Events for the entire class. It is up to each individual within the course to turn off global events.
Special Cases Login
In rare situations it becomes necessary for an Admin to create a Special Case Login to help in administering course sites. Contact a Moodle Admin for creation of such an account. After you receive your Special Case Login, you can gain access to Moodle by clicking the link, “Special Case Login” on the main login page. For instructions on adding non-UCLA users to Moodle, refer to this link:
Creating CCLE (Moodle) logins for users without a UCLA Common Login ID
Finding the Moodle Version
Below are the two ways to find the version number of Moodle. This can be important for support people, or people interested in version-specific features.
- Logged in or not, hover your mouse over the Moodle logo on the front page, and the pop-up tooltip will let you know.
- Log onto the system as an Administrator and go to the Notifications page.
See this example:

Creating CCLE (Moodle) logins for Senior Scholars
Staff, faculty and students all have a UCLA Login ID and can log into the CCLE Moodle site. However, there are cases where certain groups, such as Senior Scholars, will need to create a UCLA Login ID in order to access Moodle. If you are a Senior Scholar, follow the steps below to create a UCLA Login ID.
Please note that once you’ve created a UCLA logon, you can continue to use it even after the quarter is finished. You don’t have to create a separate UCLA logon for each quarter or academic year.
- Go to http://ccle.ucla.edu.
- Click on the “login” link in the far upper-right of the webpage.
- In the “Useful Links” box, select “Sign up for a UCLA Logon ID”.
- Complete the sign-up procedure.
- Once you have the logon, you need to log into http://ccle.ucla.edu at least once as this will make an entry into the CCLE system.
- Please email your Login ID to the contact person on the Senior Scholars staff.
- That contact person is responsible for confirming that this is indeed the person who should be given access, and then emails ccle@ucla.edu requesting that Login ID be given access (and what kind of access) to the specific class or collaboration site needed.
- CCLE support staff will then email both of them when access has been granted.
How to put Video Furnace movies on a CCLE/Moodle site
Any course with Video Furnace movies hosted by OID should now automatically be given a link on the left side of the course menu, saying Video Furnace. Students will be able to click that link to see a list of the available movies.
Requesting a test site on Moodle (CCLE)
Note: These same steps can be used to request a collaboration site on CCLE/Moodle. Or, consult the Knowledgebase article: requesting a collaboration site on moodle
Anyone with a CCLE account (UCLA Logon ID or special-case login) can request a test site on CCLE. If you don’t have a UCLA Logon ID, you can go to https://accounts.iam.ucla.edu to create one.
To request a test site if you DON’T already have an “instructor” or higher role on another CCLE site
Email the following information to ccle@ucla.edu, and someone with administrator access will handle your request:
- your name, your email address, and your home department/unit
- the purpose of the test site you are requesting
- the name you want to call the site
- the name of the person or people who should have “instructor” level permissions to administer the site
To request a test site if you DO already have an “instructor” or higher role on another CCLE site
- Log into CCLE from http://ccle.ucla.edu (click Login in the upper righthand corner). The login account you use is the one whose email will receive the notification of the site being built.
- Go to http://ccle.ucla.edu/course/request.php?. If you don’t have this link handy, you can always get to this request form by the following steps:
a. Scroll down to the end of the Course categories and My courses lists and click the “All courses” button.
b. From the All courses list, scroll down to the end and click the “Course request” button. The button should take you to this link: http://ccle.ucla.edu/course/request.php? - In the Course request screen, enter the required information: Full name, Short name, Summary and Reasons for wanting this site. You don’t need to enter an enrollment key unless you know you’ll need it.
- Click Save changes. The system will display a message confirming your request and letting you know to expect email notification after some time. Click Continue.
The system returns you to a new, empty request screen to request another site. If you don’t want to request another site, click the Home button to return to the CCLE portal.
The site request will need approval by someone with system-wide CCLE administrative access and, once approved, will be placed in whatever category they determine to be most appropriate. (Feel free to suggest what category you’d like the site to be listed under when you type your “Reasons for wanting the course” in the course request screen.) The system will email you when the site is approved and built. The email address used is the one associated with whatever CCLE account you used when you make the request.
Note to Sys Admins: Sites requested by the (built-in Moodle) Course Request function appear to those with sitewide administrators access ONLY. To access pending collaboration site requests go to: Administration >
Courses > Add/edit courses > (scroll down and click the button): Courses pending approval.
In some cases, the CCLE Incident Group (CIG) may need to vote on the appropriateness of the site. This may occur in the following situations:
1. if it’s from a unit not yet opted in, or
2. the unit is opted in, but no support contributor from the unit has been identified.
Requesting a course site on Moodle (CCLE)
This article explains how to request a course site on the CCLE Shared System for local support. If you are not local support (such as the instructor of record or TA), please reach out to your local support
For information on other types of sites on Moodle (CCLE), refer to this article: http://kb.ucla.edu/articles/site-types-on-cclemoodle or visit http://ccle.ucla.edu/about/sites.html.
There are two requirements for requesting an official course website on the CCLE/Moodle Shared System:
- The course must have a Class ID (9-digit number, previously called SRS) assigned to it by the Registrar. Consult the home department for the course, or refer to this article to locate the course SRS number from the Schedule of Classes: http://kb.ucla.edu/articles/finding-the-correct-srs—for-course-creation-requests
- The home department or unit for the instructor of record must be one that has opted into CCLE/Moodle and has agreed to support the use of CCLE/Moodle for instructional sites. For updates on current CCLE/Moodle member groups, consult http://ccle.ucla.edu/about/participateList.html.
Course Sites Build schedule runs at 8:20 am, 10:20 am, 12:20 pm, 2:20 pm, 4:20 pm, 6:20 pm, 8:20 pm (NOTE: only 200 max courses are built per build)
How to request an individual course site on CCLE
- Log into the CCLE Shared System and navigate to Site admin > Courses > UCLA course requestor. This form is currently restricted to approved local support staff. If you are providing local support, ask the lead support contact in your unit to submit your name to the list, or email ccle@ucla.edu to request access.
- In the first box, you can request to build an individual course site by specifying the Term and inputting the Class ID for the course you want. If you don’t know the SRS number, check it up in the Registrar’s Schedule of Classes. Here is a KB article on how to locate the correct SRS# for your course: http://www.kb.ucla.edu/articles/finding-the-correct-srs—for-course-creation-requests.
- Click “Get course”.
- In the individual course listing, you’ll be able to verify the instructor(s) name(s) and the home department.
- Enter an email if you or someone would like to be notified when the course is built (instructors will be notified by email when their site has been built)
- (Optional) Crosslist: If the requested course is crosslisted with other courses, enter the Class ID for each “Crosslist”. If there are more Class IDs, click the “Add additional Class ID.” Should any class website have already been built on CCLE for a course that needs to be added as a Crosslist, complete the current request procedure excluding that existing course and then manually crosslist all the courses following the instruction for “How to crosslist two already existing courses on CCLE”.
If the requested course is officially crosslisted with another course in the Registrar’s database, it will be displayed. If you don’t want to join those sites, click “No” and uncheck the box next to the Short Name and SRS number for the crosslisted course. If you want another alias added to this course, complete the the current request procedure, and then follow the instructions for “How to add crosslists to a course that is waiting in queue to be built”. - (Optional) Migrate Quiz, Migrate Files: Please ignore these settings as they are not operational at this time.
- Click “Submit Course” to submit your request. The Course Requestor will email the Contact email address you specified confirming the request, and will email again when the site is built.
How to add crosslists to a course that is waiting in queue to be built
- Should any class website have already been built on CCLE for any of the crosslisted courses, wait till all the courses have been built and then follow the instructions for “How to crosslist two already existing courses on CCLE”.
- Log into the CCLE Shared System and navigate to Site admin > Courses > UCLA course requestor. This form is currently restricted to approved by local support staff. If you are providing local support, ask the lead support contact in your unit to submit your name to the list, or email ccle@ucla.edu to request access.
- Under “View existing requests,” select the term for the course and the subject area.
- Click on the “All statuses” and select “To be built”
- Enter the Class ID for each “Crosslist”. If there are more Class IDs, click the “Add additional Class ID.” If you don’t know the Class ID, check it up in the Registrar’s Schedule of Classes. Here is a KB article on how to locate the correct Class ID for your course: http://www.kb.ucla.edu/articles/finding-the-correct-srs—for-course-creation-requests.
- Click “Save”
How to add crosslists to a course that has already been built
- Request individual course websites built for each of the aliases following the instructions for “How to request an individual course site on CCLE/Moodle”.
- Manually crosslist all the courses following the instructions for “How to crosslist two already existing courses on CCLE”.
How to crosslist two already existing courses on CCLE
- Manually crosslist the courses following the instructions here: “http://kb.ucla.edu/articles/how-to-crosslist-two-already-existing-courses-on-ccle”:http://kb.ucla.edu/articles/how-to-crosslist-two-already-existing-courses-on-ccle.
- Import any pre-existing course materials on the child courses to the meta course using the CCLE/Moodle function of “Import” (see instructions “here”: http://kb.ucla.edu/articles/import-resourcesactivities-from-one-moodle-site-to-another) or “backup/restore” (see instructions “here”: http://kb.ucla.edu/articles/backuprestore-a-moodle-course).
How to request course sites for an entire department or subject area
- Log into the CCLE Shared System and navigate to Site admin > Courses > UCLA course requestor. This form is currently restricted to approved local support staff. If you are providing local support, ask the lead support contact in your unit to submit your name to the list, or email ccle@ucla.edu to request access.
- Select the subject area under the second drop down box
- Click “Get subject area courses.”
- The Course Requestor will check if any courses have been built, they will be unchecked with a warning. But if you do not want a course to be built, check the “Build” checkbox to uncheck it.
- Enter an email if you or someone would like to be notified when the course is built (instructors will be notified by email when their site has been built)
- Note that any modification to an existing course will be ignored.
- (Optional) Crosslist: If the requested course is crosslisted with other courses, enter the Class ID for each “Crosslist”. If there are more Class IDs, click the “Add additional Class ID.” Should any class website have already been built on CCLE for a course that needs to be added as a Crosslist, complete the current request procedure excluding that existing course and then manually crosslist all the courses following the instruction for “How to crosslist two already existing courses on CCLE”.
- When you’re ready to submit the request, click “Submit requests”. The Course Requestor will email the Contact email address you specified confirming the request, and will email again when the sites are built.
Instructional sites vs. collaborative sites on CCLE/Moodle
“The following are the different types of sites that are hosted on the shared CCLE/Moodle server, with links to instructions about how to request them.
Course site. An official course website for any UCLA course with an SRS (student records system) number (a 9-digit unique ID assigned by the registrar). Normally, this site is the one to which the Registrar’s Schedule of Classes and MyUCLA “Course webpage” links go. Note that CCLE hosts only those course sites for departments or units that have opted into the CCLE and have decided to run course websites here. For instructions on how to request a course site, consult: Requesting a course site on Moodle
Collaboration site. A site for online collaboration of any kind—projects, committees, task forces, interest groups, etc. —involving at least two UCLA faculty, staff or student participants. Collaboration sites are available to anyone with UCLA affiliation to a department or unit that has opted into the CCLE. For instructions on how to request a collaboration site, consult: Requesting a collaboration site on Moodle"
How to Add a Wimba Voice Tool in CCLE Moodle
These are instructions for instructors on how to add a Wimba Voice Tool (Voice Board, Presentation Tool, Podcaster) to your course site in CCLE Moodle.
1. Login at http://ccle.ucla.edu and go to your course site.
2. Click ‘Turn editing on’ on the top right corner of the screen.
3. Under the topic area, click on the ‘Add an Activity’ drop-down menu and select Wimba Voice Tool.
4. Fill in the form by specifying the Name of the activity, which Topic area you want the item to appear, the Associated Voice Tool, and other settings.
Note: If you haven’t yet created a Wimba Voice Tool yet, you’ll be prompted to create one. If you already have, then choose one of the Voice Tools from the drop-down menu, or click ‘New’ (on the right side) to create a new one. This allows you to choose the same Voice Tool for multiple Activities that you create, should you need to do so.
5. Click ‘Create’.
How to crosslist two already existing courses on CCLE
DOCUMENTATION BELOW IS OUTDATED FOR MOODLE 2
Please see: https://ccle.ucla.edu/mod/wiki/view.php?pageid=4318-——————————————————————————————————-
(This article duplicates: https://kb.ucla.edu/link/1124)
Below are the steps to crosslist two already existing courses on CCLE
Let’s consider course A and course B as two independent courses on CCLE that need to be crosslisted.
1. In the course A Administration > Settings:
a. Set format to “UCLA Redirect”
b. add a ‘c’ at the end of the ‘Short Name’ field ( so 08F-PUBPLC100-1 becomes 08F-PUBPLC100-1c)
2. Create a new course, exactly similar to course A (let’s call it “master”).
3. In the master course Administration > Settings:
a. Set Fullname (title) to a concatenation that describes course A / course B (eg. Public Policy Lec1 / Lec 2);
b. Set the Short Name for this course to be same as that of course A, just without the ‘c’ ( eg. 08F-PUBPLC100-1 );
c. Set the Course ID number for this course to ‘08F-Master_xxxxxxxxx’ (= srs from course A);
d. Set format to “UCLA Private” format;
e. Set “Is this a meta course?” to Yes.
4. For the master course under Administration > Child courses, add course A and course B as child courses.
5. Go to Administration > Settings for course B and change the format to “UCLA Redirect”.
6. Make course A and course B hidden.
7. Change the IEI URL for course B to point to course A. (This requires special access to cis.ucla.edu/iei).
What you are doing is creating a meta course and pointing courses A and B to this meta course. The course URL still remains the same as that of course A. The students for course A and course B will be added to the course_members group of this Meta course.
How to Change your CCLE Moodle Email Address
Students who wish to change their CCLE Moodle address can do so by changing their Official UCLA E-mail Address at https://my.ucla.edu. Changes will automatically be reflected in CCLE Moodle within 24-48 hours.
For faculty and staff, please refer to this article:
https://kb.ucla.edu/link/977
backup/restore a Moodle course
Only people with administrator or instructor rights can use Backup/Restore functions on CCLE/Moodle. One can use the backup/restore functions in the Administration block to copy the course content
1) from the archive server (Moodle 1.8) to the production server (Moodle 1.9), or
2) from one course to another on the same server.
Please note that the Import function serves a similar but limited purpose. Click here to view the KB article on using Import.
- Restore/Backup of a large site may slow down the server; therefore it is recommended to Backup/Restore only sites smaller than 100MB during the peak hours (9am-9pm).
- Look at Files under the Administration block on the source course before you start the backup. If there are any unusually large files, you may want to move them to your local drive first and then upload them to the target site later manually after the restore process.
- Please remember to delete the backup files (.zip) on both the source and destination sites after the Backup/Restore process is complete because those files are no longer needed and may take up considerable space.
Scenario #1: The target course has an SRS number and automatically pulls participant data from the Registrar (e.g., a regular UCLA course).
Most times we don’t need to migrate the user data/files, and the target course already exists. We thus will follow the steps below.
A. Backup Course:
- Go to the source course website
- Go to Settings (under the Administration block) and check for any special course settings (such as an Enrollment Key) and make a note of these. They will need to be added to the new course once it has been restored. You may wish to print the Settings page for reference.
- Click “Backup” (under the Administration block). By default all Resources and Activities are included, but no User Data is included. Uncheck any materials you do not want to back up. Normally User Data (which includes student files, submissions, forum postings, glossary entries, etc.) does not need to be brought in, but you may select User Data if desired.
- Make sure of the following settings:
• “Metacourse” (if present): “No”,
• “Users”: “None”, and
• “User Files”: “No”. - At the bottom of “Backup role assignments for these roles”, select “None”.
- Click “Continue”. The next two screens will show a summary of your backup. Verify that all the information is correct and click “Continue” until you arrive at the Files > backupdata area.
- If you want to see a summary of your backup data, click “List” (under the “Action” column).
- Click the backup file and Save it to a location on your computer where you will be able to find it.
- Before leaving the source course website, delete the backup.zip file that you created. Otherwise, any subsequent backups of the course will include your original backup.
B. On your local hard drive:
- Check if the backup file is larger than 1GB. If it is, unzip the file, move the large files to another folder to reduce the total size well below 1GB, and then re-zip the folder. You will upload these files separately at a later point.
C. In the target course website:
- Click “Restore” in the Administration block.
- Click “Upload a file”, “Browse” to where you saved the backup file, and select it. Click “Upload this file”.
- Under the “Action” column, click “Restore”. (Do not click on the file name itself. This will prompt you to download the file.)
- Click “Yes” for “Do you want to continue?” This may take some time.
- A summary of the Course restore will appear. Review one last time to make sure everything is correct, then click “Continue”.
- Important: In the “Restore to” field, choose “Existing course, adding data to it”. (The default will restore into a brand-new course site.)
- Make sure of the following settings (some of these settings will not be able to be changed, depending on the settings chosen during the backup process):
• “User Data”: “None”,
• “Metacourse”: “No”,
• “Users”: “None”,
• “Groups and groupings”: “Groups and groupings” (otherwise you may get a public/private mismatch error in the later phase),
• “User Files”: “No”. - Check the “Role mappings” to be sure that the source and target roles are consistent. For example, if the source role is Instructor, the target role should be the same.
- Click “Continue”. Scroll to the target course and select it. On the next screen click “Restore the course now”. The restoring process may take a few minutes.
- When the process is complete, click “Continue” at the page bottom. You will then be taken to the course front page.
- If you have moved out any file from the original backup folder at B1, go to the Files area and upload it.
- Verify that all resources you want to be private are set as Private Course Materials. (To change the public/private setting on an item, turn editing on and click on the lock icon next to each item.)
- Check the site for internal links that are broken (e.g. images inside webpages, wikis, books, etc. or links to other areas within your course). Front page links to resources and activities should be fine (unless you have altered the course shortname).
Scenario #2: The target course has no SRS number (e.g., a collaborative or test site).
We often want to keep the user data/files and create a new course on the prod server. To do the backup/restore, we go through Steps A1-C11 as in Scenario #1, with the following exceptions:
- Find a shell course (e.g. your test site) on the prod server to perform the “restore” function.
- At Steps A2 & C5 choose the right settings to suit your specific needs.
- At Step C4, choose “New course” for the “Restore to” field and specify the category of the new course.
How to sort students in moodle grade
We can sort students by their first name, last name and assigned grades by clicking a heading on grade report chart.
1. Sorting by names: By default, students are sorted out by their first names. Click ‘Last name’ above the students’ name, and they’ll be sorted by their last name. Click it one more time, and it’ll be changed from descending to ascending or vice versa.
Click ‘First name’, and they’ll be sorted again by the first names.
2. Sorting by grades: Click the arrow next to grade items, it’ll be sorted by students’ grades either in a descending or ascending order.
Crosslisting pre-existing courses
DOCUMENTATION BELOW IS OUTDATED FOR MOODLE 2
Please see: https://ccle.ucla.edu/mod/wiki/view.php?pageid=4318-——————————————————————————————————-
(This article duplcates: https://kb.ucla.edu/link/1105)
Below are the steps to crosslist two already existing courses on CCLE
Consider course A and course B as two independent courses on CCLE that need to be crosslisted.
1. In the course A settings page:
- Change the format to UCLA Redirect format.
- Add a ‘c’ at the end of the ‘Short Name’ field (so 08F-PUBPLC100-1 becomes 08F-PUBPLC100-1c).
2. Create a new course, exactly similar to course A, to be the Master.
In the Master course setting page:
- Make sure you make it a meta course.
- The Short Name for this course will be same as that of course A, just without the ‘c’ (e.g. 08F-PUBPLC100-1).
- The Course ID number for this course is ‘08F-Master_xxxxxxxxx’ (SRS from course A).
3. Course format should be CCLE Course.
- Title should be concatenated to describe course A / course B (e.g. Public Policy Lec 1 / Lec 2).
4. Add course A and course B as child courses for the Master.
5. Go to the settings page for course B and change the format to ‘UCLA Redirect format’.
6. Make course A and course B hidden.
7. Change the IEI URL for course B to point to course A (access through https://be.my.ucla.edu/login/directLink.aspx?featureID=105)
What you are doing is creating a meta course and pointing courses A and B to this meta course. The course URL still remains the same as that of course A. The students for course A and course B will be added to the Course Members group of this meta course.
Contact Harsh Desai if you have questions.
How do I reuse a questionnaire from another quarter in CCLE Moodle?
In CCLE Moodle, as an instructor, you can create 3 questionnaire types depending on the extent that you’d like to share the questionnaire:
1. public: any instructor on CCLE Moodle can reuse the questionnaire within their courses.
2. private: only you can reuse the questionnaire within that particular course.
3. template: only you can reuse the questionnaire within any of the classes you teach.
To reuse a questionnaire from another quarter:
1. From the settings page for the questionnaire that you created, specify ‘template’ in the drop-down menu for ‘Questionnaire Type’ and click ‘Save changes’.
2. From the course that you’d like to duplicate the questionnaire, create a new questionnaire, and under ‘Define New Content – Copy Existing’ select the radio button next to the template questionnaire.
3. Fill in the fields for creating your questionnaire as appropriate. Using the template as a basis, you’ll be able to edit the questionnaire as needed.
CCLE (Moodle) Status Page
CCLE Shared System (Moodle) Statusccle.ucla.edu
Welcome to the CCLE Shared Systems Status page maintained by members of the CCLE Support team. The information provided here is designed to keep CCLE users informed about new and ongoing issues including upgrades, outages and related issues that affect the delivery of CCLE services. If you’re experiencing a problem that’s not described below, use CCLE’s Request Help feature located in the top right of the CCLE main page and within all course web sites.
PLEASE NOTE: Scheduled system maintenance windows are Tuesdays 6:00-8:00 AM and Sundays 9:00-11:00 AM. Routine maintenance may be performed during these times, and the system may be unavailable.
UNPLANNED OUTAGES
Date/Time:
Issue: Resolution Date/Time:
KNOWN ISSUES & UPDATES
Date/Time: 02/02/09
Issue: The restoration/back-up of large sites may interrupt the server and impact the delivery of CCLE services; therefore, it is recommended to backup/restore only sites smaller than 100MB during the peak hours (9am-9pm).
Estimated Resolution Date/Time: n/a
How to clean up postings in the Moodle forums
You’ll noticed if you copy your text from a wordprocessor, such as Microsoft Word, you’ll see a lot of extra text appear on your Moodle posting after you’ve added it to the forum. The chunk of additional text is generally formatting codes from that wordprocessor. The editor in Moodle will sometimes strip out what they think is bad code; it’s not technically “bad code,” but code Moodle doesn’t understand.
There are two ways to clean your posting up. The first way is to go back to your posting (you can do this step the first time you post to the forum) and click on the icon that looks like a paper with a blue W. It’s the icon third from the top right in the Moodle Editor (just above the area you enter your text). If you hover over this icon, it should say “Clean Word HTML.” This will remove some markup, but you will still need to clean up small traces of the markup. To remove the small traces, you need to click on the <> icon in the editor and delete the MS format (it’s usually this long chunk of text followed by an [endif!]). You can just delete that. Then click on the <> icon to return back to normal view. Click “Save changes” and you’re done!
Another way to prevent the markup from showing up in your forum posting is to open a simple text editor, such as Notepad, and copy the text that you wrote in MS Word and paste it into Notepad. Then copy the text again, this time from Notepad and paste it into the discussion forum. This will prevent MS formatting and markup from ever showing up in the forums.
How are wikis being used in teaching?
Articles and Other Resources
- 3 Challenges to Wiki Use in Instruction – Ruth Reynard 02/11/09
- Wiki as a Teaching Tool – Parker & Chao, Interdisciplinary Journal of Knowledge and Learning Objects – Volume 3, 2007
- Teaching, Learning, and other uses for Wikis in Academia – Campus Technology – 11/15/05
Examples at UCLA and elsewhere
Please add any examples of wikis being used in teaching that you know of here at UCLA or elsewhere. Thanks.
Moodle Books
- Online Version of Using Moodle Version 2 by Jason Cole & Helen Foster
- Review of Moodle Books from Pakt Publishing
Using Moodle, 2nd ed is available through UCLA’s aggreement with O’Reilly Book/Safari Online :
Missing Announcements or News Forum in MOODLE
In case a course has a missing announcements or news forum, here is the solution:
- Get the course id of the course you are viewing
- Goto mdl_forum in MySQL
- Find the news and announcement forums corresponding to the course id
- Delete those two forums
This will create two new forums and will create links to them in the course.
How is the Turnitin service activated and TA access granted in MyUCLA?
As of Fall 2016, Turnitin is available exclusively through CCLE. For assistance using the service through CCLE, please contact your local CCLE support group or submit a ticket for assistance.
Moodle module backup and restore
Moodle module backup and restore
By default, a module is ignored by the backup and restore processes, i.e. its database entries are not backed up or restored. To support backup and restore, the module needs to have the files backuplib.php and restorelib.php in its directory, and the files should implement several functions and in a certain way. Unfortunately, there is very little documentation out there about the implementation. Moodle Doc only has one stub page on backup, and none on restore.
In addition to the GUI option for course backup Moodle provides api for backing up a course via a script by passing the user options and modules.
Backup
The course backup process
Step One (backup_form.html)
The user starts by choosing which of the instances of modules to backup and whether to back up user data. There are other settings such as whether to back up users at the bottom.
Step Two (backup_check.html)
This page shows the user what will be backed up, and gives the user choices of proceeding or backing out.
Steep Three (backup_execute.html)
The actual backup is done in this step. Modules take turn to write to the backup XML file while their names are listed. If there is any error, this page also indicates that the backup failed for or skipped that particular module. Finally, the files are compressed and the ZIP file is stored in the files area.
Functions
backup_execute() gets called from the step three above and initiates the process in backuplib.php
backup.lib
backup.lib is responsible for including backuplib.php for each chosen module. This raises the condition that none of the module names are alike and common files across modules can be included exactly once.
backup/lib.php
Function backup_course_silently – takes user options from another function and process backup
Function backup_generate_preferences_artificially – generates user preferences to instruct the backup process what modules, instances, user_data to be backed up.
mod/MODULENAME/backuplib.php
MODULENAME_check_backup_mods($course,$user_data=false,$backup_unique_code,$instances=null) — required
$course – the course to be backed up.
$user_data – array of objects. Each of these objects represents a module instance in the course, and basically contains information from a record in mdl_MODULENAME. For example,
Array (
0 => stdClass Object (
    [id] => 3
    [course] => 3
    [name] => Test Label One
    …
  )
1 => stdClass Object (
    [id] => 4
    [course] => 3
    [name] => Test Label Two
    …
  )
)
$backup_unique_code – a code unique to this backup action, apparently to avoid two backup action being run twice.
$instances – array of objects. Each of these objects represents a module instance selected for backup and has three properties: “name” (module instance name), “userdata” (1 if backing up user data; 0 if not), “id” (module instance ID). For example, if the user chooses to back up Test Label One (label #3) with user data and Test Label Two (label #4) without user data, $instance will look like this:
Array (
3 => stdClass Object (
    [name] => Test Label One
    [userdata] => 1
    [id] => 3
  )
4 => stdClass Object (
    [name] => Test Label Two
    [userdata] => 0
    [id] => 4
  )
)
Return value – information about instances of a module be backed up in Step Two. Its format is that used by $table→data given to the print_table() function. That is, if the function return this array:
Array ( [key1] => Array ( [key1a] => row 1 column 1 [key1b] => row 1 column 2 ) [key2] => Array ( [key2a] => row 2 column 1 [key2b] => row 2 column 2 ))
Then the following table is printed in Step Two under the module’s heading:
row 1 column 1 row 1 column 2 row 2 column 2 row 2 column 2Note that the content can contain HTML code, and that’s how the assignment module achieves the effect of subheadings.
MODULENAME_encode_content_links($content,$preferences) — optional
Replace domain-dependent links to pages within a module with some domain-independent short form, so that the backup can be restored to another server and work. It looks like the format of the short form is up to the developer of the module, as long as it is understood by function MODULENAME_decode_content_links (which reverses the process). The modules I checked replaced something like “http://www.yourname.com/yourmoodlesite/mod/MODULENAME/somepage.php?param1=123¶m2=456” with something like “$SOMETHINGYOUMAKEUP*$2*$3$”.
$content – the original content with links to be encoded.
$perferences – don’t know what this is. It is not used in any of the modules I looked at.
Return value – the processed content with encoded links.
Restore
Backup IDs
When restoring, you cannot just get the data and insert records without modifying, because any foreign key you store is going to be invalid. For example, if you restore forum posts, the user IDs associated with the posts will be different in the restored course from the original course.
Moodle solves this problem with the mdl_backup_ids table, which maintains a map between values of IDs in the original course and the new course. Presumably, Moodle takes care of user, groups and roles before the functions in your restorelib.php are called. So your functions will use the following workflow:
- When you prepare a record for insertion, if a field is an ID that changes in the backup/restore process, use the backup_getid() function to get its value.
- After inserting a record, note the insert ID (i.e. the id of the new record) and use the backup_putid() function to store it in the mdl_backup_ids table.
- Process the next item.
Restoring a Moodle Collaboration Site from Archive to Production
If you are trying to restore a collaboration site from the Archive server unto the Production server but are getting user data errors (and the restore is failing), check to make sure that all users who appear in the pink error box have the exact same user information in their profiles on both the Archive and Production servers. (You can open two windows and do a side-by-side comparison.)
For example, make sure all email addresses and ID numbers match exactly between like users. If they do not, Moodle will not let you restore the site (because it assumes this is not the same user). Please refer to the attached document for screen shots.
Solution #1 (requires access to Moodle database)
Follow these steps:
- Point your browser to http://archive.ccle.ucla.edu
- Log in with your Site Admin username and password.
(If you do not know your username and password or don’t have one, contact Deborah Kearney at: dkearney@oid.ucla.edu.) - If you are a Support Admin, contact your supervising Site Admin for assistance.
In order to change users’ email addresses, you will need Site Admin access on the Archive server (see Step 2 above) and the knowledge of how to edit the Moodle database. Please contact Caroline Tam Kong (caroline@ssc.ucla.edu) or Nick Thompson (nthompson@oid.ucla.edu) for help.
Soution #2 (does not require access to Moodle database)
Follow these steps:
- Point your browser to http://archive.ccle.ucla.edu
- Log in with your Site Admin username and password.
(If you do not know your username and password or don’t have one, contact Deborah Kearney at: dkearney@oid.ucla.edu.) - If you are a Support Admin, contact your supervising Site Admin for assistance.
- Extract moodle.xml from the backup set.
- Open moodle.xml in a text editor
- Each user record is enclosed in tags. Check the offending user by ensuring that everything between the associated tags matches the user account on PROD (ensure email or firstaccess fields match with the ones in target site).
- Save and close moodle.xml
- Replace the moodle.xml in the backup set with the updated moodle.xml and zip the folder.
- Run the course restore using the updated backup set.
Note: Since Moodle 1.9.7 all user fields must exactly match between all the instances of the same courses residing on different servers in order for restore to work.
I am installing Moodle locally on a Mac. When I go to run install.php I get error 500 message.
Try changing the following lines in httpd.conf:
AllowOverride All
To:
AllowOverride None
rename .htaccess
Actually, I think its an .htaccess issue. Subversion passes the .htaccess file in the checkout unfortunately. If you’re just testing locally, you can rename your .htaccess file to something else like .htaccess_bak and then try again. This will ensure that you have access to the moodle directory. The .htaccess file tells apache to look for shibboleth authentication before allowing access to the moodle directory.
How do I Add a Student to a Cross-listed Course?
Cross-listed courses consist of one meta course and multiple child courses. A caveat of cross-listed courses is that you must add students to the child course not the meta course. Your changes will propagate up to the meta course. With the new Control Panel in CCLE Moodle, it is very easy to find child courses and then add students.
Follow these steps:
- Locate your meta course (the course that appears when you search CCLE*).
- Click on the “Control Panel” (yellow button in upper-right of screen).
- Choose the “Advanced Functions” tab.
- If your course is cross-listed, all of the children courses will appear here.
- Click on the “Assign Roles + Name of Child Course”.
- This will take you to the Assign Roles page for that child course.
- Click on “Student”.
- Search by Name.
- Click the “Add” arrow button.
Best Practice: Use the cclecourse theme for meta courses. Child courses can have different themes, if desired.
Note: Only Support Admins (and Admins) have this ability.
*Meta Courses and Child Courses use the same URL. However, when students log in they will be directed to the child course. When Support Admins log in they will be directed to the meta course.
For more information on cross-listed courses search “Moodle”, “crosslisted”.
Deploying CCLE Front Page Activities Based on Role
Site Administrators can leverage the unique characteristics of the Front Page (MySites) of CCLE to deploy site-wide activities. The advantages to using the front page are: 1. You can control who sees which activity based on user role (targeting the user) and 2. The activity appears on the MySites (Front Page) page upon login.
In this example, we will use the Instructor Student Survey — a questionnaire activity that was deployed to two different populations on CCLE. If you are deploying an activity to only one group then you can alter these steps accordingly.
IMPORTANT NOTE: Only one site-wide activity can be administered at a time. For this reason, it is imperative that you obtain CIG approval.
Part 1: Making your lists to populate the front page roles:
- Go to User Bulk Actions in the Admin Panel and use the Filters (Show Advanced) to generate the first list (All Students in this example).
- Repeat the steps above to get the second list (Instructor for this example). You can create filters based on term, if desired. For each category add that list to Selected Users and repeat for additional categories and/or term.
- For each list you create, make sure one of your filters is Authentication = Shibboleth. This is an important step because Moodle makes you specify this when uploading your users into the Front Page. See screen shot below Part 4: Step 2 (default values).
- Once you have your list the way you want it, go to Selected Users (make sure they are selected) and choose Download. A new screen appears, choose csv format.
Part 2: Remove Duplicates
On CCLE, students and instructors share roles, so it very important to remove duplicates (your activity may not work as expected if you don’t).
- Merge the Instructor list into the Stduent list (File > Import).
- Use the remove duplicates feature in Excel.
- Save this file as the Student list.
Why is Step 2 necessary? This is necessary for the following reasons:a. Moodle filters are limited (they are not conditional, but rather subtractive). For example, if you were to make a filter that included Instructors and then filter by Students, the result would be only Instructors that also have Student roles. In this example, the objective is to create a survey list of all students and then eliminate instructors from that list.
b. Instructors can, and often do, have the role of student on CCLE (due mostly to being students in collaboration sites.) The way CCLE is currently set up, it is much easier to do a global search by student role. (Alternately, you could search student role by category as a way to eliminate instructors who also have student roles (on collaboration sites), but this method would be very time-consuming and it is not recommended. Merging files and then removing duplicates is a much easier way to obtain the same results.)
c. If your Front Page roles contain duplicates (deploying to more than one group) then your survey may exhibit unintended behavior. (When a user is assigned more than one role, Questionnaire defaults to Student role.) - Now you should have two lists (instructor and student) that do not contain duplicates.
Part 3: Add role and course name to Excel
- Specify new labels in Excel called role1 and course1 for each list
- For instructors use the Non-editing instructor role (role ID = “4”). Using this role ensures that instructors will NOT have editing rights to the front page. Just put the number in the column in Excel.
- For students use the Student role (role ID = “5”). Just put the number in the column in Excel.
- For both lists put ccle in the course1 field (this is the shortname of the front page)
Part 4: Upload your users into the Front Page roles Uploading large lists puts a strain on the server. Do this on off-peak hours.
- Go to Upload Users on Admin Panel and select each of your files to upload.
- After the file uploads click Show Advanced and make sure the settings look like this:

- Your front page will now be populated with the new roles. (To check go to Front Page roles in the Admin Panel.)
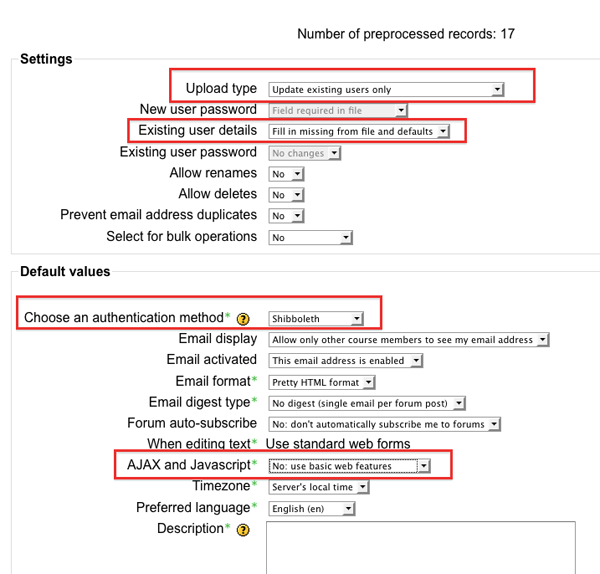
Part 5: Creating the Activity
- In this example, we are making two separate surveys using the questionnaire activity.
- Go to front page and Turn Editing On to see front page blocks. Turn on the Main Menu block and add a questionnaire(s).
- Hide the Main Menu Block.
- Make an html block(s) to hold the link(s) to your activity. In this example, we are making two html blocks.
- Label each block(s) accordingly.
Part 6: Set Permissions
- Set each of the questionnaire’s permissions so that the different roles (groups) cannot view and submit each others activity AND set permissions that allow each group to view and submit their own activity.
- Set the permissions on each html block (In this example, Students cannot view Instructor block and vice versa: the Instructor block has for the Student role: view block = prohibit and the Student block has for Non-Editing Instructor Role view block = prohibit.)
- Set the permissions on both html blocks so that Guests and Supporting Admins cannot see the blocks as well.
- Test your activity with actual users to ensure it is working correctly. (Non-editing Instructors should see and be able to submit only the Instructor Survey upon logging in to their MySites page and Students should see and be able to submit only the Student Survey upon logging in to their MySites page.)
- When your activity is ready to go live, go to the front page blocks and click the eyeball to unhide each html block containing the link(s) to the activity.
Best practices:
- For surveys, use the questionnaire activity in CCLE (do not use Feedback activity — you can’t prohibit students from submitting a feedback).
- The way front page activities are designed is that users must be logged in to view them. Do not send out direct links to your activity, instead direct users to their MySites page where they will see the link after logging in.
Useful Things Instructors can do with Roles
NEW FEATURE
Customize Student, TA and Guest Roles with Overrride Permissions
Overrides are specific permissions designed to change a role in a specific context, allowing instructors to tweak their course permissions as required. (Tweaking involves granting additional rights or revoking existing rights.) It is now possible for instructors to override permissions of a role in a given context using the Override Permissions tab in the Assign Roles screen for any student, TA or Guest enrolled in their course.
Use Case: Peer Assessment
Overrides can be used to open up areas of a course to grant users extra permissions. For example, instructors may want to experiment giving students the ability to grade some assignments (see the following screen shot) or to peer rate forum posts:
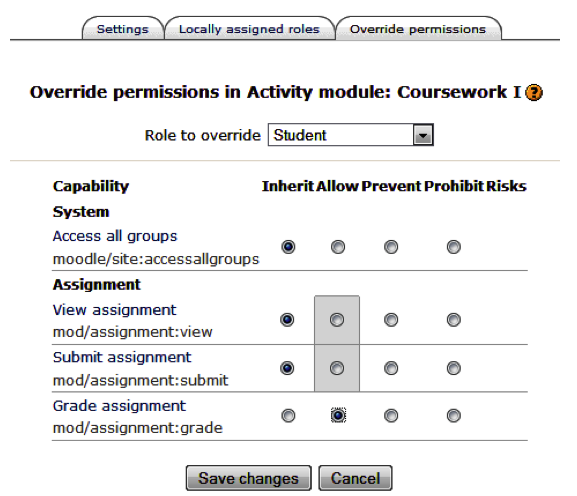
Depending on the context in which permissions are being overridden, only relevant capabilities are shown. In the above screen shot, only four capabilities are displayed. The underlying gray boxes show permissions that have been copied. The highlighted value (grade assignment) is the value of this permission in this role in the course context (or the value that was changed from the original parent role).
Use Case: Block Visibility
Overrides can also be used to restrict areas of a course. For example, instructors can control if Guests can see individual blocks by adjusting the block’s permission accordingly:
Steps:
- Turn editing on.
- In the block you want to hide, click the Assign Roles icon.
- Go to the Override Permissions tab.
- Select the Guest role.
- Set the capability moodle/block:view to prevent.
- Save changes.
Use Case: Archive Forums
In an archive forum, students may no longer start new discussions, nor add replies, but may still read all the discussions.
Steps:
- Turn editing on.
- Go to the Override permissions tab (Control Panel > Advanced Functions > Assign Roles).
- Select the Student Role.
- Set the capabilities to start discussions and reply to posts to ‘prevent’.
- Save changes.
Possible Alternative to Enrollment Keys
Many times, instructors use enrollment keys to give access to individuals who are not part of their UCLA roster (guests). Using an enrollment key can have unintended consequences and instructors are often unaware of how it can negatively impact their class.
In place of enrollment keys, manipulating the Guest Role (override permissions) may achieve the same objectives. Please talk to your instructors about their goals and keep this new feature in mind — it may help solve their problem without having to resort to the use of enrollment keys.
NOTE: Previously, the only ability instructors had over how Guests experience their course was through the use of Make Public and Make Private. Giving instructors the ability to override Guest permissions greatly increases the control they have over how Guests interact with their course site.
Best Practice
When changing any role permission, keep a detailed record of what you changed and then test your change on that particular role to ensure it has the desired effect.
There are many other use cases for this feature. You can refer to this article: http://docs.moodle.org/en/Useful_things_a_teacher_can_do_with_roles for more ideas and detailed instructions. If you have discovered a particularly good use of Override Permissions, please let us know!
source: http://www.packtpub.com/article/roles-and-permission-moodle-administration-part2
Conversion Tools for Moodle Quiz (or Glossary)
If you have a large amount of quizzes in hard copy format (Word) it might be worth the trouble to do a little bit of formatting and then use an online converter tool. Also, if you prefer to work in a text editor or Excel (as opposed to using the CCLE Quiz interface online) this tool may be handy as well. As we find more suitable tools, we will list them here.
- Supported question types: Multiple Choice (also with multiple answers) , Short Answer, Essay, Description, True/False, Cloze, Numerical, Order, Matching.
- Supports different types of glossary entries – Excel files (term TAB definition), term – definition, term: definition, term break definition.
- Encodes your textfile in UTF-8
- Unlimited number of questions and answers.
- Feedback and General Feedback for questions, category – for glossary entries.
- Use HTML tags in Question Text and Feedback. Supports embedded TeX formulas. You can insert one image for question.
- You can upload your source files and get generated XML through Download XML button
- Vice versa: Converter generates text from Moodle XML files. Works for quiz and glossary both.
Using the Database module to create an image gallery in CCLE/Moodle
Although Moodle does not ship with an image gallery module per se, the database tool can be repurposed for that function. It contains certain limitations as an image gallery, for instance:
- The database cannot browse to images stored in the Moodle File Manager, only to those stored on your hard drive.
- The database cannot upload images as a batch or in a zip file; all images must be uploaded one at a time.
- A complete image gallery/database CAN be moved from course to course. However, this can only be accomplished via Moodle’s Backup/Restore function, instructions for which I am including at the end of this document. The image gallery CANNOT be saved or stored as a file that can easily be dropped into another CCLE course.
Assuming that these limitations are acceptable, here is the process to create a new image gallery on CCLE:
- Turn Editing On for your CCLE website.
- Find the section where you want to add the image gallery.
- Open the “Add an Activity” dropdown menu for that section and choose “Database.”
- Fill in the “Name” and “Description” for the image gallery/database. All of the other fields are optional, and should be left at the default unless you specifically wish to change one of them.
- Press the “Save and Display” button.
- Within the database, you will see a series of tabs across the top of the page. Click on the tab that says “Presets.”
- Under the “Import” menu, select the radio button labelled “Image Gallery” and press the “Choose” button at the bottom of the screen. This preset will automatically populate your database with Image, Title, and Caption fields. If you want to change these fields, you can do it later by selecting the “Fields” tab at the top of the page.
- Press “Continue.” The overwrite existing settings button is irrelevant at this point, since your database currently has no settings.
- Click on the “Add Entry” tab to add an entry. As stated above, at this time, the Database tool can only find images stored on your hard drive, NOT in your file manager, and it can only upload images one at a time, not in a batch or zip file. Fields are Title, Caption, then Browse button out to the file. Field Alternative text, always a good idea to add a good description of the photo. Top will display, ‘Your entry has been saved’. You can then button Save and view or button Save and add another.
- Both the “View List” and “View Single” tabs will allow you to view the images. A set of icons below each image in those tabs will allow you to edit or delete individual images.
If you wish to reuse an existing image gallery/database in another CCLE course website, then you MUST use the “Backup/Restore” function in Moodle. There is no way that I have discovered to export the entire database as a file that can be moved from course site to course site. The “Export” button under the “Presets” tab only allows you to export your fields and the text content of those fields, NOT the image content (since it outputs .csv files, which have no way to include images). For smaller image galleries, however, where the instructor does not mind restoring the images manually, this may be the most effective means of transferring the gallery from site to site. The instructions to successfully Backup and Restore an image gallery are as follows:
- Click on “Backup” in the Admin block of the course that contains the image gallery.
- You can choose to only backup the database. However, you MUST choose to backup that SPECIFIC database, and you MUST choose to back up the User Data for that database.
- Set “Users” to “Course.”
- Click “Continue.”
- When the Backup report is given, click “Continue.”
- In the Admin block, click “Restore.” It doesn’t matter which course website you choose, since it will allow you to select the course site later.
- Find the backup file that you just created in the list of files and click “Restore” from the options to its right.
- Click “Yes” to continue.
- At the end of the Backup Details, click “Continue.”
- Finally, the course restore, AND THIS IS THE TRICKY PART. You can choose to create a new course or add the database to an existing course, as you see fit. But you must make sure to select BOTH the specific image gallery database AND its user data; the user data checkbox is stuck in the middle of the screen and blends into the text for the database, so it is easy to miss (I made this mistake numerous times). Once BOTH of those checkboxes have been selected, you can continue.
- For “Users,” choose “Course.” (If you don’t choose this, it will force it for you later.)
- Click “Continue.”
- If you chose to add the database to an existing course, select it from the list. The list is very unwieldy, and it would be nice to develop a better method of selecting the destination course, but until then, you must search through the list for your destination website.
- When it adds the database to the course, click “Continue.”
- This should complete the transfer. Check the image gallery on the destination course to make sure that everything came through properly.
Notes on restoring deleted Moodle Forum
Someone deleted a Moodle Discussion Forum with 137 posts, and it was urgent to recover it because in that course, these were part of the grade.
This is not a guaranteed solution, just a record of what we did. We only attempted it because of the urgency of the situation. Our experiment seems successful, and here’s what we did.
Note: this is in the form of a shell script, with most of the lines commented out, because we only ran one step at a time, then did queries to check that results were what we expected.
restore.sh# April 7, 2011 - experiment in restoring a forum that had been deleted.# First we found the daily database backup prior to the forum deletion time, and copied and unzipped it to backupdb.sql.# cd /data-archive/mysqldumps/# ls -al /data-archive/mysqldumps/# cp /data-archive/mysqldumps/moodle.4.gz /data-archive/mysqldumps/backupdb.gz# gunzip backupdb.gz# mv backupdb backupdb.sql# Then we copied the schema (but not the data) from our production moodle database to a new db called "forum_restore"# These could be combined but we didn't realize how many we'd need at first.# grep "INSERT INTO \`mdl_forum" backupdb.sql > foruminserts# mysql forum_restore < foruminserts# grep "INSERT INTO \`mdl_course_modules" backupdb.sql > course_modules# mysql forum_restore < course_modules# grep "INSERT INTO \`mdl_course_sections" backupdb.sql > course_sections# mysql forum_restore < course_sections# grep "INSERT INTO \`mdl_grade_items" backupdb.sql > grade_items# mysql forum_restore < grade_items# grep "INSERT INTO \`mdl_grade_grades" backupdb.sql > grade_grades# mysql forum_restore < grade_grades# Then we made a dump of the current production moodle db then restored it to clone_moodle, then pointed our stage server at it.# mysql clone_moodle < moodle_nolog.110407.mysql# Here we started putting the data back.# Note you have to hardcode the forum number.#mysql -e 'insert into clone_moodle.mdl_forum select * from forum_restore.mdl_forum where id = 11067' clone_moodle#mysql -e 'insert into clone_moodle.mdl_forum_discussions select * from forum_restore.mdl_forum_discussions where forum = 11067'#mysql -e 'insert into clone_moodle.mdl_forum_posts select * from forum_restore.mdl_forum_posts where discussion in (select id from forum_restore.mdl_forum_discussions where forum=11067)'#mysql -e 'insert into clone_moodle.mdl_forum_queue select * from forum_restore.mdl_forum_queue where discussionid IN (select id from forum_restore.mdl_forum_discussions where forum=11067)'#mysql -e 'insert into clone_moodle.mdl_forum_ratings select * from forum_restore.mdl_forum_ratings where post IN (select id from forum_restore.mdl_forum_posts where discussion in (select id from forum_restore.mdl_forum_discussions where forum=11067))'#mysql -e 'insert into clone_moodle.mdl_forum_read select * from forum_restore.mdl_forum_read where discussionid IN (select id from forum_restore.mdl_forum_discussions where forum = 11067)'#mysql -e 'insert into clone_moodle.mdl_forum_subscriptions select * from forum_restore.mdl_forum_subscriptions where forum=11067'#mysql -e 'insert into clone_moodle.mdl_forum_track_prefs select * from forum_restore.mdl_forum_track_prefs where forumid=11067'## This next one assumes that it is a forum, which is module=7#mysql -e 'insert into clone_moodle.mdl_course_modules SELECT * FROM forum_restore.mdl_course_modules WHERE module= 7 and instance = 11067'## This next one is not an INSERT, but is an UPDATE and assumes it is a forum and is in section 0. Note you have to hardcode the course number.#mysql -e "update clone_moodle.mdl_course_sections set sequence=concat(sequence, ',', (select id from forum_restore.mdl_course_modules where module = (select id from clone_moodle.mdl_modules where name='forum') and instance='11067')) where course=7410 and section=0"## Untested because they were empty# mysql -e "insert into clone_moodle.mdl_grade_items select * from forum_restore.mdl_grade_items where courseid=7410 and itemtype='mod' and itemmodule='forum' and iteminstance=11067"# mysql -e "insert into clone_moodle.mdl_grade_grades select * from forum_restore.mdl_grade_grades where itemid IN (select id from forum_restore.mdl_grade_items where courseid=7410 and itemtype='mod' and itemmodule='forum' and iteminstance=11067)"## Untested and not converted to updates because they were empty. Actually, according to David Choi, this history table wouldn't be updated anyway.#select * from mdl_grade_items_history where oldid = (select id from mdl_grade_items where courseid=7410 and itemtype='mod' and itemmodule='forum' and iteminstance=11067) and action=3;#select * from mdl_grade_grades_history where oldid=(select id from mdl_grade_grades where itemid IN (select id from mdl_grade_items where courseid=7410 and itemtype='mod' and itemmodule='forum' and iteminstance=11067)) and action=3;## Since there were no grades, and we don't yet push our grades to MyUCLA Gradebook yet, we ignored that problem.
After the steps above were done, we had a working version of the deleted forum on our stage server. Then we tested it, did a Moodle backup of the cloned course, backed up the real class site (just in case), then restored this forum into the it. Since our course format is programmed to automatically create a Discussion Forum when it finds a site doesn’t have one, the students had a bunch of posts on the new forum that we copied over to the recovered forum. We renamed the restored forum to “Discussion Forum Restored,” and went into each posting in the restored forum and used Moodle’s “Move this discussion to…” tool in the upper right hand corner of the forum post. Once all of the posts were moved to the Discussion Forum, we deleted “Discussion Forum Restored.”
I think we need to make it harder to delete a forum. Maybe we should suggest or force a backup first? Or, remove the ability of instructors or TAs to remove Forums?
Using the text editor in CCLE with iOS devices (iPad, iPhone)
One regular complaint about accessing CCLE through the iPad or iPhone is that users cannot complete activities that include the WYSIWYG (what-you-see-is-what-you-get) text editor often found in, for example, forums, quizzes and questionnaires. This is because the WYSIWYG text editor uses Flash, which iOS does not currently support.
However, the iOS user can still access the text editor by switching to the plain-text editor.
Once in the WYSIWYG editor view, select the double angle-bracket (<>) button indicated below:

Wait a moment or two for the screen to refresh to a view that will gray out the other WYSIWYG editor buttons. Once this new editor view is available, you can enter plain text.
Because the original use for this button is as an HTML editor, an iOS user who knows HTML may use HTML tags to format text in the plain-text mode.
Moodle Keynote - July 2011
From the Moot Down Under —
" Martin Dougiamas is best known as the founder of Moodle, the popular free course management system used by millions of teachers around the world. As the executive director of Moodle Pty Ltd in Perth, Western Australia, he leads the team of software developers at the heart of the Moodle project and the global network of 54 Moodle Partner service companies that help provide funding for this independent open source software project.
Martin has a mixed academic background with post-graduate degrees in Computer Science and Education, and continues to focus on researching how educators approach internet-based education. His major goal for the future is to improve the quality of education by encouraging social constructionist and collaborative practices within online learning communities. "
How to use the Javascript template in Moodles Database Activity Module
There is a javascript template located in the Moodle Database Activity Module so instructors can recognize when students click buttons or hover over textareas, and other such basic functionality.
In the jstemp.jpg, you can see several examples of working javascript.
The first function called fillBoxes() will make the input fields = “Hello World” as you can see in the picture.
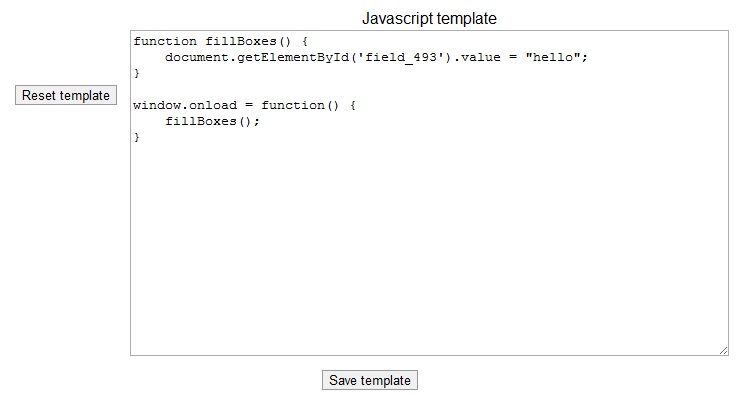
document.getElementById(‘field_493’).value = “Hello”
This line searches the document for an element with the id=“field_493” and changes its value to “Hello”.
The getElementById function requires a string parameter to work, in this case being “field_493”.
Most HTML document elements, whether a button, a picture, a string, have an id/class/name that you can fill such a parameter with. You can investigate this by right clicking the website and clicking “Inspect Element” (Chrome/FireFox) or “View Source” (Internet Explorer).
When we inspect the Moodle database website, we see in the picture that the first input field by Url: has the id=‘field_493’. Having found the element, we change the value to “Hello” using javascript, which you can see in inspect.jpg
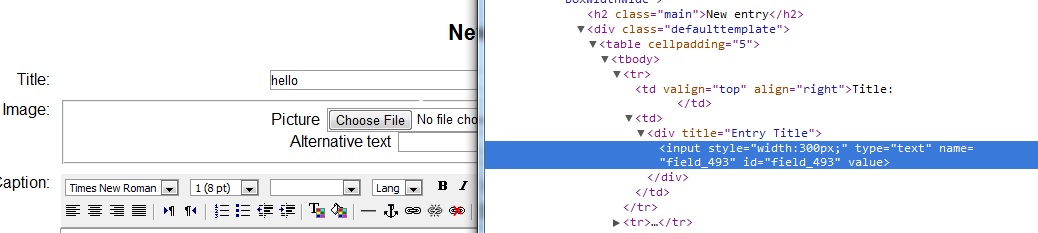
window.onload = function()
This part of the code indicates that when the website is loading, run this function. So everytime someone loads up the database with this javascript template, the code will run, looking for a field “field_493” and changing its value to “Hello”
Another way to use javascript is in making buttons. Here we want an alert box to pop up when the button is clicked. First, looking at buttonjs.jpg we write the function
alert()
which will accept a string as a parameter to display in the alert window.
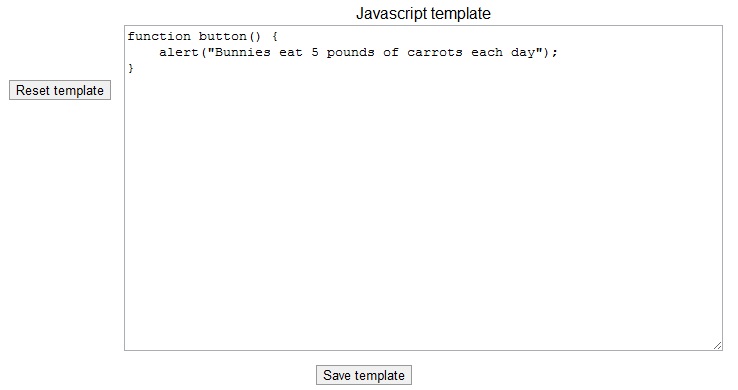
We go into our single template singletemplate.png, clicking the ‘<>’ in the editor, and add tags in HTML to create a button on our single template page. We also add the event “onclick” so when the button is clicked, the function “button()” is run. There are tons of events supported by various tags, like “onhover”, “ondoubleclick”, which you can easily google.
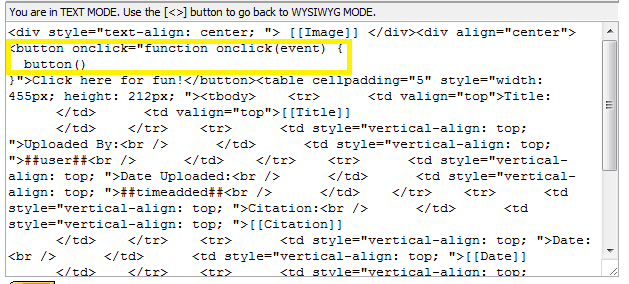
Now, as in the file buttonpopup.jpg when we go to our single template, there should be a button, which when clicked will run button(), displaying an alert box.
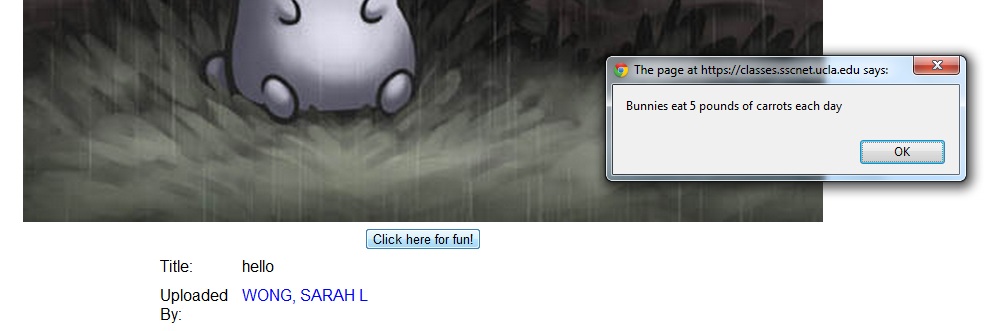
Alternate Colors in Table in a Database Activity
In order to create a table with alternating row colors in a database activity:
The following code goes into the javascript template:
function highlightRows() {var myTables=document.getElementsByTagName('table');var myRows = [];for (var i=0;i<myTables.length;i++){if (myTables[i].getAttribute('name')=='listviewrow'){myRows.push(myTables[i]);}}for (var i=0;i<myRows.length;i++){myRows[i].className = 'd'+(i%2);}};
Then in the list view, you should switch to html mode and add to the table tag in the repeated entry section the following clause:
name='listviewrow'
and you need to add in the list footer section the following code:
<script type="text/javascript">highlightRows();</script>
Finally modify the css definitions in the css template to:
table.d0 td { background-color: #FFFFFF; color: Black;}table.d1 td { background-color: #F5F5DC; color: Black;}
Color refers to the text color.
Linking database information through JavaScript template in Moodle Database Activity Module
Say you have two databases in your Moodle site, and you want to send data from one database to the other one to fill in a form. An easy way to do this is by sending the required data through the url and utilizing JavaScript.
Sample 1
In Sample 1, lets say we want to send data like the title to another database. Through HTML and JavaScript, we turn the paper icon into a button, as you can see in Sample 2. This is an <a tag, meaning an anchor tag. Automatically, through HTML, this will lead to the link specified, meaning the href=https://classes.sscnet.ucla.edu/mod/data/edit.php?d=91&url=##moreurl##&title=[[Title]]
Sample 2
So right now, we have a paper icon that links to a specified website; however, this website is not correct because the ##moreurl## contains a string that creates an error. This is where javascript comes in, which will dynamically change the website to the correct one when clicked, explaining why the <a tag has the onclick = “init()”. When clicked, the function init() will run.
Sample 3
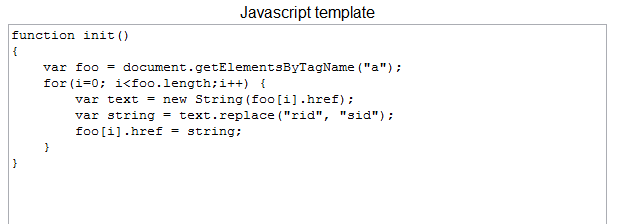
In Sample 3, we see the init() function. The first line declares that the variable foo is equal to all the elements with the tag name “a”. This fills foo with an array of all the anchor tags in the document, including the one described above in Sample 2.
Running through the array with a for loop, the variable text is defined as the anchor tag’s href, the website it links to, and then it replaces the string “rid” with “sid”. By using JavaScript, when the button is clicked, it will search through the anchor tags and replace the required string so the website linked will be correct.
Sample 4

In Sample 4, we can see the url and the displayed database. The complete url contains the needed data of the partial url, which is the ##moreurl## but with rid = sid. The title has also been sent through the url, but to place it in the database requires more JavaScript.
Sample 5
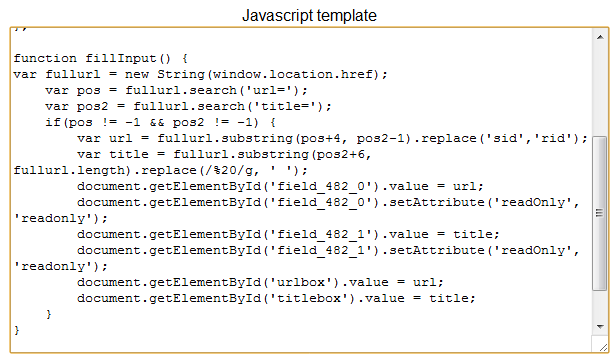
In Sample 5, the function fillInput() will take the url and parse the required information into the template in Sample 4. In this function, we want the ##moreurl## and the title — data from the previous database that was transferred over. We search for the beginning of each field in the complete url, placing values in the variables pos/pos2. If both variables are defined, meaning they were found in the url, we can get the required data through substrings.
Sample 6
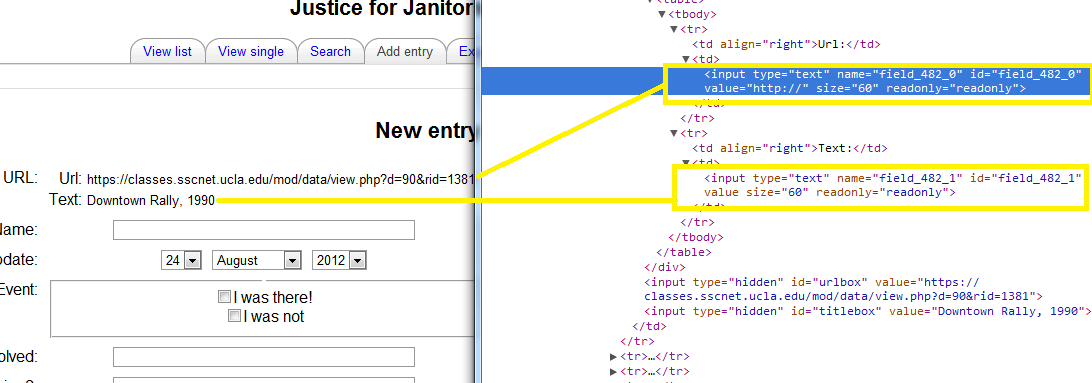
Now that we have the required data, we transfer them to the template by searching through the document. Going back to Sample 4, when we right click anywhere on the webpage, and then go to inspect element/view source, we can see the raw HTML of the page. Going over the template values in Sample 6, we see that field_482_0 is the input box for the URL: and field_482_1 is the Title: input box. Through JavaScript, we can dynamically fill in those values with the data from the url.
Thus our end result is seen in Sample 4 where we have a url with the data passed from one database to another to fill in a template!
Does CCLE have a survey function? If so, where in CCLE can I find the function? Thanks!
Please refer to the following link on information regarding survey creation on CCLE: https://docs.ccle.ucla.edu/w/Survey
CCLE Feedback activity
The members of my collaboration site want to issue a survey to UCLA members who are not part of the collab site. How can we do this?
Using the Feedback activity, you can make it “public” following these steps:
1) In the course settings, set Guest access – Yes
2) Create the feedback activity.
3) In its settings set it to Group mode – No groups and Grouping – None
4) In Permissions, go to Advanced role override – Authenticated user
5) Set mod/feedback:view and mod/feedback:complete to allow for Authenticated user
Two Turnitin IDs for one user
A student was getting this error message when she tried to submit her assignment to the Turnitin Activity on the CCLE class site:
“Uploading user information failed because user email was changed to an address that is already associated with an account. UID: *********- Old Email” *****@ucla.edu – New-Email" *****@g.ucla.edu."
Note that the upload will fail for both the student and the instructor as both face same issue.
Try contacting TurnItIn support by reading http://ucla.in/2bjuGGE
How to accept late submissions into a PeerMark assignment in Turnitin
When a paper assignment is set to allow late submissions and is also being used as the basis for a PeerMark assignment, how can these late papers be included in the review process?
The late paper date setting can be accessed by clicking the ‘Show More Options’ link in the Assignment Dates section of the PeerMark Settings page. [Please note that the late paper option only appears once the base assignment has been selected.] Papers submitted up to the late paper date will be included in the pool for peer review.
The late paper date must be after the PeerMark assignment start date but before the due date. This allows students who submit late papers to complete their own reviews and to have time for their papers to be reviewed.
As of Fall 2016, Turnitin is available exclusively through CCLE. For assistance using the service through CCLE, please contact your local CCLE support group or submit a ticket for assistance.