# Outlook
# Out of office assistance in Outlook 2003 disabled?!
Did somehow your “Out of office” assistant get disabled?
When you click on Tools>Out of Office Assistant do you get an error message:
“The command is not available. See the program documentation…blah blah blah”
There is a registry fix that you can do, but it doesnt always work.
Simple fix. Outlook likes to disable add-in’s (yes the OOO is an add-in) if it thinks it is causing a problem.
Fix:
In Outlook go to Help, select > about Microsoft Outlook. Select disabled items. Out of office assistant is in the dialouge box, enable it.
Tada!
# Microsoft Outlook Configuration Analyzer Tool 2.0 (OCAT)
“The **Outlook Configuration Analyzer Tool v2.0** (OCAT) provides a quick and easy method to analyze your Microsoft Office Outlook profile and mailbox for common configurations that may cause problems in Outlook. This can be very useful for busy Help Desk personnel when end-users call for help with Outlook or when you want to identify possible issues with Outlook proactively.”
OCAT v2 and supplemental information—
- [http://www.microsoft.com/en-us/download/details.aspx?id=28806](http://www.microsoft.com/en-us/download/details.aspx?id=28806)
.
Related—
- [http://blogs.technet.com/b/exchange/archive/2012/06/26/microsoft-outlook-configuration-analyzer-tool-ocat-v2-released.aspx](http://blogs.technet.com/b/exchange/archive/2012/06/26/microsoft-outlook-configuration-analyzer-tool-ocat-v2-released.aspx)
# How Do I access a shared calendar/contacts/tasks in Outlook Web Access (OWA)?
1\) Log-into Outlook Web Access.
2\) To view a calendar, from your inbox, enter “/USERNAME/calendar” (without the quotes) in the Address bar. USERNAME is the person’s calendar who you are trying to open.
3\) The user must give your rights to view a shared resource, otherwise Outlook Web Access will log you off. If this happens, click on Home and click on Outlook Web Access in order to log back in.
4\) To view a shared contacts, enter “/USERNAME/contacts” (without the quotes).
5\) To view a shared Tasks, enter “/USERNAME/tasks” (without the quotes).
# Outlook 2007 Spell Check is not working
Problem:
After upgrading from Office 2003 to Office 2007 spell check will stop working on some systems.
Fix:
Delete the registry key “en-US” under:
HKEY\_CURRENT\_USER\\Software\\Microsoft\\Shared Tools\\Proofing
Tools\\1.0\\Override\\en-US
# Copy Outlook 2003 Autocomplete names list to another computer
Find and copy the file \*.nk2
[http://office.microsoft.com/en-us/outlook-help/copy-autocomplete-name-list-to-another-computer-HA001139451.aspx](http://office.microsoft.com/en-us/outlook-help/copy-autocomplete-name-list-to-another-computer-HA001139451.aspx)
# In Exchange 2003, how do I set the Outlook Web Access (OWA) public/private cookie timeout value?
All answers are at own risk:
For OWA, public computer cookie timeout:
Log-into the Front-end and start the registry editor.
Navigate to:
HKEY\_LOCAL\_MACHINE\\SYSTEM\\CurrentControlSet\\Services\\
MSExchangeWeb\\OWA
Enter a new DWord Value called PublicClientTimeout
Modify the value and click on Decimal and type in a value in minutes between 1 and 432,000.
Click OK.
You will need to restart IIS.
For the private computer cookie timeout:
create a DWord value called TrustedClientTimeout in the same place.
Enter a Decimal value between 1 and 432,000.
# How do I disable the Reading Pane for MS Word attachments in Outlook 2003?
To disable:
Close Outlook 2003
Open Word 2003
Tools – Options
Click on the General Tab
Uncheck “Allow Starting in Reading Layout”
# When using Outlook 2003 with Exchange 2003, how do I get rid of those annoying network connectivity pop-ups?
All answers are at own risk:
Navigate to:
HKEY\_CURRENT\_USER\\Software\\Microsoft\\Office\\11.0\\Outlook\\Display
Types\\Balloons
Change these values to 0:
Exchange
Netwarn
NetConn
# For Outlook Rules on Exchange, I get this error: There is not enough space on the Microsoft Exchange Server to store all of your rules. Why?
The complete error is:
There is not enough space on the Microsoft Exchange Server to store all of your rules. The rules that failed to upload have been deactivated.
Exchange 2003 and earlier supports 32KB worth of rules per folder. This cannot be changed. One work around is to create a general rule to move emails to another folder and place more rules on this new folder.
The reason for this 32Kb limit?
The reason for the memory limit is that the total sum of the information that is contained in a user’s rules must fit in a remote procedure call (RPC).
The limit for Exchange 2007 and 2010 by default is 64KB but can be extended to 256KB.
see also,
- [http://support.microsoft.com/kb/147298](http://support.microsoft.com/kb/147298)
- [http://support.microsoft.com/kb/886616](http://support.microsoft.com/kb/886616)
# How Do I access the UCLA LDAP directory through Outlook 2003?
1\) To access the UCLA directory, open Outlook and select Tools – Email Accounts.
2\) Select the option “Add a new directory or address book.”
3\) On the next menu, select “Internet Directory Service (LDAP)”
4\) On the Settings menu for the Server name type in: ldap.ucla.edu.
5\) Click on More Settings and click on the Search tab.
6\) For the Search options type in exactly: ou=person,dc=ldap,dc=ucla,dc=edu
7\) Click OK, click Next and click Finish.
8\) Close and reopen Outlook.
9\) To access the UCLA directory, compose a new email and click on the To button.
10\) From the “Show Names from the” select ldap.ucla.edu.
11\) Click on Advanced on the bottom left and select Find.
12\) Fill in as many fields, typically First and Last and click OK.
13\) Search results will appear based on the fields you filled.
14\) Select the user you are trying to email and click on the To, CC, or BCC and click OK.
# In Outlook 2003 and Exchange 2003, how do I recall an email message?
In order to recall a message, odds of recalling a message increase if the receiving user(s) is also be on Exchange. The odds of a successful recall are very small if you are trying to recall a message that is sent to an outside account such as gmail, hotmail, or yahoo.
1\) In Outlook, click on the Sent Items folder and double-click the message you are trying to recall.
2\) From the sent message, click on Action – Recall This Message.
3\) You can choose to either recall any unread messages or to replace the message with another email.
4\) The Exchange server will try and retrieve the message that you sent. If the e-mail is unread it will retrieve it and depending on the action you selected above will either remove the messaage and/or replace it. You will receieve a success or failure notification in your inbox.
# Outlook 2003 Error: There was an error locating one of the items
While trying to add an exchange server account the following message appeared:
“There was an error locating one of the items needed to complete this operation. It might have been deleted”
All you need to do is so a search for ‘mapisvc.inf’ on your C: drive. It will find 2 files, one in C:\\Windows\\System32, one in C:\\Program Files\\Common Files\\System\\MSMAPI\\1033
Rename both of them to mapiscv\_old.inf – call it what you like, delete it if you are feeling in the zone. Then run Outlook 2003, it will configure and put the file back there for you, and allow you to setup your account.
# Microsoft Outlook doesn't connect or isn't sending and receiving
**Symptom:**
You have an active internet connection (test by opening a webpage) and Outlook is fully functional, except it does not seem to download new mail, and outgoing mail is not sent.
**Cause:**
Outlook may be on “Working Offline” mode. This mode assumes you are not connected to the internet, so it does not attempt to send or receive mail.
**Solution:**
1. Open Outlook
2. Check the lower-right corner of the window for an icon with a small red circle with an “X” and the word “Offline”.
3. Click the icon. A submenu will appear.
4. Click “Work Offline” to uncheck the option
It may take several seconds for the application to reconnect and transfer mail.
# Creating Distribution Lists in Outlook
These basic instructions came from [Microsoft](http://office.microsoft.com/en-us/assistance/HP052578011033.aspx)
1. On the File menu, point to New, and then click Distribution List (DL).
2. In the Name box, type a name.
3. Click Select Members.
4. In the Show names from the list, click the address book that contains the e-mail addresses you want in your distribution list.
5. In the Type name or select from list box, type a name you want to include. In the list below, select the name, and then click Members. Do this for each person you want to add to the distribution list, and then click OK.
6. If you want to add a longer description of the distribution list, click the Notes tab, and then type the text. The distribution list is saved in your Contacts folder by the name you give it.
Please note that each DL has a limited size that restricts it to a few hundred entries, which may not be enough for some. In cases such as this, it’s recommended that you instead use a database in either Excel or Access. This not only is much easier to update but you can then use this for other mail merge options in Word, for example. You can either copy/paste these names into the TO field (limited to about 1000 addresses) or create an email merge from within Word.
# I check mail in my office with Outlook Express, but at home, I check mail via webmail and my messages are gone. How can I see the same messages?
When you download mail to email clients such as Outlook, Outlook Express, etc, your mail is being wiped from the server as well; email clients are defaulted to remove messages from your server after download. Their logic is that if you’re saving it onto your computer, you won’t need it to sitting on the server taking up space. BOL generally gives you around 15MB of space for emails, it sounds like a lot, but it can actually get used up quite quickly if you have students submit papers to your email, or just getting junk mail daily can fill it up. If you should ever go over quota, then you can potentially lose any emails sent after you went over quota, which is why using Outlook Express to download your mail is recommended because you’re actually saving your emails to your computer.
To download your mail to your Outlook or Outlook Express without deleting them from the server, go to Tools → Email accounts →click on the account you wish to save onto the server and click Properties or Change. Then go to the “Advanced” tab and look for a check box that reads “Leave copy of messages on server”. Select this box. Click OK and Close and you’re done!
The emails you download after selecting this option will start to show when you check your mail remotely (through webmail for example). To detele them permenantly, you can remove them from teh server or select the option within the same option you used to leave mail on the server. This way, when you delete messages from Outlook, it will sync with your webmail.
Here’s a quick link: [http://email.about.com/od/outlookexpress/qt/et060703.htm](http://email.about.com/od/outlookexpress/qt/et060703.htm)
# Outlook and Exchange - How To's
How to fix Outlook calendar reminders that are not working
Close Outlook. At the run command (click on Start, Run) type outlook /cleanreminders and click OK. Reopen Outlook and your reminders should start working again.
If that doesn’t work, try running an additional command in the Run box – outlook /cleanreminders /reset folders and click OK.
# Outlook & Exchange - Rules not working
How to delete rules that are not working from your Exchange 2000 server.
I discovered this fix for a problem that was discovered when people couldn’t set their out of office assistants. The message appeared to be set, but then the message never went out. The way to fix this was to first delete the rules on the mail server and then redo them. This is not a fix for an end user to do themselves.
You can find this utility on your exchange 2000 server, probably under the sp3 directory or on the Exchange server cd called mdbvu32.exe in the utils directory.
When you start mdbvu32 you the first screen you get will be say NULL, just click OK and continue. A window will come up that says MDB Viewer Test Application, from here select select MDB and OpenMessageStore. You might also be asked for a profile just as you would if you were setting up Outlook for the first time with the name of the exchange server and user name – (you will be choosing the profile of the user with the corrupt rules).
Then from the MDB menu open the ROOT FOLDER, under child folder select TOP OF INFORMATION STORE (double click). Then under child folder select INBOX (double click). You will see another window called Associated Messages in Fld, these are your rules. Select the rule or rules you want to delete and then from the pull down list called OPERATIONS AVAILABLE choose
lpFld→DeleteMessages() (On Selected MSGS)and press the CALL FUNCTION button.
Close out of those windows until you get back to the MDB Viewer Test Application window and then choose MDB, Store Logoff and click OK and then it is safe to close the application.
It should be noted that the rules do not have user friendly names, you can see more properties if you double click on them. In some cases you may just want to delete all the rules and start over, which is what I did in almost all cases.
# How to Create a PST File to Archive Outlook Email
# Creating A Personal Folder in Microsoft Outlook
Since email server storage is extremely expensive, it’s useful to be able to retain old, low value emails without having to manually save them out to the hard drive as individual files. Instead, you can save old emails in what Microsoft calls a personal storage folder or PST file.
You can either set this to run using the AutoArchive option or you can manually move your old emails (and any other Outlook item) into the PST. The former is a little advanced and should only be attempted when the manual method becomes too cumbersome.
Please note that any email you move into the PST will not be accessible from any other PC as they will be stored on your local C: drive. As such, they also are not automatically backed up unless you choose to store the file somewhere that is already being backed up.
1\. To create a new personal folder, go to File > New > Outlook Data File.
2\. The option Personal Folders File (.pst) should be highlighted. Avoid using older formats unless you plan to share the file with others running the older versions. Click OK.
3\. Name your personal file something descriptive in case you need you create more than one Personal Folder. A common suggestion is to name them by year and then create new archives every year.
Note the location in the Save In box where the file will be created. By default this is put somewhere deep within your personal profile where it will likely be hard to locate later when you want to back it up or move it to another location. Change the location, if necessary.
4\. Under **Create Microsoft Personal Folders** name your folder how you want it to appear in the Folder List of Outlook. Note that you can change these values later if you wish.
5\. If you want the personal folder to be password protected, type a password and verify it. Click the checkbox **Save this password in your password list** if you want the password to save and allow the folder to open automatically.
IMPORTANT: If you choose to encrypt your personal folder, do not forget the password. Once encrypted, there is no way for anyone to access this file without the correct password.
Click OK.
6\. Your new Personal Folder should appear in your Folder List.
7\. To copy mail from your Inbox to your Personal folder, select it and drag it to your Personal Folder. To copy the entire Inbox, go to Edit > Select All and drag all the emails into the Personal Folder.
# Subscribing to JIRA's Issues and Comments using Microsoft Outlook's RSS Feeds
1\. Sign on to JIRA
2\. Click on the portlet from which you want updates.
3\. Found under Current View is RSS ( Issues | Comments ). Click on either “Issues” or “Comments” (you’ll want an RSS feed for both).
[](https://bookstack.kb.ucla.edu/uploads/images/gallery/2020-12/rss-comments-and-issues.png)
4\. In the new window/tab that will open, locate the URL address bar and type after the address “&os\_username=&os\_password=”. Cut/copy the new URL address.
Example: Jane Bruin has an account on JIRA, janebruin, with password CCLE. Her results would be the link’s address, followed by &os\_username=janebruin&os\_password=CCLE
5\. Access Microsoft Outlook.
6\. Under the Mail section is RSS Feeds. Right-click on it.
[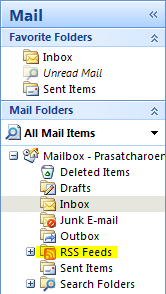](https://bookstack.kb.ucla.edu/uploads/images/gallery/2020-12/rss-in-microsoft-outlook.png)
7\. Select “Add a New RSS Feed.”
8\. When prompted for a location, paste what you copied in step 4.
# Converting messages from Thunderbird to Outlook
Instructions taken from: [http://www.broobles.com/imapsize/th2outlook.php](http://www.broobles.com/imapsize/th2outlook.php)
1\. Compact your Thunderbird folders (optional)
Thunderbird keeps messages in mbox files even after they have been deleted. If you don’t want to include deleted messages in the conversion, you have to compact your folders in Thunderbird. Right click a folder and select “Compact This Folder”. This will completely remove deleted messages from the folders mbox file.
2\. Locate mbox files in Thunderbird
Thunderbird stores messages in the Profile Folder, in the Mail and (if you use IMAP) ImapMail folders. Each mail folder (Inbox, Sent, etc.) is stored as two files — one with no extension (e.g. INBOX), which is the mail file itself (in “mbox” format), and one with an .msf extension (e.g. INBOX.msf), which is the index (Mail Summary File) to the mail file.
3\. Convert mbox files to eml files
IMAPSize has a built-in mbox2eml tool that can seamlessly convert thousands and thousands of messages. Download, install and run IMAPSize (it’s free: [http://www.broobles.com/imapsize/download.php](http://www.broobles.com/imapsize/download.php)) and invoke the mbox2eml option from the Tools menu. Select the mbox file you wish to convert (you might need to set the “Files of type” option to “All Files” in the file selection dialog, since Thunderbird mbox files don’t have an extension) and select a location where generated eml files should be stored. Click “Convert” and IMAPSize will start converting the files.
All the attachments will also be converted and your original Thunderbird files will not be touched. Starting from version 0.2.0. you can convert multiple mbox files at once.
4\. Import generated eml files into Outlook Express
Launch Outlook Express and select the local folder (or create a new one) into which you want to import your messages. Open Windows Explorer or your favorite file manager, locate the generated eml files, select them and drag and drop them into the OE application window. If Outlook Express is your email client of choice you don’t have to perform the next step.
5\. Export files from OE to Outlook
Assuming you have Outlook installed on your system, open Outlook Express and from the File menu select Export/Messages. Once exported, the messages will appear in Outlook – if they were in your inbox in OE, they’ll be added to your Outlook inbox; if they were in a local subfolder in OE, a folder of the same name will be created under your Outlook inbox.
I was using Outlook 2007 and Thunderbird v2.0.0.19 on a Windows XP Pro SP3 machine.
# In Outlook 2003, how do I change the location of the attachment folder?
1. Click Start, and then click Run.
2. In the Open box, type regedit, and then press ENTER.
3. In Registry Editor, locate the following subkey in the registry: HKEY\_CURRENT USER\\Software\\Microsoft\\Office\\11.0\\Outlook\\Options
4. On the Edit menu, point to New, and then click String Value.
5. Type DefaultPath, and then press ENTER.
6. Double-click the DefaultPath value.
7. In the Edit String dialog box, in the Value data box, type the path, including the drive letter, to the folder that you want to use for your Outlook saved items, and then click OK.
8. Exit Registry Editor.
# When you try to print another user's shared calendar in Microsoft Office Outlook 2003, the calendar does not print.
When you try to print another user’s shared calendar in Microsoft Office Outlook 2003, the calendar does not print. Additionally, you receive the following error message:
The messaging interface has returned an unknown error. If the problem persists, restart Outlook.
Method 1: Disable the TaskPad option
On the File menu, click Print.
Click Page Setup.
On the Format tab, click to clear the TaskPad check box.
Click OK to close the Page Setup dialog box.
With the Daily Style print style selected, click OK to print the shared calendar.
OR…
Method 2: Update the permissions of the user
Note These steps are to be completed by the user who shares his or her calendar and tasks.
To update the permissions for the user of the shared calendar, follow these steps:
In the Navigation Pane, click Calendar.
On the File menu, point to Folder, and then click Properties for “Calendar”.
Click the Permissions tab.
Click Add, and then add the user.
With the user selected, set the Permission Level to a minimum of Reviewer.
Click OK to close the Calendar Properties dialog box.
To update the permissions for the user of the shared tasks, follow these steps:
In the Navigation Pane, click Tasks.
On the File menu, point to Folder, and then click Properties for “Tasks”.
Click the Permissions tab.
Click Add, and then add the user.
With the user selected, set the Permission Level to a minimum of Reviewer.
Click OK to close the Tasks Properties dialog box.
# Outlook Spell Check Not Working
Prominent item can be, “If your version of Outlook is different from the version of Word or when Word is not installed at all, some features will not be enabled including the automatic (background) spell checker and AutoCorrect. In order for these features to work, Word and Outlook *must be the same version*”.
- [http://www.slipstick.com/outlook/email/spell-check-is-not-working/](http://www.slipstick.com/outlook/email/spell-check-is-not-working/)
- Also, [http://www.msoutlook.info/question/563](http://www.msoutlook.info/question/563)
# Disable Outlook 2007 RSS Feeds
If you do not want to use Outlook 2007 for your feed reader or aggregator, here is how to remove this feature from Outlook:
1. Click Tools
2. Click Options
3. Select Other tab
4. Click Advanced Options
5. Uncheck Sync RSS feeds to the Common Feed List
6. Click OK.
# Automatically Delay Messages When Sending in Microsoft Outlook
# Automatically Delay Messages when sending in Microsoft Outlook
(client-only rule).
You can automatically delay messages when using Outlook by creating a rule using the following method. For a more detailed explanation see
[Delay Messages in Outlook](http://office.microsoft.com/en-us/outlook-help/delay-or-schedule-sending-e-mail-messages-HP005242790.aspx "Delay Messages in Outlook")
1.On the Tools menu, click Rules and Alerts, and then click New Rule.
2.Select Start from a blank rule.
3\. Select when messages should be checked box, click Check messages after sending, and then click Next.
4\. Select condition(s) list, select any options you want, and then click Next.
If you do not select any check boxes, a confirmation dialog box appears. Clicking Yes applies this rule to all messages you send.
5\. Select action(s) list, select defer delivery by a number of minutes. Delivery can be delayed up to two hours.
6.Click OK, and then click Next.
7.Select any exceptions, and then click Next.
8\. Specify a name for this rule box, type a name for the rule.
9.Click Finish.
The message is held in the folder labelled “Outbox.” This is a client-only rule and only processes messages when Outlook is running on your computer.
# Outlook Cached Mode (2003 and later) improves performance
Cached mode is available in Outlook 2003 or later. It allows offline usage and usually improves Outlook mailbox performance.
## Optimizing Outlook 2007 Cache Mode Performance
For very large mailboxes (greater than 2 GB), Outlook may slow down due to the size of the file used to cache your mailbox on your computer. This blog post explains one technique to [optimize your Outlook 2007 cache mode performance.](http://blogs.technet.com/b/exchange/archive/2007/12/17/3404552.aspx)
## Enabling Cached Mode in Outlook 2003
Cached Exchange Mode, available in Outlook 2003, is similar to offline folders in previous versions of Outlook, though easier to use. (For more information about offline folders, see the Knowledge Base document In Microsoft Outlook for Windows, what are offline folders, and how do I enable and disable them?) Cached Exchange Mode allows you to work with your Exchange account data when your connection to the Exchange server is interrupted or unavailable. Cached Exchange Mode stores a copy of your mailbox on your computer. It does this by automatically creating and using an offline folder file (a .ost file) into which it downloads and maintains a synchronized copy of the items in all the folders of your mailbox. Outlook automatically manages your server connection and data updates; when your connection is restored, Outlook synchronizes your cached mailbox with your mailbox on the server.
However, you still have the option to manually set the connection behavior in order to control the amount of data transmitted to or from the Exchange server. For example, if you use a service that charges you by the amount of data you send and receive (common with cellular and GPRS connections), you can select the Download Headers option to minimize the amount of data sent over the connection, and reduce your connection time. From the headers, you can choose the full items you need.
Note: If you use third-party applications that interface with your Outlook profile (e.g., PDA synchronization software, spam filtering software, Outlook add-ins), UITS recommends that you research these applications to make sure they are compatible with Cached Exchange Mode before enabling it.
To enable or disable Cached Exchange Mode, follow these directions:
In Outlook, from the Tools menu, select Email Accounts… .
In the window that opens, under “Email”, make sure the radio button next to View or change existing email accounts is selected, then click Next.
Highlight your Exchange server account, then click Change… .
To turn on Cached Exchange Mode, under “Microsoft Exchange Server:”, check the box next to Cached Exchange Mode. To turn it off, remove the checkmark from the box. Click Next, and in the window that opens, click OK.
Click Finish. You must restart Outlook for the change to take effect.
# Disabling keyboard shortcuts in Entourage/Outlook for Mac
If you’ve ever hit CTRL+ENTER and accidentally fired off an unfinished email, this is one solution to disable that.
[http://superuser.com/questions/128842/disabling-keyboard-shortcuts-in-entourage-outlook](http://superuser.com/questions/128842/disabling-keyboard-shortcuts-in-entourage-outlook)
# Outlook 2003 is not downloading images in body of the email
Problem: Outlook 2003 is not downloading images in body of the email and instead is showing a red X but If you try and forward the message all the images display properly.
Solution: Delete the registry key: "OutlookSecureTempFolder " which is located under: HKEY\_CURRENT\_USER\\Software\\Microsoft\\Office\\9.0\\Outlook\\Security
good readings:
[http://bwain-dump.blogspot.com/2007/06/how-to-delete-outlook-temporary-files.html](http://bwain-dump.blogspot.com/2007/06/how-to-delete-outlook-temporary-files.html)
or you can use the registry to find (as listed in this article):
[http://theofficecubicle.com/2008/02/01/outlook-2003-red-x-where-embedded-image-should-be-in-email/comment-page-2/](http://theofficecubicle.com/2008/02/01/outlook-2003-red-x-where-embedded-image-should-be-in-email/comment-page-2/)
# How to Clear Cached Email Addresses in Outlook (Windows)
Sometimes mistyped or outdated email addresses get saved in Outlook’s cached memory. The easiest way to remove a cached email address is:
1. Start typing in the address that shows up incorrectly.
2. Hit the Down arrow key to select the auto completed address.
3. Hit the Delete key to delete the auto complete address
# My reminders do not pop up on Outlook after the email migration
Try running
outlook.exe /cleanfreebusy
and
outlook.exe /cleanreminders
from Start→Run.
# Shortcut keyboard commands for Outlook Web Access
There are more.. but.. here are the most useful….
ENTER
Open the selected message/contact, appointment etc. depending on the current folder you’re in.
Ctrl+N
Open/create a new message, appointment, contact etc. depending on the current folder you’re in.
Ctrl+R
Reply to the selected message.
Ctrl+U
Mark selected message as unread
Ctrl+Q
Mark the selected message as read.
Ctrl+K
Resolve the names in the address boxes (ALT+K can also be used)
Ctrl+Shift+R
“Reply all” to the selected message.
Ctrl+Shift+F
Forward the selected message.
Del
Delete the selected message.
Shift+Del
Permanently delete the selected message.
F7
Check the spelling in a message.
# Outlook 2007 (Windows 7) OLK (Attachment folder?)
Problem: You open an attachment from Outlook, (word, excel etc), you make changes to it, you just hit “save”. Where did it go? In theory, if you exit out, and say “yes” to the two “do you wish to save messages”, the file/attachment should now be updated in that email, but that never works the way you want it to…. (blame microsoft).
What do you do!! No fear, hopefully your hours of work will still be here. 50/50 chance.. but it’s worth a shot right?
Type (copy/paste) this into your IE window:
`% userprofile % \Local Settings\Temporary Internet Files\Content.Outlook`
note: take the spaces out from the % sign. should be PERCENTSIGNuserprofilePERCENTSIGN.
This will pull up the super hidden directory from where Outlook stores the temp files. Previously known as the ever so happy “OLKxxx” folder.
# Is it possible to sync outlook contacts to an iPad or iPhone?
***Is it possible to sync outlook contacts to an iPad or iPhone? What if you want to put business contacts on a personal device? thanks!***
*- question by Tara Brown*
**ActiveSync** is a popular way to connect an iOS device to the Exchange backend which Outlook interfaces:
Specifics can vary by iOS version, Outlook version, Exchange version, and the arrangement of Outlook information (local or server-side).
see also,
- Apple’s support page, **[iOS: Setting up Exchange ActiveSync](http://support.apple.com/kb/HT2480)**
- EM’s support page, [http://ucla.in/aBmDlG](http://ucla.in/aBmDlG)
- [https://kb.ucla.edu/link/934](https://kb.ucla.edu/link/934)
- [https://kb.ucla.edu/link/477](https://kb.ucla.edu/link/477)
- [iOS 4.0: Exchange Mail, Contacts, or Calendars may not sync after update](http://support.apple.com/kb/TS3398)
# Importing Calendar Items into Outlook 2010
This document provides a step-by-step set of instructions on how to import calendar items into Outlook 2010 for Microsoft Windows.
Right click the following link for [UCLA Holidays 2019](http://tweber.bol.ucla.edu/dl/ucla_2019_holidays.ics) or this link for [UCLA Academic Calendar 2019](http://tweber.bol.ucla.edu/dl/ucla_2019_academic.ics) and choose to save the attachment. You can choose a location on your computer, or accept the default, which will be Downloads.
- Open Outlook, from the Menu Bar click on **File**, **Open** choose **Import**.
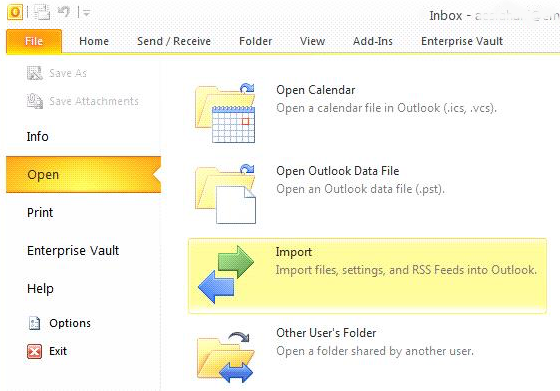
- In the Import and Export Wizard, choose “**Import an iCalendar (.ics) or vCalendar file (.vcs)**” and click Next.
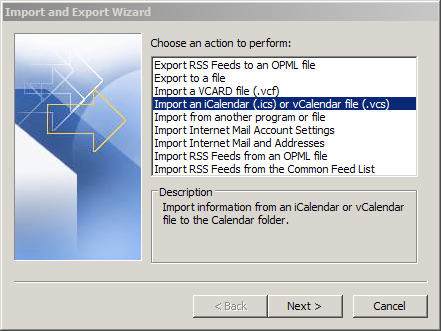
- In the browse dialog box, choose the folder you saved the file to, by default it is the Downloads folder, select the file and click OK.
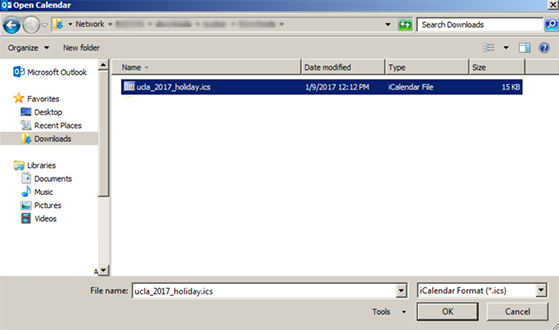
The calendar items will now appear in your Outlook calendar.
*NOTE*: Do not perform this procedure on the same import file more than once. Doing so will result in duplicate entries in your calendar.
# What are some software add-on's for Microsoft Outlook?
Two software packages I really like for Microsoft Outlook are Lookout and Attensa. Lookout is a search toolbar that quickly indexes your email messages, attachments, folders, and other Outlook files. Because it pre-indexes all files, search results are returned in seconds. Lookout is a free download for Outlook 2000 and later.
[http://www.lookoutsoft.com/Lookout/download.html](http://www.lookoutsoft.com/Lookout/download.html)
Attensa is a simple add-on which delivers RSS feeds into simple, easy email messages. Attensa is a RSS reader that adds on to Outlook. Attensa is $30 and is available at:
[http://www.attensa.com/](http://www.attensa.com/)
---
Adding to the above, there are a number of Outlook plug-ins that can be very helpful so I hope that Jarett doesn’t mind me adding to this entry. If so, we can always break this into multiple entries. I believe that Lookout was purchased by Microsoft and is now incorporated into the Windows Desktop Search.
Some other add-ons include:
Clear Context (free Personal Edition) — adds some features to better organize and prioritize emails by project.
[http://www.clearcontext.com](http://www.clearcontext.com)
Neo ($35) — a different interface that shows you many, many views of your messages and indexes them for faster searching
[http://www.caelo.com/index.php](http://www.caelo.com/index.php)
SpamBayes (free) — a Bayesian anti-spam filter
[http://spambayes.sourceforge.net/](http://spambayes.sourceforge.net/)
# How to view all e-mail messages in plain text format in Outlook 2003 and 2007
Microsoft Office Outlook 2003 and Microsoft Office Outlook 2007 provide a new option named the Read all standard mail in plain text option. This option lets you view all e-mail messages in plain text format. If you are concerned that a virus or some other type of malicious script could execute through HTML or through Microsoft Outlook Rich Text Format (RTF), you can use the Read all standard mail in plain text option to display all standard e-mail messages in plain text format. The Read all standard mail in plain text option is for display purposes only. The original e-mail message is not converted to plain text format.
[http://support.microsoft.com/kb/831607](http://support.microsoft.com/kb/831607)
# Adding Additional Mailboxes in Outlook
This document provides a step-by-step set of instructions on how to add additional mailboxes in Outlook 2010 or 2013.
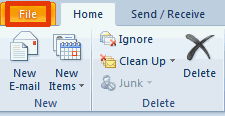
- From the Outlook menu bar, select **File**.
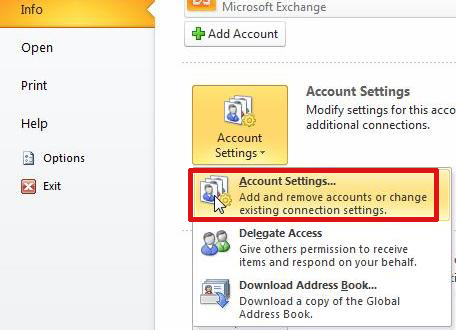
- Select Info, click Account Settings, select **Account Settings**.
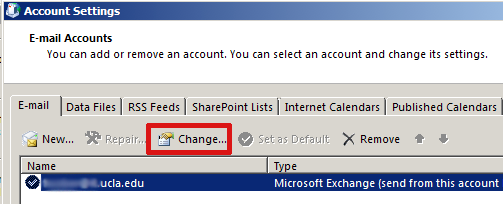
- Select your default account and click **Change**.
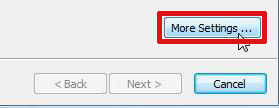
- Click on **More Settings**.
- Select the **Advanced** tab and then click on **Add**
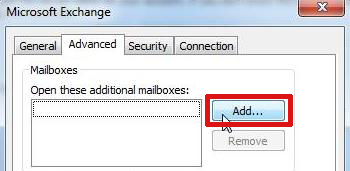
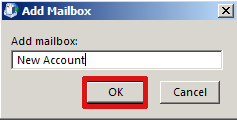
- Enter the name of the additional mailbox into the Add mailbox field and click on **OK**.
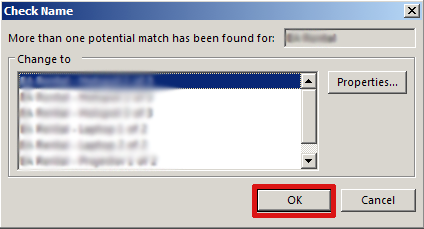
NOTE: if there is more than one potential match, choose the correct option in the dialog box and select OK
- Click on **Next**, click **Finish**, click **Close**.
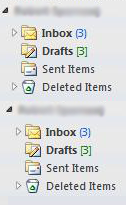
The additional mailbox has been added to Outlook. It will appear in the Outlook navigation pane.
# Outlook Duplicate Items Remover (ODIR)
*“Free, Fast and easy tool for removing duplicate items from Outlook folders*
*With **ODIR** it’s a snap to clean your Outlook folders by removing all duplicates. ODIR removes duplicates from Contacts; Calendar; Tasks; Notes and Email folders."*
- [http://www.vaita.com/](http://www.vaita.com/)ODIR.asp
Microsoft’s perspective:
- How to remove duplicate imported items in Outlook (kb299349)
- [http://support.microsoft.com/kb/299349](http://support.microsoft.com/kb/299349)
# Change Calendar Permissions in Outlook 2011
This document provides a step-by-step set of instructions on how to add change calendar permissions in Outlook 2011 for Mac.
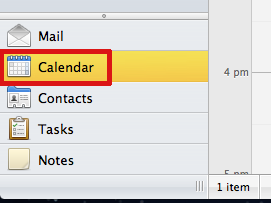
- Open Outlook and click **Calendar** in the navigation pane on the left side of the window.
- On the Home tab of the Ribbon, click **Permissions**.

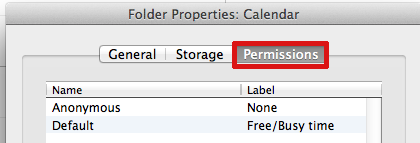
- In the Calendar Properties window, click the **Permissions** tab.
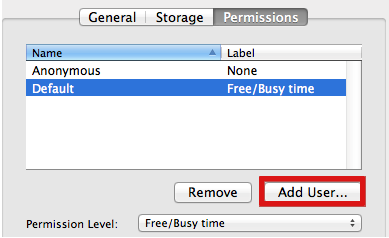
- Click on the **Add User**… button.
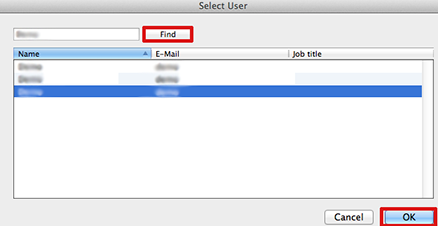
- The address book search dialog box will appear. Enter the name of the person you would like to add permissions for, click **Find**, select the user then and click **OK**.
- The person you added will appear under Name. To change their permission level from Free/Busy time (the default), click the dropdown menu next to Permission Level (see table below). Choose a level of permission to give and click **OK**
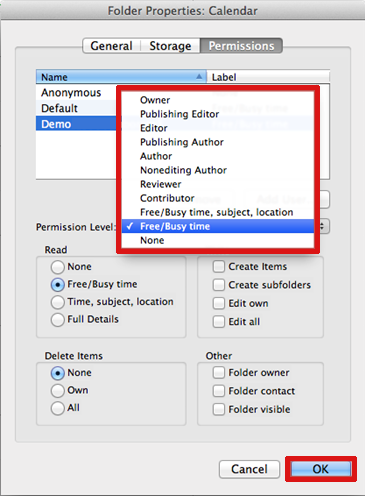
**Permission levels:**
**With this permission level (or role)** **You can** Owner Create, read, modify, and delete all items and files, and create subfolders. As the folder owner, you can change the permission levels that other people have for the folder. Publishing Editor Create, read, modify, and delete all items and files, and create subfolders. Editor Create, read, modify, and delete all items and files. Publishing Author Create and read items and files, create subfolders, and modify and delete items and files that you create. Non-Editing Author Create items (not folders), but cannot edit anything, can delete items that you create. Author Create and read items and files, and modify and delete items and files that you create. Contributor Create items and files only. The contents of the folder do not appear. Reviewer Read items and files only. Free Busy, time, subject, location View Free Busy time, subject and location. Free Busy View Free Busy time only. None No permissions.
# Clear autofill names in Outlook email
Aside from “hitting delete” on the auto-fill in the address list when using outlook, you can also delete the whole list by:
From Outlook, click Tools\\Options
Email Options\\Advanced Email Options
Deselect ‘Suggest Names while completing To, Cc and Bcc fields’
Save, close Outlook, then reopen and re-enable that setting…
Here is the “long way”
[http://support.microsoft.com/default.aspx?scid=kb;en-us;287623&Product=out](http://support.microsoft.com/default.aspx?scid=kb;en-us;287623&Product=out)
# How to strip a password from a PST File (warning not perfect) Outlook 2k
[http://www.amset.info/outlook/pst-password.asp](http://www.amset.info/outlook/pst-password.asp)
I did it once on a 3 meg PST, on outlook 2k.. so best wishes on 2k3 if they use the Unicode format or larger than 2gb pst files.
# I want to email an Outlook business card with the "notes" section of the card included. How can I send the card with this section included in the card
I was able to figure it out. I can’t delete this question so if anyone wanted to know:
1\) Right click on contact
2\) Select “Send full contact: In Internet Format vcard”
3\) Voila, an email window pops up with the full card attached.
# How to search for a folder in Outlook
I support users who can have hundreds of folders in Outlook. Outlook doesn’t let you search for a folder but this simple script will enable that ability.
In Outlook, press Alt + F11 to open Microsoft Visual Basic for Applications.
Go to Project1 > Microsoft Outlook Object > ThisOutlookSession to open the Project1 – ThisOutlookSession window.
Copy [this code](http://www.vboffice.net/en/developers/find-folder-by-name/ "http://www.vboffice.net/en/developers/find-folder-by-name/") into the Project1 – ThisOutlookSession window
Change the value of `Private Const StopAtFirstMatch As Boolean = True` to False so the script continues searching after the first result. Save and close.
To run the script, press Alt + F8. If the searched for folder is found it will be highlighted in the folder pane.
# Outlook Best Practices -- Avoiding a BCC Disaster
You’ve all probably run into the problem where someone on an email BCC list uses Reply All and blows their cover. If you don’t have time to read the article linked below, it boils down to:
- Limit the use of BCC whenever possible.
- Only use BCC when you’re willing for it to become public knowledge
- …or take some additional precaution to remove this possibility by forwarding a secondary copy of the email to the BCC list — either by BCC’ing yourself as suggested below, or by forwarding a copy of the email from your Sent Items folder.
[How to avoid a BCC disaster](http://www.lifehacker.com/software/email/how-to-avoid-a-bcc-disaster-177653.php)
Email expert Itzy Sabo discusses the pitfall of blind carbon-copying (BCC) recipients on a message: the hidden addressee can reply to all the “non-blind” recipients and blow his or her cover.
If you are a BCC recipient of a message, when you Reply-to-All, people will wonder how you got involved, and will realize that the original sender blind-copied you. This can be rather embarrassing for the original sender, who deliberately tried to hide the fact that you were copied. Who knows what can of political worms you are opening by doing this!
Sabo suggests BCC’ing yourself on an email you’d like someone else to see, and then forwarding it on to them after the fact to avoid a reply to all faux pas. Personally I use the BCC line on email messages VERY sparingly to avoid any screw-ups along these lines.
“Reply-to-All” Exposes Blind Co-conspirators [\[Email Overloaded\]](http://itzy.wordpress.com/2006/06/01/reply-to-all-exposes-blind-co-conspirators/)
# How do I repair a corrupt PST file in Outlook?
[http://support.microsoft.com/kb/q287497/](http://support.microsoft.com/kb/q287497/)
# Importing Calendar Items into Outlook 2016
This document provides a step-by-step set of instructions on how to import calendar items into Outlook 2016 for Microsoft Windows.
Right click the following link for [UCLA Holidays 2021](http://tweber.bol.ucla.edu/dl/ucla_2021_holidays.ics) or this link for [UCLA Academic Calendar 2021](http://tweber.bol.ucla.edu/dl/ucla_2021_academic.ics) and choose to save the attachment. You can choose a location on your computer, or accept the default, which will be Downloads.
- Open Outlook, from the Menu Bar click on **File**, **Open & Export** choose **Open Outlook Data File**.
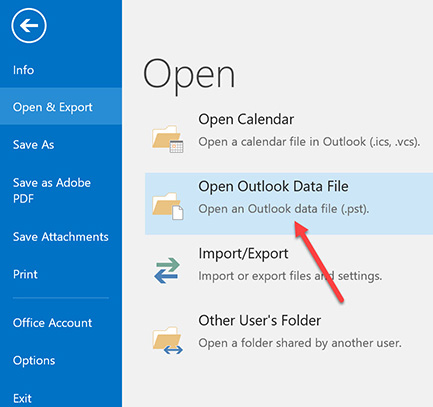
- In the Import and Export Wizard, choose “**Import an iCalendar (.ics) or vCalendar file (.vcs)**” and click **Next**.

- In the browse dialog box, choose the folder you saved the file to, by default it is the Downloads folder, select the file and click **OK**.

- Click **Import** in the dialog box.
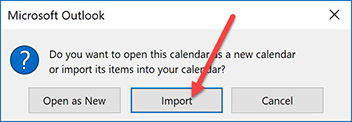
The calendar items will now appear in your Outlook calendar.
*NOTE*: Do not perform this procedure on the same import file more than once. Doing so will result in duplicate entries in your calendar. If you add United States Holidays provided by Outlook to your calendar it may also result in some duplicate holidays in your calendar.
# Importing Calendar Items into Outlook 2013
This document provides a step-by-step set of instructions on how to import calendar items into Outlook 2013 for Microsoft Windows.
Right click the following link for [UCLA Holidays 2019](http://tweber.bol.ucla.edu/dl/ucla_2019_holidays.ics) or this link for [UCLA Academic Calendar 2019](http://tweber.bol.ucla.edu/dl/ucla_2019_academic.ics) and choose to save the attachment. You can choose a location on your computer, or accept the default, which will be Downloads.
- Open Outlook, from the Menu Bar click on **File**, **Open & Export** choose **Import/Export**.
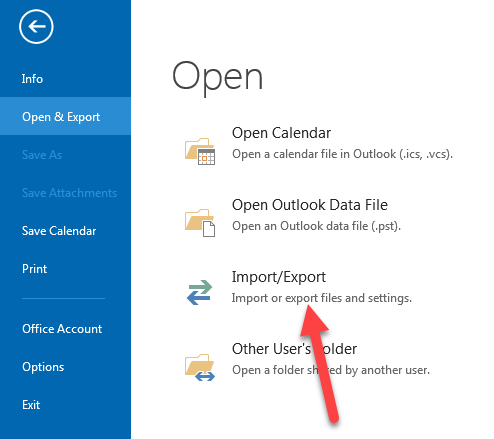
- In the Import and Export Wizard, choose “**Import an iCalendar (.ics) or vCalendar file (.vcs)**” and click Next.
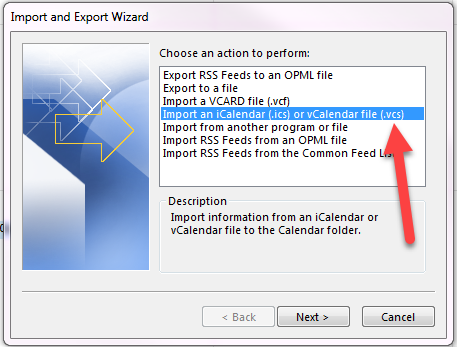
- In the browse dialog box, choose the folder you saved the file to, by default it is the Downloads folder, select the file and click **OK**.

- Click **Import** in the dialog box.
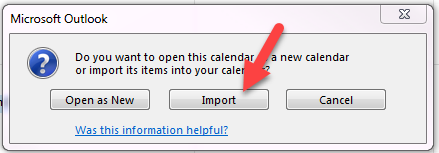
The calendar items will now appear in your Outlook calendar.
*NOTE*: Do not perform this procedure on the same import file more than once. Doing so will result in duplicate entries in your calendar. If you add United States Holidays provided by Outlook to your calendar it may also result in some duplicate holidays in your calendar.
# Outlook 2010 Offline Address Book
This document provides a step-by-step set of instructions on how to download the Offline Address Book in Outlook 2010.
- Click the File Tab, Click on Account Settings, and then click Download Address Book.

- In the Offline Address Book dialog box, make sure that the Download changes since last Send/Receive check box is checked then click OK.

- Your Outlook Offline Address Book is now up-to-date.
# How do I set the importance of an email in Office 365 Outlook Web Access?
You can let people know the urgency of a message by setting the importance to High, Normal, or Low.
# How to set importance in **Office 365 Outlook Web Access**:
When **composing** or **replying** to an email, click the drop down menu at the bottom, next to the row of icons. Hover your mouse over “Set importance” and click on the desired level of importance. By default, importance is set to Normal.
