Internet and Web Browsers
- VPNs
- What is a VPN and why do I care?
- What is the Cisco VPN Client error message "Required VPN subsystem not available"
- How do I uninstall the Cisco VPN Client for Mac OS X?
- VPNs Across UCLA
- Firefox
- Why can't I print my UCLA paystub from Firefox?
- How do I control the popup blocker settings in Firefox?
- What can I do with the Download Manager on Firefox?
- How do I customize the toolbars in Firefox?
- What are the most common mouse shortcuts for Mozilla Firefox?
- How do I print from Firefox?
- How do I use Page Setup on Firefox?
- How do I make Firefox my default browser?
- How do I get/install/uninstall/switch/update themes in Firefox?
- Firefox Add-Ons for Web Developers
- Google Browser Sync!
- "Quick Tabs" in Firefox
- How can I gather research resources while using Firefox?
- Greasemonkey and Firefox
- Did you know these basic Firefox Tips?
- Optimizing Firefox for broadband
- Keeping Firefox Plugins Up-to-Date
- Edit Mispelled Words in Firefox
- Firefox Tab Groups
- Firefox 7 and Internet Connection Issues
- Firefox Extension Check
- 1Password icon displaying twice in Firefox 29
- Firefox ESR
- Adjust Firefox top visit suggestion in address bar
- Chrome
- Internet Explorer
- Clear IE forms
- Internet Explorer Problems
- Internet Explorer 6 (IE6) upgrade notification message
- IE Browser bug
- Safari
- UCLA Campus Networks
- Guest Logons for the Campus Wireless Network
- How can I access restricted UCLA websites from off campus?
- Campus wireless network
- What is Eduroam, how does it work, how prevalent is it on campus and does it use the usual UCLA authentication?
- eduroam stops connecting in OS X
- How do I turn on cookies?
- How do I submit a URL that is too long into ...?
- I am getting this error message when I try to log in: "Your login is no longer valid. Please try logging in again."
- Data Mining on the Internet with Google
- What is Bluesocket, NoCat Auth and Chillispot
- How should I save my images for the web?
- Google Guidelines for Webmasters
- How do I add or remove a page/website/etc from Google's index!
- Setting up ENVI or IDL network licensing
- How to explain RSS the Oprah way
- Browser Feature Comparison
- Resizing form text areas on web pages
- What is Yahoo Pipes?
- OpenSSH "permission denied" error
- SSH Authentication Agents and Secure Password-less Logins
- Do shortened URLs like the ones created on ucla.in still work if the source URL changes?
- Capturing Media from the Internet
- Bookmarking secure sites and modifying existing bookmarks
- Google Power Search
- Disabling Java in web browsers
- Using a Google Account "Application Specific Password"
- Browser incognito mode
VPNs
What is a VPN and why do I care?
VPN stands for Virtual Private Network and it is invaluable when you want to use UCLA licensed resources from off-campus machines.
Specifically, the UCLA Library and the California Digital Library have licensed many different bibliographic and research databases that are restricted to UCLA machines.
If you have cable modem or DSL from home the BruinOnline VPN enables you to login and access those databases as if you were in your office at UCLA.
Note: UCLA MFA enabled users should consult Authenticating Using Multi-Factor Authentication on the Campus VPN.
What is the Cisco VPN Client error message "Required VPN subsystem not available"
When starting up the VPN client software, I get the following error message: “Required VPN subsystem not available”. Why?
There are several possible reasons why this happened; most likely tied to the Cisco VPN Service. A lot of times I’ve seen this happen because the VPN service starts up before any working networking connection has started. Try the following steps:
1. Restart the Service
a) Make sure you have a working network connection. If you are using the wireless UCLAWLAN, see if you can reach any UCLA website like http://www.bol.ucla.edu. If you are using a wired connection, see if you can reach any website like http://www.google.com
b) Restart the Cisco VPN Service. Click Start → Run… → type in “services.msc” → Right-Click on “Cisco Systems, Inc. VPN Service” → select “Restart”
2. Reboot the Machine
3. Un-install and re-install the VPN service
How do I uninstall the Cisco VPN Client for Mac OS X?
The Cisco VPN Client on Mac OS X systems must be uninstalled by running a script via a terminal window. This may be useful to you, particularly if you now wish to use the built-in VPN client for OSX ( http://www.bol.ucla.edu/services/vpn/pptp/docs/macosx.html ):
Please follow the instructions below: sudo /opt/cisco-vpnclient/bin/vpn_uninstall4. Follow the instructions to remove the VPN Client and close the terminal
application when it has finished.
NOTE: You will need have the admin password for your computer in order to run the script.
The above path is incorrect here are the correct instructions from Cisco’s web site;
The VPN Client uninstall script uninstalls any previous command-line or GUI version of the VPN Client from your workstation.
To uninstall the VPN Client for Mac OS X
Step 1 Open a terminal window.
Step 2 Run the following command:
sudo /usr/local/bin/vpn_uninstall
Step 3 Enter your password
Step 4 You are prompted to remove all profiles and certificates.
If you answer yes, all binaries, startup scripts, certificates, profiles, and any directories that were created during the installation process are removed.
If you answer no, all binaries and startup scripts are removed, but certificates, profiles, and the vpnclient.ini file remain.
VPNs Across UCLA
Many in the UCLA community are aware of the BOL VPN, Virtual Private Network, for on-campus wireless and off-campus wired connectivity. Some departments have discretionally implemented specific department VPN profiles as well. Department will policies vary. User can contact respective departments for precise information:
Campus (BOL) VPN:
https://www.it.ucla.edu/bol/services/virtual-private-network-vpn-clients
SSC:
Where can I obtain the VPN Client to tunnel into the Social Sciences network
MedNet:
Communicate with the local SOM departmental CSC
Also, contact Medical Center help desk, x44357.
Life Sciences:
Communicate with the local departmental CSC
Also, contact helpdesk@lifesci.ucla.edu, or x51000
Departmental users should always feel free to ask their departmental CSC for computing assistance:
Firefox
Why can't I print my UCLA paystub from Firefox?
I just tried printing my stub from Firefox, it pulled up Acrobat Reader, so I’m assuming it’ll print fine.
Despite personal and security perferences, users may need to use Internet Explorer ocassionally to get full functionality on certain websites.
How do I control the popup blocker settings in Firefox?
The Popup Blocker Options/Preferences are located in the Content panel of
Tools > OptionsEdit > PreferencesFirefox > Preferences.
From there, you can do the following things:
- Block Popup Windows: Deselect this option preference to
disable the popup blocker altogether.
- Exceptions dialog: This is a list of sites that you want to allow
to display popups. The dialog has the following choices:
Note: Blocking popups may not always work and may interfere with
some web sites.
What can I do with the Download Manager on Firefox?
In addition to keeping information on all your downloads in one place, the
Download Manager keeps convenient download actions easily accessible for each
of your downloads.
Pause
You can pause any downloads currently in progress by clicking thePause link beside the file entry. This may be useful, forexample, if you need to open a small download started after a large download.Pausing downloads gives you the choice to decide which of your downloads aremost important. When you want to continue downloading those files, simply usethe Resume link to finish those downloads.Cancel
If after starting a download you decide you no longer need that file, cancelingthe download is simple: just use the Cancel link beside that fileentry to cancel it and free up your connection for your browsing and otherdownloads.Open the File
When a download has finished, the Open link will appearby the file entry. Use it to open the file.Remove the File’s Entry
If you do not wish to store information on a particular download, removing theentry is as simple as the click of a mouse. Simply use the Removelink beside the file entry to delete it.Retry a Download
If for any reason a download does not complete, it is easy to attempt thedownload again. To recover from a failed download and retry it, just use theRetry link next to the file entry and Firefox willrestart the download for you.Show Download Folder
If you have set Firefox to save all downloads to a folder inDownload Manager OptionsPreferences,you can open this folder by clicking the Folder Name at thebottom of the Download Manager window.How do I customize the toolbars in Firefox?
There are two basic methods of customizing the toolbars in
Firefox:
- Adding/Removing Toolbars
- Rearranging Items on the
Toolbars
Adding/Removing Toolbars
You can take away certain toolbars if you do not wish to keep them on your
screen. Currently, these toolbars can be removed:
- Bookmarks Toolbar
You cannot currently remove the Menu Bar because you cannot move the menu
items (File, Edit, Help, etc.) to a different toolbar, and they must stay on
the screen at all times.
To remove a toolbar, look in the View menu on your Menu Bar. Select View > Toolbars. You should see a few menu items.
The top ones (above the separator) are the toolbars you may show. Toolbars
currently shown are checked, and toolbars currently hidden are not checked.
To show or hide a toolbar, simply click its menu item. The toolbar will now
be shown or hidden based on your choice.
To add a toolbar, select View > Toolbars >
Customize. Click on Add New Toolbar (in the bottom of the
dialog). This should give you a dialog to enter a name. Enter a name, click
OK, and then click Done. Now select the View > Toolbars menu, and you should see your new
toolbar listed. Follow the procedures in the previous section to show or hide
it.
Rearranging Toolbar Items
To rearrange the items (icons, buttons, text boxes, etc.) on your toolbar,
right-clickpress Ctrl and
click on any part of the toolbar that is not a text box and select
Customize…. This will bring up the toolbar
customization dialog.
Drag and drop any items you want to and from the toolbars (excluding the
menu items). You can also rearrange icons already on the toolbars by
dragging and dropping them wherever you wish. When the toolbars and items are
arranged the way you want them, click Done.
Special Toolbar Items
There are a few special items that are available to you when customizing the
toolbar. They are as follows:
- Separators: These allow you to separate items on the
toolbars with a small vertical line.
- Spacers: These allow you to separate items on the
toolbars with a fixed-size space, usually around 20 pixels on most
themes.
- Flexible spacers: Spacers allow you to separate items
on the toolbars with a space. These spacers automatically resize to fill
all of the empty space on the toolbar. These are good for positioning
items on the right of a toolbar.
Themes
Themes are small files that are installed in Firefox that change
the look and feel of Firefox. Themes are not allowed to modify the
actions or functionality of Firefox, only the look.
Getting and Installing Themes
You can download and install many themes from Mozilla Update.
Internet searches will find many other themes as well.
Usually when you click on a link to install a theme, Firefox
displays a dialog asking you for permission to install the theme. You can
choose to allow the download and installation or to cancel the process.
Uninstalling Themes
Should you ever wish to remove a theme from Firefox, select Tools > Themes to open the Theme Manager.
In the Theme Manager, select the theme you wish to remove, and click the
Uninstall button. You may need to close and then reopen
Firefox for all changes to take effect.
Switching Themes
To switch between your installed themes, select Tools
> Themes to open the Theme Manager.
In the Theme Manager, select the theme of your choice, and click
the Use Theme button. It is recommended that you close and then
reopen Firefox so that the theme can be applied correctly.
Updating Themes
Whenever you would like to check for a newer version of a theme that you
have installed, select Tools > Themes to open
the Theme Manager.
In the Theme Manager, Firefox displays Update Now buttons
for themes with available updates. Click the respective button for the theme
you would like to update.
By default, Firefox will periodically check and notify you when a
new version for one of your installed themes is available. You can change
this behavior in the Update
tab of the Advanced panel of OptionsPreferences.
You can check for updates manually by clicking the Find Updates
button.
Extensions
Extensions are small add-ons to Firefox that change existing
browser functionality or add new functionality.
Getting and Installing Extensions
Installing an extension involves a very similar process to installing
themes. Extensions can be found at Mozilla Update.
There should be an install link for each extension on that extension’s
page. As long as JavaScript is not disabled in your browser, clicking this
link will install the extension for you.
Uninstalling Extensions
Should you ever wish to remove an extension from Firefox, select
Tools > Extensions to open the Extension
Manager.
In the Extension Manager, select the extension you wish to remove, and click
the Uninstall button. You may need to close and then reopen
Firefox for all changes to take effect.
Updating Extensions
Whenever you would like to check for a newer version of an extension that
you have installed, select Tools >
Extensions to open the Extension Manager.
In the Extension Manager, Firefox displays Update Now
buttons for extensions with available updates. Click the respective button for
the extension you would like to update.
By default, Firefox will periodically check and notify you when a
new version for one of your installed extensions is available. You can change
this behavior in the Update
tab of the Advanced panel of OptionsPreferences.
You can check for updates manually by clicking the Find Updates
button.
What are the most common mouse shortcuts for Mozilla Firefox?
This is a list of the most common mouse shortcuts in Mozilla Firefox.-———————————————-
Back
Close TabMiddle-click on Tab
Decrease Text SizeCtrlCmd+Scroll up
ForwardCtrl+Sift+Scroll up
Increase Text SizeCtrlCmd+Scroll down
New TabDouble-Click on Tab Bar
Open in Background TabCtrlCmd+Left-clickMiddle-click
Open in Foreground TabCtrlCmd+Shift+Left-clickShift+Middle-click
Open in New WindowShift+Left-click
Paste URL and GoMiddle-click on Tab
Reload (override cache)AltOpt+Left-click
Scroll line by lineAltOpt+Scroll
How do I print from Firefox?
Printing a Page
To print the current page:
- Select File > Print.
To print selected text:
- Select the text in the current page.
- Select File > Print. The print dialog
box will appear.
- Under Print Range, click Selection.
The web page’s author and the size of the printed page, not the size of the
onscreen window, determine placement of content on the printed page. Text is
wrapped and graphics are repositioned to accommodate paper size.
How do I use Page Setup on Firefox?
To customize how pages are printed in Firefox, you can use Page Setup:
- Select File > Page Setup.
In Page Setup, you can change the following settings for pages you want to
print:
- Format & Options: Choose the orientation, scale, and other
options:
- Margins & Header/Footer: Click this tab to set up margins,headers, and footers:
- &PT: Page Number with Total (Example: “3 of
5”)
- &P: Page Number
- &D: Date
- &U: URL
- &T: Page Title
How do I make Firefox my default browser?
To make Firefox your default web browser:
1. Select Tools > OptionsEdit > PreferencesFirefox > Preferences and click the “Check Now” button in the General panel.…
When setting a computer to use Firefox as the primary browser, it is helpful to disable Internet Explorer’s checks to make it the default browser:
Start > Settings > Control Panels > Internet Options > Programs > Internet Explorer should check to see whether it is the default browser
On campus, some sites are not browser neutral and require Internet Explorer. To facilitate using IE with Firefox, check the Firefox plug-ins IE Tab or IE View
How do I get/install/uninstall/switch/update themes in Firefox?
Getting and Installing Themes-—————————————
You can download and install many themes from Mozilla Update.
Internet searches will find many other themes as well.
Usually when you click on a link to install a theme, Firefox
displays a dialog asking you for permission to install the theme. You can
choose to allow the download and installation or to cancel the process.
Uninstalling Themes-————————
Should you ever wish to remove a theme from Firefox, select Tools > Themes to open the Theme Manager.
In the Theme Manager, select the theme you wish to remove, and click the
Uninstall button. You may need to close and then reopen
Firefox for all changes to take effect.
Switching Themes-——————-
To switch between your installed themes, select Tools
> Themes to open the Theme Manager.
In the Theme Manager, select the theme of your choice, and click
the Use Theme button. It is recommended that you close and then
reopen Firefox so that the theme can be applied correctly.
Updating Themes-——————
Whenever you would like to check for a newer version of a theme that you
have installed, select Tools > Themes to open
the Theme Manager.
In the Theme Manager, Firefox displays Update Now buttons
for themes with available updates. Click the respective button for the theme
you would like to update.
By default, Firefox will periodically check and notify you when a
new version for one of your installed themes is available. You can change
this behavior in the Update
tab of the Advanced panel of OptionsPreferences.
You can check for updates manually by clicking the Find Updates
button.
Firefox Add-Ons for Web Developers
Here’s another cool add-on
firebug is similar to the “web developer” firefox plugin but amped up.
And another http://developer.yahoo.com/yslow/
more on yslow here
http://www.phpied.com/yslow-performance-extension-for-firebug/
Firefox Add-on’s are small extensions that add new functionality to Mozilla Firefox. They can add new features, toolbars, and are completely customizable.
It is in a developers interest to peruse Firefox’s “Developer Tools” and “Website Integration” add-on categories to find extensions which fit your work style: https://addons.mozilla.org/firefox/
—
TO INSTALL: Click the link, wait a moment until you can click the “Install Now” button that pops up, wait for it to download, and restart your browser.
TO REMOVE: If it’s a toolbar, you can hide them under View > Toolbars, un-checking (selecting) Web Developer, for example. To remove it all together, select Tools > Extensions, selecting the extension and pressing Uninstall on the bottom left.
- Colorzilla – Advanced Eyedropper, ColorPicker, Page Zoomer, and other goodies. (Windows Only)
- HTML Validator – Tidy for FireFox! Highly recommended for web developers. Lets you check your page’s validation by doing a View / Page Source.
- FireBug – Allows live HTML, CSS, and JavaScript edits and lets you visualize CSS metrics. MUST HAVE for debugging and web developing. Apparently it’s also good for viewing and debugging Ajax traffic.
- MeasureIt – Provides a ruler to measure the width and height (in pixels) of any element on a webpage.
- View Formatted Source – Displays CSS being applied to each element. Great for debugging.
- View Source Chart – Tame tables and containers. Great for debugging.
- IE Tab and/or IE View add-ons to emulate IE functionality in Firefox. More on IE Tab here.
- Copy Plain Text – Allows you to copy plain text into editors directly from a webpage without having to go through notepad etc.
- Load Time Analyzer – Allows developers to measure and graph how long web pages take to load in Firefox.
- Web Developer (see below)
Web Developer – For web developers and programmers. Useful functions include:
1. Disable > Disable JavaScript. This can reveal what we deliver, or don’t, for the 1.5% who have JavaScript off.
2. Cookies. If your UCLA site uses cookies, you can see how it breaks down if cookies are turned off.
3. CSS. To have a truly accessible site, turning off the CSS should show a fairly logical structure. Or not.
4. Resize. You can check how it looks at 800×600 even if your monitor has a larger resolution, and how your site fits for the < 10% who stick with the smaller resolution.
5. Tools. Something to consider for setting a standard: valid HTML, CSS, feeds, and Section 508/WAI accessibility. This is a tedious process, on a programming end, but it’s a professional step to make it check out with web accessibility standards — a step beyond if it just “works” in IE/Firefox.
See also, https://kb.ucla.edu/link/220
Google Browser Sync!
Firefox’s major asset is its wide variety of user community created and supported extensions.
The ability the save all open windows and active tabs was a “cannot live without” feature brought forth, in part by Tab Mix Plus. Firefox 2 now incorporates similar functionality. The ability to sync bookmarks across various installs using the Foxmarks extension greatly eased the transition between desktop, laptop, and/or virtual machines as well.
Google, being Google, has upped the ante with “Google Browser Sync for Firefox ":https://addons.mozilla.org/addon.php?id=1122. (Verbatim) Google Browser Sync for Firefox is an extension that continuously synchronizes your browser settings—including bookmarks, history, persistent cookies, and saved passwords—across your computers. It also allows you to restore open tabs and windows across different machines and browser sessions.
A valuable extension to save session feature between computers, such as those users who use a desktop and laptop, or Windows machine and Mac OS machine.
Session Manager allowed for more powerful session saving than Tab Mix Plus, not only loading whatever sites you were visiting but the position of the scrollbar, contents typed into textfields, etc. At the moment this extension is not available for Firefox 2.0
"Quick Tabs" in Firefox
Internet Explorer 7 (IE7) for Windows XP+ only has been released in November 2006. Some have said the “Quick Tabs” is reason alone to use IE7.
Firefox already has had such a feature through add-ons:
Tab Catalog — https://addons.mozilla.org/firefox/1937/
- Has an option to disable the viewing of the tab catalog on button roll-over. The Tab Catalog button is a well-behaved toolbar element and can be placed where desired on the toolbar(s).
Firefox Showcase — https://addons.mozilla.org/firefox/1810/
- Very much like Quick Tabs.
Viamatic foXpose — https://addons.mozilla.org/firefox/1457/
- Also, very much like Quick Tabs.
Ctrl Tab Preview — https://addons.mozilla.org/firefox/2134/
- A bit different. Has a very Mac OS X feel to it.
As with most Firefox extensions, many options are available for a given extension/add-on.
It has been said, “If you are not using Firefox extensions, you are not using Firefox”.
How can I gather research resources while using Firefox?
Zotero [zoh-TAIR-oh] is a free, easy-to-use Firefox extension to help you collect, manage, and cite your research sources.
A good quick demo screencast can be found at:
http://www.zotero.org/documentation/screencasts/intro
Works only with Firefox 2.0, but does so on Win, Mac and Linux. In a quick test, I was able to search the UCLA Library and download a list of citations.
Need to store a copy of the article? One that is linked to the record in Zotero? Follow instructions here (#2), to sync PDF storage in Zotero to Box.
http://guides.library.cornell.edu/zotero_to_Box
Use the “default” email in Zotero.
Greasemonkey and Firefox
Greasemonkey is a Firefox extension that allows user-created Javascripts to tweak Firefox in various ways. Greasemonkey scripts are like Firefox extensions, but much simpler.
You can download Greasemonkey from its page on Firefox add-ons.
Once you have it installed, go to userscripts.org to find some scripts. There’s no telling what you might find. To install a script, click on a link to the script’s .js file, and Greasemonkey will detect it automatically and let you install it.
If you need additional help, visit the official Greasemonkey website.
Did you know these basic Firefox Tips?
Taken from:
http://cybercapital.org/index.php/2007/05/21/did-you-know-these-basic-firefox-tips/
- To quickly find any word in a web page type /word it will highlight the word and press Ctrl+G to “Find Again†that word again
- If you wish to remove an item from your Address Bar Drop down menu,
Highlight it without clicking and use Shift+Delete. - Clear your Download history to make the download manager more
responsive : Tools | Options | Privacy - Type about:cache?device=disk in your address bar to view/save items
that you have in your firefox disk cache - Type about:cache?device=memory in your address bar to view/save items
that you have in your Firefox memory cache - Drag any link to the Download Manager Window to add & download the
link. - If you accidentally delete a bookmark and want to recover it, open the
“Bookmarks Manager†and use Ctrl+Z,
or Edit | Undo. - Double Clicking empty space on the Tab Bar will open a ‘New Tab’
- Holding down the Ctrl key when you right click
to “View Image†or “View Background Image†will open the image in a New
Tab or New Window. - A bookmarks Folder’s position can also be Dragged & Dropped but you must hold down
the SHIFT key while Dragging. - To prevent a website from replacing/changing your rightclick context
menu go to Tools > Options > Web Features then click the “advanced
tab†and de-select “remove or replace context menusâ€. Update: go to Tools>Options>content>Advanced on Firefox2 - You can work offline in Firefox just go to File > Work Offline. This
means that you can browse your previously visited pages even when
you’re offline this is a really cool feature but not many people who use it. - You can bookmark the current page by dragging the icon from the
location bar to your Bookmarks folder. You can also drag it to the
desktop to make an icon for that page. - To stop animated gifs from moving, press the ESC key.
Optimizing Firefox for broadband
Taken from a PC World article…
Open Firefox
Type about:config in address bar and press Enter
Type network.http in the filter field
Double-click network.http.pipelining.maxrequests to bring up the "Enter integer value’ dialog box. Enter a higher number than the default 4: try 15. and click OK.
Double-click network.http.proxy.pipelining to set it to ‘true’.
Right-click anywhere on the page and select New Integer. Enter nglayout.initialpaint.delay and then click OK.
Set the integer value to 0 (zero) and click OK again.
Keeping Firefox Plugins Up-to-Date
Quick verifier to keep Firefox plugins up-to-date —
http://www.mozilla.com/en-US/plugincheck/
Edit Mispelled Words in Firefox
Firefox keeps a per profile dictionary of custom words. To correct words which inadvertently enter it:
- Go to “%APPDATA%\Mozilla\Firefox\Profiles”
- On Mac OS X, go to “~/Library/Application Support/Firefox/Profiles”
- Enter the profile folder, usually like “.default”
- Edit “persdict.dat” with a text editor (WordPad, Notepad, or Textedit)
Save, and done.
Firefox Tab Groups
Firefox is pushing tab groups to better organize the web browsing experience. Video & web page gives a overview:
http://support.mozilla.com/en-US/kb/what-are-tab-groups
Firefox 7 and Internet Connection Issues
In case you come across any users who might be running v7.x of Firefox on Win x86 or x64, and complain of slow performance, can’t/won’t load pages, etc., while other browsers have no problem, below is an Mozilla article which may help.
“If you have a problem connecting to a website, you may see error messages like Server Not Found. This article describes how to troubleshoot problems that cause this error” —
See also,
Firefox Extension Check
Mozilla has created a page to detect and verify status of plugins:
- http://www.mozilla.org/en-US/plugincheck/
- Includes Flash player, Shockware, Java, RealPlayer, Silverlight, and others
(Quoting) The Mozilla Plugin Check page is a general tool for keeping web browser plugins up to date.
Fully supported browsers do the following:
- Gathers every plugin’s metadata and optionally its live data
- Check with the Plugin Directory by mime-type
- Try to match the plugin metadata with information we know about plugins.
- If there is a match, then check to see if the version is outdated or has a security vulnerable.
Although the supported top plugins are a healthy portion of the traffic on the internet, we have a long way to go in terms of covering all plugins.
. .
Additional information about the project:
1Password icon displaying twice in Firefox 29
1Password 3.9.20 add-on for Firefox displays both the “1P” and the 1Password key icon in the Firefox toolbar in Firefox 29.0.
This is a result of 1Password’s add-on not yet properly supporting Firefox 29’s new UI— Firefox 29 changes extension display behavior.
- Open Firefox 29
- Click on the hamburger button in the upper-right corner
- Click on “Customize” in the lower-left corner of the popup window
- On the toolbar, you should see the following text: “Show 1Password” (no quotes)
- Right-click on “Show 1Password”, then click on: “Remove from Toolbar”
- Click on the green button labelled “Exit Customize”
http://discussions.agilebits.com/discussion/24332/firefox-29-0-1password-extension-buttons
Firefox ESR
Mozilla offers an Extended Support Release (ESR) based on an official release of Firefox for desktop for use by organizations including schools, universities, businesses and others who need extended support for mass deployments―
- https://www.mozilla.org/en-US/firefox/organizations/faq/
- https://wiki.mozilla.org/Enterprise/Firefox/ExtendedSupport:Proposal
- Downloads, http://ftp.mozilla.org/pub/mozilla.org/firefox/releases/latest-esr/
- Wikipedia, http://en.wikipedia.org/wiki/History_of_Firefox#Extended_Support_Release
Adjust Firefox top visit suggestion in address bar
Firefox 43.0.1 introduced a new "visit: suggestion at the top of the list of sites returned in searches entered into the address bar.
To disable this (standard behavior prior to 43.0.1):
- Go to about:config
- Change browser.urlbar.unifiedcomplete to false
To enable this (standard behavior in 43.0.1):
- Go to about:config
- Change browser.urlbar.unifiedcomplete to true
Disabled (default prior to 43.0.1):
Enabled (default as of 43.0.1):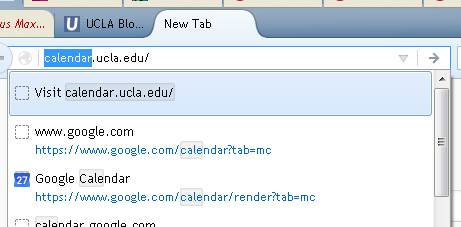
Source:
https://www.reddit.com/r/firefox/comments/3×98fa/is_there_a_way_of_turning_off_the_top_visit/
Chrome
Google's new web browser Chrome
Google’s open-source web browser Chrome now has 40% to 60% of the market.
It’s available for download at http://www.google.com/chrome
- Which Browser is Best? Chrome vs. Firefox vs. Internet Explorer – PC Magazine, Sept. 26, 2014
- 7 New Google Chrome Features You Should Know – particularly for web developers – Oct. 2014
- Google Chrome Features http://tools.google.com/chrome/intl/en-US/features.html
- More about the underlying technology of Google Chrome
http://www.google.com/googlebooks/chrome/
- Why Did Google Abandon Firefox?
http://gigaom.com/2008/09/02/why-did-google-abandon-firefox/
- Google Chrome vulnerable to carpet-bombing flaw – Sept. 2, 2008
-
N.Y. Times – David Pogue review of Chrome – Sept. 04, 2008
(registration required)
- above taken from Mike Takahashi’s Aug. 3rd, 2008 post to CWP-L mailing list as well as from followup posts.
- Customize Chrome for Better Browsing – Linux Magazine March 4, 2010
Take a full page screenshot in Google Chrome
Download the extention “Awesome Screenshot: Capture & Annotate”
https://chrome.google.com/webstore/detail/alelhddbbhepgpmgidjdcjakblofbmce
This will add an icon in your Google Chrome toolbar that allows you to capture screenshots and annotate them easily.
Take screenshots of:
- the visible part of the page
- a selected area
- the entire page
Chrome for Enterprise
For standardized deployment Google does offer Chrome for enterprises—
-
http://www.google.com/intl/en/chrome/business/browser/
Additional information— - FAQ, http://support.google.com/chromeos/a/bin/answer.py?hl=en&answer=188447
- Google Enterprise Blog, http://googleenterprise.blogspot.com/2012/10/enhanced-chrome-browser-support-for.html
- GPO Template, http://support.google.com/installer/bin/answer.py?hl=en&answer=146164
Internet Explorer
Clear IE forms
Problem: User wants to clear what shows up in Internet Explorer when doing searches via the web (Google or Yahoo).
Solution:
Open Internet Explorer.
Click on Tools.
Click on Internet Options.
Click the Content tab.
Click the AutoComplete button.
Click the Clear Forms button.
Click the OK button.
For graphical step by step instructions check out this link:
http://www.tacktech.com/display.cfm?ttid=219
Internet Explorer Problems
Since most people use IE, and most sites are written to support it, it’s important to know how to address common issues that can arise when suddenly unable to access a specific website.
As with any technical problem, the first step is reboot and confirm that you can repeat the problem. The next step is try another PC or check with someone else to see if they have the same problem. If not, then this confirms that the problem has something to do with your PC and you’ll want to consider the below procedure.
Step 1: Make sure that you’re using a current browser — preferably Internet Explorer version 6. If not, you may want to install the current version. Note that for certain websites many modified browsers such as the AOL browser will not work, nor will many non-standard browsers such as Firefox, Mozilla, Opera, etc.
Step 2: Update and patch your PC by running Windows Update (from IE, select Tools > Windows Update). Accept all critical patches and any Windows updates related to IE. Also update your antivirus and antispyware products and do a full system scan with each.
Step 3: Clear your temporary IE settings by selecting Tools > Internet Options and then click the Clear History, Delete Cookies and the Delete Files buttons.
Step 4 — Reset the IE security & advanced settings to the defaults as follows:
1. Security: Go to Tools > Internet Options. You would then click on the Security tab, and reset all four zones to the default level by clicking on the Default Level button for each zone.
2. Privacy: Go to the Privacy tab and reset this to the default level (medium) 3. Advanced: Go to the Advanced tab and click on Restore Defaults.
4. You can also try to add the problematic server as a trusted site by highlighting Trusted sites > click sites > type in the address > click add > uncheck require server verification > click OK > click apply.
Step 5 — Turn off any advanced network security software. If you have any security software (such as a firewall) running on your computer or your network, this could potentially cause problems. Also, if you have Mcafee or Norton Antivirus, it is possible that they installed a firewall for you.
Windows XP Users — Select Start > Settings > Control Panel > Windows Firewall, select Off and then OK.
Step 6: There are many ways in which things still can go wrong including some problems that are beyond your control. Sometimes the only solution is to reinstall either IE or possibly the entire operating system (and then all other programs). Since this is an extreme solution, you should try to find some alternate work-around solution that’s acceptable. One of these might be to try an alternate browser such as Netscape, Opera, Firefox or Mozilla — although these browsers do not work with as many websites as IE.
Internet Explorer 6 (IE6) upgrade notification message
This is a script that displays a notification message informing the user to upgrade their browser to a newer version of Internet Explorer or alternate browser such as Firefox, Chrome or Safari.
All of the necessary files and instructions can be downloaded at: http://ucla.in/gCnyuI
IE Browser bug
We have learned of a vulnerability which makes it possible for hackers to take control of a user’s computer after it has been infected with malicious code. This vulnerability affects all versions of Windows released since 2001. A permanent fix is expected by May 13.
Please note that if you must use IE (for specific applications, for example) the attack will not work without Adobe Flash. The recommended solution for this is to upgrade to the most current version of Adobe Flash. The update can be found at http://helpx.adobe.com/security/products/flash-player/apsb14-13.html.
Other references:
http://www.cnet.com/news/stop-using-ie-until-bug-is-fixed-says-us/
Safari
Enabling the Safari debug menu
Safari has a very useful Debug menu for checking Javascript errors, viewing a page’s DOM tree, changing its User Agent string, and much more. Unfortunately, it’s disabled by default, so many users never even know about it.
To enable it, open a terminal window and type:defaults write com.apple.Safari IncludeDebugMenu 1
I’m not sure why you’d want to, but to disable it again type:defaults write com.apple.Safari IncludeDebugMenu 0
UCLA Campus Networks
Guest Logons for the Campus Wireless Network
Bruin OnLine offers UCLA faculty and staff the option of providing guest network logon IDs for their sponsored guests. Guest logon IDs will provide access to UCLA’s GACNET classrooms and wireless network through the UCLA Campus Public Network Portal. For more information please see:
https://www.it.ucla.edu/bol/services/guest-network-logon-ids
How can I access restricted UCLA websites from off campus?
If you need access to websites, or computer systems only available on the UCLA campus, you can still connect from off-campus if you are running campus’ VPN software. Information about campus VPN software is available at https://www.it.ucla.edu/it-support-center/services/virtual-private-network-vpn-clients.
Campus wireless network
Please see BOL’s help article here on campus wifi:
https://help.bol.ucla.edu/kb_view.do?sysparm_article=KB0010954
What is Eduroam, how does it work, how prevalent is it on campus and does it use the usual UCLA authentication?
Question posted by Cathy McCann
My understanding is that Eduroam (http://www.eduroam.org/)allows UCLA wireless authentication via either UCLA login, or visitors from other participating schools can log in with their school’s login.
- 02/2017, https://www.it.ucla.edu/news/eduroam-wireless-network
- 8/29/2011: UCLA_SECURE to merge with eduroam network
- http://www.dailybruin.com/index.php/article/2011/09/ucla_switches_secure_wireless_network_to_eduroam
- https://www.eduroam.us/
- https://www.eduroam.org/
- http://en.wikipedia.org/wiki/Eduroam
Thanks! I also found these articles on BOL KB:
https://help.bol.ucla.edu/kb_view.do?sysparm_article=KB0010955 and https://help.bol.ucla.edu/kb_view.do?sysparm_article=KB0010965.
eduroam stops connecting in OS X
User previously is able to connect to eduroam, but suddenly is no longer able to in OS X.
OS X wifi status shows as “connecting” and then eventually fails to connect. Deleting eduroam wifi profile doesn’t help, as user still cannot connect, and the prompt for an updated security certificate to connect to eduroam never pops up.
One possible issue is that the user’s existing 802.1x certificate is still being retained, and needs to be deleted.
eduroam needs to be removed in three areas before attempting to reconnect again:
1) System Preferences → Network → Advanced → under “Preferred Networks”, select “eduroam” and delete it.
2) Select the 802.1x tab , chose the eduroam network, and delete it. If you cannot delete it here please continue, as we will address that in steps #3 and #4.
3) Close System Preferences, from Applications → Utiltiies → open Keychain Access. From the login keychain, select the certificate associated with eduroam and delete it. Please reboot after.
4) Go to System Preferences → Profiles, click on “eduroam” and delete the profile.
This should completely remove all traces of the old 802.1x certificate stored for eduroam, and restore eduroam connectivity.
https://stackoverflow.com/questions/39311507/802-1x-mac-el-capitan-profile-delete
How do I turn on cookies?
To enable your cookies, go to the Tools menu of your browser. Now depending on if you’re using IE or Firefox, or something else, it might be named differently, but click on the Tools menu and look for Options.
For Firefox, click on the Privacy tab, you’ll want to look for something that says “Cookies.” A check box button you have to click on to enable cookies, click OK to end. For IE, once you’re at the option screen, click on the general tab. Where it says temporary settings, click on “Settings,” select the option that reads “Automatically.” Click OK to end.
If you’re on a Mac and are using Safari, click on the Safari tab, and go to Preferences. Under the Security tab, check to see if under Accept Cookies, it says “only from sites you navigate to).
If you’re worried about other people getting to your passwords or getting to your logins, you can delete the cookies off your computer (the option is located at the same place where you went to set the cookies).
How do I view and control cookies in my web browser? – Indiana U. Knowledgebase
How do I submit a URL that is too long into ...?
Sometimes you find that you need to save an extremely long link, like the one below, into a program that doesn’t allow links that long. For example Social Sciences Computing’s Classweb allows links to be 255 characters long, but the link below from UC-elinks is 384 characters long.
While waiting for the programmer to consider your request to allow longer links.
Another option is http://tinyurl.com. That free service converted the huge link below into a much shorter one.
Before
Extremely long URL from UC eLinks for specific article a professor wanted students to read
A list of similar URL shortening/redirection services is available at Listible
UCLA Has licensed this one: https://kb.ucla.edu/link/1227
I am getting this error message when I try to log in: "Your login is no longer valid. Please try logging in again."
There are two scenarios where this occurs. Are you getting this message after logging in or before you had a chance to?
If it is before you log in, your internet browser might be saving your logins and if you close the window before you sign out, the next time you go to the page, it’s assuming that you’re still logged in. (Sometimes your internet browser might save information about a page you were just on and it will attempt to recall it for you when you return to the page, sometimes it is a helpful thing, sometimes it can be a hassle).
To fix this, if you’re using Firefox, go to the Tools menu of your web browser, and select Options. Click on the “Privacy” option and look for Cookies. Then hit “Clear”.� Refresh your page and attempt to log in again.
For Internet Explorer, go to the Tools menu and select Internet Options.� Click on the “General” tab and look for Temporary Internet Folder,� then hit Delete cookies. Also, under Temporary Internet Files, hit Delete Files.
Now if you’re on a Mac and are using Safari, click on Safari at the top of the menus and select Preferences. Click on the “Security” tab and then click on Show Cookies.� You can either delete all the cookies, or select certain ones. It is alright to delete them all since cookies aren’t supposed to save passwords. If you’re trying to log in with your Brunin Online account or your University ID, and want to select certain ones to delete, then search for ISIS under the Name field.
Now if this error occurs before you had a chance to log in, the error page coming from the cached memory. What caching does is it saves information to the temporary folders and each time you go to the site, it will try to pull from the cached memory to make the download of the page faster. To remove cached items, follow the same steps to removing cookies, except, look for cache instead of cookies.�
Data Mining on the Internet with Google
Expand your power of Google.
Google (and many other search engines) has the ability not only to search on keywords, but also using a more “database-ish” query language to really narrow down your search results. The following is a summary of a few of the most useful lesser known features.
Helpful tips include:
- To include phrases quote the words together (straight quotes). For instance, “Bill Clinton” returns results as most expect whereas a search for Bill Clinton will return pages with the two words anywhere in the resultant page.
- To exclude words in a search, prefix the word or phrase with a minus sign (-).
- To restrict a search to a specific domain such as UCLA, use the modifier inurl: (thus, for UCLA append inurl:ucla.edu to the search).
- If you prefer a form interface for advanced queries, click on "Settings" > "Advanced search" or go directly to https://www.google.com/advanced_search.
- Go in to "Settings" > "Search settings" to display more than ten results per page.
Here are some pages for crafting better searches.
What is Bluesocket, NoCat Auth and Chillispot
What is Bluesocket, NoCat Auth and Chillispot ?
In short, those devices work by providing authentication services to wireless users to ensure they can access those services they’re allowed to. For example, when a user is authenticated, he/she can begin to access the internet, check mail from his/her wireless computer.
You may have heard of the term “hotspot” and “splash screen”. Say when you sit down at Starbucks Cafe, you can surf the net by login with an ID an password. Those devices mentioned above allow you to setup similar services.
At UCLA (in some areas), when you open your browser on the laptop computer, you may see the browser automatically redirected to a login screen. Once you entered your BOL ID and password and completed the authentication, you can begin to access the internet.
NOTE: authentication only checks your identity but it offers no encryption. If you are using a public wireless service, what you are transmitting over the air (packets) can be captured and reassembled to reveal the content. If you are paranoid then use encryption (VPN – virtual private networking). VPN is available on BOL website.
How it (hotspot / splash screen) works is beyond the scope of this discussion, more information can be found at:
Bluesocket is available commercially and can be very expensive. Some areas on campus use BlueSocket behind the scenes.
NoCAT and chillispot are opensource which means you can download the software and install it on a suitable PC. DD-WRT has a chillispot implementation option:
- http://www.dd-wrt.com/wiki/index.php/Chillispot
- Many additional technical descriptions by searching
How should I save my images for the web?
When saving images for the web, you must consider the size and quality of the image. The goal is to get the smallest possible file size while retaining the appropriate level of quality.
Using any photo editor available, you should:
- Crop the photo to show only the relevant content
- Resize the photo to fit on a web page
The most globally compatible web pages are no wider than 800 pixels - Save the file as a .jpeg
The JPEG image format is widely accepted as the best option for compressing photographs. For graphics that are created on a computer, GIF tends to be the format of choice.
Most photo editors will give you a choice on the level of compression to use. Quality and file size decrease as the compression level goes up. After you save your file, check it to make sure it is small enough, AND you are satisfied with the quality. The following image is a 130×100 pixel image which is 8 Kilobytes in size.
After all this hard work your image may still contain a lot of unnecessary information that it doesn’t need to look good on the web.
Losslessly Compressing Images
Often when you save images with tools such as Fireworks or Photoshop the resultant files contain extra data, including color data that may even be unused in the image and even things such as meta data. By compressing images without losing the image’s look or visual quality you can save on data that needs to be downloaded.
Yahoo’s smush.it service is incredibly good at doing this job for you. Simply upload the images that you want to ‘smush’ and it will losslessly compress them for you. In order for this to work file must have the extension png, jpg, (not jpeg), or gif.
Google Guidelines for Webmasters
Google offers tips and guidelines for webmasters and web developers in their Webmaster Help Center. Sitemaps, robots.txt, improving ranking, adding or removing sites from the index, etc.
How do I add or remove a page/website/etc from Google's index!
add:
http://www.google.com/support/webmasters/bin/answer.py?answer=34397
remove:
http://www.google.com/support/webmasters/bin/answer.py?answer=35301
Setting up ENVI or IDL network licensing
To configurate RSI (now ITTVIS)’s ENVI/IDL to use floating network licenses (version 4.2/4.3).
OS X:
load a terminal window. Type setenv LM_LICENSE_FILE port@servername
Windows:
right click on My Computer, goto Properties, go to the Advanced tab, go to Environment Variables.
Create a new System variable, Variable: LM_LICENSE_FILE ; Value: port@servername
port@servername will be specific to your particular license server.
ENVI and IDL 4.4/6.4 should be similar, but a February 19, 2008 check of ITTVIS’s site shows slightly different methods:
http://www.ittvis.com/services/techtip.asp?ttid=3882
Open an Apple X11 Terminal shell window, change directories (cd) to the bin subdirectory of your main IDL directory and issue the correct “lmutil lmpath -override idl_lmgrd <port@servername>” command to reference the licenses from your network license server. For example, if your main IDL directory is located in the default location (i.e., /Applications/rsi/idl_6.1) then issue the following commands:
cd /Applications/rsi/idl_6.1/bin
./lmutil lmpath -override idl_lmgrd 1700@myserver
This will create a file called “.flexlmrc” in your home directory. This procedure only needs to be done once. IDL or ENVI sessions started by this user should then be able to obtain floating licenses from the network license server.
ENVI 4.8 OS X/Unix network licensing changes (December 2010)
The default directory has changed slightly.
cd /Applications/itt/idl/idl80
./bin/lmutil lmpath -override idl_lmgrd 1700@myserver
Where 1700@myserver will be substituted with your specific your port and specific server.
ENVI 5.0 OS X/Unix network licensing changes (Spring 2012)
The default directory has changed slightly.
cd /Applications/exelis/idl/
./bin/lmutil lmpath -override idl_lmgrd 1700@myserver
Where 1700@myserver will be substituted with your specific your port and specific server.
ENVI 5.4 Windows/OS X network licensing changes (Winter 2017)
ENVI now has a GUI-based License Manager on the client side to connect to a server. This eliminates the need to set via command line (OS X) or Windows system variable in most cases.
How to explain RSS the Oprah way
Great for all those non-technical people:
http://cravingideas.blogs.com/backinskinnyjeans/2006/09/how_to_explain_.html
Browser Feature Comparison
Ever wonder about web browser standards support for particular products? The following links attempt to summarize standards support, features, and technical detail comparison between browsers for web developers.
Wikipedia Comparison of Web Browsers
WebDevout Browser Support
-SF2#html
Feel free to append additional sources.
Resizing form text areas on web pages
Sometimes you run into forms on web pages that have text boxes that are too small for your liking. Is there any way to resize them?
If you have Firefox 1.5 or higher, the answer is yes!
First, install Greasemonkey. I love it, and this article will explain why you should love it too.
Visit this page on userscripts.org to get a script called “Textarea_drag_resize”. Click on the link to the .js file and Greasemonkey will automatically detect and install it. You may need to activate it by right-clicking the monkey icon in the lower right of the Firefox frame, and selecting the new script. It will take effect immediately, and add a convenient draggable icon on every textarea element.
What is Yahoo Pipes?
“Pipes is a free online service that lets you remix popular feed types and create data mashups using a visual editor. You can use Pipes to run your own web projects, or publish and share your own web services without ever having to write a line of code.” – taken from http://pipes.yahoo.com/docs/overview
I saw this on the web for librarians (Web4Lib list) Feb. 11, 2007, but I haven’t tried building anything with it yet. The Librarians on the list seemed to quickly figure out the tools and make some mashups. Someone mentioned that it’s still in beta.
- http://pipes.yahoo.com/
- 30 Pipes Modules
- Article mentioning Pipes It’s aimed at the SEO (Search Engine Optimization) crowd.
Please post any pipes you make. The Pipes site lists a bunch already.
OpenSSH "permission denied" error
If your private key file (e.g. ~/.ssh/id_rsa) has too much permission, OpenSSH will complain “permission denied” and not work. By default, the permission might be something like 644 or 700. You need to set it to 600. (Got the solution from this article)
SSH Authentication Agents and Secure Password-less Logins
In conventional password authentication, you prove you are who you claim to be by proving that you know the correct password. The only way to prove you know the password is to tell the server what you think the password is. This means that if the server has been hacked, or spoofed, an attacker can learn your password.
Public key authentication solves this problem. You generate a key pair, consisting of a public key (which everybody is allowed to know) and a private key (which you keep secret and do not give to anybody). The private key is able to generate signatures. A signature created using your private key cannot be forged by anybody who does not have that key; but anybody who has your public key can verify that a particular signature is genuine.
So you generate a key pair on your own computer, and you copy the public key to the server. Then, when the server asks you to prove who you are, SSH can generate a signature using your private key. The server can verify that signature (since it has your public key) and allow you to log in. Now if the server is hacked or spoofed, the attacker does not gain your private key or password; they only gain one signature. And signatures cannot be re-used, so they have gained nothing.
There is a problem with this: if your private key is stored unprotected on your own computer, then anybody who gains access to that will be able to generate signatures as if they were you. So they will be able to log in to your server under your account. For this reason, your private key is usually encrypted when it is stored on your local machine, using a passphrase of your choice. In order to generate a signature, PuTTY must decrypt the key, so you have to type your passphrase.
This can make public-key authentication less convenient than password authentication: every time you log in to the server, instead of typing a short password, you have to type a longer passphrase. One solution to this is to use an authentication agent, a separate program which holds decrypted private keys and generates signatures on request. When you begin a Windows session, you start Pageant and load your private key into it (typing your passphrase once). For the rest of your session, you can start PuTTY any number of times and Pageant will automatically generate signatures without you having to do anything. When you close your Windows session, Pageant shuts down, without ever having stored your decrypted private key on disk. Many people feel this is a good compromise between security and convenience.
(text taken from here)
Main advantage of authentication agents is not having to type or remember passwords for every system you need to login, quite a time-saver if you’re using SSH on a daily basis. Additionaly, passwords can be long and cryptic – in other words, very secure.
Detailed setup instruction for Unix systems. Recommended read for users on all operating systems.
http://www.sshkeychain.org/mirrors/SSH-with-Keys-HOWTO/
SSHKeychain is a nice Mac OS X authentication client which stores private keys in the user’s Keychain:
http://www.sshkeychain.org/
Windows users can use PuTTY suite of tools, containing PuTTYgen (SSH key generator) and Pageant (authentication agent). Documentation on using Pageant.
Do shortened URLs like the ones created on ucla.in still work if the source URL changes?
For ucla.in, if the source URL changes, the ucla.in link will still point to the original link that was created. There is currently no option to update URLs from ucla.in once they have been created.
Capturing Media from the Internet
Capturing Media from the Internet
Jack Bishop, Ph.D.
Instructional Technologist
UCLA Office of Instructional Development
2/2011
Collecting media for use in your classrooms can be quite a daunting task especially for materials on the Internet that seem impossible to download. When it comes to collecting media from the Internet, we find a whole new set of problems to overcome. Mostly every video or sound file on the Internet is protected from copying or downloading, so what do you do? Well, fortunately there are a group of programmers building open source and free programs and tools to help keep the Internet free. The five tools below are very useful in capturing different types of media from the Internet. There are numerous other tools available to purchase, but these five FREE programs can be a lifesaver.
*Audacity *
A free recording/editing software that does an amazing job at both tasks. This can be used to create narrations, conduct interviews, edit music or sound files, and even capture sounds from the Internet.
For Windows: Get it for free at: http://audacity.sourceforge.net/. Download the recommended installer, then under the Optional Downloads section, download: “LADSPA plug-ins 0.4.15 installer (.exe file, 1.5 MB) – over 90 plug-ins” at: http://audacity.sourceforge.net/download/windows , and most importantly, “LAME MP3 encoder – Allows Audacity to export MP3 files,” at: http://lame.buanzo.com.ar.
For MAC users, go to: http://audacity.sourceforge.net/download/mac , download the appropriate software for your system, then under the Optional Downloads section, download: “LADSPA plug-ins installer – over 90 plug-ins” at: http://audacity.sourceforge.net/download/beta_mac , and most importantly, “LAME MP3 encoder – Allows Audacity to export MP3 files,” at: http://lame.buanzo.com.ar.
Download Helper
This is a free extension for the Mozilla Firefox Browser. To get it, go to: https://addons.mozilla.org/en-US/firefox/addon/video-downloadhelper/. Using DownloadHelper, you can easily save videos from most of the popular video sites on the Internet. It is also possible to capture all the images from a gallery in a single operation.
For MAC users, http://video-downloadhelper.en.softonic.com/mac
The free version places a small water mark on the video in the upper left hand corner. To remove this mark you must “register” the program for $28.50. I find the price worth it since the registered version not only eliminates the water mark, but it will capture the audio from a video and convert it to an MP3. Also, registered versions will have access to support for the conversion feature.
KeepVid – Works for Windows and MAC
If you prefer not downloading anything to help with capturing there are several online solutions. One of them is KeepVid. If you like KeepVid, you can make it very easy to use by dragging the box (highlighted here in red) to your links, or bookmarks toolbar (number 1). Then, when you are on a site from where you wish to capture video, just click on the bookmark and keep vid page will open. Copy the URL of the video and paste it into the URL field on the page (number 2).
After you copy the URL of the video into the URL box on the KeepVid page (number 3 below), click the Download button (number 4), and the results will be displayed in the window below (number 5). Right click on the file you want and save it to your hard drive. Check it out: http://keepvid.com/
Zamzar – Works for Windows and MAC
Zamzar is another free online tools used for capturing media from the Internet. Zamzar converts files into many different formats and in 4 easy steps delivers a link to the converted files in your email.
The interesting thing about Zamzar is that on top of online media conversion, it can convert file formats of files on your hard drive. So if you have a video file in a format that does not play well with PowerPoint, you can upload it and have it converted. This is a very easy to use program for free. http://www.zamzar.com/
Audio Hi-Jack – MAC
Record any audio – three simple words to explain Audio Hijack Pro. You can record from applications like youtube, iTunes, Skype or DVD Player. You can record from microphones and other hardware. If you hear it, you can record it. This works great for capturing the audio of video clips or songs that play from the Internet.
http://www.rogueamoeba.com/audiohijackpro/
For additional assistance or for help using these programs please contact me at 310-794-9726, or send me an email at: jbishop@oid.ucla.edu
Bookmarking secure sites and modifying existing bookmarks
How to bookmark protected UCLA application sites and ALL other UCLA-logon-required sites that are protected— this is an issue with many sites that require a logon and do not have a bookmark-friendly first landing page.
This is not limited to just UCLA Shibboleth (UCLA Logon) protected sites, however in this example this is what is being used.
Instructions below are for Firefox and for Internet Explorer.
Start:
- Wherever you have the site URL stored (usually via e-mail for most users), find the site URL.
- Right click on the site → “copy link location” (or “copy hyperlink” or similar)
- do a normal (left) click on the URL to cause it to open in your browser of choice.
- Add a bookmark for the site. PLEASE GIVE IT a relevant name instead of the default name. Please remember where you placed the bookmark.
The remaining steps are browser-specific:
Firefox:
- Go to Bookmarks → Organize Bookmarks
- Go to folder you placed the bookmark you just created in (please remember the name of the bookmark/the folder you placed it in from step #4).
- Click on the bookmark ONCE to select it.
- At the bottom of the bookmarks library window, you will see three fields— Name/Location/Tags. Verify this is the correct bookmark per the Name you created in step #4.
- Click on the “Location” field, COMPLETELY delete the old location, then right click → PASTE.
- Confirm that the URL you just pasted in is the same URL from step #2.
- Close the Bookmarks Library window by hitting the red x at the very top right.
Then you’re done! The next time you click on the link, it should open the UCLA-login-required site correctly.
Internet Explorer:
- Click once on Favorites → find the bookmark you just created → RIGHT-click on it → select Properties
- Verify this is the correct bookmark per the name you created in step #4.
- In the “URL” field of the window that opens up, COMPLETELY delete the old location, then right click → PASTE.
- Confirm that the URL you just pasted in is the same URL from step #2.
- Close the bookmark window by hitting “ok” at the bottom.
Then you’re done! The next time you click on the link, it should open the UCLA-login-required site correctly.
Google Power Search
Improve your Google search skills with Google’s Power Searching and Advanced Power Searching online courses—
- Power Searching and Advanced Power Searching Courses, http://www.powersearchingwithgoogle.com/
- Go Back to a Specific Date in Google Web History – June 2, 2014
- Sharpen your search skills, http://www.google.com/insidesearch/landing/powersearching.html
- Dan Ruseel’s Search ReSearch http://searchresearch1.blogspot.com/
Disabling Java in web browsers
If you want to improve your web browsing security by disabling Java, here are directions for different web browsers:
- http://tantek.com/2012/364/b1/how-to-disable-java-now-chrome-firefox-opera-safari
- http://antivirus.about.com/od/securitytips/ht/How-To-Disable-Java-In-Internet-Explorer.htm
- http://appleinsider.com/articles/13/01/11/zero-day-flaw-prompts-apple-to-block-java-7-from-os-x
Using a Google Account "Application Specific Password"
Quoting, “Some applications that access your Google Account (such as Gmail on your phone or Outlook) cannot ask for verification codes. To use these applications, you will not use verification codes. Instead, you’ll enter an application-specific password in place of your normal password.”
Link below is also valid when seeking to revoke a password on a trusted device. For instance, revocation may desired on a potentially compromised device or a device which has been lost.
See—
Browser incognito mode
Everyone should know about and use their web browser’s ‘privacy’ or ‘incognito’ mode. It shouldn’t be a tool used only by IT professionals and web developers.
http://college.wfu.edu/itg/blog/why-and-how-privacy-modes-in-browsers/
(How to go incognito in different browsers)":https://ithelp.brown.edu/kb/articles/361-configure-incognito-browsing