Windows 7
- Converting Windows 7 volume install from KMS to MAK
- manually assign KMS host to client running Windows Vista or 7
- Windows 7 Support for Dell & HP
- Are there any changes to the AIS Remote Printing (OASIS) setup directions for Windows 7?
- Windows 7 Backup and Restore
- Windows 7 computer will not detect any USB Flash Drive
- Microsoft Windows 7 Support Areas
- Windows 7 Migration Time
- Windows 7 Upgrade Paths
- Mouse scroll wheel issues in Windows 7
- Vista or Win7 client can't connect to file shares on older Win boxes or NAS devices
- win 7 imaging and deploying
- Taskbar buttons switch to Last Active Window in Windows 7
- Activate Windows 7 XP Mode
- Black screen after Windows 7 install on late 2009 iMac
- Windows 7 Administrator Password
- DVD drivers error when installing Windows
- How to Find Your Computer Name in Windows 7
Converting Windows 7 volume install from KMS to MAK
Most Windows 7 licenses at UCLA should be deployed via UCLA’s KMS over the network.
However, some users’ systems are offline and hence will require that you use a MAK.
To convert from the KMS to the MAK, the steps are somewhat different than Windows Vista’s GUI. You must use the CLI:
http://support.microsoft.com/kb/929826
1. Click Start, click All Programs, click Accessories, and then right-click Command Prompt.
2. Click Run as administrator.
If you are prompted for an administrator password, type the password. If you are prompted for confirmation, click Continue.
3. At the command prompt, type the following command, and then press ENTER:
slmgr -ipk xxxxx-xxxxx-xxxxx-xxxxx-xxxxx
Note In this command, xxxxx-xxxxx-xxxxx-xxxxx-xxxxx represents your MAK product key.
manually assign KMS host to client running Windows Vista or 7
Windows Vista and 7 under MCCA at UCLA are validated through a KMS (key management service) server on campus. If for some reason Windows doesn’t automatically validate through the KMS you can manually assign the KMS host to your client.
Run the command prompt as an administrator.
Enter:
cscript \windows\system32\slmgr.vbs /skms 128.97.141.165
There are two KMS servers and either one can be used:
- kms1.softwarecentral.ucla.edu 128.97.141.165
- kms2.softwarecentral.ucla.edu 128.97.141.90
After a short pause you will be notified of the success of the connection within the command prompt.
For more information read the Windows Volume Activation 2.0 Deployment Guide here.
Windows 7 Support for Dell & HP
Direct links to Dell’s & HP’s Windows 7 support areas –
.
Also,
.
Both areas have links to obtain free Windows 7 upgrades for select computers obtained within their eligibility window.
Are there any changes to the AIS Remote Printing (OASIS) setup directions for Windows 7?
The instructions for setting up AIS Remote Printing on XP still applies. I would recommend printing to a networked printer. Give the IP Address of the networked printer when filling out the form to AIS.
Windows 7 Backup and Restore
Windows 7 Backup
Draft v0.1 — 6 April 2011
Brian J. Won brian@ssc.ucla.edu
UCLA Social Sciences Computing
Guide to basic setup and restore using Windows 7’s built-in backup.
Setup:
Start → Control Panel → System and Security → Backup and Restore

Backup → Set up backup.

Starting Windows Backup will take a while. On a reasonably fresh Windows 7 installation with a new HP 8100 Elite CMT, it took several minutes.
Next, pick a drive to back up to. Windows 7 will automatically recommend external harddisks, although you may choose an internal one if your computer has multiple physical internal harddisks.
SSC recommends that you use an external harddisk that you have dedicated solely for backup. Unplug the drive entirely when not using it to backup your system (if you are doing only periodic backups). If you are doing continuous backup as some programs permit then please leave the drive constantly connected.
In this example we will be using an external WD MyBook 3.0 (connected as J:) for backup.

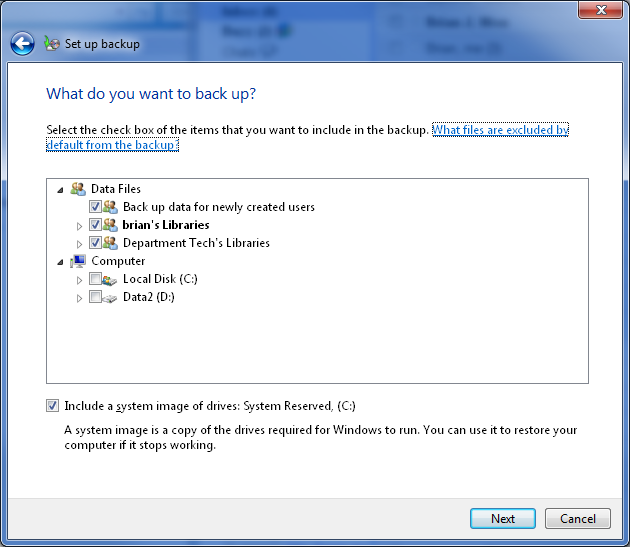
Windows Backup in Windows 7 offers two choices on what to back up—“Let Windows choose”, which backs up selected folders such as Documents, Pictures, the desktop, and creates a system image. This option is fine for most users.
The second choice, “Let me choose”, is for users who do not use Windows’ default storage locations for their data. SSC has found some users store things in legacy areas such as “C:\research” or other folders. This option will let the user select them manually.

When selecting “Let me choose”, Windows will give you a folder tree of the computer with checkboxes next to each folder. Expand the tree as needed and check the desired folders to backup. By default, a separate folder tree for “Data Files” will be included for user data and will be checked by default. Also included by default, a system image of the boot drive will be performed.
Windows Backup by default backups almost all files, unlike some other programs that do not do certain file types (such as video) by default.
The next screen will review the backup settings chosen before running the backup.
The backup schedule settings may be changed from this screen, or they may be changed later. The computer and backup drive must be both be on and connected for backup to occur, so the default time provided by Windows—in this case, every Sunday at 7:00pm—may not be ideal.

The “change schedule” is fairly simple. Backup frequency, time, and date may all be adjusted.

Hit “ok” or if you did not need to change the backup schedule, skip that. Instead, go ahead to “Save settings and run backup.”
We will create a system repair disc later.
This will close the “Set up backup” window and go back to the main Backup and Restore window in Control Panel, where you can then view your backup progress. If this is your first backup, this may take some time depending on the amount of data involved.

After completion, the screen will look slightly different to show that at least one completed backup has been done.

You may then create a System Repair disc from the same screen, on the left side under “Create a system repair disc.”
Restore
Starting from Control Panel → System and Security → Backup
Go to “restore my files” for the basic restore of missing/damaged user files.

This may take a while to load, depending on the size of your backup.
You may then search or browse for the files you wish to restore from backup.

To search for a file, hit “search” and then type in all or part of the file name or folder name to search for it, then check the box for the desired file or folder, and hit ok.

To browse for files or browse for folders, the navigation screen is similar—it shows previous backup occurrences as folders with the date/time of the backup, and you may navigate inside to find the one you wish.
Select the files or folders you wish to add, then hit “add file” or “add folder” as needed to add to the restore.

Once all of the files and folders to restore have been selected, hit “next.” If some of the files or folders selected are unwanted, select them and hit “remove.”

Restore files will then ask where do you wish to restore them—to the original location, or to a different location.
The “In the original location” will overwrite the existing file in that location, which is what you may wish to do if the original file was overwritten, damaged, or corrupted and you wish to restore it immediately.
The “In the following location” will restore the backup file to a folder or drive of your choice. This is useful if you wish to compare the current version of the file with the restored version from the previous backup.

After hitting “restore”, if you have picked a location where the file already exists, the standard Windows file copy and “warning, this file already exists” dialog will pop up. Hit “copy and replace” to restore the version from backup, “don’t copy” to skip copying, or “copy, but keep both files” to change the name of the restored file to the name shown by Windows.
This is a standard Windows copy dialog, if you are unfamiliar with it, please consult other sources as an extensive explanation is beyond the scope of this document.
After restoration is complete, Restore Files will report it and give you an option to see which files were restored.

The “View restored files” is a standard Windows Explorer view of the locations files were restored to.
After viewing the restored files, you may close the Explorer window, then hit “finish” in the Restore Files to complete the process.
Windows 7 computer will not detect any USB Flash Drive
Steps to Safely Cleanup and Remove old USB Mass Storage Drivers on your PC
Shut down your computer. Unplug your USB storage devices: USB Disks, flash, cams, CD/DVD, etc. as well as your USB hubs
==> Other USB devices like keyboards, mice and LAN adapters can stay plugged in
Boot computer back up. Click for how to determine whether you are running 32 or 64 bit Windows
Download drivecleanup.zip, unzip and save to your desktop. Move the 32 or 64 bit version of DriveCleanup.exe to C:\Windows\System32
Open an elevated command prompt window:
NOTE! It must be an elevated command prompt window or the tool won’t work. (If you need instruction, click on the embedded hyperlink in the bullet below.) p.s. Thanks to andrew129260 in helping to highlight this important point! ;)
Open an elevated (administrator) command prompt window!!
In the command prompt enter: drivecleanup.exe
==> Your output should be similar to my example below.
==> If, instead, you get an error message like Command not recognized it means you didn’t move Drivecleanup.exe to the right directory
Reboot. Now just replug your devices for fresh clean device reinstalls! :)
Code:
C:\>[B]drivecleanup.exe[/B]
DriveCleanup V0.7.0 (Win32)
Uninstalls non present storage volumes, Disk, CDROM, Floppy devices
and deletes their registry items
Freeware by Uwe Sieber – www.uwe-sieber.de
removing USB device ‘USB\VID_0000&PID_0000\7&2285BC2A&0&1’
OK
removing USB device ‘USB\VID_0411&PID_00A2\WDC_WD2500_____WD-WCANKE590248’
OK
removing USB device ‘USB\VID_0BB4&PID_0C02&MI_00\6&2DD32CD2&1&0000’
OK
removing USB device ‘USB\VID_1058&PID_0702\575845313037453632383432’
OK
removing USB device ‘USB\VID_1058&PID_0702\7274787265616E206C2E3132’
OK
removing USB device ‘USB\VID_1058&PID_0702\F53A39F2AB75F5CDC4B6ABC3’
OK
removing Disk ‘USBSTOR\DISK&VEN_HTC&PROD_ANDROID_PHONE&REV_0100\7&1012C922&1&HT9A2HF00558&0’
OK
removing Disk ‘USBSTOR\DISK&VEN_WD&PROD_1600BEVEXTERNAL&REV_1.02\575845313037453632383432&0’
OK
removing Disk ‘USBSTOR\DISK&VEN_WD&PROD_N_EXTEREXTERNAL&REV_1.02\7274787265616E206C2E3132&0’
OK
removing Disk ‘USBSTOR\DISK&VEN_WD&PROD_N_EXTEREXTERNAL&REV_1.02\F53A39F2AB75F5CDC4B6ABC3&0’
OK
removing Disk ‘USBSTOR\DISK&VEN_WDC_WD25&PROD_00JS-00NCB1&REV_\WDC_WD2500_____WD-WCANKE590248&0’
OK
removing volume ‘STORAGE\REMOVABLEMEDIA\8&3152D400&0&RM’
OK
removing volume ‘STORAGE\REMOVABLEMEDIA\9&29B6E3D1&0&RM’
OK
removing volume ‘STORAGE\REMOVABLEMEDIA\9&BC53371&0&RM’
OK
removing volume ‘STORAGE\VOLUME\1&30A96598&0&SIGNATURE44FDFE06OFFSET7E00LENGTH2543150400’
OK
removing volume ‘STORAGE\VOLUME\1&30A96598&0&SIGNATUREC12C6F64OFFSET7E00LENGTH3A388A8400’
OK
Regkey delete HKLM\System\MountedDevices\\\Volume{91a9bc60-2535-11df-b96f-00256495135f}
OK
Regkey delete HKLM\System\MountedDevices\\\Volume{91a9bc61-2535-11df-b96f-00256495135f}
OK
Regkey delete HKLM\System\MountedDevices\\\Volume{dce40c14-30ad-11df-b973-00256495135f}
OK
Regkey delete HKLM\System\MountedDevices\\\Volume{d4227929-32c8-11df-b97c-00256495135f}
OK
Regkey delete HKLM\System\MountedDevices\\??\Volume{9827b60e-34f1-11df-b983-00256495135f}
OK
Regkey delete HKLM\System\MountedDevices\\DosDevices\Z:
OK
Regkey delete HKLM\System\MountedDevices\\DosDevices\H:
OK
Regkey delete HKCU\Software\Microsoft\Windows\CurrentVersion\Explorer\MountPoints2\H
OK
Regkey delete HKCU\Software\Microsoft\Windows\CurrentVersion\Explorer\MountPoints2\Z
OK
Removed 6 USB devices
Removed 0 USB hubs
Removed 5 Disk devices
Removed 0 CDROM devices
Removed 0 Floppy devices
Removed 5 Storage volumes
Microsoft Windows 7 Support Areas
With the official Windows 7 release, MSDN virtual labs have been updated:
.
Topics include:
- AppLocker
- BitLocker
- BranchCache
- Microsoft Application Virtualization (APP-V)
- Microsoft Enterprise Desktop Virtualization (MED-V)
- Problem Steps Recorder
- Search Federation
- User Account Control
- Windows Troubleshooting Packs
- Springboard – http://technet.microsoft.com/en-us/windows/dd361745.aspx?ITPID=carepgm
- Webcasts – http://www.microsoft.com/events/series/technetwindows7.aspx?tab=webcasts
- Forums – http://social.technet.microsoft.com/Forums/en-US/category/w7itpro
Windows 7 Migration Time
A “clean install” for Windows 7 is preferred, but Windows Vista users have an option to upgrade the existing system to Windows 7.
Time estimates from Chris Hernandez, a Microsoft Software Engineer, are:
.
from,
Windows 7 Upgrade Paths
There is much information on upgrading Windows Vista to Windows 7 on the Internet.
Note, Windows Vista editions are limited to what edition of Windows 7 they can directly upgraded:
.
see also,
- Windows 7 Upgrade Paths
- Windows 7 Editions — Comparison Chart
- Upgrading to Windows 7: what XP and Vista users need to know
- Windows 7 Migration Time
Mouse scroll wheel issues in Windows 7
A mouse with a scroll wheel that works fine in Windows Vista, Windows XP, and other OS’es does not work properly in Windows 7.
In some applications in Windows 7, it may work fine, in others, it either does not work, or does not scroll down (scrolling up still works in some cases).
This may occur on hardware that is Windows 7 approved and should work. In some cases this has been reported in Vista as well, but almost never older OS’es (such as XP, 2000, etc.).
This is a common issue:
http://www.google.com/search?hl=en&lr=&client=firefox-a&rls=org.mozilla:en-US:official&tbo=p&num=50&tbs=qdr:y&q=windows+7+scroll+wheel+problem&start=100&sa=N
The root cause appears to be that the software in question is that the mouse being uses can send more fine-grained mouse wheel input than the software in question supports.
If installing the latest mouse drivers does not solve the problem, and the latest application software updates do not solve this problem, the best solution is to replace the mouse.
http://forums.winamp.com/showthread.php?postid=2533770#post2533770
-
It’s due to the handling of the delta value passed in the wm_mousewheel message assuming a delta of 120 but some mice have a smaller delta (as is allowed on vista/win7) which breaks the previous logic. one of the devs was meant to be looking into changing the handling but that never happened i believe and without knowing what mice exhibit this finer level of scrolling (as i need a new mouse but can’t get a definite answer) i’m not going to shell out for something that won’t help.
-
Specific example: This issue has been replicated at SSC with the Microsoft Comfort Mouse Optical 3000 as well as several other generic mouses. On the same system, the Microsoft IntelliMouse Optical USB and Logitech LX3 work fine. Installing Microsoft Intellipoint software (and uninstalling it did not help). The system in question worked fine in Windows XP, but not in Windows 7.
Applications affected included Microsoft Access 2007, but not Windows Explorer or Firefox.
Per the links above, this issue is not particular to these specific applications or hardware.
Vista or Win7 client can't connect to file shares on older Win boxes or NAS devices
Microsoft has enhanced their security standards, in particular their aging Samba (SMB) Windows File Sharing protocol. By default, Win 7 only communicates with other file sharing clients and servers which are also using the new more secure version of the Samba file sharing protocol. Because of this, it will not properly communicate with computers running older versions of Samba (SMB) Windows File Sharing protocol.
You can change the default behavior—but also reduce security—by the following:
- From the command line, run the Local Security Policies console snapin (secpol.msc)
- Open Local Policies –> Security Options –> Network Security: LAN Manager authentication level
- Change the setting from “NTLMv2 responses only” to one of the more lenient settings, like “LM and NTLM – use NTLMV2 session security if negotiated”
win 7 imaging and deploying
I’m in the process of cloning my Win 7 images. I understand the only official way to change SID’s and copy the configure profile to the default user is with sysprep. Does anyone have some good step by step references from start to finish. From using sysprep to make a zero touch installation, to deploying the image through wds and configuring each machine to come up with the correct name, join the domain, be placed in the correct OU, etc. Or does anyone use ghost?
I’ve gotten to the point of having an unnattend.xml file (still asking for the network location), and copying the installation with imagex to a hard drive. The problem is putting it back on the computer (missing ntldr error), and then eventually using wds to push the images (43 gigs in ghost and 22 gigs using imagex) to some 150 pc’s (for starters). The next step after is to get the images in a central repository and push them back out to the pc’s with zero touch.
Thank you for any help,
Mark’s Blog : The Machine SID Duplication Myth – http://blogs.technet.com/markrussinovich/archive/2009/11/03/3291024.aspx
Je Jin’s DISM Tool – http://forums.mydigitallife.info/threads/9682-Je-Jin-s-DISM-Tool
can’t help much because we’ve always added PC’s to the domain manually – whether using Ghost, BDD, or the Win7 System Image tool. We’ve just started using the new Altiris 7 and have been able to successfully image systems with XP, Vista and Win7. We’re still learning the interface but it seems fine so far.
Taskbar buttons switch to Last Active Window in Windows 7
In the Windows 7 taskbar, if you have lots of windows for the same application open, things may get confusing when you are trying to find the window you want.
If you control-click on the application in question, the last window will show up. If you keep clicking, it will cycle through open windows.
To change it so that a normal click (instead of a control-click) goes to the last active Windows, you may hack the registry to do so:
- open regedit.exe
- Find the registry key: HKEY_CURRENT_USER\Software\Microsoft\Windows\CurrentVersion\Explorer\Advanced
- Create a new 32-bit DWORD value on the right hand side, give it the name LastActiveClick, and set the value to 1
- close regedit, then log off and log back on.
Activate Windows 7 XP Mode
Windows 7’s XP Mode is not installed by default. Rather, qualifying Windows 7 versions can download it from Microsoft—
http://www.microsoft.com/windows/virtual-pc/download.aspx
( NOTE: the page validates the downloading system to insure it qualifies )
.
Important licensing considerations —
http://www.softwarecentral.ucla.edu/MicrosoftVirtualDesktopLicensing.htm
Black screen after Windows 7 install on late 2009 iMac
Boot into MacOS, install either NTFS Mounter or NTFS 3G in order to make the NTFS partition writable.
On the Windows OS drive, delete the existing ATI driver:/Windows/System32/Drivers/atikmdag.sys
Reboot into Windows 7, download the latest ATI HD 4850 driver from AMD.
Note: Apple’s alleged fix for this graphics card driver issue is a dud.
Windows 7 Administrator Password
I have a department laptop that I use, I have forgotten the adminstrative password, is there away to reset it with out reinstalling the windows 7 operating system? I am currently using the user account on the system for my research.
Try the suggestions here: http://superuser.com/questions/95685/lost-my-windows-7-admin-password-need-to-change-or-reset-it
Assuming the hard drive is not encrypted, one commercial option is Stellar Phoenix ($49). (Its availability highlights a machine’s vulnerability when someone gains physical access to a machine!)
try Hirens boot CD we use it all the time to remove passwords
http://www.hirensbootcd.org/hbcd-v151/
(read password tools section)
download at http://www.hirensbootcd.org/download/
Good luck
DVD drivers error when installing Windows
I recently received a new HP Folio 13 ultrabook and began installing Windows 7 Pro 64 bit on it (it came with Home). Because the ultrabook has no optical drive I was using a LaCie external DVD drive to install Windows.
After booting to the install disk I kept getting the message that DVD drivers were needed before the installation could continue. After trying many fixes I finally found a post online that suggested switching the DVD drive to the other USB port before clicking “Install Now”. It worked.
This may work for other models.
- Boot to the Windows disk in your external optical drive.
- When presented with “Install Now”, unplug the drive and move it to another (or the other) USB port. Then click “Install Now”.
- If your external drive needs a second USB port for power you can always attach the second power-only plug to another computer.
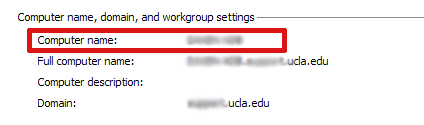
How to Find Your Computer Name in Windows 7
This document provides a step-by-step set of instructions on how to find your computer’s name in Microsoft Windows 7.
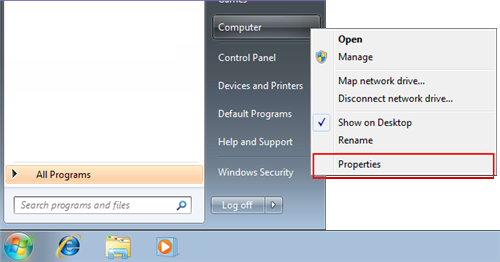
- Click on the Start button.
- Right-click on Computer.
- Select Properties.
Your computer name will be listed near the bottom of the window that opens under “Computer name, domain, and workgroup settings”.