# MacOS, Windows, and Linux
# Windows XP
# How do I see someone else's screen on Windows XP so I can help them?
If both machines are running Windows XP, you can use Remote Assistance (instead of Remote Desktop) to see and control their machine, with their permission. Here is a writeup describing [how to use remote assistance in Windows XP](http://www.windowsnetworking.com/j_helmig/wxprmass.htm)
There is another solution using VNC
[Here is the link](http://www.realvnc.com/)
VNC allows cross-platform remote control among Windows, Mac and Unix/Linux machines.
To have a solution which can cross all platforms and bypass firewalls, with or without administrative privileges, one would like to use WebEx (subscription based, free trial available).
[http://www.webex.com](http://www.webex.com)
[http://www.webex.com/solutions/online-support-svc.html](http://www.webex.com/solutions/online-support-svc.html)
# How do I get into SAFE MODE in Windows 2000/XP
1. Restart machine
2. Hit F8 as the machine is booting up
3. Select “Safe Mode” or “Safe Mode with Networking” from the menu by using the cursor keys
# Installation of TCP/IP Printer in Windows XP Using the Printer's IP Address
# Using the IP address of a printer is one way to set up a printer on your Windows XP computer. You will need to get the ip address of the printer; ask your friendly technical support person for help in getting this information.
1. Start → Settings → Printers.
2. Double-click on Add Printer & press Next.
3. Make sure that the Automatically detect and install my Plug and Play printer is NOT selected. Select Local Printer & press Next.
4. If it for a printer with a newly designated IP address, select Create a new port & select Standard TCP/IP port from the type menu, and press Next.
5. Type in the IP address of the printer & press OK.
6. Select the manufacturer from the left pane & select the model of the printer from the right pane & press Next.
7. Name the printer as you like & decide whether this printer is to be the default printer, and press Next.
8. Decide whether to share the printer or not, and press Next.
9. Decide whether to print a test page or not, and press Next.
10. Press Finish to complete the installation.
# How can you encrypt files on a Windows XP system?
Windows XP Encryption
Microsoft Windows XP Pro has built-in encryption as part of the file system (EFS). More info can be found here on how to encrypt files:
[http://www.iopus.com/guides/efs.htm](http://www.iopus.com/guides/efs.htm)The important part is to backup the encryption key to a floppy disk or other medium because if the Windows OS becomes unbootable or damaged, the data may be lost.The Windows XP encryption does not protect the files if the specific user is logged in at the moment. It only prevents unauthorized access from other profiles or if the hard drive is pulled and plugged into another machine.
A simple way to encrypt files is use a compression tool such as WinRar
([http://rarlab.com/download.htm](http://rarlab.com/download.htm)) and compress the files in RAR format with a password. Zip compression also supports password encryption, but it is more susceptible to dictionary attacks on the password. The upside to Zip compression is that it is more compatible without installing additional software (XP and OS X have Zip decompression built-in)
# How do I disable automatic restarting when using Automatic Updates in Windows XP?
If you have enabled automatic updates on your Windows XP Machine, now the computer will restart by itself. Sometimes this causes problems because people will have programs open and can lose data!
Here is how to get around this problem, and it is only for WinXP Pro:
Ever since Microsoft release Windows XP Service Pack 2, the company keeps emphasize the fact that you should enable Automatic Updates on your computer.
Automatic updates are usually a good thing but there is a serious problem with it.
Sometimes updates need to restart the computer to finish the installation. Until SP2 Automatic Updates would not restart your computer automatically. But this is not the case with SP2.
Once you scheduled Automatic Updates to be installed (by default at 03:00 AM), if the update requires restart Windows will notify you that it needs to restart. If you are not logged in and do not restart within 5 minutes, Windows will automatically restart your computer.
This behavior can cause a lot of problems. Documents you left open and did not save will be lost, downloads you started that have not finished will be terminated, and even hard disk maintenance like defrag that is working will get terminated, which might cause lost of data.
Unfortunately Windows XP Home users can not do much to change this behavior, except saving all the data before going to sleep or disabling the automatic updates.
On the other hand Windows XP Pro users can tell Windows never to restart the computer automatically. In order to do that follow these steps.
- In the Start Menu go to Run type “gpedit.msc” and press Enter
- Now a Group Policy editor will open. In this window navigate to: Computer Configuration → Administrative Template → Windows Components → Windows Update
- Double click on No auto-restart for scheduled Automatic Updates installations
- In the settings window Choose Enabled and click OK
- Close Group Policy Editor
The next time Windows updates your system it will not restart the computer automatically, but will notify you that restart is needed in order to finish the installation.
# Remove WinXP Printer Notifications
See below if you’re tired of the pop-up balloon everytime you print.
- Remove WinXP Printer Notifications \*\*
1\. Click on Start, select Run from the Start Menu.
2\. Type in “regedit”.
3\. Browse to the key HKCU\\Printers\\Settings and find the key “EnableBalloonNotificationsLocal” or “EnableBalloonNotificationsRemote”.
If the Key doesn’t already exist, create a DWORD value with that name and set the value to 0.
4\. Change the Value Data to “0”. Reboot or Restart the Print Spooler Service.
# Access denied error when installing Windows XP Service Pack 3
When attempting to upgrade Windows XP systems to Service Pack 3, you get one of the following errors:
- Service Pack 3 setup error. Access is denied.
- Service Pack 3 setup error. Service Pack installation did not complete
Checking the svcpack.log file in c:\\Windows will probably show a:
- DoRegistryUpdates failed
Less common errors for Service Pack 3 installation failure include system hangs during installation— both during installation, file backup, and registry modification.
**If you have followed MS KB 949377 and Windows XP SP3 still does not install for you, please read the entire article.**
Per Microsoft Knowledgebase article 949377:
[http://support.microsoft.com/kb/949377](http://support.microsoft.com/kb/949377)
Follow the steps they recommend:
- Method 1: Download and then install the full Windows XP Service Pack 3 download package from the Microsoft Download Center (e.g. if you are trying from Windows update, try to download the SP3 network install and use that to install): [http://support.microsoft.com/kb/322389/](http://support.microsoft.com/kb/322389/)
- Method 2: Method 2: Restart the computer, and then close or disable any antivirus or antispyware program that may be running. For UCLA users this typically means Sophos and Spysweeper.
If Methods #1 and #2 fail, try Method 3:
- Method 3: Reset the registry and the file permissions
- Download and then install the Subinacl.exe file. To do this, visit the following Microsoft Web site: [http://www.microsoft.com/downloads/details.aspx?FamilyID=e8ba3e56-d8fe-4a91-93cf-ed6985e3927b&displaylang=en](http://www.microsoft.com/downloads/details.aspx?FamilyID=e8ba3e56-d8fe-4a91-93cf-ed6985e3927b&displaylang=en)
- Start Notepad.
- Copy and then paste the following text into Notepad.
cd /d “ProgramFiles\\Windows Resource Kits\\Tools”
subinacl /subkeyreg HKEY\_LOCAL\_MACHINE /grant=administrators=f /grant=system=f
subinacl /subkeyreg HKEY\_CURRENT\_USER /grant=administrators=f /grant=system=f
subinacl /subkeyreg HKEY\_CLASSES\_ROOT /grant=administrators=f /grant=system=f
subinacl /subdirectories SystemDrive /grant=administrators=f /grant=system=f
subinacl /subdirectories windir\\**.** /grant=administrators=f /grant=system=f
secedit /configure /cfg windir\\repair\\secsetup.inf /db secsetup.sdb /verbose
- Save this Notepad file as Reset.cmd.
- Ensure you are running as Administrator, then double-click the Reset.cmd file to run the script. This script may take a long time to run.
- Install Windows XP SP3.
***If Windows XP Service Pack 3 still does NOT install successfully for you*** , please attempt Method 3’s last 5 steps (out of 6) in **safe mode**.
# Change the Default NumLock State in Windows XP
Problem: Numlock is enabled in the BIOS but doesn’t work on the XP logon screen.
Solution: You can edit the registry and set the numlock to be enabled on login. The info from the link below says it enables or disables the numlock feature after login but it worked at login for the system I applied the registry change to. Previously that system would not enable the numlock on the login screen even though numlock is enabled in the BIOS.
Here are the Registry Settings:
User Key: \[HKEY\_USERS\\.DEFAULT\\Control Panel\\Keyboard\]
Value Name: InitialKeyboardIndicators
Data Type: REG\_SZ (String Value)
Value Data: 0 = NUMLOCK is turned off after logon, 2 = NUMLOCK is turned on after logon
For more info check out this link:
[http://www.winguides.com/registry/display.php/196](http://www.winguides.com/registry/display.php/196)
If that doesn’t work you might have to use a 2 line vb script file:
[http://support.microsoft.com/default.aspx?scid=kb;en-us;314879](http://support.microsoft.com/default.aspx?scid=kb;en-us;314879)
# Repair the Master Boot Record in XP
Use the fixmbr command, available in Recovery Console, to repair the Master Boot Record on an XP machine. If a computer won’t boot or sustained some damage due to a virus or other cause, this may resolve the problem.
Boot from your Windows XP CD and when prompted, press R to access the Recovery Console.
1\. When you reach the command prompt, type the following and then press Enter.
fixmbr
2\. The fixmbr utility will write a master boot record to the hard drive that you’re currently using to boot into Windows XP. This will repair any corruption or damage that the master boot record may have.
3\. Take out the Windows XP CD, type exit and then press Enter to restart your PC.
Assuming that a corrupt master boot record was your only issue, Windows XP should now start normally.
# Windows XP End of Life 4/8/2014
Microsoft will cease support for Windows XP on April 8, 2014. Computers running XP after April 8 are at increased risk of being compromised. It is strongly recommended that users upgrade their operating systems well before April 8. Check Microsoft’s system requirements for Windows 7 and Windows 8 to see if an upgrade is possible for your computer.
- [http://windows.microsoft.com/en-us/windows7/products/system-requirements](http://windows.microsoft.com/en-us/windows7/products/system-requirements)
- [http://windows.microsoft.com/en-us/windows-8/system-requirements](http://windows.microsoft.com/en-us/windows-8/system-requirements)
See also,
- Countdown timer webpage, [http://countingdownto.com/countdown/143839](http://countingdownto.com/countdown/143839)
- Countdown timer gadget, [http://www.microsoft.com/en-us/download/details.aspx?id=11662](http://www.microsoft.com/en-us/download/details.aspx?id=11662)
- UCLA Policy 401, [https://www.itsecurity.ucla.edu/plan/policies\_ucla](https://www.itsecurity.ucla.edu/plan/policies_ucla)
# Windows XP Transfer Tool from Microsoft
As the end of support for Windows XP on April 8th nears Microsoft is continuing to focus on ensuring customers are aware of the deadline and helping them to migrate to a modern operating system. The offering is from a partnership between Microsoft and Laplink—
- **[http://blogs.windows.com/windows/b/windowsexperience/archive/2014/03/03/new-windows-xp-data-transfer-tool-and-end-of-support-notifications.aspx](http://blogs.windows.com/windows/b/windowsexperience/archive/2014/03/03/new-windows-xp-data-transfer-tool-and-end-of-support-notifications.aspx)**
# XP Desktop Setup for AIS Remote Printing
1\. Enable LPR printing services (Print Services for Unix).
Click on the Start Menu then Control Panel.
Click on Add or Remove Programs.
Click on Add/Remove Windows Components.
Select Other Network File and Print Services.
Click on Details.
Select Print Services for Unix.
Click on OK, then click on Next.
Click on Finish.
2\. Enable TCP/IP printing services to start automatically.
Click on the Start Menu then Control Panel.
Click on Performance and Maintenance.
Click on Administative Tools.
Click on Services.
Double Click on TCP/IP Print Server.
Click on Start under Service status:
Change Startup type to: Automatic.
Click on OK.
3\. Enable Port 515 under the XP Firewall.
Click on the Start Menu then Control Panel.
Click on Network and Internet Connections.
Click on Windows Firewall.
Click on the Exceptions Tab.
Click on Add Port.
For Port Name enter: AIS Remote Printing
For Port Number enter: 515
Select TCP then click on OK.
Click on OK again.
These steps needs to be implemented on the workstation for AIS Remote Printing services like IDOCS to function.
One the AIS Administration side. You will need to contact the AIS Help Desk at x66951 or by emailing to ensure that they have the correct IP address for your workstation and queue name for the printer. I always make the queue name: ais (I believe the queque name is case sensitive).
To look up your IP address:
Click on the Start Menu then on Run.
Type: cmd
Then click on OK.
Type: ipconfig
Hit enter.
Your IP address should now be listed. Write it down.
If you have never had Remote Printing setup by AIS before you can go to this url:
[http://media.ais.ucla.edu/printer\_connect\_request.htm](http://media.ais.ucla.edu/printer_connect_request.htm)
To fill out a request form or you can contact the AIS Help Desk.
SECRET CODE: 1001373 – Mike Lee
SUPER SUPER SECRET CODE (Hummingbird Explorer): 1002102
AIS Helpesk Number: x66951
NOTES:
Selecting the correct R-Printer
Have users log into Oasis
iddb
prnt
f8 to scroll through list
S (capital S) to select appropriate printer
double checked that you selected the right one because putting an “S” on the printer actually selects the one below that…
Tricky Tricky…
# How to Change Your Computer Name in Windows XP
Here are the steps to change the name on your computer when you’re using Windows XP
1\. Go to “start” menu and click on “control panel”
2\. A new window will pop up with different options to select from. Click on “system” to go to system properties.
3\. Another window will pop up with different tabs seen at the top of the window. Click on “computer name”
4\. Click on “change” and enter the new computer name in the field that says “computer name.”
5\. Click “ok” and your computer should be given the new name.
# You can't add a printer and you have print spooler error in Windows XP
[http://support.microsoft.com/default.aspx?scid=kb;en-us;324757](http://support.microsoft.com/default.aspx?scid=kb;en-us;324757)
Download and run the tool Microsoft provides to fix this issue.
# Recover from a Corrupted Windows Registry
When a Windows XP sp2 system cannot boot, but system restore had been enabled (as is now by default), [How to recover from a corrupted registry that prevents Windows XP from starting](http://support.microsoft.com/?kbid=307545).
The procedure describes a method by booting from the Windows XP CD-ROM. Understanding the procedure, a technician can also perform the essential steps upon a hard drive extracted from the source computer.
# How do I make a Windows XP PC automatically login?
If you want to have a Windows XP automatically log in (on a domain or not), you can use the Tweak UI tool available here:
[http://www.microsoft.com/windowsxp/downloads/powertoys/xppowertoys.mspx](http://www.microsoft.com/windowsxp/downloads/powertoys/xppowertoys.mspx)
You’ll need to be an administrator to install it.
There will be a Login category on the left side where you can type in the user name and password that should auto login every time you start up.
Be aware that the password is stored plaintext in the registry, so do not use if that’s a problem. You could use this, for example, on TA lab computers where everyone knows the password anyway.
To avoid auto login, hold down the left shift key when Windows starts up.
If your computer is not part of a domain you can configure Windows XP to automatically logon simply by:
1\. Click Start, click Run, and type control userpasswords2
2\. Uncheck the Users must enter a username and password to use this computer check box.
3\. Click Apply.
4\. Enter the user name and password you wish to automatically log on with, and then click OK.
5\. Click OK again and you’re all done.
This feature allows other users to start your computer and use the account that you establish to automatically log on. Enabling auto logon makes your computer more convenient to use, but can pose a security risk.
Check out this link: [http://windowsxp.mvps.org/Autologon.htm](http://windowsxp.mvps.org/Autologon.htm)
for more info on both the TweakUI and control userpasswords2 methods.
Check out this link: [http://www.winguides.com/registry/display.php/13/](http://www.winguides.com/registry/display.php/13/)
for more info on how the password is stored in the registry when you used the TweakUI method.
# I have Windows XP, how can I restore my computer to a previous configuration?
You can use a feature called �System Restore� to restore your Windows XP PC to a previous working configuration.
Click Start → Programs → Accessories → System Tools → System Restore.
Remember that the Windows XP default desktop view and Start menu are different from the Windows Classic View.
The first time you use System Restore, two options appear on the welcome page:
- Restore my computer to an earlier time
- Create a restore point
Click �Restore my computer to an earlier time� → click Next.
On the calendar that appears, choose the restore point to which you would like to roll your system back. Click �Next�.
You will be prompted to close all applications before completing the restore process, because the computer will restart.
After the computer restarts, a confirmation screen will appear → click �OK� to continue using your computer.
The next time you start System Restore, you will see a third option, �Undo my last restoration�. This can be helpful if the restore point you went back to last time did not correct the original problem that you were having; you can easily return to the configuration from which you started troubleshooting.
# Dell Optiplex 755's and Windows XP installation
Windows XP installer does a blue screen of death on installation, with a STOP: 0×0000007B error. Installation fails due to the BSOD and is not recoverable.
In this particular instance, it means Windows cannot detect and load the correct harddisk controller driver, because it does not support the default SATA operation mode in the Dell BIOS.
In BIOS, in the Drives — SATA Operation, you can change from the default RAID/AHCI mode to RAID/ATA mode (*not* Legacy mode), and Windows setup will now run.
This error occurs in both Windows XP and Windows XP x64, even with SP2 slipstreamed. As for the fix, I have only tried it with Windows XP x64 **with** SP2 slipstreamed.
—
A user online has reported the same problem, albiet with a slightly different solution: [http://www.msfn.org/board/index.php?showtopic=107364c](http://www.msfn.org/board/index.php?showtopic=107364c) :
The user there recommends installing the updated BIOS, which then enables a “Legacy” mode to be selected in the SATA Operation menu. Then the user loads Windows XP and with F6, loads the Dell SATA drivers. From my testing, you do not actually need to load the Dell SATA drivers, but I believe this user was using a different OS (XP SP2 32-bit) and that may be a factor.
The Dell BIOS update (rev A04) was released 6 November and is available on the Dell site at [http://support.dell.com/](http://support.dell.com/) .
" 5. Added SATA legacy mode support for older operating systems. "
This update is labeled as “URGENT” according to Dell. It adds a “Legacy” mode support for the SATA operation, although we do not need to use this mode, so I am unsure if we need it or not.
—
Slipstream drivers as well as SP2 with the insturctions below, or use [www.nliteos.com](http://www.nliteos.com) tools or similar.
[http://www.tacktech.com/display.cfm?ttid=414](http://www.tacktech.com/display.cfm?ttid=414)
—
If the system is configured with a recovery partition. It may need to be removed before you will be able to boot from the xp disk.
# How to disable CD-ROM auto-run in Windows XP
1. Run the Registry Editor (regedit.exe)
2. Go to HKEY\_LOCAL\_MACHINE\\SYSTEM\\CurrentControlSet\\Services\\Cdrom
3. Change the value of the key AutoRun to 0.
(Source: [http://www.annoyances.org/exec/show/article03-018](http://www.annoyances.org/exec/show/article03-018))
A less invasive method for disks without autrun.inf (such as music, dvd, and picture disks) is to right click on the disk drive and select properties. Under the AutoPlay tab you can set different actions for different media types.
You can also hold down shift while inserting the disk to prevent disks from auto-running.
# Windows 7
# Activate Windows 7 XP Mode
Windows 7’s XP Mode is not installed by default. Rather, qualifying Windows 7 versions can download it from Microsoft—
**[http://www.microsoft.com/windows/virtual-pc/download.aspx](http://www.microsoft.com/windows/virtual-pc/download.aspx)**
( NOTE: the page validates the downloading system to insure it qualifies )
.
Important licensing considerations —
[http://www.softwarecentral.ucla.edu/MicrosoftVirtualDesktopLicensing.htm](http://www.softwarecentral.ucla.edu/MicrosoftVirtualDesktopLicensing.htm)
# Are there any changes to the AIS Remote Printing (OASIS) setup directions for Windows 7?
The instructions for setting up AIS Remote Printing on XP still applies. I would recommend printing to a networked printer. Give the IP Address of the networked printer when filling out the form to AIS.
# Windows 7 Backup and Restore
# Windows 7 Backup
**Draft v0.1 — 6 April 2011**
**Brian J. Won **
**UCLA Social Sciences Computing**
Guide to basic setup and restore using Windows 7’s built-in backup.
## Setup:
Start → Control Panel → System and Security → Backup and Restore

Backup → Set up backup.

Starting Windows Backup will take a while. On a reasonably fresh Windows 7 installation with a new HP 8100 Elite CMT, it took several minutes.
Next, pick a drive to back up to. Windows 7 will automatically recommend external harddisks, although you may choose an internal one if your computer has multiple physical internal harddisks.
SSC recommends that you use an external harddisk that you have dedicated solely for backup. Unplug the drive entirely when not using it to backup your system (if you are doing only periodic backups). If you are doing continuous backup as some programs permit then please leave the drive constantly connected.
In this example we will be using an external WD MyBook 3.0 (connected as J:) for backup.

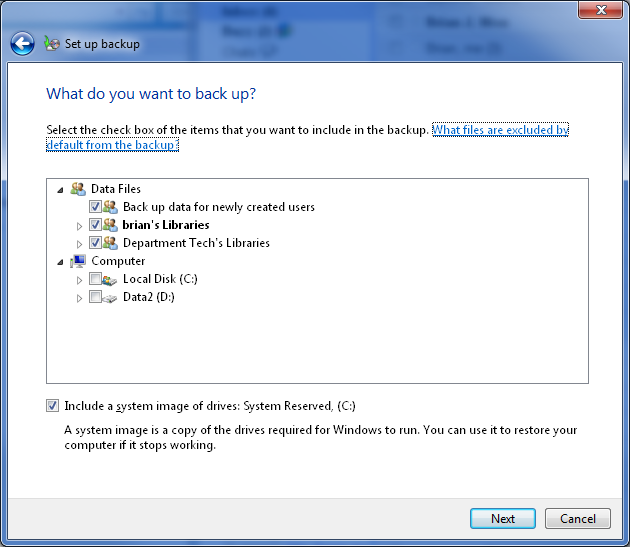
Windows Backup in Windows 7 offers two choices on what to back up—“Let Windows choose”, which backs up selected folders such as Documents, Pictures, the desktop, and creates a system image. *This option is fine for most users.*
The second choice, “Let me choose”, is for users who do not use Windows’ default storage locations for their data. SSC has found some users store things in legacy areas such as “C:\\research” or other folders. This option will let the user select them manually.

When selecting “Let me choose”, Windows will give you a folder tree of the computer with checkboxes next to each folder. Expand the tree as needed and check the desired folders to backup. By default, a separate folder tree for “Data Files” will be included for user data and will be checked by default. Also included by default, a system image of the boot drive will be performed.
Windows Backup by default backups almost all files, unlike some other programs that do not do certain file types (such as video) by default.
The next screen will review the backup settings chosen before running the backup.
The backup schedule settings may be changed from this screen, or they may be changed later. The computer and backup drive must be both be on and connected for backup to occur, so the default time provided by Windows—in this case, every Sunday at 7:00pm—may not be ideal.

The “change schedule” is fairly simple. Backup frequency, time, and date may all be adjusted.

Hit “ok” or if you did not need to change the backup schedule, skip that. Instead, go ahead to “Save settings and run backup.”
We will create a system repair disc later.
This will close the “Set up backup” window and go back to the main Backup and Restore window in Control Panel, where you can then view your backup progress. If this is your first backup, this may take some time depending on the amount of data involved.

After completion, the screen will look slightly different to show that at least one completed backup has been done.

You may then create a System Repair disc from the same screen, on the left side under “Create a system repair disc.”
## Restore
Starting from Control Panel → System and Security → Backup
Go to “restore my files” for the basic restore of missing/damaged user files.

This may take a while to load, depending on the size of your backup.
You may then search or browse for the files you wish to restore from backup.

To search for a file, hit “search” and then type in all or part of the file name or folder name to search for it, then check the box for the desired file or folder, and hit ok.

To browse for files or browse for folders, the navigation screen is similar—it shows previous backup occurrences as folders with the date/time of the backup, and you may navigate inside to find the one you wish.
Select the files or folders you wish to add, then hit “add file” or “add folder” as needed to add to the restore.

Once all of the files and folders to restore have been selected, hit “next.” If some of the files or folders selected are unwanted, select them and hit “remove.”

Restore files will then ask where do you wish to restore them—to the original location, or to a different location.
The “In the original location” will overwrite the existing file in that location, which is what you may wish to do if the original file was overwritten, damaged, or corrupted and you wish to restore it immediately.
The “In the following location” will restore the backup file to a folder or drive of your choice. This is useful if you wish to compare the current version of the file with the restored version from the previous backup.

After hitting “restore”, if you have picked a location where the file already exists, the standard Windows file copy and “warning, this file already exists” dialog will pop up. Hit “copy and replace” to restore the version from backup, “don’t copy” to skip copying, or “copy, but keep both files” to change the name of the restored file to the name shown by Windows.
This is a standard Windows copy dialog, if you are unfamiliar with it, please consult other sources as an extensive explanation is beyond the scope of this document.
After restoration is complete, Restore Files will report it and give you an option to see which files were restored.

The “View restored files” is a standard Windows Explorer view of the locations files were restored to.
After viewing the restored files, you may close the Explorer window, then hit “finish” in the Restore Files to complete the process.
# Windows 7 computer will not detect any USB Flash Drive
Steps to Safely Cleanup and Remove old USB Mass Storage Drivers on your PC
Shut down your computer. Unplug your USB storage devices: USB Disks, flash, cams, CD/DVD, etc. as well as your USB hubs
==> Other USB devices like keyboards, mice and LAN adapters can stay plugged in
Boot computer back up. Click for how to determine whether you are running 32 or 64 bit Windows
Download [drivecleanup.zip](http://api.viglink.com/api/click?format=go&jsonp=vglnk_141420872675512&key=552a35ca1eb1421626a0f973ac2a90af&libId=6d39f715-27e1-4733-bccd-f33afedbc830&loc=http%3A%2F%2Fwww.techspot.com%2Fcommunity%2Ftopics%2Fusb-drive-or-flash-problems-how-to-cleanup-and-remove-old-usb-storage-drivers.145884%2F%23post875300&v=1&out=http%3A%2F%2Fwww.uwe-sieber.de%2Ffiles%2Fdrivecleanup.zip&title=USB%20drive%20or%20flash%20problems%3F%20How%20to%20cleanup%20and%20remove%20old%20USB%20storage%20drivers%20-%20TechSpot%20Forums&txt=drivecleanup.zip%20cleanup%20and%20remove%20old%20USB%20storage%20drivers%20-%20TechSpot%20Forums&txt=drivecleanup.zip "http://api.viglink.com/api/click?format=go&jsonp=vglnk_141420872675512&key=552a35ca1eb1421626a0f973ac2a90af&libId=6d39f715-27e1-4733-bccd-f33afedbc830&loc=http%3A%2F%2Fwww.techspot.com%2Fcommunity%2Ftopics%2Fusb-drive-or-flash-problems-how-to-cleanup-and-remove-old-usb-storage-drivers.145884%2F%23post875300&v=1&out=http%3A%2F%2Fwww.uwe-sieber.de%2Ffiles%2Fdrivecleanup.zip&title=USB%20drive%20or%20flash%20problems%3F%20How%20to%20cleanup%20and%20remove%20old%20USB%20storage%20drivers%20-%20TechSpot%20Forums&txt=drivecleanup.zip"), unzip and save to your desktop. Move the 32 or 64 bit version of DriveCleanup.exe to C:\\Windows\\System32
Open an elevated command prompt window:
NOTE! It must be an elevated command prompt window or the tool won’t work. (If you need instruction, click on the embedded hyperlink in the bullet below.) p.s. Thanks to andrew129260 in helping to highlight this important point! ;)
Open an elevated (administrator) command prompt window!!
In the command prompt enter: drivecleanup.exe
==> Your output should be similar to my example below.
==> If, instead, you get an error message like Command not recognized it means you didn’t move Drivecleanup.exe to the right directory
Reboot. Now just replug your devices for fresh clean device reinstalls! :)
Code:
C:\\>\[B\]drivecleanup.exe\[/B\]
DriveCleanup V0.7.0 (Win32)
Uninstalls non present storage volumes, Disk, CDROM, Floppy devices
and deletes their registry items
Freeware by Uwe Sieber – [www.uwe-sieber.de](http://www.uwe-sieber.de)
removing USB device ‘USB\\VID\_0000&PID\_0000\\7&2285BC2A&0&1’
OK
removing USB device ‘USB\\VID\_0411&PID\_00A2\\WDC\_WD2500\_\_\_\_\_WD-WCANKE590248’
OK
removing USB device ‘USB\\VID\_0BB4&PID\_0C02&MI\_00\\6&2DD32CD2&1&0000’
OK
removing USB device ‘USB\\VID\_1058&PID\_0702\\575845313037453632383432’
OK
removing USB device ‘USB\\VID\_1058&PID\_0702\\7274787265616E206C2E3132’
OK
removing USB device ‘USB\\VID\_1058&PID\_0702\\F53A39F2AB75F5CDC4B6ABC3’
OK
removing Disk ‘USBSTOR\\DISK&VEN\_HTC&PROD\_ANDROID\_PHONE&REV\_0100\\7&1012C922&1&HT9A2HF00558&0’
OK
removing Disk ‘USBSTOR\\DISK&VEN\_WD&PROD\_1600BEVEXTERNAL&REV\_1.02\\575845313037453632383432&0’
OK
removing Disk ‘USBSTOR\\DISK&VEN\_WD&PROD\_N\_EXTEREXTERNAL&REV\_1.02\\7274787265616E206C2E3132&0’
OK
removing Disk ‘USBSTOR\\DISK&VEN\_WD&PROD\_N\_EXTEREXTERNAL&REV\_1.02\\F53A39F2AB75F5CDC4B6ABC3&0’
OK
removing Disk ‘USBSTOR\\DISK&VEN\_WDC\_WD25&PROD\_00JS-00NCB1&REV\_\\WDC\_WD2500\_\_\_\_\_WD-WCANKE590248&0’
OK
removing volume ‘STORAGE\\REMOVABLEMEDIA\\8&3152D400&0&RM’
OK
removing volume ‘STORAGE\\REMOVABLEMEDIA\\9&29B6E3D1&0&RM’
OK
removing volume ‘STORAGE\\REMOVABLEMEDIA\\9&BC53371&0&RM’
OK
removing volume ‘STORAGE\\VOLUME\\1&30A96598&0&SIGNATURE44FDFE06OFFSET7E00LENGTH2543150400’
OK
removing volume ‘STORAGE\\VOLUME\\1&30A96598&0&SIGNATUREC12C6F64OFFSET7E00LENGTH3A388A8400’
OK
Regkey delete HKLM\\System\\MountedDevices\\\\\\Volume{91a9bc60-2535-11df-b96f-00256495135f}
OK
Regkey delete HKLM\\System\\MountedDevices\\\\\\Volume{91a9bc61-2535-11df-b96f-00256495135f}
OK
Regkey delete HKLM\\System\\MountedDevices\\\\\\Volume{dce40c14-30ad-11df-b973-00256495135f}
OK
Regkey delete HKLM\\System\\MountedDevices\\\\\\Volume{d4227929-32c8-11df-b97c-00256495135f}
OK
Regkey delete HKLM\\System\\MountedDevices\\\\??\\Volume{9827b60e-34f1-11df-b983-00256495135f}
OK
Regkey delete HKLM\\System\\MountedDevices\\\\DosDevices\\Z:
OK
Regkey delete HKLM\\System\\MountedDevices\\\\DosDevices\\H:
OK
Regkey delete HKCU\\Software\\Microsoft\\Windows\\CurrentVersion\\Explorer\\MountPoints2\\H
OK
Regkey delete HKCU\\Software\\Microsoft\\Windows\\CurrentVersion\\Explorer\\MountPoints2\\Z
OK
Removed 6 USB devices
Removed 0 USB hubs
Removed 5 Disk devices
Removed 0 CDROM devices
Removed 0 Floppy devices
Removed 5 Storage volumes
# Converting Windows 7 volume install from KMS to MAK
Most Windows 7 licenses at UCLA should be deployed via UCLA’s KMS over the network.
However, some users’ systems are offline and hence will require that you use a MAK.
To convert from the KMS to the MAK, the steps are somewhat different than Windows Vista’s GUI. You must use the CLI:
[http://support.microsoft.com/kb/929826](http://support.microsoft.com/kb/929826)
1\. Click Start, click All Programs, click Accessories, and then right-click Command Prompt.
2\. Click Run as administrator.
If you are prompted for an administrator password, type the password. If you are prompted for confirmation, click Continue.
3\. At the command prompt, type the following command, and then press ENTER:
slmgr -ipk xxxxx-xxxxx-xxxxx-xxxxx-xxxxx
Note In this command, xxxxx-xxxxx-xxxxx-xxxxx-xxxxx represents your MAK product key.
# manually assign KMS host to client running Windows Vista or 7
Windows Vista and 7 under MCCA at UCLA are validated through a KMS (key management service) server on campus. If for some reason Windows doesn’t automatically validate through the KMS you can manually assign the KMS host to your client.
Run the command prompt as an administrator.
Enter:
`cscript \windows\system32\slmgr.vbs /skms 128.97.141.165`
There are two KMS servers and either one can be used:
- kms1.softwarecentral.ucla.edu 128.97.141.165
- kms2.softwarecentral.ucla.edu 128.97.141.90
After a short pause you will be notified of the success of the connection within the command prompt.
For more information read the Windows Volume Activation 2.0 Deployment Guide [here](http://technet.microsoft.com/en-us/library/cc303280.aspx).
# Windows 7 Support for Dell & HP
Direct links to Dell’s & HP’s Windows 7 support areas –
- **[Dell’s Windows 7 online support center](https://support.dell.com/support/topics/global.aspx/support/win7_support/win7_portal?c=us&cs=25&l=en&s=hied)**
- **[HP’s Windows 7 online support center](http://www.hp.com/united-states/windows7/)**
.
Also,
- **[Windows 7 Upgrade Option Program — Microsoft](http://www.microsoft.com/windows/buy/offers/upgrade-option.aspx)**
.
Both areas have links to obtain free Windows 7 upgrades for select computers obtained within their eligibility window.
# Microsoft Windows 7 Support Areas
With the official Windows 7 release, MSDN virtual labs have been updated:
- **[http://technet.microsoft.com/en-us/virtuallabs/ee862412.aspx](http://technet.microsoft.com/en-us/virtuallabs/ee862412.aspx)**
.
Topics include:
- AppLocker
- BitLocker
- BranchCache
- Microsoft Application Virtualization (APP-V)
- Microsoft Enterprise Desktop Virtualization (MED-V)
- Problem Steps Recorder
- Search Federation
- User Account Control
- Windows Troubleshooting Packs
.
Related, Microsoft has expanded other forums’ content:
- **Springboard** – [http://technet.microsoft.com/en-us/windows/dd361745.aspx?ITPID=carepgm](http://technet.microsoft.com/en-us/windows/dd361745.aspx?ITPID=carepgm)
- **Webcasts** – [http://www.microsoft.com/events/series/technetwindows7.aspx?tab=webcasts](http://www.microsoft.com/events/series/technetwindows7.aspx?tab=webcasts)
- **Forums** – [http://social.technet.microsoft.com/Forums/en-US/category/w7itpro](http://social.technet.microsoft.com/Forums/en-US/category/w7itpro)
# Windows 7 Migration Time
A “clean install” for Windows 7 is preferred, but Windows Vista users have an option to upgrade the existing system to Windows 7.
Time estimates from Chris Hernandez, a Microsoft Software Engineer, are:

.
from,
- **[Microsoft: Windows 7 upgrade can take nearly a day](http://arstechnica.com/microsoft/news/2009/09/microsoft-upgrade-to-windows-7-can-take-up-to-a-day.ars)**
- **[Chris Hernandez’s Blog](http://blogs.technet.com/chris_hernandez/archive/2009/09/02/windows-7-upgrade-performance.aspx)**
# Windows 7 Upgrade Paths
There is ***much*** information on upgrading Windows Vista to Windows 7 on the Internet.
Note, Windows Vista editions are limited to what edition of Windows 7 they can directly upgraded:

.
see also,
- **[Windows 7 Upgrade Paths](http://technet.microsoft.com/en-us/library/dd772579(WS.10).aspx)**
- **[Windows 7 Editions — Comparison Chart](http://en.wikipedia.org/wiki/Windows_7_editions#Comparison_chart)**
- **[Upgrading to Windows 7: what XP and Vista users need to know](http://arstechnica.com/microsoft/news/2009/02/upgrading-to-windows-7-what-xp-and-vista-users-need-to-know.ars)**
- **[Windows 7 Migration Time](https://kb.ucla.edu/link/1201)**
# Mouse scroll wheel issues in Windows 7
A mouse with a scroll wheel that works fine in Windows Vista, Windows XP, and other OS’es does not work properly in Windows 7.
In some applications in Windows 7, it may work fine, in others, it either does not work, or does not scroll down (scrolling up still works in some cases).
This may occur on hardware that is Windows 7 approved and should work. In some cases this has been reported in Vista as well, but almost never older OS’es (such as XP, 2000, etc.).
This is a common issue:
[http://www.google.com/search?hl=en&lr=&client=firefox-a&rls=org.mozilla:en-US:official&tbo=p&num=50&tbs=qdr:y&q=windows+7+scroll+wheel+problem&start=100&sa=N](http://www.google.com/search?hl=en&lr=&client=firefox-a&rls=org.mozilla:en-US:official&tbo=p&num=50&tbs=qdr:y&q=windows+7+scroll+wheel+problem&start=100&sa=N)
The root cause appears to be that the software in question is that the mouse being uses can send more fine-grained mouse wheel input than the software in question supports.
If installing the latest mouse drivers does not solve the problem, and the latest application software updates do not solve this problem, the best solution is to replace the mouse.
[http://forums.winamp.com/showthread.php?postid=2533770#post2533770](http://forums.winamp.com/showthread.php?postid=2533770#post2533770)
\-
It’s due to the handling of the delta value passed in the wm\_mousewheel message assuming a delta of 120 but some mice have a smaller delta (as is allowed on vista/win7) which breaks the previous logic. one of the devs was meant to be looking into changing the handling but that never happened i believe and without knowing what mice exhibit this finer level of scrolling (as i need a new mouse but can’t get a definite answer) i’m not going to shell out for something that won’t help.
-
Specific example: This issue has been replicated at SSC with the Microsoft Comfort Mouse Optical 3000 as well as several other generic mouses. On the same system, the Microsoft IntelliMouse Optical USB and Logitech LX3 work fine. Installing Microsoft Intellipoint software (and uninstalling it did not help). The system in question worked fine in Windows XP, but not in Windows 7.
Applications affected included Microsoft Access 2007, but not Windows Explorer or Firefox.
Per the links above, this issue is not particular to these specific applications or hardware.
# Black screen after Windows 7 install on late 2009 iMac
Boot into MacOS, install either [NTFS Mounter](http://ntfsmounter.com/) or [NTFS 3G](http://macntfs-3g.blogspot.com/) in order to make the NTFS partition writable.
On the Windows OS drive, delete the existing ATI driver:
`/Windows/System32/Drivers/atikmdag.sys`
Reboot into Windows 7, download the latest ATI HD 4850 driver from AMD.
Note: Apple’s [alleged fix](http://support.apple.com/kb/TS3173) for this graphics card driver issue is a dud.
# Windows 7 Administrator Password
I have a department laptop that I use, I have forgotten the adminstrative password, is there away to reset it with out reinstalling the windows 7 operating system? I am currently using the user account on the system for my research.
Try the suggestions here: [http://superuser.com/questions/95685/lost-my-windows-7-admin-password-need-to-change-or-reset-it](http://superuser.com/questions/95685/lost-my-windows-7-admin-password-need-to-change-or-reset-it)
Assuming the hard drive is not encrypted, one commercial option is **[Stellar Phoenix](http://www.stellarinfo.com/password-recovery.htm)** ($49). (Its availability highlights a machine’s vulnerability when someone gains physical access to a machine!)
try Hirens boot CD we use it all the time to remove passwords
[http://www.hirensbootcd.org/hbcd-v151/](http://www.hirensbootcd.org/hbcd-v151/)
(read password tools section)
download at [http://www.hirensbootcd.org/download/](http://www.hirensbootcd.org/download/)
Good luck
# How to Find Your Computer Name in Windows 7
This document provides a step-by-step set of instructions on how to find your computer’s name in Microsoft Windows 7.
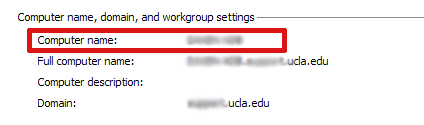
1. Click on the Start button.
2. Right-click on Computer.
3. Select Properties.
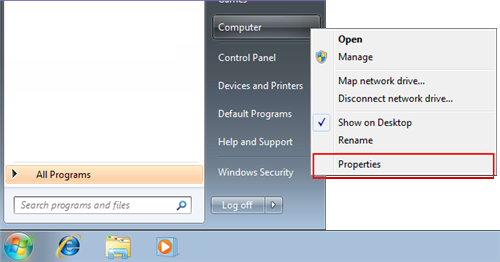
Your computer name will be listed near the bottom of the window that opens under “Computer name, domain, and workgroup settings”.
# Vista or Win7 client can't connect to file shares on older Win boxes or NAS devices
Microsoft has enhanced their security standards, in particular their aging Samba (SMB) Windows File Sharing protocol. By default, Win 7 only communicates with other file sharing clients and servers which are also using the new more secure version of the Samba file sharing protocol. Because of this, it will not properly communicate with computers running older versions of Samba (SMB) Windows File Sharing protocol.
You can change the default behavior—but also reduce security—by the following:
1. From the command line, run the Local Security Policies console snapin (secpol.msc)
2. Open Local Policies –> Security Options –> Network Security: LAN Manager authentication level
3. Change the setting from “NTLMv2 responses only” to one of the more lenient settings, like “LM and NTLM – use NTLMV2 session security if negotiated”
# win 7 imaging and deploying
I’m in the process of cloning my Win 7 images. I understand the only official way to change SID’s and copy the configure profile to the default user is with sysprep. Does anyone have some good step by step references from start to finish. From using sysprep to make a zero touch installation, to deploying the image through wds and configuring each machine to come up with the correct name, join the domain, be placed in the correct OU, etc. Or does anyone use ghost?
I’ve gotten to the point of having an unnattend.xml file (still asking for the network location), and copying the installation with imagex to a hard drive. The problem is putting it back on the computer (missing ntldr error), and then eventually using wds to push the images (43 gigs in ghost and 22 gigs using imagex) to some 150 pc’s (for starters). The next step after is to get the images in a central repository and push them back out to the pc’s with zero touch.
Thank you for any help,
---
Mark’s Blog : The Machine SID Duplication Myth – [http://blogs.technet.com/markrussinovich/archive/2009/11/03/3291024.aspx](http://blogs.technet.com/markrussinovich/archive/2009/11/03/3291024.aspx)
Je Jin’s DISM Tool – [http://forums.mydigitallife.info/threads/9682-Je-Jin-s](http://forums.mydigitallife.info/threads/9682-Je-Jin-s)-DISM-Tool
---
can’t help much because we’ve always added PC’s to the domain manually – whether using Ghost, BDD, or the Win7 System Image tool. We’ve just started using the new Altiris 7 and have been able to successfully image systems with XP, Vista and Win7. We’re still learning the interface but it seems fine so far.
# DVD drivers error when installing Windows
I recently received a new HP Folio 13 ultrabook and began installing Windows 7 Pro 64 bit on it (it came with Home). Because the ultrabook has no optical drive I was using a LaCie external DVD drive to install Windows.
After booting to the install disk I kept getting the message that DVD drivers were needed before the installation could continue. After trying many fixes I finally found a post online that suggested switching the DVD drive to the other USB port before clicking “Install Now”. It worked.
This may work for other models.
1. Boot to the Windows disk in your external optical drive.
2. When presented with “Install Now”, unplug the drive and move it to another (or the other) USB port. Then click “Install Now”.
3. If your external drive needs a second USB port for power you can always attach the second power-only plug to another computer.
# Taskbar buttons switch to Last Active Window in Windows 7
In the Windows 7 taskbar, if you have lots of windows for the same application open, things may get confusing when you are trying to find the window you want.
If you control-click on the application in question, the last window will show up. If you keep clicking, it will cycle through open windows.
To change it so that a normal click (instead of a control-click) goes to the last active Windows, you may hack the registry to do so:
1. open regedit.exe
2. Find the registry key: HKEY\_CURRENT\_USER\\Software\\Microsoft\\Windows\\CurrentVersion\\Explorer\\Advanced
3. Create a new 32-bit DWORD value on the right hand side, give it the name LastActiveClick, and set the value to 1
4. close regedit, then log off and log back on.
Reference:
[http://www.howtogeek.com/howto/16334/make-the-taskbar-buttons-switch-to-the-last-active-window-in-windows-7/](http://www.howtogeek.com/howto/16334/make-the-taskbar-buttons-switch-to-the-last-active-window-in-windows-7/)
# Windows Vista
# Where can I find information regarding new/updated drivers required to run Vista?
If you’re intending to install Vista on your computers, the process will likely require the installation of new/updated drivers. RadarSync offers a free, easy to browse clearinghouse for Vista drivers at [www.radarsync.com/vista/](http://www.radarsync.com/vista/) .
# Where can I find Information regarding deploying Vista?
To download Microsoft’s step-by-step guides providing instructions for IT professionals deploying or migrating to Vista, please go to:
[http://www.microsoft.com/downloads/details.aspx?FamilyID=311f4be8-9983-4ab0-9685-f1bfec1e7d62&DisplayLang=en](http://www.microsoft.com/downloads/details.aspx?FamilyID=311f4be8-9983-4ab0-9685-f1bfec1e7d62&DisplayLang=en)
Microsoft states that their Business Desktop Deployment 2007 is “the best practice set of comprehensive guidance and tools to optimally deploy desktops running Windows Vistaâ€. See for yourself at:
[http://www.microsoft.com/technet/desktopdeployment/bdd/2007/default.mspx](http://www.microsoft.com/technet/desktopdeployment/bdd/2007/default.mspx)
# Sysprep links for XP and Vista
enjoy, links that i keep handy
technet xp
[http://technet.microsoft.com/en-us/library/bb457073.aspx](http://technet.microsoft.com/en-us/library/bb457073.aspx)
technet vista
[http://technet.microsoft.com/en-us/library/cc721929.aspx](http://technet.microsoft.com/en-us/library/cc721929.aspx)
sysprep with ghost
[http://service1.symantec.com/](http://service1.symantec.com/)SUPPORT/on-technology.nsf/docid/2000081610075225
# Mapping a Novell drive on Windows Vista
Change Security Policy on Windows Vista in order to map a Novell Drive.
1. Administrative Tools
2. Click on Local Security Policy
3. Click on Local Policies
4. Click on Security Options
5. Find "Network security: LAN Manager authentication level
6. Set value to Send LM and NTLM responses
This should allow for the Novell mappings to take
# Wireless networking on vista doesn't get a valid DHCP IP
When trying to connect to the UCLAWLAN, the IP obtained would be 169.254.×.×. This is sign that the machine cannot reach the DHCP server.
From Microsoft’s knowledgebase article on this.
Consider the following scenario:
• You connect a Windows Vista-based computer to a network.
• A router or other device that is configured as a Dynamic Host Configuration Protocol (DHCP) server is configured on the network.
• The router or the other device does not support the DHCP BROADCAST flag.
In this scenario, Windows Vista cannot obtain an IP address.
Cause:
This issue occurs because of a difference in design between Windows Vista and Microsoft Windows XP Service Pack 2 (SP2). Specifically, in Windows XP SP2, the BROADCAST flag in DHCP discovery packets is set to 0 (disabled). In Windows Vista, the BROADCAST flag in DHCP discovery packets is not disabled. Therefore, some routers and some non-Microsoft DHCP servers cannot process the DHCP discovery packets.
See Microsoft’s knowledgebase article for the solution:
[http://support.microsoft.com/kb/928233/EN-US/](http://support.microsoft.com/kb/928233/EN-US/)
# Microsoft Enhanced Mitigation Experience Toolkit (EMET)
**Microsoft EMET 5** has now been released to general availability.
Could be an interesting addition for those needing Internet Explorer and added protection—
- **[http://www.microsoft.com/emet](http://www.microsoft.com/emet)**
- [http://support.microsoft.com/kb/2458544](http://support.microsoft.com/kb/2458544)
TechNet Blogs–
- [http://blogs.technet.com/b/msrc/archive/2014/07/31/general-availability-for-enhanced-mitigation-experience-toolkit-emet-5-0.aspx](http://blogs.technet.com/b/msrc/archive/2014/07/31/general-availability-for-enhanced-mitigation-experience-toolkit-emet-5-0.aspx)
- [http://blogs.technet.com/b/srd/archive/2014/07/30/announcing-emet-v5.aspx](http://blogs.technet.com/b/srd/archive/2014/07/30/announcing-emet-v5.aspx)
*Feel free to add links to other articles about EMET which may be useful and/or interesting. Thanks!*
# How to map Novell network drive when running Windows Vista
With the introduction of Windows Vista, mapping network drive to the Novell server without using the Novell Vista Client is still possible. In order to accomplish this, you have to make some changes with the way Vista authenticate.
- Open Control Panel
- Administrative Tools
- Local Security Policy
- Local Policies
- Security Options
- Double-click on Network Security: Lan Manager Authentication Level
On the drop down box, you want to change/select “Send LM & NTLM – use NTLMv2 session security if negotiated”
Note: The above menu driven is available with Vista Ultimate, Vista Business and Vista Enterprise. If you don’t have that version, you can run regedit and modify this key:
- \[HKEY\_LOCAL\_MACHINE\\SYSTEM\\CurrentControlSet\\Control\\Lsa\] “LmCompatibilityLevel”=dword:00000001
Once this is done, from windows explorer, you can click on map network drive and fill in the pertinent information such as \\\\servername.sscnet.ucla.edu\\share.
- If you Windows local account is the same as your Novell login ID, then you don’t have to do anything.
- If it is different, you can choose to login using a different user name.
# Windows Vista and Roxio causes cd-rom/dvd drive not to recognize
On certain version of Roxio Easy CD Creator on Windows Vista, the DVD drive may not be recognized. In Device Manager, the DVD drive cannot start.
When Vista SP1 is reapplied, this fix needs to be reapplied as well.
Link: [http://forums.extremeoverclocking.com/p2990771.html](http://forums.extremeoverclocking.com/p2990771.html)
“Also do you have roxio easy cd creator that came with it? Sometimes roxio puts upper/lower filters and occasionally a bkp of those filters in the registry causing a drive not to function. Start> regedit. The registry string is HK Loc Machine>system>current control set>control>class look for this key 4D36E965, highlight it and on the right pane of the regedit tool you MIGHT see upper and lower filters, if you delete these if they are listed, reboot and try your drive again.”
# Network Printing Problems in Vista
ISSUE 1
I do not know if you have noticed, but here is another big problem with vista when humnet user tries to install network printer.
By default regular users are not permitted to install network printers.
For instance,
You have a user that wants to install a network printer from Clio on his/her profile. They click on Add Printer, Search Network Printer , They Find the printer and they click add. Vista will ask to install the printer and when you click on Install, it does not give them permission to install the driver because obviously they are not administrators. This is not an issue for windows XP user.
Here is a Solution Microsoft has to offer and I think we should add it to our image if we ever going to use vista:
In run Type : gpedit.msc
· If you are prompted for an administrator password or confirmation, type your password or click Continue.
· Under User Configuration, expand Administrative Templates, expand Control Panel, and then click Printers.
· Right-click Point and Print Restrictions in the right hand pane, and then click Properties.
· Click Enabled.
· In the Security Prompts area, select Do not show warning or elevation prompt in the When installing drivers for a new connection box and in the When updating drivers for an existing connection box. These settings enable the print drivers to be installed without credential or elevation prompts.
Now the user is not asked for permission when they try to add a network printer.
ISSUE 2
Vista doesn’t set administrator’s default printer for all users. If you are an administrator and you have created a local TCP/IP account and would like to have that printer to be a default printer for all users. You will need to do the following . This is not the case on XP
Open Notpad
· Type rundll32 printui.dll PrintUIEntry /y /n"HM349-NELC-HP2430 or rundll32 printui.dll PrintUIEntry /y /n"PDF995
o ( notice the printer HM349-NELC-HP2430 has to be installed on the machine in order to be set to default, the above command does not install network printer for you, you will need to install the printer first using TCP/IP connection… )
· Save the file as setdefaultprinter.bat
o Name the file whatever you like just leave the extension as bat short for batch file
· Now under Run type gpedit.msc
· Expand User Configuration
· Expand Windows setting
· Open Scripts(Logon/Logoff)
· Open Logon and add the path for the script.
This will ensure that every time the user logins . you will have your local printer set to default.
Alternative Solution ( installing network printer for user on logon):
Another method requires the popular con2prt.exe file which is part of NT Resource Kit. I have attached the file for you. You can copy the file to your windows\\system32 directory to have access to the file from cmd line.
Con2prt.exe connects users to network printer without user interaction with simple command such as
con2print.exe /cd \\\\clio\\HM350-COMPLIT-HP2430 will connect user to printer HM350-COMPLIT-HP2430 and sets the printer to default. to have this command run on logon. Use the gpedit.msc and follow the above instruction.
If you are using Vista, you should resolve issue one first so the user has permission to install the drivers.
This is very helpful since every user till now had to connect to the printer themselves for their profiles and I myself had to do this over and over for my users.
# Where do I download Windows Vista language packs?
The recommended method is via Windows Update, per Windows Vista integrated help or the online help here:
[http://windowshelp.microsoft.com/Windows/en-US/Help/35a1b021-d96c-49a5-8d8f-5e9d64ab5ecc1033.mspx](http://windowshelp.microsoft.com/Windows/en-US/Help/35a1b021-d96c-49a5-8d8f-5e9d64ab5ecc1033.mspx)
Please scroll down for Vista Service Pack 1 MUI’s.
-———————
Click to open Windows Update.
In the left pane, click Check for updates, and then wait while Windows looks for the latest updates for your computer.
If any updates are found, click View available updates.
Select the MUI that you want, and then click Install updates. If you are prompted for an administrator password or confirmation, type the password or provide confirmation.
-—-
However, if you do not have any updates, or if, for me, you have updates but it never displays any MUI’s, you have to look for it.
Keep in mind that installing MUI’s is very slow compared to Windows XP.
Per this link from Ars Technica:
[http://episteme.arstechnica.com/eve/forums/a/tpc/f/99609816/m/855006884831](http://episteme.arstechnica.com/eve/forums/a/tpc/f/99609816/m/855006884831)
---
MUI’s in order -
Chinese (PRC)
Chinese (Hong Kong SAR)
English
Spanish
Swedish
Japanese
Portuguese (Brazil)
Norwegian
Dutch
Finnish
French-
Russian
German
Danish
Korean
Italian
16 32 bit packs:
[www.download.windowsupdate.com/msdownload/update/v3-19990518/cabpool/lp-zh-cn\_ac12404fd3350e08ba766c9ab774eb61ecfa7a45.exe](http://www.download.windowsupdate.com/msdownload/update/v3-19990518/cabpool/lp-zh-cn_ac12404fd3350e08ba766c9ab774eb61ecfa7a45.exe)
[www.download.windowsupdate.com/msdownload/update/v3-19990518/cabpool/lp-zh-hk\_b485acb744566b62d9cde2464f64068882d97d2d.exe](http://www.download.windowsupdate.com/msdownload/update/v3-19990518/cabpool/lp-zh-hk_b485acb744566b62d9cde2464f64068882d97d2d.exe)
[www.download.windowsupdate.com/msdownload/update/v3-19990518/cabpool/lp-en-us\_c38cb05f3146b642c95743633998808fa5229875.exe](http://www.download.windowsupdate.com/msdownload/update/v3-19990518/cabpool/lp-en-us_c38cb05f3146b642c95743633998808fa5229875.exe)
[www.download.windowsupdate.com/msdownload/update/v3-19990518/cabpool/lp-es-es\_a163c4bbc9c34f2e299c057ef8861f0fa3d8a76d.exe](http://www.download.windowsupdate.com/msdownload/update/v3-19990518/cabpool/lp-es-es_a163c4bbc9c34f2e299c057ef8861f0fa3d8a76d.exe)
[www.download.windowsupdate.com/msdownload/update/v3-19990518/cabpool/lp-sv-se\_0bb9314bb33c9c0cae897bd34147e14e11daa3b5.exe](http://www.download.windowsupdate.com/msdownload/update/v3-19990518/cabpool/lp-sv-se_0bb9314bb33c9c0cae897bd34147e14e11daa3b5.exe)
[www.download.windowsupdate.com/msdownload/update/v3-19990518/cabpool/lp-ja-jp\_f563d5c82a3a156fc764fb78dc25cde8856dc251.exe](http://www.download.windowsupdate.com/msdownload/update/v3-19990518/cabpool/lp-ja-jp_f563d5c82a3a156fc764fb78dc25cde8856dc251.exe)
[www.download.windowsupdate.com/msdownload/update/v3-19990518/cabpool/lp-pt-br\_86694c7aba41372e04da9d45ce40309a3141a9e3.exe](http://www.download.windowsupdate.com/msdownload/update/v3-19990518/cabpool/lp-pt-br_86694c7aba41372e04da9d45ce40309a3141a9e3.exe)
[www.download.windowsupdate.com/msdownload/update/v3-19990518/cabpool/lp-nb-no\_751c84a87022d16f8270116727fbcdeb4efc841a.exe](http://www.download.windowsupdate.com/msdownload/update/v3-19990518/cabpool/lp-nb-no_751c84a87022d16f8270116727fbcdeb4efc841a.exe)
[www.download.windowsupdate.com/msdownload/update/v3-19990518/cabpool/lp-nl-nl\_6ed633b7ecd8a8ae26d4196010912ae6e4ca804a.exe](http://www.download.windowsupdate.com/msdownload/update/v3-19990518/cabpool/lp-nl-nl_6ed633b7ecd8a8ae26d4196010912ae6e4ca804a.exe)
[www.download.windowsupdate.com/msdownload/update/v3-19990518/cabpool/lp-fi-fi\_cb28440f6b925a98432acc92e59b51fbccdc5169.exe](http://www.download.windowsupdate.com/msdownload/update/v3-19990518/cabpool/lp-fi-fi_cb28440f6b925a98432acc92e59b51fbccdc5169.exe)
[www.download.windowsupdate.com/msdownload/update/v3-19990518/cabpool/lp-fr-fr\_c5197c4631ff183b3a315f2187a6f02856bb697c.exe](http://www.download.windowsupdate.com/msdownload/update/v3-19990518/cabpool/lp-fr-fr_c5197c4631ff183b3a315f2187a6f02856bb697c.exe)
[www.download.windowsupdate.com/msdownload/update/v3-19990518/cabpool/lp-ru-ru\_56e37b9fa209bf0334d8813372636b58744b1d3b.exe](http://www.download.windowsupdate.com/msdownload/update/v3-19990518/cabpool/lp-ru-ru_56e37b9fa209bf0334d8813372636b58744b1d3b.exe)
[www.download.windowsupdate.com/msdownload/update/v3-19990518/cabpool/lp-de-de\_129e9e10085876706cf81f9949c31a6d9ea0a231.exe](http://www.download.windowsupdate.com/msdownload/update/v3-19990518/cabpool/lp-de-de_129e9e10085876706cf81f9949c31a6d9ea0a231.exe)
[www.download.windowsupdate.com/msdownload/update/v3-19990518/cabpool/lp-da-dk\_f619cf28316a0cf623e1ef9a2e5fab630302a921.exe](http://www.download.windowsupdate.com/msdownload/update/v3-19990518/cabpool/lp-da-dk_f619cf28316a0cf623e1ef9a2e5fab630302a921.exe)
[www.download.windowsupdate.com/msdownload/update/v3-19990518/cabpool/lp-ko-kr\_3339e4062ccbac56eed8a773024c0ffb847853d0.exe](http://www.download.windowsupdate.com/msdownload/update/v3-19990518/cabpool/lp-ko-kr_3339e4062ccbac56eed8a773024c0ffb847853d0.exe)
[www.download.windowsupdate.com/msdownload/update/v3-19990518/cabpool/lp-it-it\_4e18e2e79d2c77d1a1efd45eef86a54bf5f117ab.exe](http://www.download.windowsupdate.com/msdownload/update/v3-19990518/cabpool/lp-it-it_4e18e2e79d2c77d1a1efd45eef86a54bf5f117ab.exe)
16 64 bit packs:
[http://www.download.windowsupdate.com/msdownload/update/v3-19990518/cabpool/lp-zh-cn\_c7a1440a03f226a8ada96d05fc4005672360b7e8.exe](http://www.download.windowsupdate.com/msdownload/update/v3-19990518/cabpool/lp-zh-cn_c7a1440a03f226a8ada96d05fc4005672360b7e8.exe)
[http://www.download.windowsupdate.com/msdownload/update/v3-19990518/cabpool/lp-zh-hk\_d5566545afb858c3187e26d2d146d637aafeb1a7.exe](http://www.download.windowsupdate.com/msdownload/update/v3-19990518/cabpool/lp-zh-hk_d5566545afb858c3187e26d2d146d637aafeb1a7.exe)
[http://www.download.windowsupdate.com/msdownload/update/v3-19990518/cabpool/lp-en-us\_a26f55943f01c1ce94c60d8d276b71a1279b785a.exe](http://www.download.windowsupdate.com/msdownload/update/v3-19990518/cabpool/lp-en-us_a26f55943f01c1ce94c60d8d276b71a1279b785a.exe)
[http://www.download.windowsupdate.com/msdownload/update/v3-19990518/cabpool/lp-es-es\_c0d6ad4877e4070ac6c56d3779f11097b0474b05.exe](http://www.download.windowsupdate.com/msdownload/update/v3-19990518/cabpool/lp-es-es_c0d6ad4877e4070ac6c56d3779f11097b0474b05.exe)
[http://www.download.windowsupdate.com/msdownload/update/v3-19990518/cabpool/lp-sv-se\_d39e406d29d8b6dd731721a6016964263b649223.exe](http://www.download.windowsupdate.com/msdownload/update/v3-19990518/cabpool/lp-sv-se_d39e406d29d8b6dd731721a6016964263b649223.exe)
[http://www.download.windowsupdate.com/msdownload/update/v3-19990518/cabpool/lp-ja-jp\_b0a3ce38426e0a4214a0c65476fe627e2f9017b0.exe](http://www.download.windowsupdate.com/msdownload/update/v3-19990518/cabpool/lp-ja-jp_b0a3ce38426e0a4214a0c65476fe627e2f9017b0.exe)
[http://www.download.windowsupdate.com/msdownload/update/v3-19990518/cabpool/lp-pt-br\_6196e1a16c11d0790f07c4bdebf6cf493ba389c2.exe](http://www.download.windowsupdate.com/msdownload/update/v3-19990518/cabpool/lp-pt-br_6196e1a16c11d0790f07c4bdebf6cf493ba389c2.exe)
[http://www.download.windowsupdate.com/msdownload/update/v3-19990518/cabpool/lp-nb-no\_edbdac0a00118fe2113115b24319b009078e9d7b.exe](http://www.download.windowsupdate.com/msdownload/update/v3-19990518/cabpool/lp-nb-no_edbdac0a00118fe2113115b24319b009078e9d7b.exe)
[http://www.download.windowsupdate.com/msdownload/update/v3-19990518/cabpool/lp-nl-nl\_d70eeabdf121b18b51fabcda75831ca8b7cef3f3.exe](http://www.download.windowsupdate.com/msdownload/update/v3-19990518/cabpool/lp-nl-nl_d70eeabdf121b18b51fabcda75831ca8b7cef3f3.exe)
[http://www.download.windowsupdate.com/msdownload/update/v3-19990518/cabpool/lp-fi-fi\_5e849137665b2e505f78b397f6db63dd7cc67048.exe](http://www.download.windowsupdate.com/msdownload/update/v3-19990518/cabpool/lp-fi-fi_5e849137665b2e505f78b397f6db63dd7cc67048.exe)
[http://www.download.windowsupdate.com/msdownload/update/v3-19990518/cabpool/lp-fr-fr\_19aa2eb3524742dd3617c4a930b435aa7b3e2c37.exe](http://www.download.windowsupdate.com/msdownload/update/v3-19990518/cabpool/lp-fr-fr_19aa2eb3524742dd3617c4a930b435aa7b3e2c37.exe)
[http://www.download.windowsupdate.com/msdownload/update/v3-19990518/cabpool/lp-ru-ru\_079c1214fe16627a1759530bb3cd63a269e9a352.exe](http://www.download.windowsupdate.com/msdownload/update/v3-19990518/cabpool/lp-ru-ru_079c1214fe16627a1759530bb3cd63a269e9a352.exe)
[http://www.download.windowsupdate.com/msdownload/update/v3-19990518/cabpool/lp-de-de\_2ecd8315fcc93731c126cc8de2dc077c3a2f8bd1.exe](http://www.download.windowsupdate.com/msdownload/update/v3-19990518/cabpool/lp-de-de_2ecd8315fcc93731c126cc8de2dc077c3a2f8bd1.exe)
[http://www.download.windowsupdate.com/msdownload/update/v3-19990518/cabpool/lp-da-dk\_d642f36bd4aeb50bee1bb9db29f67a75500a6f2f.exe](http://www.download.windowsupdate.com/msdownload/update/v3-19990518/cabpool/lp-da-dk_d642f36bd4aeb50bee1bb9db29f67a75500a6f2f.exe)
[http://www.download.windowsupdate.com/msdownload/update/v3-19990518/cabpool/lp-ko-kr\_86fb0badb0f282a2b2e154dca33bee4f36f4a21f.exe](http://www.download.windowsupdate.com/msdownload/update/v3-19990518/cabpool/lp-ko-kr_86fb0badb0f282a2b2e154dca33bee4f36f4a21f.exe)
[http://www.download.windowsupdate.com/msdownload/update/v3-19990518/cabpool/lp-it-it\_f37ed5378767169fdfea712c7a22aec1c3deb09c.exe](http://www.download.windowsupdate.com/msdownload/update/v3-19990518/cabpool/lp-it-it_f37ed5378767169fdfea712c7a22aec1c3deb09c.exe)
-———————
For Vista Service Pack 1, this is a **partial** list of a much more comprehensive one originally from:
[http://techblissonline.com/vista-sp1-mui-multilingual-user-interface-64bit-x64-language-packs-download-free/](http://techblissonline.com/vista-sp1-mui-multilingual-user-interface-64bit-x64-language-packs-download-free/)
x64 versions:
Chinese (simplified):
[http://www.download.windowsupdate.com/msdownload/update/software/updt/2008/04/lp-zh-cn\_715b7879c7fa04bc8fef8f7da5d25cd3d4ac33d3.exe](http://www.download.windowsupdate.com/msdownload/update/software/updt/2008/04/lp-zh-cn_715b7879c7fa04bc8fef8f7da5d25cd3d4ac33d3.exe)
French: [http://www.download.windowsupdate.com/msdownload/update/software/updt/2008/04/lp-fr-fr\_6f6013466e73fdd53d3b05afc29035c8717a7f72.exe](http://www.download.windowsupdate.com/msdownload/update/software/updt/2008/04/lp-fr-fr_6f6013466e73fdd53d3b05afc29035c8717a7f72.exe)
German: [http://www.download.windowsupdate.com/msdownload/update/software/updt/2008/04/lp-de-de\_6dcf03abddc251cca859599c87f421c8df61951f.exe](http://www.download.windowsupdate.com/msdownload/update/software/updt/2008/04/lp-de-de_6dcf03abddc251cca859599c87f421c8df61951f.exe)
Italian: [http://www.download.windowsupdate.com/msdownload/update/software/updt/2008/04/lp-it-it\_beeda327848b3b587e02fa7fc820e2db7832c5b8.exe](http://www.download.windowsupdate.com/msdownload/update/software/updt/2008/04/lp-it-it_beeda327848b3b587e02fa7fc820e2db7832c5b8.exe)
Japanese: [http://www.download.windowsupdate.com/msdownload/update/software/updt/2008/04/lp-it-it\_beeda327848b3b587e02fa7fc820e2db7832c5b8.exe](http://www.download.windowsupdate.com/msdownload/update/software/updt/2008/04/lp-it-it_beeda327848b3b587e02fa7fc820e2db7832c5b8.exe)
Korean: [http://www.download.windowsupdate.com/msdownload/update/software/updt/2008/04/lp-ko-kr\_35b007d62bb85d77563c9c4c7f10fb4b62e5d8c1.exe](http://www.download.windowsupdate.com/msdownload/update/software/updt/2008/04/lp-ko-kr_35b007d62bb85d77563c9c4c7f10fb4b62e5d8c1.exe)
Portuguese (Brazil): [http://www.download.windowsupdate.com/msdownload/update/software/updt/2008/04/lp-pt-br\_551c62dd870c460d9037f1688f6ccfe962c9dcd1.exe](http://www.download.windowsupdate.com/msdownload/update/software/updt/2008/04/lp-pt-br_551c62dd870c460d9037f1688f6ccfe962c9dcd1.exe)
Russian: [http://www.download.windowsupdate.com/msdownload/update/software/updt/2008/04/lp-ru-ru\_3e442c42f8bae5801178bf42ae7d5141d8190db7.exe](http://www.download.windowsupdate.com/msdownload/update/software/updt/2008/04/lp-ru-ru_3e442c42f8bae5801178bf42ae7d5141d8190db7.exe)
Spanish: [http://www.download.windowsupdate.com/msdownload/update/software/updt/2008/04/lp-es-es\_ab98cfd30ecf2937d9151a51bafd6183eab03e2b.exe](http://www.download.windowsupdate.com/msdownload/update/software/updt/2008/04/lp-es-es_ab98cfd30ecf2937d9151a51bafd6183eab03e2b.exe)
32-bit versions:
Chinese (simplified): [http://www.download.windowsupdate.com/msdownload/update/software/updt/2008/04/lp-zh-cn\_f59ef0c461e6ab07aa10364fb7476ecdbfac8087.exe](http://www.download.windowsupdate.com/msdownload/update/software/updt/2008/04/lp-zh-cn_f59ef0c461e6ab07aa10364fb7476ecdbfac8087.exe)
French: [http://www.download.windowsupdate.com/msdownload/update/software/updt/2008/04/lp-fr-fr\_465046f5bdfc4298fc50eb319091c2b0a3b38972.exe](http://www.download.windowsupdate.com/msdownload/update/software/updt/2008/04/lp-fr-fr_465046f5bdfc4298fc50eb319091c2b0a3b38972.exe)
German: [http://www.download.windowsupdate.com/msdownload/update/software/updt/2008/04/lp-de-de\_9d639d8497f912f5c1d9f213eb5f842681a5a518.exe](http://www.download.windowsupdate.com/msdownload/update/software/updt/2008/04/lp-de-de_9d639d8497f912f5c1d9f213eb5f842681a5a518.exe)
Italian: [http://www.download.windowsupdate.com/msdownload/update/software/updt/2008/04/lp-it-it\_ab4a758ef378c57a27fc379daea60141f418a2fa.exe](http://www.download.windowsupdate.com/msdownload/update/software/updt/2008/04/lp-it-it_ab4a758ef378c57a27fc379daea60141f418a2fa.exe)
Japanese: [http://www.download.windowsupdate.com/msdownload/update/software/updt/2008/04/lp-ja-jp\_838e72b9b4c1d046199bb0a16df22dc54de78b78.exe](http://www.download.windowsupdate.com/msdownload/update/software/updt/2008/04/lp-ja-jp_838e72b9b4c1d046199bb0a16df22dc54de78b78.exe)
Korean: [http://www.download.windowsupdate.com/msdownload/update/software/updt/2008/04/lp-ko-kr\_30d39777bd7a89e04bf82a0872f0715fc0e2829b.exe](http://www.download.windowsupdate.com/msdownload/update/software/updt/2008/04/lp-ko-kr_30d39777bd7a89e04bf82a0872f0715fc0e2829b.exe)
Portuguese (Brazil): [http://www.download.windowsupdate.com/msdownload/update/software/updt/2008/04/lp-pt-br\_9965ec113186503c771429fa967e8aab845b36fc.exe](http://www.download.windowsupdate.com/msdownload/update/software/updt/2008/04/lp-pt-br_9965ec113186503c771429fa967e8aab845b36fc.exe)
Russian: [http://www.download.windowsupdate.com/msdownload/update/software/updt/2008/04/lp-ru-ru\_479d878f3cf33422dd4271be26d18b4a86ffb858.exe](http://www.download.windowsupdate.com/msdownload/update/software/updt/2008/04/lp-ru-ru_479d878f3cf33422dd4271be26d18b4a86ffb858.exe)
Spanish: [http://www.download.windowsupdate.com/msdownload/update/software/updt/2008/04/lp-es-es\_90e8fbb6a08844cca3d6298de5bedbaae278e4ff.exe](http://www.download.windowsupdate.com/msdownload/update/software/updt/2008/04/lp-es-es_90e8fbb6a08844cca3d6298de5bedbaae278e4ff.exe)
# Dell Optiplex GX620 systems and Windows Vista
Good news: Windows Vista natively supports all components in the typical Dell Optiplex GX620.
Bad news: **except** for audio.
Worse: Dell lists **no** Vista drivers of any sort as of this writing on their support site for the GX620.
Dell USA does not list any audio drivers on their support page or training pages, and a call to Dell Gold Support turned up nothing at this time. Cyril at Dell Gold had me try the Optiplex 755 driver, but that returned an error. However a google search turns this up:
[http://support.euro.dell.com/support/downloads/download.aspx?c=uk&l=en&s=gen&releaseid=R145149&formatcnt=1&libid=0&fileid=193393](http://support.euro.dell.com/support/downloads/download.aspx?c=uk&l=en&s=gen&releaseid=R145149&formatcnt=1&libid=0&fileid=193393)
R145149.exe is the packaged Dell ADI 64 Bit Onboard Sound Driver for Vista x64 for the following systems:
-—-
OptiPlex GX280
OptiPlex GX520
OptiPlex GX620
OptiPlex SX280
Dell Precision WorkStation 370
Dell Precision WorkStation 470
Dell Precision WorkStation 670
-—-
This has been installed successfully on Windows Vista Enterprise x64 and passed on to Dell for inclusion in their records.
# Linux and Unix
# Specify section number with Unix man (manual) command
Sometimes, there are multiple man pages under the same name, identified by section numbers. For example, there is a MKDIR user command and a MKDIR programming function call. if you just type “man mkdir” at the prompt, it might take you to one but not the other.
You can add a -s flag to specify the section number , e.g.
- man -S 1 mkdir # shows the manual for MKDIR
- man -S 2 mkdir # shows the manual for MKDIR
# Bash scripting
- [Learning Shell Scripting Language: A Guide from Newbies to System Administrator](http://www.tecmint.com/learning-shell-scripting-language-a-guide-from-newbies-to-system-administrator/) – October 3, 2013
- [Bash shell scripting Tutorial – Part I](http://mylinuxbook.com/bash-shell-scripting-part-i/)
- [Advanced Bash-Scripting Guide](http://tldp.org/LDP/abs/html/)
- [bash Cookbook](https://learning.oreilly.com/library/view/bash-cookbook-2nd/9781491975329/) – UCLA only – licensed through [O’Reilly Safari books online](http://uclibs.org/PID/432785)
- [Unix: Debugging your scripts](http://www.itworld.com/operating-systems/383027/unix-debugging-your-scripts)
- [10 Useful Chaining Operators in Linux with Practical Examples](http://www.tecmint.com/chaining-operators-in-linux-with-practical-examples/) – December 13, 2013
- [Bash Scripting Quirks & Safety Tips](http://jvns.ca/blog/2017/03/26/bash-quirks/) – *March 26, 2017* Includes links to other resources, e.g.
[Command Line Challenge Game](https://cmdchallenge.com)
- [Advanced Bash-Scripting Guide: Manipulating Strings](http://www.linuxtopia.org/online_books/advanced_bash_scripting_guide/string-manipulation.html)
*Please add Bash links that you’ve found useful.*
# lsof, the least talked about Unix tool
Apparently this is one of the least talked about, but most useful Linux/Unix tools.
**lsof** lists information about files opened by processes, and according to these articles, that is more useful than it sounds.
- [http://dmiessler.com/study/lsof/](http://dmiessler.com/study/lsof/)
- [http://0xfe.blogspot.com/2006/03/troubleshooting-unix-systems-with-lsof.html](http://0xfe.blogspot.com/2006/03/troubleshooting-unix-systems-with-lsof.html)
*Heard about this on [http://reddit.com](http://reddit.com)*
# In Unix, what do I do when a file I want to edit in vi says "Line too long"?
In Unix, when the vi editor says “line too long” it’s usually because it was copied up from a Mac where the end of line marker is different.
This command works for me on Solaris:
`tr '\015' '\012' < in_file > out_file`
Source: [http://www.maths.ox.ac.uk/help/faqs/files/dos-mac-to-unix.shtml](http://www.maths.ox.ac.uk/help/faqs/files/dos-mac-to-unix.shtml)
The numbers are in octal. Be sure and transpose from decimal or hex if necessary.
- [ASCII Character Codes Conversion Chart](http://publib.boulder.ibm.com/infocenter/pseries/v5r3/index.jsp?topic=/com.ibm.aix.commadmn/doc/commadmndita/conversion_table.htm)
# How can I check/verify that Red Hat Enterprise Linux is up-to-date for Daylight Savings Time
As the root user, enter the following at the command line:
$ zdump -v /etc/localtime | grep 2007
You should see Mar 11 as one of the dates, if not your system needs to be updated. For more info, go here:
[http://kbase.redhat.com/faq/FAQ\_80\_7909.shtm](http://kbase.redhat.com/faq/FAQ_80_7909.shtm)
# 15 Basic ‘ls’ Command Examples in Linux
I learned at least three things from this list, and I’ve been using *ls* for years.
[15 Basic ‘ls’ Command Examples in Linux](http://www.tecmint.com/15-basic-ls-command-examples-in-linux/)
The new things for me were:
- *ls -lh* – human readable format on file sizes
- *ls -ltr* – reverse output order, which is particularly useful when sorting by date
- *ls -lS* – sort by file size
- *ls -R* – Recursively list Sub-Directories (can be combined with S for size)
Note: so far, all of these commands work for me in OS/X as well.
# cron job examples
Here are some interesting examples of cron job use.
- [http://www.thegeekstuff.com/2009/06/15-practical-crontab-examples/](http://www.thegeekstuff.com/2009/06/15-practical-crontab-examples/) – *I didn’t know about @monthly, @yearly, and @reboot, or changing the MAIL destination setting.*
- [http://www.pantz.org/software/cron/croninfo.html](http://www.pantz.org/software/cron/croninfo.html)
- [http://www.adminschoice.com/crontab-quick-reference](http://www.adminschoice.com/crontab-quick-reference)
== updated by Shinn on 2/22/2013 =====
\*/(number) only worked in Linux, not Solaris, so were @yearly, @monthly and @daily.
MAILTO=”someone@somedomain” can be used in CentOS to redirect cron output to other account.
# adding date to bash history command
Coming from Solaris to Linux, one thing I’ve missed for years was that the Linux bash *history* command doesn’t show timestamps. Thanks to my colleague, Shinn, I learned about this config settings that can go into .bashrc to solve that problem, and add a few other useful settings, as well. In Debian, the (system) file to modify is /etc/bash.bashrc, and /etc/bashrc in CentOS. Of course, user can modify her/his .bashrc.
`export HISTTIMEFORMAT='%F %T '`
Before:
```
355 vi .bashrc
356 history
357 history | wc -l
```
After:
```
355 2013-03-15 10:07:03 vi .bashrc
356 2013-03-15 10:07:17 history
357 2013-03-15 10:07:48 history | wc -l
358 2013-03-15 10:13:43 cat .bashrc
359 2013-03-15 10:57:46 exit
360 2013-03-15 13:22:12 history
361 2013-03-15 13:22:35 more .bashrc
```
`export HISTSIZE=1000` – extends history from the default 500 most recent commands, to 1000.
`export HISTCONTROL=ignoredups` – removes duplicates from history
`export HISTCONTROL=ignoreboth` – I’m not sure about this one.
*Please add other config options you find useful.*
# How do I extract certain columns from a text file in Unix?
Somehow I can never remember the *cut* command in Unix. But I occasionally want to remove certain columns from a text file of data. *cut* will do that.
## Delimited
Here is a simple tab-delimited example. (Use the -d option to set a different column delimiter.)
**Data File (tab-delimited)**
```
111 222 3333 444 555 666
111 222 3333 444 555 666
111 222 3333 444 555 666
111 222 3333 444 555 666
111 222 3333 444 555 666
```
**Command**
```
cut -f1,4,6 filename
```
**Output**
```
111 444 666
111 444 666
111 444 666
111 444 666
111 444 666
```
There are two other examples in the Search and Replace section of this KB article.
[https://kb.ucla.edu/link/117](https://kb.ucla.edu/link/117)
More options are available in the Unix man pages for cut. Type *man cut*
## Fixed Width
Use the *-c* option to select characters based on position.
**Data File (fixed width)**
```
111 222 3333 444 555 666
111 222 3333 444 555 666
111 222 3333 444 555 666
111 222 3333 444 555 666
111 222 3333 444 555 666
```
**Command**
```
cut -c9,16 filename
```
**Output**
```
222
222
222
222
222
```
# Command Line Tools to Monitor Linux Performance
*If you have any tools for monitoring Linux, or have comments or limitations on these, please add them to this article. Thanks,*
- [15 Command Line Tools to Monitor Linux Performance](http://www.tecmint.com/command-line-tools-to-monitor-linux-performance)
# Awk Explained
Awk is a Unix tool that can be very useful for dealing with text but can be hard to understand. Here are some useful explanations.
- [awk is a beautiful tool](http://eriwen.com/tools/awk-is-a-beautiful-tool/)
- [Famous Awk One-Liners Explained, Part I](http://www.catonmat.net/blog/awk-one-liners-explained-part-one/)
- [8 Powerful Awk Built-in Variables – FS, OFS, RS, ORS, NR, NF, FILENAME, FNR](http://www.thegeekstuff.com/2010/01/8-powerful-awk-built-in-variables-fs-ofs-rs-ors-nr-nf-filename-fnr/)
- [How to use awk command in Linux](http://xmodulo.com/2014/07/use-awk-command-linux.html)
- [Handy One-Line Scripts for Awk](http://www.pement.org/awk/awk1line.txt) – Eric Pement
# Finding most recently changed files in Unix
How do I find the most recently changed files in a set of subdirectories on Unix or Linux?
## Answer 1: This will show the most recent 10 files in current directory and below.
It supports filenames with spaces. And can be slow with lots of files [http://stackoverflow.com/a/7448828](http://stackoverflow.com/a/7448828)
`sudo find . -type f -exec stat --format '%Y :%y %n' "{}" \; | sort -nr | cut -d: -f2- | head`
```
2015-08-03 13:59:49.000000000 -0700 files/CV_Smith_1July2015.pdf2014-12-05 09:46:33.000000000 -0800 files/CV_Smith_1Dec2014.pdf2013-03-04 10:23:16.000000000 -0800 files/Thumbs.db2013-03-04 10:16:57.000000000 -0800 files/CV_Smith_March2013.pdf2013-01-07 11:44:11.000000000 -0800 files/CV_Smith_5Jan2013.pdf
```
## Answer 2: This will show all files modified in last day, in current directory and below
`find . -mtime -1 -ls`
This version will just print the filenames, without the file sizes or times.
`find . -mtime -1 -print`
# Thin Client technology - Linux Terminal Server Project HOWTO
*The text below was copied with permission from post by Harry Mangalam, UCI, to [UC-CSC Mailing List](https://maillists.uci.edu/mailman/listinfo/uccsc)*
I typed up the notes I took as I was evaluating the LTSP for Lab and
Office deloyment, added a few introductory paras and got this:
[http://moo.nac.uci.edu/~hjm/LTSP\_HOWTO.html](http://moo.nac.uci.edu/~hjm/LTSP_HOWTO.html)
Feedback, criticism, corrections, and suggestions how to improve it
welcome. If you have additional links that should be added, let me
know.
Those at UCI are welcome to visit for a demo until the hardware gets
redeployed. I’ve tested with 64bit PCs netbooting 64 & 32bit OSs, and
an old 32bit PIII laptop netbooting the 32bit OS.
From the introduction:
-————-
There are many technologies tempting your wallet these days with
promises of secure, easy, efficient, low-cost, scalable desktop
computing. Many of these are based on virtualized Windows, with
proprietary technology at each layer of the whole solution. (Tom Holub
and crew evaluated this Windows-based onion/parfait at Berkeley in
2008-2009.)
I say … meh.
Linux and the Linux Terminal Server Project (LTSP) have provided this
kind of technology for at least a decade for free. It is being used in
large rollouts in the 3rd world where the technology cost issue is
most important and in the 1st world where the human costs are the main
issue. Before you sink $thousand$ trying to stack proprietary
technology upon proprietary technology, why not see what some free
software can provide? If you have the (minimal) hardware, you can have
an LTSP system up and running in about 2 hours. No licenses, no
signatures, no faxes, no crippleware, no POs, no RFPs, no bids, no
lawyers. And surprisingly few tears.
---
```
Table of Contents1. Introduction2. Assumptions3. Pre-Requisites3.1. Prep work3.2. Hardware3.3. Software4. Installing the LTSP server4.1. Installing a preconfigured LTSP system4.2. Installing over an pre-installed system5. Creating the client OS6. Server vs Client Applications7. Changing the client BIOS to PXE-boot8. Booting the client9. Upgrading & Changing the client OS10. Adding / upgrading applications11. Adding storage12. Multimedia to LTSP clients13. Shared printers.14. Local storage devices15. Handling Application versions16. Adding LDAP, Kerberos, NIS/NFS17. LTSP coexistence with Windows apps18. Thin Client Promotion, Propaganda, Discussion19. Copyright notice
```
# combining unix stderr output with stdout
The problem is that when I run script x and redirect it to a file, all of the error messages come to the screen when I want them to also go to that file.
With bash shell, use:
program > outputfile 2>&1
My colleague found this for me in the book [Unix Power Tools](http://oreilly.com/catalog/9780596003302/) which is available online at UCLA here. [http://proquest.safaribooksonline.com/0596003307](http://proquest.safaribooksonline.com/0596003307)
# How do I keep color output when paginating shell output through less?
Let’s say that you like the color output that comes out of ls (different colors for different file types). But when you have lots of files and want to paginate it through less, you lose the color output. So how do we keep the colors?
You need to give the -r flag to less to tell it to pass through the color escape sequences:
```
ls | less -r
```
That might not work because on some systems ls is set as an alias to:
```
ls —color=auto
```
(you can find out by typing “alias ls”)That makes it show color only for interactive terminals (sort of…) but piping
into less isn’t an interactive terminal.
So you can do this:
```
ls —color | less -r
```
or
```
ls —color=always | less -r
```
That’s probably too much trouble, so you can set up an alias by
editing your ~/.bash\_profile and adding this: (if you’re using bash as your shell)
```
alias lsl=‘ls —color=always | less -r’
```
You can change lsl to whatever name you like.Or if you want a long directory listing, you can do something like this:
```
alias lsl=‘ls -alg —color=always | less -r’
```
# Unix Cheat Sheets and Tricks
While Unix is an extremely flexible, powerful, and stable operating system, mastering it can require apprenticing yourself to an expert and monitoring every keystroke. This article will hopefully grow as others add their favorite Unix tricks.
**The best trick is to learn to read *man pages* and understand them. If you can do that, you’ll have Unix at your fingertips.**
- [‘The Art of Unix Programming’ by Eric Raymond](http://www.catb.org/~esr/writings/taoup/html/) – *full-text available online*
- [Learn 10 good UNIX usage habits – IBM](http://www-128.ibm.com/developerworks/aix/library/au-badunixhabits.html)
- [Advanced Shell Topics](http://suso.suso.org/docs/adv_shell/)
- [Slicing and Dicing on the Command Line](http://www.linux-mag.com/cache/7301/1.html) – *Linux Magazine article on a host of methods for reformatting plain text — including the text used by graphical applications like spreadsheets and email programs.*
- **Cheat Sheets**
- [http://www.sloppycode.net/nix/](http://www.sloppycode.net/nix/)
## Searches (and Replace)
- Search and replace text in a list of files: perl -pi.bak -e ‘s/OLDSTRING/NEWSTRING/g’ FILELIST
- search for tablename references in db program:
- egrep -rl -e ‘(select|insert|update)(.\*)tablename’ \*
- Extract username and realnames from passwd file: **cut -d: -f1,5 /etc/passwd | sort**
- Extract unique IP addresses (first field) from web server logs. In this case, any looking for winnt to try and track nimda worm.
- tail -10000 access\_log | grep winnt | cut -d" " -f1 | sort -u
## Finding Files
- find files owned by group xxxx: **find . -group xxxx -print**
- find files owned by user xxxx: **find . -user xxxx -print**
- list most recent logins (and FTP): **last**
- list most recent logins (and FTP) by username: **last username**
- to change date/time of file:
**/usr/bin/touch -am -t 195401010000 filename** \_makes it Jan 01 1954 \_
- show environment of all processes: **ps -ae**
- list table of contents of tarfile **tar tvf tarfilename**
- To change permissions on directories, not files, recursively. Here’s two examples:
- **find . -type d -exec chmod 775 {} \\;**
- **find . -type d -exec chmod g+s {} \\;**
- To change permissions on all htm files recursively:
chmod -R 664 \*htm
- To find and print out all files owned by user:
- go to /etc/passwd to find user ID number
- go to the directory where you want to start your search
- type: **find . -user 30152 -print**
- To find and replace owner: **find . -user 30152 -exec chown newuser {} \\;**
- Find all php files in this directory or below
- Linux find . -name \*php
- Solaris find . -name \\\*php
- Find all php files in this directory or below and display first few lines of each
- find . -name \*php -exec head {} \\;
- Remove all files that end with xxx: find . -name \\\*xxx -print -exec rm {} \\;
- This one searches all php, pl and pm files for the term board\_extras
find . \\( -name \\**php -o -name \\**pl -o -name \\\*pm \\) -exec grep board\_extras {} \\; -print | less
- Find and chgrp to classweb for all files with other group ID
find . -not -group classweb -exec chgrp classweb {}
\\; | less
- Find all files with rw-r—r—: find . -perm 644 -ls | more
- chmod on them with ok? y/n: find . -perm 644 -ok chmod 664 {} \\;
- chmod on all of them: find . -perm 644 -exec chmod 664 {} \\; ran as root. Important to have space after {}
- Find all files named ta.inc and run search and replace to change " <?" to “<?”
- `find . -name ta.inc -exec perl -pi.bak -e 's/^ <\?/UCLA Programmers Wiki.*
# vi editing notes
vi is a Unix text editor that is almost always available, on any Unix or Linux system. Knowing how to edit in it means you’ll always have an editor available, for editing config files or whatever.
To convert a unix text file to a windows/dos text file
:%s/$/\\^M/
% – the whole file (same as 1,$)s – substitute/ – substitution delimeter$ – end of line\\ – (1 backslash) escape next character^M – carriage return (enter ctrl-v ctrl-m)Uppercase a file
%s/.\*/\\U&/
from: [http://sites.netscape.net/ianjdonaldson/](http://sites.netscape.net/ianjdonaldson/)
Replace tabs with a comma in vi
:1,$s/\\(\[TAB\]\\)/,/g
Replace tabs with two spaces. Do it with Perl:
perl -pi.anytabs -e ‘s/\\t/ /g’ isisboth.inc
deletes every line that contains “string”
:g/string/d
deletes every line that does not contain “string”
:v/string/d
or
:g!/string/d
delete every empty line
:g/^$/d
remove trailing blanks
:%s/ \*$//g
Replace the following lines
create user user103 identitified by user103
create user user104 identitified by user104
create user user105 identitified by user105
with
grant connect to user103
grant connect to user104
grant connect to user105
:%s/^.**\\(user.**$\\)/grant connect to \\1/g
copy lines 1 through 5 after line 35
:1,5t35
copy lines 1 through 5 at the end of the file
:1,5t$
remove null lines in the file
:g/^$/d
Replace commas with Carriage Returns
:1,$s/,/CTRL-V then press Return and ^M will pop up, then /g
10/23/2001
Trying to do regex but even simple ones won’t work
:%s#\\(dec.**\\)#\\1\\1# Substitute pattern match failed
:%s#\\(dec.\\)#\\1\\1#
Anything with .** in it fails.
Found that we were pointing at the /usr/ucb version of vedit. Using /usr/bin/vi it works. Changed the alias to point to right one. This is a common problem where the man entry talks about the version you aren’t using.
vi – :set ignorecase for case-insensitive searching
:set noignorecase
\[/literal\]
To do a quick indent of several lines -
Go to the first line that you want to indent and type in the number of lines after that that you want to shift. Then push SHIFT + > (the greater than sign) to move your lines to the right and click SHIFT + < to move your lines to the left (you might have to push the carrot button twice). To change the indention size, you have to set the width in your vi config file. Go to your home directory and add the following line to the .exrc file: “sw=2”.
*This article was originally posted on the UCLA Programmers Wiki.*
# Linux scp command examples
I’ve used scp for years, but didn’t know many of these options. The compress-before-transferring and recursively copying a subdirectory structure, look particularly useful.
- [12 scp command examples to transfer files on Linux](http://www.binarytides.com/linux-scp-command/)
# diff and patch
- [The Ten Minute Guide to diff and patch](http://stephenjungels.com/jungels.net/articles/diff-patch-ten-minutes.html)
- [Using diff and patch](http://www.linuxforums.org/applications/using_diff_and_patch.html)
# UNIX Tutorials
[Learn UNIX in 10 minutes](http://freeengineer.org/learnUNIXin10minutes.html)
[UNIX Tutorial for Beginners](http://www.ee.surrey.ac.uk/Teaching/Unix/index.html)
[How To Look Like A UNIX Guru](http://www.cs.usfca.edu/~parrt/course/601/lectures/unix.util.html)
**Best Practices**
- [Learn 10 Good UNIX Usage Habits](http://www.ibm.com/developerworks/aix/library/au-badunixhabits.html)
- [Learn 10 More Good UNIX Usage Habits](http://www.ibm.com/developerworks/aix/library/au-unixtips/index.html?S_TACT=105AGX20&S_CMP=EDU)
- [Three Books Every System Administrator Should Read](http://www.linux-mag.com/cache/7400/1.html) – Matt Frye Linux Magazine -July 1st, 2009
- [Unix commands and tools you just can’t live without](http://www.itworld.com/operating-systems/350405/unix-commands-and-tools-you-just-cant-live-without) – Sandra Henry-Stocker – March 31, 2013
# Linux tee command
The Linux “tee” command is extremely useful in the right situation. This article gives some good examples:
- [http://linuxaria.com/pills/linux-terminal-the-tee-command](http://linuxaria.com/pills/linux-terminal-the-tee-command)
# Manipulating data on Linux
This is an introduction to those using Linux for data analysis for the first time.
*It came from a post by UCI colleague Harry Mangalam to [UC-CSC Mailing List](https://maillists.uci.edu/mailman/listinfo/uccsc)*
“As an aid to helping students accomplish the basics on one of our
clusters, I’ve written up a doc that describes some of the tools and
utilities (and gotchas) that they might encounter. You’re welcome to
use, re-use, or modify it as per the Creative Commons Documentation
license. Suggestions, additions, edits, are welcome.”
A work in progress, it’s available here:
[Manipulating Data on Linux](http://moo.nac.uci.edu/~hjm/ManipulatingDataOnLinux.html)
# Advantages of less over more (UNIX)
This article is intended to provided reasons to use the UNIX program *less* over its predicessor *more*.
**What is *less*?**
If you use the *whatis* program for *less* on a UNIX terminal you get “opposite of more”. What does this mean? *more* allows a user to incrementally display text from the beginning scanning forward. *less* allows a user to view text backwards (in addtion to forwards).
**Why use *less*?**
*less*, in addition to forwards-backwards scrolling, also supports sideways scrolling. This gets rid of the wordwraping that *more* uses.
The controls are simpler. The arrow keys control movement. In addition the old controls work as well.
Another advantage of *less* is that it can start up before reading the entire file (which *more* has to wait for).
**Useful features of *less*** /keyword performs a search for keyword ?keyword performs a search for keyword backwards n repeats last search N repeats last search backwards g seek to beginning of file or line specified (ie 20g)^1^ G seek to end of file or line specified (ie 20G)^1^ m marks position (ie mz) ’ returns to position (ie ’z) s save the input if less input is a pipe (s file.txt) p or % jump to point in file. value must be between 0 and 100 (ie 20%)1 Warning: may be slow if number specified is large
**Useful commandline options** -N prefix line numbers to every line -jn jump to line n -xn\[,m\]\* set tab location (ie less -x5,10,12 will align tabs to 5th line, 10th line, 12th line, 14th, 16th, 18th lines… because the difference of the last two is 2)More help can be found using the following lines:
`man less`
`less --help`
# Case-insensitive searching in vi
By default, all searches in vi are case-sensitive. To do a case-insensitive search, go into command mode (press Escape), and type `:set ignorecase`. You can also type `:set ic` as an abbreviation.
To change back to case-sensitive mode, type `:set noignorecase` or `:set noic` in command mode.
If you tend to use this feature a lot, consider putting `set ignorecase` into your vi configuration file. See the article on [customizing vi](https://kb.ucla.edu/link/659).
# Customizing vi
The Unix editor vi lets you customize its behavior in a numer of ways. There are two ways to customize vi. The first way is to enter command mode by hitting Escape, then type a colon and the command as it is shown.
The second way is to create a file called .exrc in your home directory. Each command goes on its own line, and the commands are parsed as though you typed them directly in vi. There are a couple rules your .exrc needs to follow:
- No blank lines are allowed.
- Directives must be typed on a single line.
- Lines beginning with double quotes (") are marked as comments and are ignored.
# Setting options
vi has some options which take values, and other options which are either on or off. To set an option with some value, type `set [option]=[value]`. To turn a boolean option on, type `set [option]`, and to turn it off type `set no[option]`. Here are a few examples which will demonstrate the syntax as well as list some useful options.
- `set tabstops=4` – sets tabstop width to 4 spaces
- `set autoindent` – turns on auto-indent
- `set ignorecase` – ignores case for searching
- `set showmatch` – highlights matching parentheses and brackets when you type them
- `set nowrapscan` – searches will not wrap around to the beginning when they reach the end
Most options have abbreviations. You can find a full list of options, their abbreviations, and what they do at: [http://ex-vi.sourceforge.net/ex.html#11](http://ex-vi.sourceforge.net/ex.html#11)
# Abbreviations
By setting an abbreviation, vi will replace any occurance of the abbreviation you type with the full phrase. To set an abbreviation, type `abbr [abbreviation] [full phrase]`. For example:
`abbr _ssc Social Sciences Computing` will take effect whenever you type “\_ssc”. You don’t need to type any special commands, it will be replaced as you type.
# Mappings
Mappings are just like abbreviations except they work in command mode rather than typing mode. You can set a map to perform a common task, like common replacements or insertions. You can put as many commands as you like into the mapping. The syntax for mappings is: `map [abbreviation] [command list]`
An example of a useful mapping would be one that spellchecks a word:
`map teh :%s/teh/the/g`
This executes a document-wide replacement command (teh → the) whenever you type “teh” in command mode. Note that you can use colon-prefixed commands here too. Also note that a better way to solve the above spellchecker would be to say: `abbr teh the` and vi would spellcheck as you type. ;)
---
A sample .exrc file which demonstrates a lot of features can be found at: [http://grox.net/doc/unix/exrc.php](http://grox.net/doc/unix/exrc.php)
# PHP Client can break `less`
When you do php through command line (i.e. `php somescript.php`) and you pipe it to less (i.e. `php somescript.php | less`), this has the possibility of breaking the functionality of /usr/bin/less. To exit you need to type ‘q’ then hit enter.
# How to synchronize files and directories from one location to another on Unix
Although tar can be used to synchronize/copy files/directories from one location to another (i.e. “tar -cf – -C srcdir . | tar -xpf – -C destdir”), it is really an archive tool and does not do the job as well as rsync. rsync does not have to go through the archive stage and can be used to synchronize one filesystem (or part of it) from one location (local or remote) to another (local or remote). rsync can do full or incremental synchronization. Although rsync is available on Unix, Mac and Windows, just the Unix usage will be described below.
To do a full sync of one location to another:
rsync -Havx srcdir/ destdir
To do an incremental sync after a full sync above:
rsync -Havx srcdir/ destdir (same command)
Note that for incremental sync, data added at the source (after the initial full sync) will be copied to the destination, but data deleted at the source will not be deleted at the destination. To force an incremental sync to delete data in the destination that is no longer in the source (this is like a real sync that is sometimes dangerous), do:
rsync -Havx —delete srcdir/ destdir
If you’re using a filesystem with a snapshot feature, include the option:
—exclude=.snapshot/
# avoiding increasing indents while pasting into vi
When pasting text into a vi editing screen, sometimes you’ll get each line increasingly indented like this.
```
aaaaaaaaaaaaaaaaaa bbbbbbbbbbbbbbbbbb cccccccccccccccccc
```
Use this command to change the “paste” setting. Then change it back when you’re done.
`:set paste`
`:set nopaste`
# SAS on 64b Ubuntu Linux
*This was contributed by a colleague from UCI, Harry Mangalam.*
Having spent 3 days debugging this, I thought I might make it easier
for others who might run into it.
SAS 9.2 uses Java for at least some of its plotting routines
(minimally the ‘ods graphics’).
The 64b version of SAS still uses the 32b version of Java and
officially only supports SUSE and RHEL as a platform. For a variety
of reasons, I run it on Ubuntu Intrepid, which meant that I got a
flurry of "we do not support that platform’ replies from SAS
technical support when I tried to figure out why it was failing
with “ERROR: Cannot load Java Runtime Engine”
The short version is that in order to support the 32b version of Java,
the 32b compatibility libs are required. You can install them on a
Ubuntu platform with:
sudo apt-get install apt-get install ia32-libs ia32-sun-java5-bin\\
sun-java5-jre libc6-i386 lib32gcc1 lib32z1 lib32stdc++6 lib32asound2\\
lib32ncurses5
(if you’re going to use a direct-from-Sun JRE, omit the packages
with ‘java’ in the names.).
I installed Sun’s latest 1.5 JRE (jre1.5.0\_21) in the same SAS root as
their supplied JRE (jre1.5.0\_12). It seemed to work with SAS’s JRE,
but it threw a few “Locking assertion failure” errors. Using Sun’s
JRE, it ran without errors.
It also needs the environment vars set to tell SAS where to find
things:
```
# convenience shortcutexport SASPATH=/where/you/rooted/SAS-x86_64/9.2# following is required to allow 32bit java to find its libs; may vary# with your installationexport LD_LIBRARY_PATH=${SASPATH}/jre1.5.0_21/lib/i386:\${SASPATH}/jre1.5.0_21/lib/i386/server:${LD_LIBRARY_PATH}# Need to set the CLASSPATH to the JRE root so when SAS calls java,the right one is executed.export JAVAHOME=${SASPATH}/jre1.5.0_21/
```
SAS tech support spent 3 days insisting that it was the wrong Java
sub-version number that was the problem.
—
Harry Mangalam – Research Computing, NACS, UC Irvine
# Ruby one-liner to count logins in Linux last command
## count logins in last command
If you want to take the output of the Linux `last` command, and get a count of how many times each user connected to your server, this script will do.
### sample input
```
tommytrojan sshd abc.def Fri May 15 13:30 - 13:30 (00:00)joebruin sshd ddd.eee Fri May 15 13:30 - 13:30 (00:00)joebruin sshd ddd.eee Fri May 15 13:30 - 13:30 (00:00)janebruin sshd ddd.eee Fri May 15 13:30 - 13:30 (00:00)
```
### sample output
```
Total entries: 4joebruin = 2janebruin = 1tommytrojan = 1
```
### script and explanation
`last | ruby -ane 'BEGIN{rows=0; a={}}; next if $F[0].nil?; a[$F[0]]||=0;a[$F[0]]+= 1; rows += 1; END{puts "Total entries: #{rows}" ; a.sort_by{|k,v|v}.reverse.each{|k,v| puts "#{k} = #{v}"} }'`
- ruby -e executes the following script; -n loops; and -a splits input and outputs into $F array
- BEGIN block is necessary to initialize row count and a hash, where we’ll store counts
- next if $F.nil?; is necessary, because at least one of our input lines had no user field.
- $F gives us first field in input line.
- a\[$F\]||=0; initializes hash location to 0 if it hasn’t been used yet
- a\[$F\]+= 1; increments user access count in hash
- END block lets us print our report.
- a.sort\_by{|k,v|v}does a sort by the counts, not by the user names. a.sort would have been enough if we just wanted it sorted by the key, ie: usernames.
- reverse.each{|k,v| puts “#{k} = #{v}”} reverses the sort to get descending order, and outputs the key (k) and value(v), e.g. username = access count.
### useful links
- [http://benoithamelin.tumblr.com/ruby1line](http://benoithamelin.tumblr.com/ruby1line)
- [http://www.tutorialspoint.com/ruby/ruby\_predefined\_variables.htm](http://www.tutorialspoint.com/ruby/ruby_predefined_variables.htm)
NOTE: My colleague did the same thing in this shell script. And his script includes the line with the missing user field.
`last | cut -d" " -f1 | sort | uniq -c | awk '{print $1" " $2}' | sort -nr`
# Linux performance analysis in 60 seconds
Here’s an intro to understanding what’s going on with a Linux server, quickly.
[http://techblog.netflix.com/2015/11/linux-performance-analysis-in-60s.html](http://techblog.netflix.com/2015/11/linux-performance-analysis-in-60s.html)
*If anyone has others, please post them here.*
# Reasons to Use Vim over Vi
This page [Difference Between VIM and vi](https://web.archive.org/web/20110321153748/http://www.dc.turkuamk.fi/docs/soft/vim/vim_diff.html) goes over some of the advantages of vim over vi.
*(Note: the page disappeared, so now we’re pointing at the Internet Archive’s March 2011 cached version.)*
To list some useful features:
Multi-level History
- Undo – *n* u (*n* is the number of levels)
- Redo – *n* ctrl-r
Windowing
- horiz split – :new *file*
- vert split – :vs *file*
- next window – ctrl-w ctrl-w
- prev window – ctrl-w ctrl-p
Visual mode
- start – v
- finish and…
- move – h,j,k,l
- change – c
- delete – d
- yank – y
- alter case – ~,U,u
Command Completion – *tab*
Insert Completion
- match dictionary – ctrl-x ctrl-k
- match from includes – ctrl-x ctrl-i
- match line – ctrl-x ctrl-l
- current file
- next match – ctrl-n
- prev match – ctrl-p
Additional info: [http://csswizardry.com/2014/06/vim-for-people-who-think-things-like-vim-are-weird-and-hard/](http://csswizardry.com/2014/06/vim-for-people-who-think-things-like-vim-are-weird-and-hard/)
# Unix grep, find and maxdepth
*I’m writing this so I can find it next time I want to do this, and so my student programmers can more easily compare config settings across test sites.*
Problem: Find a particular line quickly in a file in 7 different directories. In this case, it’s a Moodle config setting in 7 different installs, each with thousands of files.
Solution: With the help of this site, [http://helpdesk.ua.edu/unix/tipsheet/tipv1n10.html](http://helpdesk.ua.edu/unix/tipsheet/tipv1n10.html) I found a quick way to do it without traversing the thousands of files in each directory. The cheat is that I knew the config file in a Moodle install is always in the same spot. But I could leave maxdepth out.
The key here is that while I know
```
grep -r search_string *
```
would work, it would take forever to go through all of those files, some of them quite large. I didn’t know how to get the recursive grep to only look at certain files. Turns out that is what backticks are for.```
grep quiet `sudo find . -maxdepth 3 -type f -name config.php`./stage/moodle/config.php: $CFG->quiet_mode = TRUE;./ssctrunk/moodle/config.php:$CFG->quiet_mode = FALSE;./kai/moodle/config.php: $CFG->quiet_mode = TRUE;./videoannotation/moodle/config.php: $CFG->quiet_mode = TRUE;./test/moodle/config.php: $CFG->quiet_mode = TRUE;./coursemenu/moodle/config.php: $CFG->quiet_mode = TRUE;./joe/moodle/config.php: $CFG->quiet_mode = TRUE;
```
**Quick Explanation:**
1. grep quiet – will search for the text “quiet” in the list of files produced by the command in backticks.
2. sudo – to avoid being told I don’t have permission to see certain files.
3. maxdepth – to only go 3 directories deep instead of recursing through everything. (I knew where the config.php file would be.)
4. -type f -name config.php – only look at files named config.php. Ignore all others.
# Useful Commands for Vi
The page is meant to document some of the more useful, but obscure commands in vi. For commands exclusive to vim see [Reasons To Use Vim Over Vi](https://kb.ucla.edu/link/957). Please feel free to add commands you would like to see on this page.
% move to matching (, {, or \[ *n* G goto line *n* f *char* move to position of the next *char* t *char* move to position before next *char* J join the next line to the current one m *reg* mark position in *reg* which can be a-z ` *reg* move to position in *reg* which can be a-zNotes:
f and t are useful for changing quotes. say you are at the first position on the line below
echo “old\_text” . $var . “preserve”;to change this you simply to say “new\_value” in place of “old\_text” you can press
f"lct"new\_valuem and ` are useful for marking locations to remember and moving large chunks of code.
# using find and chmod together in Unix
In Unix, if you need to clear up a set of subdirectories to see what permissions or ownership of everything under a given directory, these commands work for me on Solaris. There are differences because you don’t want to give execute permissions to files. And these commands assume that none of the files need to be executable.
## Directories
This command finds and lists owner, group and permisions for all directories beneath the current directory.
`find . -type d -exec ls -algd {} \;`
This command changes the permissions of all of them. Obviously, only use 775 if those are the permissions you want to give.
`find . -type d -exec chmod 775 {} \;`
## Files
This command finds and lists owner, group and permisions for all files beneath the current directory.
`find . -type f -exec ls -alg {} \;`
This command changes the permissions of all of them. Obviously, only use 664 if those are the permissions you want to give.
`find . -type f -exec chmod 664 {} \;`
## Alternative Syntax
If you only need to change permissions within a single directory and not all subdirectories these commands will work as well:
This command will change the permissions of all files in the current directory to 664
`chmod 664 *`
Immediately followed by this command:
`chmod 775 */`
which will change the permissions of all directories to 775
# finding words in binary files
In Unix the strings -a command will output all the text strings in a binary file.
Solaris man page for strings says: “The strings utility looks for ASCII strings in a binary file. A string is any sequence of 4 or more printing characters ending with a newline or a null character.”
This was extremely helpful just now while trying to debug a program where we didn’t have the source code. In this case it let us find all references to spss.
`strings -a subsda3 | grep -i spss`
Apple OS/X also seems to have the “string” command.
# grep tricks
I’ve been using *grep* (Global Regular Expression Print) to search files on Unix for years and never knew you could have it appear in color. And here are some other interesting articles about *grep*.
- [http://unstableme.blogspot.com/2009/03/highlight-match-with-color-in-grep.html](http://unstableme.blogspot.com/2009/03/highlight-match-with-color-in-grep.html)
- [http://opensourcehacker.com/2012/05/29/power-searching-using-unix-grep/](http://opensourcehacker.com/2012/05/29/power-searching-using-unix-grep/)
- [http://eriwen.com/tools/grep-is-a-beautiful-tool/](http://eriwen.com/tools/grep-is-a-beautiful-tool/)
- [http://www.itworld.com/operating-systems/364065/unix-groping-through-big-data-grep](http://www.itworld.com/operating-systems/364065/unix-groping-through-big-data-grep)
[http://regexr.com/](http://regexr.com/) is an online tool to learn, build, & test Regular Expressions.
# Location of the sudo log file
The log file contains the commands issued along with the issuers’ user names.
Distribution Location [Centos](http://www.centos.org/docs/4/4.5/Security_Guide/s3-wstation-privileges-limitroot-sudo.html) /var/log/secure
# OS X Mountain Lion
# ENVI 5.0 and OS X 10.8 installation
ENVI 5.0 requires additional packages not included in OS X 10.8 Mountain Lion.
Java – ENVI has required Java for years. The ENVI installer will prompt the user and download it as part of ENVI installation.
X11 – X11 is no longer included with Mountain Lion, but the installer will prompt the user to manually download X11 v2.7.2 or later from [http://xquartz.macosforge.org](http://xquartz.macosforge.org)
Installing X11 using the installer defaults seems to work for most users. v2.7.4 was tested and does seem to work.
Exelis compatibility notes:
[http://www.exelisvis.com/Support/HelpArticleDetail/ArticleId/5294/](http://www.exelisvis.com/Support/HelpArticleDetail/ArticleId/5294/)ENVI-IDL-object-graphics-can-fail-or-crash-ENV-IDL-on-Mac-OS-X-10-8-using-XQuartz-2-7-2.aspx
# Install Sophos on Mac OS 10.8
By default, Mac OS 10.8 only allows users to install applications from ‘verified sources’. BOL downloads are not verified; therefore, upon installation you will receive the error message: “Downloaded Program.mpkg” can’t be opened because it is from an unidentified developer.
To allow the installation:
Go to System Preferences—> Security & Privacy
Click on the lock icon in the bottom, left corner and enter the Admin password
In the General Tab, under the header “Allow applications downloaded from:”, choose Anywhere.
Source: [https://kb.wisc.edu/helpdesk/page.php?id=25443](https://kb.wisc.edu/helpdesk/page.php?id=25443)
# OS X Snow Leopard
# Mac OS X & Mac OS X Server v10.6 Security Guides
Mac OS X and Mac OS X Server Security Guides
**[http://www.apple.com/support/security/guides/](http://www.apple.com/support/security/guides/)**
**[http://www.nsa.gov/ia/guidance/security\_configuration\_guides/operating\_systems.shtml](http://www.nsa.gov/ia/guidance/security_configuration_guides/operating_systems.shtml)**
*Information in part from Tim Parker, Sr. Systems Engineer, Higher Education Division, Apple*
# Turn off Spotlight indexing in Snow Leopard
In some cases, constant indexing of files inside large compressed files (eg: Netboot images) can cause a machine to become unusable. Simply unchecking options in System Preferences >> Spotlight will not help prevent Mac OS from constantly attempting to index those files.
Instead, indexing can be turned off from the command line. From terminal, type the following command to disable indexing:
`sudo mdutil -a -i off`
To turn it back on:
`sudo launchctl load -w /System/Library/LaunchDaemons/com.apple.metadata.mds.plist@sudo mdutil -a -i on`
There are a few good free app launchers that mimic Spotlight’s functionality (eg: Alfred App).
# Cisco VPN Client for Mac OS 10.6 Snow Leopard
If you upgrade to Mac OS 10.6 Snow Leopard you might need to reinstall the BOL Cisco vpn client: [https://www.bol.ucla.edu/pub/bol/vpn/software/vpnmac-4.9.01.0180.dmg.zip](https://www.bol.ucla.edu/pub/bol/vpn/software/vpnmac-4.9.01.0180.dmg.zip)
Alternately, users can uninstall the Cisco client (via the command-line, using “sudo /usr/local/bin/vpn\_uninstall” in Terminal), and use the Snow Leopard built-in VPN client, which can be accessed from System Preferences→Network, and also features a convenient VPN control in the menu bar.
More configuration Details:
VPN type: IPsec
Server: vpn.ucla.edu
Group Name: UCLAIPSEC
Shared Secret: R2d3gg!#5
# Ricoh printer/copier setup for older models not supported in OS X 10.6
There is (as of this writing) a large user base of older model Ricoh MFPs (copier/scanner/fax) installed that do not have an OS X 10.6 driver from Ricoh. This includes the Ricoh Aficio MP 8000.
The researched solution is to use the open-source pxlmono driver setup (Linux openprinting/Apple CUPS). Many additional workarounds exist (e.g. use the newer model drivers for an older MFP), but there are some issues— for many, *UserCode* support is required to print, which is missing.
For these cases:
Step 1:
Install pxlmono drivers (currently pxlmono 1.9, Foomatic-RIP 4.06, Ghostscript 8.71) from here: [http://www.linuxfoundation.org/collaborate/workgroups/openprinting/macosx/pxlmono](http://www.linuxfoundation.org/collaborate/workgroups/openprinting/macosx/pxlmono)
Step 2:
From the same link as above, scroll down to your printer model, click on the link and go to that printer page. Then click on “view PPD” to identify the printer PPD file name to verify functionality you need. (this step may not be necessary)
Step 3 (thanks to August from Ricoh for figuring this out):
Go to
*/Library/Printers/PPDs/Contents/Resources/en.lproj*
Find the *ppd.gz* file that corresponds to your printer. Extract it to just a *.ppd* file.
Step 4:
Edit the PPD file to change the user code from the generic predefined 1001, 1002, or 1003 to your actual user codes.
(per "Hard code Usercode in the driver PPD file, chose to edit it manually; instructions:
[http://www.linuxfoundation.org/collaborate/workgroups/openprinting/database/ricohfaq#Ricoh\_FAQ](http://www.linuxfoundation.org/collaborate/workgroups/openprinting/database/ricohfaq#Ricoh_FAQ)
)
Save the changes. It may be useful to repack the extracted PPD file again but it is not necessary— it is somewhat more clear if you do so.
Step 5:
via System Preferences, add the printer as normal. Make sure to select the correct driver— you may see it twice since you have now the .ppd version and the .ppd.gz version— guess between the two (aka try both if needed), but one of them was correct. If you have repacked the PPD file into ppd.gz and removed the uncompressed version then this potential complication is removed.
Print a test page— e.g. in Microsoft Word 2011, go to Print, under Standard Presets, go to Printer Features, then Feature Sets: Job Log: and pick the correct user code you have inputted.
If the correct user codes do not preset themselves as choices you may need to reboot the machine, reselect the printer driver, or both. It did not work the first two times but the third time it took.
(Suspect the OS was caching the printer driver, hence why no changes were seen to the UserCode).
# OS X Lion
# How to Reset Password in Lion
See [http://www.macyourself.com/2011/08/20/how-to-reset-password-for-mac-os-x-10-7-lion/](http://www.macyourself.com/2011/08/20/how-to-reset-password-for-mac-os-x-10-7-lion/)
# Disable Mac OS X Lion Resume
Disable Mac OS X Lion Resume & App Window Restore Completely
- [http://osxdaily.com/2011/07/18/disable-mac-os-x-lion-resume-window-restore/](http://osxdaily.com/2011/07/18/disable-mac-os-x-lion-resume-window-restore/)
\_
Disable “Reopen Windows When Logging Back In” in Mac OS X Lion Completely
- [http://osxdaily.com/2011/08/25/disable-reopen-windows-when-logging-back-in-in-mac-os-x-lion-completely/](http://osxdaily.com/2011/08/25/disable-reopen-windows-when-logging-back-in-in-mac-os-x-lion-completely/)
# Disable Mac OS X Lion 10.7 Startup Chime / Sound
Write a couple of Mute/Unmute shell scripts as outlined below, add them to the login and logout hooks.
[Mute Startup Sound in OS X Lion](http://my.opera.com/mereh/blog/2011/07/30/apple-osx-mute-startup-sound-chime-in-osx-10-7-lion-and-others)
The files *and* the parent directories **must** have the following permissions:
`-rwxr-xr-xowner: rootgroup: wheel`
# OS X El Capitan
# OS X 10.11 El Capitan – Learning Resources
For those seeking more information on OS X 10.11 El Capitan, Lynda.com has:
- **Mac OS X El Capitan New Features**, [http://www.lynda.com/Business-Computer-Skills-Mac-tutorials/Mac-OS-X-El-Capitan-New-Features/417648-2.html](http://www.lynda.com/Business-Computer-Skills-Mac-tutorials/Mac-OS-X-El-Capitan-New-Features/417648-2.html)
- 1h 8m; This is the quick intro module
- **Mac OS X El Capitan Essential Training**, [http://www.lynda.com/Mac-OS-X-tutorials/Mac-OS-X-El-Capitan-Essential-Training/417649-2.html](http://www.lynda.com/Mac-OS-X-tutorials/Mac-OS-X-El-Capitan-Essential-Training/417649-2.html)
- 8h 21m; This is the longer, more complete dive into the features
- Has exercise files, which may enhance utility of the module
Aside from Lynda.com, there is—
- **OS X 10.11 El Capitan: The *Ars Technica* Review**
- [http://arstechnica.com/apple/2015/09/os-x-10-11-el-capitan-the-ars-technica-review/](http://arstechnica.com/apple/2015/09/os-x-10-11-el-capitan-the-ars-technica-review/)
- Article is 13 pages long
- Also, [How to make your own bootable OS X 10.11 El Capitan USB install drive](http://arstechnica.com/apple/2015/09/how-to-make-your-own-bootable-os-x-10-11-el-capitan-usb-install-drive/)
- Not yet seeing El Capitan material on **Safari ProQuest**, [http://proquest.safaribooksonline.com/](http://proquest.safaribooksonline.com/)
- There are *Missing Manual*/etc titles for Mavericks and Yosemite available
General note: Feel free to skip through Lynda.com modules for topics of interest on whatever viewing device works for you (Phone, Tablet, iOS, Android, desktop computer, etc). Transcript option can be heady to quickly skim a module for tidbits of particular interest.
# iCal Slow after El Capitan 10.11 Upgrade
After upgrading to El Capitan, iCal was extremely slow, with lots of spinning beach balls and long wait times each time I was trying to edit a calendar entry. Checking in the Apple forums revealed that others were having similar issues, along with the occasional iCal crash.
The solution that worked here:
1\. Close Calendar.
2\. Finder > Go (while holding down option key) > Library > Preferences
3\. Find com.apple.iCal.plist and drag it to the desktop.
4\. Reopen Calendar.
No more beach balls!
# How to Change your Domain Password on OS X El Capitan
This document provides a step-by-step set of instructions on how to change your expired domain password on a computer running OS X El Capitan. This password is used to log into departmental Windows computers and resources.
*Your new password must meet password complexity standards as defined by your department.*
Upon logging on to your computer, you receive “Reset Password” dialog box. You are receiving this message because your domain password has expired. You must change the password before you can use your computer, you will be prompted to enter:
- The “New password” you want to set for your account (following IT’s standards for “Choosing a Good Password”)
- Retype your “New password” in the "Verify password” field
- You do not need to enter a password hint
- Then click “Reset Password” to apply the changes you have just made to your account.
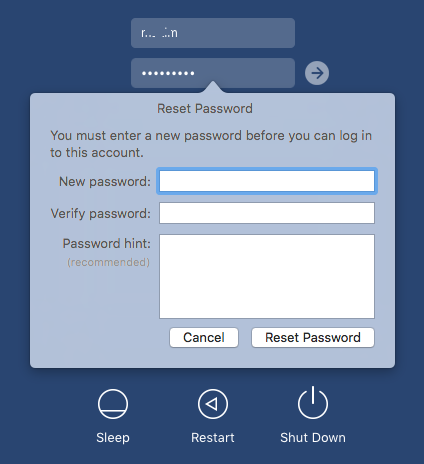
You will now be prompted to to update the OS X Keychain. Click “Update Keychain Password”.
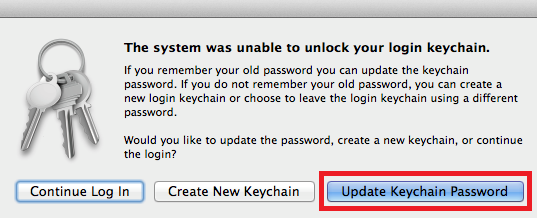
When prompted, enter your **previous** password.
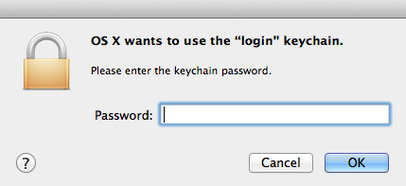
Click “OK”. Your domain password has now been changed and your OS X Keychain has been updated.
**Common Errors**:
- In order for the password change to be successful, you must ensure that what you are typing in the “New password” field matches your entry in the “Confirm password” field. If these entries do not match, you will not be able to click “Reset Password”.
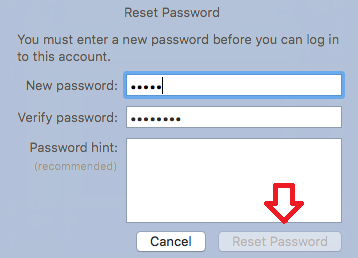
- Your new password MUST meet password standards. If your password does not meet minimum security standards, you will see the error below and your new password will not be accepted.
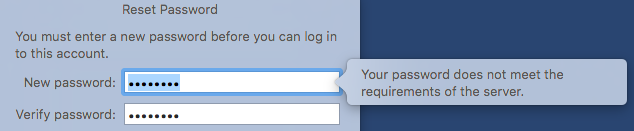
# Windows Server
# Windows Server 2008 R2 Articles and White Papers
Microsoft’s Index of Articles and White Papers for **Windows Server 2008 R2**. Has discourse on:
1. General Overview
2. File and Storage Solutions
3. Management and Power Efficiency
4. Virtualization with Hyper-V
5. Remote Desktop Services
6. Web Application Platform
7. Better Together with Windows 7
8. High Availability
9. Newsgroups and Forums
**[http://www.microsoft.com/windowsserver2008/en/us/white-papers.aspx](http://www.microsoft.com/windowsserver2008/en/us/white-papers.aspx)**
# Windows Server 2012 TechNet Reference PDF
**Windows Server 2012 R2 and Windows Server 2012 TechNet Library documentation as a PDF**
*(Quoting:)* " This download is an Adobe® PDF of the entire contents of the Windows Server 2012 R2 and Windows Server 2012 section of the Microsoft TechNet Library, for the convenience of Windows Server users who have limited Internet access, or require a portable version of the Windows Server 2012 R2 and Windows Server 2012 documentation. The PDF is 8,709 pages in length. Highlights of the PDF include the following.
- What’s New in Windows Server 2012 R2
- What’s New in Windows Server 2012
- Technical Scenarios
- Install and Deploy Windows Server
- Migrate Roles and Features to Windows Server
- Secure Windows Server
- Manage Privacy in Windows Server
- Support and Troubleshoot Windows Server
- Server Roles and Technologies
- Management and Tools for Windows Server "
- **[http://www.microsoft.com/en-au/download/details.aspx?id=41182](http://www.microsoft.com/en-au/download/details.aspx?id=41182)**
# How do I activate Windows Server?
Microsoft Windows Server must be activated against a KMS (Key Management Server) or with a MAK (Microsoft Activation Key).
In general, KMS will be the best method by which to activate Windows Server products on a server that is regularly connected to the campus network. Based upon feedback from the campus, in an effort to avoid any unnecessary duplication of effort and resources, a campus-wide KMS for Windows Servers has been established. Every campus department has the option to use this KMS to activate Windows Server on all servers. For more information on the campus-wide KMS, please go to [www.softwarecentral.ucla.edu](http://www.softwarecentral.ucla.edu).
# Windows Server Core Management
“Server Core is a minimal server installation option for computers running on the Windows Server 2008 operating system or later. Server Core provides a low-maintenance server environment with limited functionality.” – this is basically a version of Windows server that is gutted of the non-essential services/functions of the OS to provide a cleaner, more efficient version of the OS.
Management of this version of the OS can be challenging, that’s where Core Configurator comes into play: [http://coreconfig.codeplex.com/](http://coreconfig.codeplex.com/)
This small application allows for GUI management of the OS to get Core up and running quickly.
# Basic Troubleshooting Tips for Personal Laptops and Campus Internet Connections
This article is to give you a general (and basic) guide of how to troubleshoot your laptops when you are trying to connect to the internet on campus. This is assuming your network card works and is already installed. This guide may be useful in most cases, however it surely doesn’t cover all the problems and troubleshooting things that you can do.
\*These are the settings you want on your computer for the TCP/IP settings: “Obtain IP address automatically”, “Obtain IP address from DNS Server”, and “Use DHCP server to obtain IP address”
BASIC TROUBLE SHOOTING STEPS:
1\. Make sure you are using the right cable! Phone cables look the same as ethernet cables, but the tips have fewer pins. If in doubt, go to the UCLA Store (or another electronics store) and ask a store clerk to show and compare a phone cable to an ethernet cable for you.
2\. Check the IP address. There are different ways to do it for win98, ME, XP, and 2k:
For WIN 98 (and maybe WIN ME), go to “Start→Run” and type “winipcfg”. There’ll be a drop down menu that might have “ppp adapter” selected. Click on that and try to select another adapter that looks more like the ethernet card, for example “3COM Nic”, “Intel Ethernet Card”, or “10/100mpbs NIC” etc.
For WIN XP and WIN 2K, go to “Start→Programs→Accessories” and click on “Command prompt”. Type in “ipconfig”
Look at the displayed IP address. If it starts with 164.67.. then that’s a good sign. It’s connected to the UCLA network and reached the DHCP server. If it’s not 164.67, that means there is something wrong with the network card/settings or the cable. If it starts with 192.168, then most likely you had set up your own ip address, and you’ll have to change it. (View step 3.)
If the IP address is 164.67, then try opening up the browser again. If it doesn’t work, check internet explorer’s “Tools—>Internet Options” and click on the “Connections” tab. Go to the LAN settings button at the bottom and click on it. Make sure no proxy server is set, and if it is, check off the box that says “automatically detect proxy settings.”
3\. Check their TCP/IP settings (this includes ip address settings, dhcp server settings, dns server settings, etc.)
For WIN 98 (and maybe WIN ME), go to the control panel, go to the network settings. In the window, there may be multiple TCP/IP listings. Choose the one that looks most like the network card/Ethernet card. For example, again, “TCP/IP 3Com Ethernet card” or “TCP/IP 10/100 mbps NIC.” Click on that and then click on the “Properties” button. Under IP address, make sure it’s set to “Obtain IP address automatically.” Click on WINS resolution and at the bottom, make sure it’s set to “Use DHCP for Wins Resolution.” On the DNS Configuration tab, make sure it’s set to “Disable DNS.” IF YOU NEED TO CHANGE THE INFORMATION, WRITE DOWN THE PREVIOUS DNS SERVER/IP ADDRESS ETC.! Just in case you have to change it again or that wasn’t the cause of the connection problem.
For WIN XP and WIN 2K, getting to the TCP/IP settings is a little different. Go to the control panel, go to “network and dialup settings.” There should be one or more icons labeled “Local Area Connection” or something of the like. Right click on the icon and select “properties” from the menu. Going from memory, I think it should bring you to a window where you can see whether they set their IP address or not. Make sure it’s not set to your own IP address and that it’s actually getting the IP address automatically. Now click on “Advanced” and make sure it’s using the DHCP server for the IP address. Usually XP and 2K already have these settings correct by default (but’s that’s not always the case, so its better to check).
4\. If you are in XP and you have a network connection, but the Cisco Systems prompt doesn’t come up, go to Local Area Network, click on the “authentication” tab, and disable “enable network access.” This box gives you the option of verifying with a Smart Card or some other things. Unchecking this box might work.
5\. At this point, close all browsers and open them up again. Hopefully it works, because this is the end of the basic guide for how to troubleshoot your own laptop.
Otherwise, contact someone else who may be more familiar with your network settings (such as a electronics/software repair technicians).
# What are some common processes in Windows Operating System?
FILENAME: Explorer.exe.
PROGRAM NAME: Windows Explorer.
DESCRIPTION: Microsoft’s Windows shell.
FILENAME: Iexplore.exe.
PROGRAM NAME: Microsoft Internet Explorer.
DESCRIPTION: Microsoft’s Web browser.
FILENAME: Lsass.exe.
PROGRAM NAME: Local Security Authentication Server, Windows NT/2000/XP.
DESCRIPTION: Validates passwords when users log on.
FILENAME: Msimn.exe.
PROGRAM NAME: Microsoft Outlook Express.
DESCRIPTION: Microsoft’s mail client.
FILENAME: Msmsgs.exe.
PROGRAM NAME: MSN and Windows Messenger.
DESCRIPTION: Microsoft’s IM client.
FILENAME: Ndisuio.sys.
PROGRAM NAME: NDIS User I/O.
DESCRIPTION: Internal Windows driver; performs internal communications tasks within Windows.
FILENAME: Rundll32.exe.
PROGRAM NAME: Run DLL as a program.
DESCRIPTION: Runs code from a dynamic link library (for example, a Control Panel applet) as if it were a complete program.
FILENAME: Services.exe.
PROGRAM NAME: Windows NT/2000 services.
DESCRIPTION: Performs system logging, tracks resources, sends messages and alerts, manages PnP devices, handles Windows networking.
FILENAME: Setup\_wm.exe.
PROGRAM NAME: Windows Media Player Setup.
DESCRIPTION: Occasionally tries to check with Microsoft for updates.
FILENAME: Svchost.exe.
PROGRAM NAME: Generic Host Process for Win32 services (Windows 2000).
DESCRIPTION: This program is similar to the Unix inetd.exe
FILENAME: Userinit.exe.
PROGRAM NAME: Initiate user environment.
DESCRIPTION: This program sets up a user’s computing environment immediately after log-on. It starts the shell, establishes network connections, and handles other similar logistics.
FILENAME: Winlogon.exe.
PROGRAM NAME: Windows log-on utility.
DESCRIPTION: Accepts user passwords.
FILENAME: Wmplayer.exe.
PROGRAM NAME: Windows Media Player.
DESCRIPTION: Microsoft’s media player. May be activated by Web pages or other software and can slow the system dramatically.
# How can I type foreign language characters?
## Mac OS X
Courtesy of Indiana University’s Knowledgebase, here are instructions for typing foreign language characters in Mac OS X. This includes various kinds of accents, the tilde and upside down question mark.
- [http://kb.iu.edu/data/anhf.html](http://kb.iu.edu/data/anhf.html)
- [http://french.about.com/library/bl\_faq\_accents-mac.htm](http://french.about.com/library/bl_faq_accents-mac.htm)
- [How to type Degree Temperature Symbol in Mac OS X](http://osxdaily.com/2009/12/12/how-to-type-degree-temperature-symbol-in-mac-os-x/)
## Windows
There are various ways to type foreign language characters in Windows. Switching to the international keyboard layout helps with typing accented characters quickly:
- [http://french.about.com/library/bl\_faq\_accents.htm](http://french.about.com/library/bl_faq_accents.htm)
# How to Create a New PDF Document
These are the basic ways that you can do this:
The Easiest Way (on most applications)
1)Go to File → Print and Select the Adobe PDF printer.
2)Select a place to save to drive(C:\\, A:\\, D:\\, etc.)
Another Easy Way
1)Open some program (Word, Powerpoint, etc.) and create a document.
2)When you are done with the document, go to the top bar (right side) and look for a red and white icon that looks like a sheet with a little fold on the top right corner and two columns of text. Click on that icon and wait a few seconds.
The Somewhat Harder Way
1\) Open some program (Word, Powerpoint, etc.) and create a document.
2)When you are done with the document, go to the top bar (right side) and look for “Adobe PDF”. Click on that to get a menu and then click on “Convert to PDF”. Type in the name for the file desired. Make sure the save in location is workspace because it seems to default to wherever the word/powerpoint file was saved. Then click save. It takes a few seconds and you are done.
The Long and Complicated Way: creating a PDF file from a .prn file, using Acrobat Distiller
1)Open some program (Word, Powerpoint, etc.) and create your document.
2)Select print from within that program, but select the “Print to File” checkbox. When you then press “Print” it will ask you where you want to save the .prn file. Chose a file name and save it to any prefered drive. One thing to note, I have received an error before about fonts. The error tells you what to do, just follow what it says. Generally something to do with print properties.
3)Open Acrobat Distiller (Start→ Programs→ Graphics and Web Programs→ Distiller 5.0). Wait a minute for it to build it’s font table.
4)Select File→ Open. Change to “All Files” and the drive you choose. Select your .prn file and click “OK”.
5)Immediately, it will ask you where you want to save your .pdf document. Choose your drive. Click “OK”.
6\) When finished, close Distiller and open up your .pdf to make sure it looks correct.
# How do I use apt-get to install some "testing" packages into a Debian "stable" system?
If you’ve found yourself wanting to run a Debian stable system but you have a burning need to use a particular testing package, then this is for you. (This might be the case if you want to run PHP5 or PostgreSQL 8.1 on Debian Sarge.)
Some notes:
- Don’t try this unless you already understand the differences between the stable, testing, and unstable distributions of Debian — No, seriously! Don’t even think about trying this if you don’t have some clue about what you’re getting yourself into
- The following works for Debian Sarge
- You can change the repository servers to your favorite ones… I just picked an arbitrary one as an example
Edit your apt sources list and add sources for testing (and unstable also if you’re feeling adventurous):
Edit this file:
/etc/apt/sources.list:
```
# these entries were in the file already:deb http://mirrors.kernel.org/debian/ stable main non-free contribdeb-src http://mirrors.kernel.org/debian/ stable main non-free contribdeb http://security.debian.org/ stable/updates main non-free contrib# add these entries for testing:deb http://mirrors.kernel.org/debian/ testing main non-free contribdeb-src http://mirrors.kernel.org/debian/ testing main non-free contrib# add these entries for unstable:deb http://mirrors.kernel.org/debian/ unstable main non-free contribdeb-src http://mirrors.kernel.org/debian/ unstable main non-free contrib
```
The next step is to make sure that your system remains a “stable” system by default and will only pick up “testing” packages when you explicitly say so. You’ll need to create a preferences file for apt:
Create this file:
/etc/apt/preferences:
```
Package: *Pin: release a=stablePin-Priority: 700Package: *Pin: release a=testingPin-Priority: 650Package: *Pin: release a=unstablePin-Priority: 600
```
A higher number means that the distribution will be chosen before a distribution with a lower number.
This is what you do to force a testing package (such as PostgreSQL 8.1) to be installed:
First update your package listings:
```
apt-get update
```
Now install some bleeding-edge package:
```
apt-get -t testing install postgresql-8.1
```
**IMPORTANT**: Pay attention to what apt tells you after you enter this command! You will most likely need to install/upgrade a number of dependencies to get a testing package to install. Sometimes you will be upgrading shared libraries that are also used by other stable packages. Think about what you’re doing and make sure you can live with these shared libraries being switched to testing. If the number of upgrades required fills up an entire page… you might want to reconsider what you’re doing…
# Sharing a Printer from XP Box to MacOSX Box
On the WinXP Box:
Add the TCP/IP print server service
Log in with Administrative privileges.
Click Start → Settings → Control Panel.
Double-click Add-remove Programs.
Click the Add-Remove Windows Components side button.
Open the Other Network File and Printer Services section.
Put a checkmark in Print Services for Unix.
Click OK; click Next. (The Computer will probably ask for the WinXP install disk, go ahead and put it in and the install will run automatically.)
Click Finish.
Close the Add-remove programs window.
To have the service start automatically (as a daemon):
Click Start → Settings → Control Panel.
Double-click Administrative Tools.
Double-click Services.
Double-click TCP/IP print Server.
Change the “Startup Type” to Automatic.
Click OK and close the windows that are open.
To share the printer for TCP/IP printing:
Click Start → Settings → Printers.
Right-click the print you want to share and select Sharing.
Click the radio button for Share as and fill in the share name you want to print to.
=========
On your Mac:
Launch the Print Center.
Click the “Add Printer” button.
Change “Appletalk” to “IP Printing”
Enter the WinXP Computer’s IP address in the Address box.
Uncheck the default queue radio button.
Enter the name of the printer share you defined on the XP machine.
Select your printer model (Install Gimp-Print if you don’t see a ppd for your printer, restart print center and try again).
Print away!
And… it’ll ask for a username and password. Use the local account the user has on the PC.
# Simple Way to Lock Your Computer
Simple way to lock a Windows computer
You can create a desktop shortcut that will lock your computer when you double-click it:
1. Right-click the desktop and select New, then Shortcut. This will open the Create Shortcut Wizard.2. For the location of the item, type the following:windir\\System32\\rundll32.exe user32.dll,LockWorkStation
3. Click Next.4. Type an appropriate name for this shortcut and click Finish.You will now have a shortcut on your desktop that will lock your computer when you double-click it.
---
Another option is to use the keyboard combination: Winkey-L
If your keyboard does not have Windows keys, Ctrl-Alt-Del and then Enter (or space) also works for the Windows NT family (NT, 2000, XP, 2003).
# What is a daemon?
In UNIX, a Daemon stands for Disk and Execution Monitor. A daemon is a long-running background process that answers requests for services. The term originated with Unix, but most operating systems use daemons in some form or another. In Windows NT, 2000, and XP, for example, daemons are called “services”. In Unix, the names of daemons conventionally end in “d”. Some examples include inetd, httpd, nfsd, sshd, named, and lpd.
# How do I create a shortcut in Windows?
In Windows, a shortcut is an icon used to represent a document, folder, or program file. You can open a file or launch an application by clicking the icon. Shortcuts are particularly useful because you can put them on your desktop or in the Start menu without having to make a copy of the actual file itself. This saves space by allowing you to keep a single copy of a large program file, while placing one or more shortcuts to the file wherever they are convenient.
To create a shortcut:
1. Right-click the location where you want the new shortcut to appear.
2. From the menu that appears, select New and then Shortcut.
Enter the path of the file, folder, or application for which you want to make a shortcut, or click the Browse… button to locate it.
3. Click Next, then Finish.
4. If you are prompted to select an icon, pick one from the choices displayed in the window, and then click Finish.
# What is the IP Address of my computer?
For Windows 2000/XP/2003
1. Click on the Start button
2. Select Run
3. Type “cmd” or “command”
4. Type “ipconfig”
The system’s IP Address, Subnet Mask, and Default Gateway should be on display
Type “exit” once you have reviewed the information.
• • •
Typing “ipconfig /all” gives details for all network connections, active or not.
• • •
Or go to [http://www.whatismyip.com](http://www.whatismyip.com) to find out what IP address other servers think you are.
# What is SAFE MODE in Windows?
Safe Mode is a special diagnostic version of Windows that bypasses some Windows startup files. If you have a problem with your hardware configuration or your computer’s display drivers that prevents Windows from loading normally, you may be able to resolve the problem by booting into Safe Mode and changing the relevant settings.
# My display is upside-down (turned 90 degrees to right or left).
Some integrated Intel graphic cards (common on Dell Optiplexes) allow you to flip your display 180 degrees with a key stroke. Ctrl-Alt-UpArrow will put you back in the normal upright mode.
# "decompressor are needed to see this picture"
The “… decompressor are needed to see this picture” problem often comes up for us when Mac created PowerPoint files are brought onto our PC based presentation setup.
A “quick and dirty” solution if you find yourself in this situation is to get the presentation back onto a mac. Copy out all affected pictures, paste them into “preview” ( File | new from clipboard), and export (or “save as”) JPEGs. Then put all your new JPEGS back into your presentation using the menu’s “insert picture” command. \[the same process is even better if done in Photoship (if you have it at hand)\]
To avoid this problem happening, when creating a PPT slideshow on a Mac use “insert picture” to place all your images and DO NOT use copy and paste.
Other tips that are said to help avoid this problem include:
-compressing pictures in a non-quicktime based app (e.g. photoshop).
-Allowing PowerPoint to compress or edit every picture (e.g. do a contrast adjustment to each pic in PP on the mac).
-use pictures converted into pdf files or png files rather than jpegs.
-avoid using tiffs and picts
# My hard disk crashed, What should I do?
Contact your local support personnel. A technician can remove your hard disk and run various diagnostics on the drive. If the problem is not too severe, data can be transferred to another hard drive or networked drive while the defective hard disk is being replaced. However, severe physical damage to a hard disk will require a professional data recovery service. This is a very expensive option which can cost hundreds to thousands of dollars. A company that offers professional data recovery service is [ONTRACK](http://www.ontrack.com)
Also:
- Data Savers: [http://www.datasaversllc.com/](http://www.datasaversllc.com/)
- Drive Savers: [http://www.drivesaversdatarecovery.com/](http://www.drivesaversdatarecovery.com/)
- Reference UCLA’s Program ID#: DS83141
- DriveSavers offers UCLA staff, faculty and students the following benefits:
- Automatic University discounts up to 27%
- Free Shipping to and from DriveSavers, Inc. via Federal Express
- Free Evaluation Service on Economy Service single drives recoveries
- No Data-No Charge Policy for our Economy and Standard Service single drive recoveries
- Ability to recovery encrypted data (i.e., PGP encrypted)
- Business Associate Agreement (BAA) exists with UCLA Medical Center
- MDS Data Recovery Service: [http://www.mdsdiskservice.com/](http://www.mdsdiskservice.com/)
- Lazarus Data Recovery [http://www.lazarus.com/](http://www.lazarus.com/)
- ACS Data Recovery [http://www.acsdata.com/](http://www.acsdata.com/)
# Printing to Window's Shared Printers from OSX (across workgoup or domain)
Took a while for me to get this process down, so hopefully the below saves you some time.
1 – Set up a printer in “Printer Setup Utility” … it probably wont work but do it anyway (there must be a printer set-up or CUPS won’t be switched on).
2 – In “directory access” (in utilities folder) configure SMB/CIFS to use your domain or workgroup. Also point it directly to your WINS server (by IP address) if at all possible.
3 – Open a web browser and navigate to CUPS admin interface:
[http://localhost:631/printers](http://localhost:631/printers)
“Modify” the printer you just created.
Click through and leave everything as it is except the Device URI field – here enter address of printer in following format:
smb://username:password@domain\_name/machine\_name/shared\_printer\_name
\[for this last step I reccomend setting up a very limited access account just for such cross platform printing purposes — on a workgroup or somewhere where username isn’t important just put in some dummy info (but put something in)\]
# Double clicking on a drive letter opens a search screen
Here’s an interesting problem.
When double clicking on a drive letter (such as c:), instead of showing the content inside the drive; Windows opens up a search screen.
The solution is to open a command prompt screen and type in: regsvr32 /i shell32.dll
Before this problem occured. I ran Microsoft Windows Live Safety Center [http://safety.live.com/site/en-US/default.htm](http://safety.live.com/site/en-US/default.htm)
Note: WLSC is Beta so be careful.
# Unable to run windows update or MS Office update
If you are unable to run Windows Update or MS Office update (e.g: installation failed). A quick check that can save you time from searching around is to right click on my computer, select manage, expand services and applications, click on services.
Make sure these services have started:
\- Background intelligent transfer service.
\- Office source engine.
# What do I do if I get an "Unmountable Boot Volume" Error during windows startup?
Cause:
1. This issue can be caused by a corrupt boot.ini file.2. This issue can also be caused by a bad hard disk driveAnswer:
Corrupt boot.ini file
1. To resolve this issue you will need to boot into the recovery console.Windows XP users choose
- To repair a Windows XP installation using recovery console, press R.
After selecting the installation you will be prompted for the administrator password, enter the password exactly as you would in Windows. If you do not know the Windows administrator password you cannot enter the recovery mode.
Finally after you have entered the password you will be at a MS-DOS prompt similar to the MS-DOS shell window you can get through Windows. However, you will also have access to many additional commands not found in standard MS-DOS mode.
- Typing in help at the prompt will give a complete listing of all commands available through
the prompt.
2. In the recovery console type chkdsk /p to check to see if the disk drive is bad or marked asdirty.3. If after performing this check it is unable to locating anything wrong with the hard diskdrive, reboot the computer.4. If after performing this step the computer still has the same issue, reboot the computer andload back into the recovery console.5. Once back into the recovery console type chkdsk /r to locate any bad sectors and recover anydata. If errors are located during the check skip to the next section(Seriously corrupted or bad hard disk drive)6. Once completed reboot the computer to determine if this has resolve your issue.Note: If after running either of these chkdsk commands your computer is able to successfully boot into Microsoft Windows XP make sure you have all the latest updates for your computer. Also it is always a good idea to back up all your critical data.
Seriously corrupted or bad hard disk drive:
If while running the above steps you encounter errors with the hard disk drive and/or the above steps do not resolve your issue it is likely your hard disk drive is failing or has already failed. To determine if this is the case it is recommended you run the Windows XP setup, delete all partitions, recreate the partitions, format the hard disk drive, and reinstall Windows XP.If errors are encountered during the creation of the partitions or the format process it is likely that the hard disk drive is bad and it should be replaced.
# How to create dual boot Mac OS X and Windows XP on the Mac Book Pro using boot camp
For general information and requirement:
[http://www.apple.com/macosx/bootcamp/](http://www.apple.com/macosx/bootcamp/)
For boot camp installation & setup guide (PDF file):
[http://images.apple.com/macosx/bootcamp/pdf/Boot\_Camp\_Beta\_Setup\_Guide.pdf](http://images.apple.com/macosx/bootcamp/pdf/Boot_Camp_Beta_Setup_Guide.pdf)
IMPORTANT NOTE: Don’t turn on the “Auto Update” during the installation of Windows XP. Otherwise, the windows will crash after the installation, and the dual boot will not work.
# How To Backup Your Mac Intelligently
Here’s a detailed approach to backing up your Mac. Please feel free to add other solutions or approaches.
- [http://www.sitening.com/blog/2006/05/23/how-to-backup-your-mac-intelligently/](http://www.sitening.com/blog/2006/05/23/how-to-backup-your-mac-intelligently/)
Apple’s next version of the OSX operating system will include a backup system service called “Time Machine”
- [http://www.apple.com/macosx/leopard/timemachine.html](http://www.apple.com/macosx/leopard/timemachine.html)
---
Here’s some feedback from a March 2007 [UCLA OS/X Forum](http://lists.stat.ucla.edu/mailman/listinfo/osxforum) post with the question.
What backup software do you recommend?
--
Retrospect is the traditional back-up utility for Macs, but
Prosoft Engineering has a nice back-up utility, Data Backup. Their
Website is [http://www.prosofteng.com/](http://www.prosofteng.com/), and you can find their
products your local Apple store.
There are some other back-up utilities (you can search
[VersionTracker](http://www.versiontracker.com/php/qs.php?mode=basic&action=search&str=backup+software&srchArea=macosx&submit=Go) ), but I’m partial to Prosoft Engineering’s products.
Data Rescue has saved my bacon on a number of occasions (it’s a
non-destructive data recovery tool, and it’s extremely effective,
even with drives that have severely corrupted directory structures).
The quality of this product, its ease of use, and the company’s
excellent support won me over, so I’ve tried some of their other
products (specifically, Picture Rescue and Data Backup).
I haven’t had a situation where I could really test Picture Rescue
(knock on wood), but I like Data Backup and find it up to the
standard of Data Rescue. I think you’ll find a consensus on this
forum that Prosoft Engineering is one of the really good developers.
You can download software from Prosoft Engineering’s Website and demo it.
---
I know this won’t help you until June, but have you looked at the Time Machine feature of Leopard? Looks very neat. You can set it up to mirror to external drives (see [http://www.apple.com/macosx/leopard/timemachine.html](http://www.apple.com/macosx/leopard/timemachine.html) )
---
It depends on what you want from a backup: full, bootable mirror? Incremental file additions/deletions? Selected folders?
A really simple thing to do is cron rsync at a set interval. I personally use SuperDuper ([http://www.shirt-pocket.com/SuperDuper/SuperDuperDescription.html](http://www.shirt-pocket.com/SuperDuper/SuperDuperDescription.html)).
On a related note, for those wishing to synchronize files and folders between machines, you might look into Unison, developed out of Penn State ([http://www.cis.upenn.edu/~bcpierce/unison/](http://www.cis.upenn.edu/~bcpierce/unison/)). I’ve been using it for three months now with success.
---
Let’s not forget Time Machine. But that’s for another day.
Right now there are a lot of solutions out there. You can see them from [http://www.versiontracker.com/macosx/](http://www.versiontracker.com/macosx/). I can recommend Synchronize! and Retrospect although I’ve found Dantz (maker of Retrospect) slacking off with their Mac version recently. Maybe that’s changed.
I’ve found the cheapest being rsync. Below is a script I’ve used successfully.
@ #!/bin/tcsh -f@
@ # UCLA Statistics, 10/21/2005@
`set thishost = `hostname``
`set mailto = "you`your.email.domain" # change this to your email@
`set subject = "Backup completed on: $thishost"`
`set source = "/your/source/folder" # change this to your source`
`set target = "the mounted target" # change this to your mounted target`
`set dest_volume = "/Volumes/$target"`
`set mailprog = "/usr/bin/mail"`
`set syncprog = "/usr/bin/rsync"`
`# Guarantee the destination volume is mounted`
`if !( -d '$dest_volume'/ ) then`
@ /usr/sbin/diskutil mount `/usr/sbin/diskutil list | /usr/bin/grep ‘$target’ | /usr/bin/awk ‘{print $6}’`@
`endif`
`@@cat <UCLA pricing: [http://www.cdwg.com/ucla](http://www.cdwg.com/ucla)
Do agree on the comment of EMC, which acquired Dantz in late 2004, as
slacking off on Retrospect’s Mac OS versions…
---
Agree that Synchronize! is a very nice product.
Personally, my favorite is from [ProSoft… DataBackup](http://www.prosofteng.com/products/data_backup_info.php?PHPSESSID=2dd490343514911d93b6f923e7c934af)>. It is a fully featured personal backup program that includes the great features of Sync & full backup. But the closer for me was the ability to create bootable backups… that is an extremely cool feature and very handy.
---
Backuppc has really great resource management. For example, I’m
currently backing up 663.14GB of data on 110GB of actual disk space.
It does this through the normal, run of the mill hard linking method
and a pooling system that matches identical files across multiple
clients and only backs it up once.
In homogenous labs, the results are outstanding. For example, if you
did 20 full backups of 50 fresh installs of OSX….it most likely
would only use the same amount of disk space as a single full backup
of a single client would.
Pros:
- Web interface with access controls to limit functionality of admin
users vs. normal users.
- CLI interface for scripting or management over ssh.
- Capable of bare metal restoration
- Built around standard unix programs such as rsync, tar, apache,
perl, etc. (this was a big one for me, retrieving data from a
proprietary backup archive discontinued a couple of years ago = no fun)
- 100% cross platform (windows, freebsd, unix, solaris…anything)
Cons:
- It’s a disk backup system. So no tape, etc. backups
- It’s not “plug and run”, you have to design a backup policy that
suits your needs, be familiar with setting up an apache server with
mod\_perl, etc.
- If your clients aren’t using smb services and need to use dhcp,
you have to serve a static dhcp address (map the ip to the mac of the
requesting client)
- Requires familiarity with unix command line.
Besides the above points, it’s as feature full as any other package I
was looking at.
So far, I’ve been very satisfied. I haven’t gotten around to testing
the new rsync that came with the 10.4.9 patch that’s supposed to be
capable of handling extended attributes and ACL’s, but this would
make it even better. ;)
I should add, that for home backups and syncing for my various
machines (work, server account, home) I mostly use [unison](http://www.cis.upenn.edu/~bcpierce/unison/)
---
- [http://www.lacie.com/silverkeeper/](http://www.lacie.com/silverkeeper/) – freeware from Lacie
# Is there a way to create virtual desktops in Mac OS X?
Virtal desktops are a convenient way of organizing your program windows. You can “switch” desktops and choose which one to open a program inside, allowing you to group your windows by application type or anything you want. For example, make one desktop your browsing desktop, another your terminal desktop, another for email, etc. Switching desktops is as easy as clicking on a small window (called a “pager”) or pressing a keyboard shortcut. If you’ve ever used a Linux desktop manager like GNOME or KDE, it will look familiar to you.
One popular free desktop manager is called (appropriately enough) Desktop Manager. Its home page is [http://desktopmanager.berlios.de/](http://desktopmanager.berlios.de/). It features convenient shortcuts for moving windows from one desktop to another, and special switching effects like a rotating cube. It’s not only practical but also pretty! I recommend adding the program to your dock window and setting it to open at startup, so it feels more like part of Mac OS itself.
VirtueDesktops ([http://virtuedesktops.info/](http://virtuedesktops.info/)) is another free desktop manager with similar features.
# How do I open an EPS file using GIMP in Windows?
The following works for Gimp 2.2.10, Ghostscript 8.54, and Windows XP:
1. Install Gimp and Ghostscript (hopefully that is pretty straightforward)
2. Gimp will give an error message if you try to open an EPS file
3. Fix this problem by setting this environment variable:
- GS\_PROG = C:\\Program Files\\gs\\gs8.51\\bin\\gswin32c.exe
- Change that path to match your Ghostscript installation location
# PcAnywhere 11 giving you errors at the login screen?
On the Windows taskbar, click Start > Run. The Run dialog box appears.
In the Run dialog box, type regedit in the Open: box.
Click OK.
In the Registry Editor dialog box, go to the key:
HKEY\_LOCAL\_MACHINE>System>CurrentControlSet>Services>AW\_HOST
In the right pane, click Start.
On the Edit menu, click Modify.
In the Edit DWORD Value window, change “Value Data” to 1.
Click OK.
Close the Registry Editor
The pcAnywhere 11.0 host will now start correctly.
Technical Information:
This problem occurs if SysPrep modified the registry setting for AW\_HOST. To fix this problem, the DWORD value for AW\_HOST must be reset to its original value of “1.”
# Automatically skip "Compress Old Files" when doing Disk Cleanup in 2000 or XP
When running ‘Disk Cleanup’ on a Windows 2000 or XP workstations, you may have notice that it pauses for a long time when checking for files to be compressed. One of things you can to do to save time is to edit the registry file to automatically bypass this step in Disk Cleanup. This is good if you already know that you won’t be using the Compress Old Files feature and just need to clean up unnecessary files.
1\. Click on Start > Run > Regedit (or Regedt32.exe)
2\. Backup your current registry. To do this, click on File > Export and enter a name. (I suggest using the date as part of your name, as in backup-reg-mar-3-2003)
3\. After you have backed up your registry, drill down as follows:
HKey Local Machine > Software > Microsoft > Windows > Current Version > Explorer > Volume Caches > Compress Old Files
4\. In the right hand pane, double click on the REG\_SZ (default) variable to edit it
5\. A window pops up that will have a long string of characters in the Value Data field:
B50F5260-0C21-11D2-AB56-00A0C9082678
6\. Press DEL to remove (clear out) the value data field, then click OK and then exit the RegEdit program. Note: we are NOT deleting the actual key, just the value assigned to the key!
7\. That’s it, and you don’t even have to reboot!
# Advice when switching from Windows to Apple
When switching from Windows to Apple (OS/X) there are some hints and tips that can make it easier and more fun.
- [Mac 101](http://www.apple.com/support/mac101/)
- [A Guide to OS X Software for Switchers](http://flernk.blogspot.com/2006/07/guide-to-os-x-software-for-switchers.html)
- [Top 10 Things all Switchers Should Know](http://plasticbugs.com/?p=312)
- [How Does Open Source Software Stack Up on the Mac?](http://www.macdevcenter.com/pub/a/mac/2006/07/25/software-stack-for-the-mac.html)
- [Tips and Tricks Section of The Unofficial Apple Weblog](http://www.tuaw.com/category/tips-and-tricks/ "TUAW")
- [The Gems of Apple Development Tools](http://macapper.com/2007/04/16/the-gems-of-apples-development-tools/)
- [http://bestmacsoftware.org/](http://bestmacsoftware.org/)
*Does anyone else have advice or links to add?*
# Assigning permanent location for a USB drive
Windows will assign USB drives the first available drive letter when they are detected. If you have more that one device, this could cause problems, because drive letters will be different for them if they are not plugged in the same order every time. A workaround to this can be found at
[http://www.pcstats.com/articleview.cfm?articleid=1676&page=9](http://www.pcstats.com/articleview.cfm?articleid=1676&page=9)
which instead maps the USB device to a permanent folder on your hard drive.
# How do I manage Windows user accounts?
Windows gives you two different ways to manage users on a machine. For either of these methods to work, you must be logged on as an administrator.
# The simple way
If you go into the User Accounts section of the Control Panel, you’ll see a list of users. You can create, modify, or delete accounts here. It’s pretty self-explanatory, however there are some caveats to using this tool. It may not let you add a non-admin user, complaining that there must be an administrator account in place first. This causes no end of frustration to users, who can see that there **already is** an account called “Administrator”, yet Windows seems to not recognize it. “Administrator” is a built-in account, and Windows does not consider it to be a true admin account. If you want to create a regular user account, you must first create a **secondary** administrator account. Fortunately, there is a way around this restriction.
# The powerful way
Another way of altering the list of users is to go through Administrative Tools. To get there, go into Control Panel → Administrative Tools. Open up Computer Management to bring up a new window. Under System Tools on the left-hand navigation panel of this window, expand the “Local Users and Groups” item. Click on Users to see the user list. From here, you may perform the usual user actions (create/delete/edit) but with fewer restrictions and more options than the simple method above. For example, if you want to create a non-admin user and the User Accounts control panel is refusing to let you do so, follow the steps in this section, then go to Action → New User in the top menu bar.
# How do I reset a user's password in Mac OS X?
If a user forgets their password in Mac OS X, you can use the install disc to reset ANY of the user account passwords.
Boot from the install disc (or any install disc with a version higher than the installed OS X version) by having the disc in the drive and holding down C on bootup.
Choose Reset Password from the top Utilities menu.
If a user has activated the Master Password and turned on File Vault, do NOT reset a user’s password in this fashion as this will make the data unrecoverable unless you reset the account back to the original password.
# My hard disk is dying! How do I make an emergency backup?
Disaster has struck and your hard disk is in its final death throes. No problem, you made a backup last night, right? Of course you did… but a pipe burst and you lost your backup tapes?
Assuming that you’re trying to backup a UNIX or Linux system:
(if it’s Windows or Mac… let’s let someone else fill this in later)
If your disk is in the process of dying, it’s probably in a fragile state. You want to avoid writing to it, and you want to make your backup right away and quickly. Let’s assume that you have shell access to another UNIX/Linux machine with enough disk space to copy the entire drive of your dying system. If you don’t, then go knock on some doors and come back when you find one.
Here’s the plan: Log in as root and use tar to make a backup of the entire filesystem. Instead of writing the output to the disk, we’re going to pipe that output across a SSH connection to your spare host. Here’s the command: (login as root first)
```
tar -zcpf - / | ssh username@spare_host "cd backups_dir; cat > backup.tar.gz"
```
Watch the output for messages about read errors. If your disk is dying there will probably be some files that cannot be read. If you’re lucky, this won’t include any important files. Also, tar isn’t exactly the best way to backup the filesystem (due to open files and such)… but you’re in a hurry and it should get most of your important files.
# Moving from Hummingbird v8 to V9? Got some errors?
Some errors have popped up when trying to access models once you upgraded to version 9 of Bi/Query Hummingbird.
()()()()
Upgraded from 8.x to version 9.0.1, and now when trying to connect to any model getting error: Connection Error – MS ODBC SQL Driver login failed for user NULL. Not associated with a trusted SQL server connection. The Test for the SQL datasource tests fine.
Make sure this error message says “USER NULL”….
**Fix:**
The first thing I would do is run through the following steps:
Shut down all BI applications on your machine.
Open the \\Program Files\\Hummingbird\\BI\\Query\\bi.ini file in Notepad
Change the line:
ODBC.TestConnectWhenMissingInfo=True
to
ODBC.TestConnectWhenMissingInfo=False
Save and then close this file.
---
Also, another error AFTER you do this might be, after fixing the above, and you try to login you get an error of “ODBC data source name which is specified in the connection document for the data model no longer exists…”
This can often happen when a model is moved from one machine to another or if the DSN actually gets deleted.
**Fix:**
Since you have tested the ODBC connection we can safely assume that the DSN exists and works. The next step is to force the connection document for this model to use that data source name. You can do this by selecting menu Host > Connection (from within Hummingbird).
From the Connections dialog select the connection document that you are using to connect to the database.
This will likely be the default connection document which is denoted by a black dot beside its name.
Click on this one and then press the Edit… button.
You will likely get a message : "The datasource ‘’ cannot be found.
Click OK on this message.
rom the Data source dropdown field select the correct data source (QDB Production – SQL Server) and then click Save.
Tada!
# Apple OS/X Hex Editor
If you need a hex editor in OS/X to see exactly what is in a file, download this free one.
- [http://ridiculousfish.com/hexfiend/](http://ridiculousfish.com/hexfiend/)
Two other Unix commands for working with binary data are **dd** and **od**. You can read about them from their man pages:
- man dd
- man od
Taken from email by Jose Hales-Garcia to [OS/X Forum List](http://lists.stat.ucla.edu/mailman/listinfo/osxforum)
# How to not set a file/application association in OS/X?
In OS/X does anyone know how to **not** set a file/application association? I have both FileMaker and Final Cut Pro. If I export as XML from FileMaker, the OS sees it as a Final Cut Pro document and automatically opens Final Cut Pro and read the doc in Final Cut Pro.
Yes, I can use **Get Info** to change the association via “Always Open with…” but I want to set this to “None.” I’d rather XML docs (because of the variety of applications that may want to read them) have no association and let me manually choose the application I want to open the file in. Does anyone know how?
**Solution**
If you install RCDefaultApp, it offers the ability to remove all
applications associations from a particular type of file:
[http://www.rubicode.com/Software/RCDefaultApp/](http://www.rubicode.com/Software/RCDefaultApp/)
*Taken from OSXForum mailing list.*
# Windows Explorer Startup Options
A number of times the following shortcut has proven helpful to force Windows Explorer to open a specific folder and do so in “Explorer” mode (so you can see the folders on the left without having to hit the Folders button every time).
1\. create a new shortcut to a given folder using your favorite method — mine is to right-click on the folder and select Send To > Desktop.
2\. right-click on the new shortcut and select Properties.
3\. in the Target field (on the Shortcut tab) preface the current path with:
**c:\\windows\\explorer.exe /e,**
So if the folder path was “C:\\My Docs” in the Target field, it should now read:
**c:\\windows\\explorer.exe /e,“C:\\My Docs”**
\[note: you may have to change paths if you’re Windows OS is installed elsewhere. I wanted to use the SystemRoot variable but this KB doesn’t seem to allow the percent sign\]
I realize that this only saves 1 click but all those clicks can add up over time. :)
# How to enable Remote Desktop through Registry or GPO
If you have ever been remote and cannot connect to a computer/server and need to have remote desktop enabled, you can enable it via remote registry or through a GPO.
[http://www.computerperformance.co.uk/w2k3/services/terminal\_services\_remote\_desktop.htm](http://www.computerperformance.co.uk/w2k3/services/terminal_services_remote_desktop.htm)
HKEY\_LOCAL\_MACHINE\\SYSTEM\\CurrentControlSet\\Control\\Terminal Server
key to change is “fDenyTSConnections” change the value from 1 to 0.
Or you can create a custom adm file for gpo by using the following template.
Info on creating custom adm files can be found at the following link.
[http://support.microsoft.com/kb/816662/](http://support.microsoft.com/kb/816662/)
CLASS MACHINE
CATEGORY RemoteDesktop
POLICY “Enable Remote Desktop”
KEYNAME “SYSTEM\\CurrentControlSet\\Control\\Terminal Server”
EXPLAIN “Enabling this setting will allow Remote Desktop Connections to be made to the Server. Disabling this setting will prohibit Remote Desktop Connections from being made to the Server. Setting this to ‘Not Configured’ will keep the previous registry setting.”
VALUENAME “fDenyTSConnections”
VALUEON NUMERIC 0
VALUEOFF NUMERIC 1
END POLICY
END CATEGORY
# Which port does Apple's Remote Desktop use?
Apple’s Remote desktop uses PORT 3283.
# Making Windows Run Faster
There are so many things that can slow a PC — excessive software, insufficient resources (hard drive, RAM, etc), bad drivers, rogue programs (viruses, spyware, etc), or just the cumulative bloat that Windows acquires over time. I hope that this becomes a good starting point for myself and others to create a comprehensive list of tips to speed our performance without having to completely reinstall Windows.
The best tip is probably: change your PC as little as possible. This means don’t install any unnecessary software. That being said, it **can** also happen that newer versions of software have fixed known problems in older versions. This usually isn’t the case, however as most programs get slower as additional features are added in later versions. This means that you should check with the vendor to see if there are known performance issues.
## General Tips
Scan for viruses and spyware.
Uninstall unused programs.
Clear your browser cache. If you have broadband, set your cache to less than 100MB.
Defragment your hard drive.
Remove programs from the Startup folder.
Disable unnecessary programs from the System Tray.
If the above didn’t work, see if the slowness can be traced to a specific program. If so, reinstall that program.
This is a great article:
[What Kind of Maintenance Do I Need to Do on My Windows PC?](http://lifehacker.com/5815256/what-kind-of-maintenance-do-i-need-to-do-on-my-windows-pc)
Here’s an older article, specifically for XP users:
[Making Windows XP Start Faster](http://www.pcmag.com/print_article2/0,1217,a=146373,00.asp)
# Turn off Automatic Search for Network Printers
I not really want to see all the network printers on my subnet, especially the ones that do not belong to my department. Here is how to disable this “feature”:
1. Click Start, click Control Panel, click Appearance and Themes.
2. Click Folder Options to open the Folder Options dialog box.
3. Click the View tab.
4. In the Advanced Settings list, click to clear the Automatically Search for Network Folders and Printers check box.
5. Click OK.
# Microsoft Volume Activation 2.0 Notes / Q& A
I attended the MS Live Meeting (10/27/2006) regarding the new Volume Activation 2.0 which will be implemented in the new coming Windows Vista, Windows Server (LongHorn) and also in future MS products. The next version of Volume Activation 3.0 is in the work and will be released in the future.
Some terminologies:
SPP (software protection platform)
MAK (multiple activation keys)
KMS (key management services)
MAK – one time activation against MS.
1- individual act – each matchine individually connects can activates with MS
2- proxy activation – one centralized act request on behalf of multiple desktops with one connection to MS
KMS
1- activate against a customer hosted service NOT with MS
2- systems must reactivate by connecting to a corp networks at least every 6 months
Volume activation doesn’t require end-user action
if have more than 25 machines, it is better to setup kms locally. KMS activates client for 180 dyas upon each connection.
Systems silently re-connect regularly (def. 7 days) to renew activation.
RFM – reduced functionality mode. when windows not act within 30 days or significant hardware changes or tampering with OS detected.
---
Q & A (collected during the live meeting)—————-
Question: Will these slides be available for download?
Answer: Yes, it will be available next week
Question: Will this also affect Office in the future?
Answer: Yes for future versions of Office but not the immediate version of Office namely Office 2007
Question: Where will the link be posted?
Answer: We will send out an e-mail with links
Question: Does Microsoft plan to expand its Volume Activation program to include Windows Xp or other Windows products?
Answer: Future versions of Windows will leverage this platform. Currently there are no plans to retrofit Windows XP with this model
Question: Why does Microsoft send VLKs to Campus Agreement customers by email?
Answer: We are in the process of updating this process – we will no longer include VLKs in our notifications; these will only be available on MVLS.
Question: Will these deployment methods be compatible with products like Synmantec GHOST Enterprise?
Answer: Yes
Question: From what date will you be ceasing to send VLKs to Campus Agreements via email?
Answer: I’ve just been corrected… we are looking at removing these in the future, but don’t have a date yet. VLKs will continue to be available via MVLS.
Question: How many VAMT hosts for 80,000 PC’s?
Answer: If the VAMT host are able see all 80K PCs, one VAMT is sufficient. You can have as many VAMT/KMS host as necessary.
Question: Will KMS be back ported to run on Windows Server 2003?
Answer: Yes, We plan on providing Windows Server 2003 support by Q12007
Question: What ports are needed for the KMS server to open firewall?
Answer: 1688 but it is configurable
Question: How do client machines find the KMS machine on the network?
Answer: Through SRV records in the DNS or through FQDN or IPv4, IPv6 address specificed by the IT Pro in the registry
Question: Would the process of activating Vista be any different between a brand new install versus an upgrade from an existing OS?
Answer: No it will be the same
Question: Is the KMS machine required to be a dedicated server?
Answer: No it can be co-hosted with other services.
Question: Can you run multiple KMS machines for redundancy?
Answer: Yes, you can
Question: When will KMS be available and what platform does it run on?
Answer: Now on Windows Vista and Windows Longhorn. Windows Server 2003 support will be available in Q1 of 2007
Question: Are OEMS going to be able to distribute machines that are already activated?
Answer: OEM machines with Windows Vista will come pre-activated. Unless these are reimaged w/ VL media, they would not be impacted by Volume Activation 2.0.
Question: Can an organization get multiple MAKs in different sizes?
Answer: There will be one MAK per your license agreement
Question: Will this method be the same for Academic Select or will VLK’s still be available?
Answer: This key technology will be used by all of our VL programs, including Open, Select, Campus, School, etc.
Question: Can an organization use independant MAK, MAK Proxy and KMS at the same time?
Answer: Yes, we anticipate most customers will use all three combinations very often
Question: How will education customers be able to re-image OEM machines that came licensed and pre-activated?
Answer: Our VL customers have rights to re-image a machine with VL media for the identical license. In this event it would not be pre-activated, as the installation would now be managed by Volume Activation 2.0.
Question: Our univerisity system has multiple locations and we have a campus agreement. Will each location receive it’s own key or will there be a system-wide key?
Answer: We will be providing a KMS and MAK key per volume licensing enrollment. If you have a single enrollment covering system-wide, then yes, you would have a single set of keys for the full system.
Question: A little off topic—but does the Windows System Image Manager allow for the configuration of an answer file to automatically perform individual activation?
Answer: Yes, the step-by-step guide that is part of Business Desktop Deployment guide ([www.microsoft.com/desktopdeployment](http://www.microsoft.com/desktopdeployment)) has the required details
Question: If we buy a PC with Vista installed, but we use a Ghost image to deploy Vista over the OEM license, will have have to buy two licenses for that computer? (I.e., OEM plus the volume license.)
Answer: Our VL customers have reimaging rights to reinstall the identical license with VL media (i.e. can not reimage Windows XP Home with Windows XP Pro). In reinstalling the same license, there is no need to purchase again – your sole license would come from the OEM.
Question: To understand this SPP better, we’ll be required to re-activate all our computers every 30 days?
Answer: No, only the KMS activated machines require to renew their activation status at least once every 180 days by default it is 7 days but that info is configurable by the administrator
Question: If the O.S. is tamppered, do we need to buy a new key/license?
Answer: No you just need to reinstall the OS for integrity purposes and reactivate
Question: Does this activation include Student Select?
Answer: No. Student Select customers are receiving the equivalent of FPP “bits”, so there is an individual key, that allows for a single installtion.
Question: Is the kms tied to active directory machine accounts?
Answer: No
Question: If we have 2 KMS servers, can we report activity by each KMS server?
Answer: Yes
Question: We have adjunct faculty who occasionally connect through VPN, will the activation happen automatically and how long does it take?
Answer: yes, it is network connectivity sensitive and it exchanges approx 400bytes of data as such it should be quick
Question: Our faculty members often leave for Sabbatical without notifying us. How will we switch those computers (after the fact) from KMS to MAK?
Answer: The will get notification after the 180 days and they will have 30 days before they connect to KMS host to renew their status
Question: Will you make the slides from the presentation available?
Answer: yes
Question: For Students, you note a ‘retail prduct key’ for permanent activation. Does this mean media will be required?
Answer: Physical media will be the simplest solution as each student will have their own individual key. You could also image a number of student devices (under Campus/School Student Option) via the VL media but would need to be prepared to manage the activation process overtime.
Question: what kind of hardware change would result in reactivate the key?
Answer: For KMS activated machines if the hard-disk where the OS changes then it will require reactivation, in the case of MAK activation if there are significant changes such as processor, hard-drive that will trigger re-activation request
Question: In the higher ed how do we handle the students that are not on the domain?
Answer: The simplest way will be to leverage standard physical media. This would provide an individual key (good for a single install) to each student.
Question: HOw does a client know where the KMS is? (by that I don’t mean the DNS, but rather the name of the KMS server)?
Answer: It queries the DNS or determines using the FQDN or IPv4, IPv6 info specified by the administrator
Question: Will the student media contain a retail product key for products purchased under the Student Select?
Answer: Yes. The Windows Vista Business Edition Upgrade key will be good for a single installation.
Question: What happens if the MAK is stolen?
Answer: You can work with Microsoft to block the key, we will block it at your request.
Question: Will any of this affect MSDNAA licensing?
Answer: Yes. For deployment on instituation owned devices, you would need to leverage the new Volume Activation 2.0; for students, we would need to arrange for individual keys, just as is done today.
Question: If I replace a motherboard, does it use another license. If I have 100 licenses, will this new rebuild count an additional license used?
Answer: activation is not same as license
Question: Can you MAK Activate after initally doing KMS on a machine?
Answer: Yes, we provide scripts to enable you to do it.
Question: If we want to continue using campus multiple license agreement for Microsoft OS (XP or 2000, 2003) and Office 2000/2003, will we have to use Vista and purchase Vista licenses?
Answer: If you are under Campus Agreement, you will need to continue your subscription, but can elect when you wish to deploy Windows Vista. In the interim you are running the previous versions via “downgrade rights”.
Question: If a MAK is stolen, and Microsoft blocks the key, how does that effect MAK and KMS installations using the same license(s)?
Answer: If you perform any genuine validation it will indicate it is non-genuine, we will not do this without customer agreement
Question: What is the download link for this presentation?
Answer: [http://msevents.microsoft.com/](http://msevents.microsoft.com/)CUI/EventDetail.aspx?EventID=1032314520&Culture=en-US
Question: Will Vista run as a virtual machine (either Microsoft’s or VMWARE)?
Answer: Yes, it can and it can be activated as well
Question: In one of your previous answer ("No. Student Select customers are receiving the equivalent of FPP “bits”, so there is an individual key, that allows for a single installtion.") what are bits?
Answer: meaning the Vista software
Question: A faculty member has a KMS-activated computer, which he takes to Mongolia for a year with no advance notice to ITS. What happens?
Answer: After 6 months of not being able to reconnect to KMS, they will get a notice that they will go into RFM (Reduced Function Mode) in 30 days if the machine is not activated within that time. After that (~7 months), they could log in for up to an hour to reactivate or rekey the device in RFM.
Question: You mentioned use for software asset management. Is that to manage MS products only? Or can other non-MS products be managed as well?
Answer: we are providing license store and public APIs enabling other vendors to store and mange their license info
Question: Will it be possible to re-image OEM licenses on student owned machines?
Answer: This can only be done under Campus/School Student Option (not Student Select); this would imply that the activation would then need to be managed via Volume Activation 2.0
Question: Will the audio portion of the presentation also be available along with the slides?
Answer: Yes, it will be available in 24 hours here: [http://msevents.microsoft.com/](http://msevents.microsoft.com/)CUI/EventDetail.aspx?EventID=1032314520&Culture=en-US
Question: Are you going to be offering “deployment classes” for this?
Answer: it is part of the Business Desktop Deployment guideance material and training provided by many partners
Question: Will there be a class on this for us slow learners?
Answer: technical documents will be available on teh TechNet site as of next week. There will also be a link to this information on the following site: [http://www.microsoft.com/licensing/resources/vol/default.mspx](http://www.microsoft.com/licensing/resources/vol/default.mspx) also live next week. Online training will also be available on the Microsoft Partner Program web site
Question: Is there a charge for additional KMS keys?
Answer: No
Question: If activation is different from licensing, why did you answer “enabling other vendors to store and manage their license info”? Can you explain the relationship between activation and licensing?
Answer: Activation is an execution process to support licensing policy, but are not directly linked. Just as we license via a user count undere Campus Agreement, that would not match 1:1 to the number of devices covered, which would in turn need to be activated. It would be entirely reasonable to have a greater number of devices than licenses under Campus Agreement (the FTE number is a proxy measurement), and based on changes to hardware, etc. you would have a greater number of activations versus number of covered devcies.
Question: What is the process *when* the MAK is stolen? (not IF in a .edu)
Answer: you can report this and all piracy concerns via . The key can be blocked and a new key can be reissued. Please note, you will not be liable.
Question: Will All versions of Vista and Lognhorn need to be MAK’ed or KMS’ed?
Answer: All volume edition copies yes.
Question: Is the KMS client for Server 2K3 available now, and if not, when (and where)?
Answer: We are aiming for WinServer 2003 support by the end of this year.
Question: You said OEMs come preactivated—is that typically using MAK method or Key management Service?
Answer: OEM activation uses special BIOS marker that is pre-loaded by the OEMs, if you need to reload the machine with VL images then it has to be activated using MAK or KMS
Question: How does a machine locate a KMS?
Answer: using SRV record in DNS or FQDN or IP address specified by the administrator
Question: Can you email me the URL for the event and the Q&A? (I can’t cut/paste the URL from this window)
Answer: [http://msevents.microsoft.com/](http://msevents.microsoft.com/)CUI/EventDetail.aspx?EventID=1032314520&Culture=en-US
Question: Can you email me the URL for the event and the Q&A? (I can’t cut/paste the URL from this window)
Answer: [http://msevents.microsoft.com/](http://msevents.microsoft.com/)CUI/EventDetail.aspx?EventID=1032314520&Culture=en-US
Question: How will this new licensing scheme be affected or affect products such as Shared Computer Toolkits, DeepFreeze etc?
Answer: it doesn’t
Question: When there are hardware changes, when is a new key required?
Answer: to clarify. A new key would not be necessary – but reactivation may be necessary. With KMS – activations are unlimited. With MAK – this would count as another activation. As for the hardware changes – significant hardware changes would need to happen with MAK before reactivation is needed.
Question: How do we address the issue of students who have a habit of needing to reinstall Windows multiple times per year (such as computer science and engineering)? Also, in the case WGA for those of who worked with MS Enginerring to determine the the WGA error was in fact an MS error, what are we supposed to do in the future to prevent this from happening again?
Answer: we are working very hard to resolve these type of issues and ensure it doesn’t repeat.
Question: Do you have a link to the BBD guide?
Answer: it should be up next week on the technet site: [http://www.microsoft.com/technet/desktopdeployment/default.mspx](http://www.microsoft.com/technet/desktopdeployment/default.mspx) a link will be added
Question: does the KMS require any sort of authentication such as username/password or domain login or is it open to any machine that can access that port on the KMS host?
Answer: no it currently requires no additional authentication
Question: Student media currently allows for two installations so that the student is able to reinstall the software in case of a system failure. Will that be the same for Vista Student Media?
Answer: The current media actually allows an unlimited number of installations (reinstalls) on the SAME machine. It provides for installation on a single machine only (Office provides “secondary use rights” so Office could be installed on a primary and secondary machine used by the same user).
Question: Is there a Vista sysprep tool available currently so that we can start testing?
Answer: yes,
Question: There are many 3rd party license management tools. Is there any effort by MS to work with these other vendor’s products?
Answer: yes, we are working with them so that they can consume the data provided by Microsoft
Question: Home Use Media will no longer contain individual licenses? Must we then use VA 2.0 to manage our home users as well?
Answer: Work at Home (WAH) media will continue to contain individual keys.
Question: KMS sounds complicated. You have to have a server and if a machine goes out of use for a while off campus it deactivates. What is the benifit of using KMS over MAK? What is the downside of MAK that I’m not getting?
Answer: KMS provides more adminstrator control and no activation limit
Question: This is a followup. KMS clients need to ‘know’ where the KMS service is located. Is the user prompted for this info or can we add this info via script so the activation is silent?
Answer: there is no user interaction. it is determined through auto-discovery or explicity registration by the admin
Question: When is the exact release date for Vista and the new Office?
Answer: We expect to have Windows Vista and Office 2007 available to our VL customer before the end of the year (MVLS will be the first place to get access), and general availability in retail in the January timeframe.
Question: How long before the Key Management Server software will be released? Even if still in beta or prerelease.
Answer: KMS is available now, KMS on W2K3 will be available in Q1 of 2007
Question: Is the KMS server located by forrest or by domain?
Answer: It is a service running on any Vista or Longhron machine. As long as DNS info is set for cross-forrest discovery it should be able to serve all machines
Question: Were do we get keys to give to students that graduate and are entitled to a perpetual license?
Answer: We would recommend starting by issuing physical media which is individually keyed – in this instance there is no change needed at graduation. If the student devices are managed via KMS, that install can be rekeyed to a retail key (available w/ physical media).
Question: Will Office 2007 use the same activation technology as Vista or will it be activated like previous versions of Office.
Answer: Office 2007 currently doesn not use this activation technology
Question: What happens when you’ve had to activate a machine more than twice due to various failures and you reach the activation limit?
Answer: In the case of KMS there is no limit and in case of MAK you can request for revision in the limit
Question: Will the keys continue to change annually, a current frustration for us?
Answer: At this point we have moved to “re-using” enrollment numbers under Campus, so both the enrollment number and keys will continue to be available (won’t change annually).
Question: how do programs effect activation ex deep freeze?
Answer: there will be no impact
Question: Reference DeepFreeze; only concern would be 6 month reactivation DeepFreeze would have to be thawed to accomplish this.
Answer: There should be no impact on using DeepFreeze
Question: what version of Vista will .edu be getting?
Answer: Most likely Enterprise version, ultimate will be an upgrade.
Question: if you have 40 kms servers all in dns, is it a registry setting at a site that directs the workstations to the local KMS server?
Answer: no not at this moment, it is random
Question: If there’s no impact on DeepFreeze, how do systems maintain lease-life info?
Answer: we probably need to follow-up on this since we don’t know much about Deepfreeze please follow-up
Question: Will there be a web archive of the text Q&A win dow for this event?
Answer: yes
# svchost.exe - application error
You get the error: svchost.exe – application error the instruction at “0×745f2780” referenced memory at “0×00000000” the memory could not be “read”.
Click OK to terminate the program.
Click cancel to debug the program.
First Solution (Easy Fix)
1.Go 2 the start menu
2.Right click “my computer”
3.Click “properties” then the “automatic updates” tab
4.Choose “turn off automatic updates”
5.Reboot your computer
6.Go back to start menu and in all programs go to “windows update” you have to be connected to the internet.
7.Manually update windows.
8.Turn your automatic updates back on.
After the above steps are finished. Reboot and check for improvements.
If you still get the error try the second solution below:
Second Solution (Not so easy fix)
Perform these steps leaving the svchost crash dialog open.
Repair Steps:
1.Verify Windows Update and BITS Service settings:
a.Click Start→Run, type “services.msc” (without quotation marks) in the open box and click OK.
b.Double click the service “Automatic Updates”.
c.Click on the Log On tab, please ensure the option “Local System account” is selected and the option “Allow service to interact with desktop” is unchecked.
d.Check if this service has been enabled on the listed Hardware Profile. If not, please click the Enable button to enable it.
e.Click on the tab “General ”; make sure the “Startup Type” is “Automatic”. Then please click the button “Start” under “Service Status” to start the service.
f.Repeat the above steps with the other service: Background Intelligent Transfer Service (BITS)
2.Re-Register the Windows Update DLLs
<< run the Batch file “SVCHostERR.bat” – or manually perform steps in this section.
a.Click on Start and then click Run, type: cmd and click OK.
b.In the command window type “REGSVR32 WUAPI.DLL” (without quotation marks) and press Enter. When you receive the “DllRegisterServer in WUAPI.DLL succeeded” message, click OK.
c.Repeat these steps for each of the following commands:
REGSVR32 WUAUENG.DLL
REGSVR32 WUAUENG1.DLL
REGSVR32 ATL.DLL
REGSVR32 WUCLTUI.DLL
REGSVR32 WUPS.DLL
REGSVR32 WUPS2.DLL
REGSVR32 WUWEB.DLL
d.Next stop the windows update Service by typing: “net stop WuAuServ”
3.Rename the Windows Update folder:
a.Click Start, Run, type: windir and press Enter.
In the opened folder, rename the folder SoftwareDistribution to SD\_Old.
4.Restart the Windows Update Service.
a.Click Start, Run, net start WuAuServ.
5.Reboot system
6.Manually run Windows Update
If that still doesn’t work reformat and reinstall the OS!
# What is Trusted Computing?
An interesting (if you like technical) article excerpted from Amit Singh’s book, “Mac OS X Internals”, discusses trusted computing on Mac OS X (tools included)…
[http://www.osxbook.com/book/bonus/chapter10/tpm/](http://www.osxbook.com/book/bonus/chapter10/tpm/)
Also, Wikipedia has an excellent article describing TC and its the pros and cons…
[http://en.wikipedia.org/wiki/Trusted\_computing](http://en.wikipedia.org/wiki/Trusted_computing)
# What are the options for running Windows and OS X on an Intel Mac?
As of now there are two truly viable options for running Windows XP on the new Intel Mac computers. The first is to dual boot via [Boot Camp](http://www.apple.com/macosx/bootcamp/) offered by Apple, the second is a third party virtualization progam called [Parallels Desktop](http://www.parallels.com/en/products/workstation/mac/).
This [developer brief](http://mi6.ais.ucla.edu/devbriefs/dual-win-xpos-x-environment) explores the drawbacks and benefits of both as of August 2006.
# MacBook waking while lid is closed
“If you have ever had your MacBook or MacBook Pro inexplicably wake while the lid is closed, there is a good probability that Bluetooth may be the culprit. If you have Bluetooth enabled, there is a default setting ‘Allow Bluetooth devices to wake this computer’ that is checked ‘On’.
I have found that if you uncheck this box, unwarranted waking from sleep stops."
Tim Parker
Sr. Systems Engineer
Higher Education Division, Apple
(Quoted from email with permission.)
# How do I clear a stuck print job after trying to cancel it from system tray?
Try this:
1. Click Start → Run
2. Type “CMD”, then click OK
3. Type “net stop spooler” and press enter to turn off the service
4. Wait a couple of seconds and check the print queue from the system tray, hopefully the stuck print job has disappeared
5. Type “net start spooler” and press enter to turn on the service again
6. Type “exit”
Good luck!
Updated reference:
[http://www.howtogeek.com/100358/how-to-cancel-or-delete-a-stuck-print-job-in-the-windows-print-queue/](http://www.howtogeek.com/100358/how-to-cancel-or-delete-a-stuck-print-job-in-the-windows-print-queue/)
If you find that print jobs remain stuck, you may need to terminate the *splwow64* for 32-bit to 64-bit printer process before you can delete the stuck print job files.
# How to install OS/X remotely
*The following was passed to me verbatim by a professor in my area.*
*I haven’t tried it yet myself.*
How to install OSX software remotely:
- [http://www.hmug.org/HowTos/RemoteInstall.html](http://www.hmug.org/HowTos/RemoteInstall.html)
To update OSX remotely:
- [http://www.hmug.org/HowTos/RemoteSysUpdate.html](http://www.hmug.org/HowTos/RemoteSysUpdate.html)
For example, how to install xcode and perl remotely on OSX:
1\. GCC
If you need to build several programs from source, you need a compiler.
On OSX, the development environment is called xcode and can be
downloaded from [http://developer.apple.com/tools/download/](http://developer.apple.com/tools/download/) — I had to
sign up for a free account first. To install the dmg remotely (see
detailed instructions at [http://www.hmug.org/HowTos/RemoteInstall.html](http://www.hmug.org/HowTos/RemoteInstall.html)),
log on to the OSX machine and issue
hdiutil mount xcode\_2.4.1\_8m1910\_6936315.dmgcd /Volumes/Xcode\\ Toolssudo installer -verbose -pkg XcodeTools.mpkg -target /cdhdiutil unmount /Volumes/X\*You now have a build environment with gcc (3.3 and 4.0 in my case).
2\. Perl
If you need a more recent verson of perl than what is included in OSX,
you can get the latest stable version, currently 5.8.8 (cf.
[http://www.perl.com/download.csp):](http://www.perl.com/download.csp):)
mkdir -p ~/src/perl (tilde comes before /src/perl)cd ~/src/perl (tilde comes before /src/perl)wget [http://www.perl.com/](http://www.perl.com/)CPAN/src/stable.tar.gztar zxvf stable.tar.gzcd perl-5.8.8./configureThis is a lengthy process — select defaults where possible, and say yes
to “Use the PerlIO abstraction layer.” I also said yes to threading, but
this may not be advisable. I accepted the default prefix, /usr/local.
Once configured,
makemake testIf it checks out (I got a syslog error, likely because OSX uses
/var/log/system.log, which I ignored), you may want to switch to root
user before you install:
sudo bashmake installNext, if you’re using the bash shell, edit /etc/profile and add
/usr/local/bin to the PATH before /usr/bin. Issue
source /etc/profileor, if you’re on the OSX machine, exit your user and log back in. Verify
that your default perl is your freshly compiled one:
which perlshould give you “/usr/local/bin/perl” and not “/usr/bin/perl”.
Incidentally, one problem with installing stuff remotely on OSX is that
the system keeps going to sleep on you; I use the wakeonlan program in
Linux to keep it awake.
# How to take screenshots in OS X
Quick answer: [http://take-a-screenshot.org/](http://take-a-screenshot.org/) (different tabs for different systems)
Use these shortcuts to take pictures of the screen in Mac OS X. Screen shots are saved as files on the desktop as Picture 1, Picture 2, etc. If you want to put the screen shot in the Clipboard, rather than create a file, hold down the Control key when you press the other keys. You can then paste the picture into a document.
- Take a picture of the whole screen: Command-Shift-3
- Take a picture of part of the screen: Command-Shift-4, then drag to select the area you want in the picture.
- To cancel, press Escape.
- Take a picture of a window, a menu, the menu bar, or the Dock: Press Command-Shift-4, then press the Space bar. Move the pointer over the area you want so that it’s highlighted, then click.
- To drag to select the area instead, press the Space bar again. To cancel, press Escape.
You can also take pictures of the screen using the Grab application (in the Utilities folder). This has the advantage that you can save the file wherever you want.
Some applications, such as DVD Player, may not let you take pictures of the screen.
*The above was borrowed and modified from the Finder’s built-in Help*
## Advanced
If you want to change the default location where the pictures are stored, or you want other options, consider the answers to this question to the [UCLA OSXForum List](http://lists.stat.ucla.edu/mailman/listinfo/osxforum)
**Question:** Is there any way to configure the OS/X screencapture utility to save the images in a specified directory? Ideally, it could ask me each time where to save it, but it would still be very useful to just always save somewhere besides my desktop.
I vaguely remember seeing something about all OS/X apps having config files stored somewhere and that they could be edited for really specific preferences.
I did try going to the Keyboard Shortcuts Preference setting but that didn’t show me the command that was being executed.
**Answers:**
- [Screenshot Settings](http://www.macworld.com/weblogs/macgems/2005/09/tigerscreenshots/) by Dan Frakes – article that includes several products for customizing where (and
in what format) screenshots are saved
- Article author’s personal favorite [Screenshots Preference Pane](http://www.ego-systems.com/Products/screenshotsprefpane.html)
- Updated link to [Screenshot Settings 1.1](http://scriptbuilders.net/files/screenshotsettings1.1.html) – mentioned in article
- There’s the Grab utility (in Utilities) which asks where to save the screenshot.
- Also, there are third party solutions… [http://digitalmedia.oreilly.com/2006/01/01/mac-os-x-screenshot-secrets.html](http://digitalmedia.oreilly.com/2006/01/01/mac-os-x-screenshot-secrets.html)
- [A script to create uniquely-named screenshots](http://www.macosxhints.com/article.php?story=20060926235209265) – read the comments for improvements to the script.
- Using Automatorr (/Applications) you can create your own AppleScript as well. When you launch Automator, select ‘System’ from the Library column, then select ‘Take a Screenshot’ and drag it to the Workflow column. There you can set all sorts of options, such as where to save it to. The other neat options are; what type of screen shot (full screen or selective), a timed setting as well.
- And yet more…. If you want to use the built-in screencapture and have it same somewhere else you can do this in the terminal:
`defaults write com.apple.screencapture location /Path/To/Location`
- This article covers some of the “extras” for screencapture. [http://digitalmedia.oreilly.com/2006/01/01/mac-os-x-screenshot-secrets.html](http://digitalmedia.oreilly.com/2006/01/01/mac-os-x-screenshot-secrets.html)
- You can also do “man screencapture” in Terminal.app if you want to see what options are available there for scripting.
- Enthusiastic recommendation for Ambrosia Software’s [Snapz Pro X](http://www.ambrosiasw.com). Affordable, flexible, and the support is excellent. Snapz Pro X permits you to select both destination and file type
on the fly, and gives you the option of capturing a particular object or group of objects (open windows), a selected area, or the entire screen, again on-the-fly, and all from one capture command (which is Command-3 by default, but is user-definable, so you can retain OS X’s built-in screen capture facility, if you wish). Snapz Pro X will capture menus with the cursor visible, and for a bit more money you can purchase the video capture option (nice for creating support docs with video—i.e., you can create QuickTime movies actually displaying the on-screen actions).
# Mac OS X Keyboard Shortcuts
Ever forget that Mac OS X keyboard shortcut to quickly move to the end of a line or document? Here’s a comprehensive listing of Mac OS X keyboard shortcuts.
[http://www.danrodney.com/mac/](http://www.danrodney.com/mac/)
# Stuck CD/DVD in Macbook Pro
So I was installing Windows Vista on a 15" Macbook Pro using Bootcamp. Everything was proceeding along smoothly. I partitioned 45 Gb for the Windows Partition, I inserted the Vista CD#1, and the installation process proceeded. I was prompted to insert Vista CD#2, but couldn’t figure out how to get CD#1 out because the “Eject” CD/DVD button was unresponsive.
Answer:
Power down the MBP, then power it back up while pressing & holding the trackpad button. The MBP will spit out the CD/DVD.
Ps
I had to use a DVD version of Vista to sucessfully install the operating system. Works great! The MBP scored a 4.5 running Windows Vista.
# How to view DBDesigner4 documents in Mac OS X
Unfortunately, DBDesigner4 is written in Delphi, which is practically Windows-only, so there is not and probably will not be a Mac OS X version. Also, no other applications are able to show diagrams in this format.
DBDesigner is replaced by MySQL workbench. It was a part of the MySQL GUI Tools bundle until recently, when it was removed as it was too unstable. I have read somewhere that they are rewriting the application, so it would not be ready for a while.
Workarounds:
- Open a diagram in DBDesigner4 in Windows, export the diagram to raster image (PNG, etc), then view the exported image in OS X.
- Use an emulator (e.g. Parallels, Wine, Darwine) to run DBDesigner4 on OS X.
# How can I compare text files in Windows?
Some Windows machines come with a basic comparison tool from Microsoft named **windiff.exe**. If your machine doesn’t already have WinDiff, it can be found in the [Windows XP Service Pack 2 Support Tools](http://www.microsoft.com/downloads/details.aspx?FamilyID=49ae8576-9bb9-4126-9761-ba8011fabf38&displayLang=en).
A more robust alternative is the Open Source WinMerge.
*“WinMerge is an Open Source visual text file differencing and merging tool for Win32 platforms. It is highly useful for determing what has changed between project versions, and then merging changes between versions.”*
You can find WinMerge at [http://winmerge.org/](http://winmerge.org/).
In addition to those dedicated compare tools, Notepad++ ([http://notepad-plus-plus.org/](http://notepad-plus-plus.org/)) has a compare feature as one of its plugins (it comes bundled initially).
Another option is Cygwin ([http://www.cygwin.com/](http://www.cygwin.com/)), a project who’s aim is to provide “a Linux-like environment for Windows”. It provides textual analysis applications like head, tail, grep and diff. You can use diff to compare two files, or multiple files in a directory, or recursively compare two directories (not for the faint of heart!). It also works well with other open source applications that work on windows, like emacs which you can use to see a nice visual colorful representation of the differences!
**comp is more for checking if two files are identical, rather than seeing the differences** If everything fails, there’s a built-in command called “comp”. Type “comp /?” at the command prompt to see how to use it.
There is also a DOS command ‘fc’ which will show you lines that mismatch, type “fc /?” at the command prompt to see how to use it.
# Apple Remote Desktop
On Mac OS 1.4, there is the option to turn on ‘Apple Remote Desktop’ under the
Sharing system preference. Does this allow me to connect and remote control my
mac from another mac? What do I use for the client – Apple Remote Desktop
Client? Does this use the same ARD security so the user information
(username/password) is encrypted? Is all the session information encrypted as well?
I guess I am basically asking if Apple provides, for free, a one user license
for ARD. I know Apple sells ARD licenses for 10 users or unlimited users, but
this seems like Apple is throwing us a freebie here. Am I right?
**Answers**
ARD is essentially an apple-branded version of VNC (with a different hash
algo so that vnc clients don’t interwork). the ARD management
application also has some features for remote control and probing that make it
a slight value add, but if you are thinking of a small installation maybe
VNC would be better for you.
But yes, in short, ARD lets you remote control your mac. or observe
someone else’s session. There is some encryption but I believe it is
limited to user/pass info and not the entire session. with VNC common
practice is to tunnel it through an SSH session to achieve the
latter…
you’ll have to ask tim/skip about licensing
Alan Wood
--
Good questions!
The ARD client is included with every copy of Mac OS X, but the Remote Desktop Application is NOT included, that is a separate purchase. Obviously, without the ARD application, having the client doesn’t buy you much, but in the ‘old days’ when the client was not included it was a nightmare to install the client on EVERY system you wanted to manage. So, this new method is more for convenience. The Remote Desktop application comes in two flavors, based on licensing. You can purchase a 10 user version which allows you to manage up to 10 remote computers at a time, or unlimited clients which is the all you can eat version.
Insofar as encryption of remote services, I’ll quote from the documentation:
‘Security and encryption
Apple Remote Desktop 3 users 128-bit AES encryption to ensure that all remote communications are secure, even over the internet, with client computers running Mac OS X v10.3 or later. For screen control and file copy tasks, where encrypting large amounts of data may significantly degrade performance, administrators can choose encryption for improved security or leave encryption off for better performance.’
So, there ya go. There is a good technology overview of ARD @ <[http://www.apple.com/remotedesktop/>](http://www.apple.com/remotedesktop/) and also you can find the admin guide there as well.
Tim Parker
Systems Engineer
Higher Education Division, Apple
--
You can also use “Chicken of VNC” as a client, instead of the ARD
manager, after enabling the VNC option in Access Privileges of ARD. Here is a
link to the download:
[http://www.apple.com/downloads/macosx/networking\_security/chickenofthevnc.html](http://www.apple.com/downloads/macosx/networking_security/chickenofthevnc.html)
Chicken of VNC does not offer encryption though.
Babak Samii
--
However, you can get encryption via ssh tunneling. For example, say you have VNC set up to work over 5901. To set up an encrypted network “tunnel” for processes using this port, the following command should work:
$ ssh -L 5901:localhost:5901 -N -f -l rocky sshserver.mydomain.com
For macs though, the localhost hostname can be problematic in some cases. So this might be more robust:
$ ssh -L 5901:127.0.0.1:5901 -N -f -l userfoo sshserver.mydomain.com
The specific option descriptions can be found in the ssh man page, but basically this will forward all traffic occuring on port 5901 to the sshserver over an encrypted channel. The -N says no commands are to be executed (just simple port forwarding). The -f puts the operation into the background.
You can find the process id via:
$ ps aux | grep ssh
So you may kill it when done. There are no limits to how many ports you can forward. The only “gotcha” for this method is that it’s only as secure as user forgetfulness. For personal use, I recommend aliasing your vnc client command in your shell profile. For bash, if the client command is ‘vncbar’ this would look like:
.bash\_profile:
alias vncbar=‘ssh -L 5901:127.0.0.1:5901 -N -f -l userfoo sshserver.mydomain.com; vncbar’
If in a multi-user environment, a more creative solution might be needed. Such as writing a wrapper script and placing it in a high order path such as /usr/local/bin.
James Kyle
\_Taken from [http://lists.stat.ucla.edu/mailman/listinfo/osxforum](http://lists.stat.ucla.edu/mailman/listinfo/osxforum) \_
# Print Screen Fixes
Print screen has saved me many times in various cases. Its a feature that you should know if you work at some kind of tech support.
The print screen button on the keyboard for PC saves an image of the screen onto the clipboard. You then just open up an image editing program (like Paint) to paste onto it. You can also use the Alt-Print Screen key combination to copy only the current window in Windows.
For Macs, Command & Shift & 3 does the same thing. Even neater is the Command & shift & 4 feature which allows you to specify which portion of the screen to capture.
Cases where this is helpful is when something needs to be pulled off a website, converting a file format to an image, saving someone’s work on a page when Ctrl & save is not possible, printing otherwise-unprintable things from various programs, etc.
If you have a bit of expertise with some graphics editing program (more advanced than Paint), then the ability to print screen becomes even more powerful.
# How do I install Ant on Mac OS X?
[Installation of Ant on OS X](http://www.asceticmonk.com/blog/?p=388) is a solid walkthrough. It not only walks you through the Unix commands to install Ant and set up a symbolic link to it but also explains what they do.
# Description and guidelines on creating system service agent accounts on Mac OS X (Tiger)
For any system service agent that you want to create in Mac OS X, you would do the following:
sudo dscl localhost -create /NetInfo/root/Groups/system\_groupname
sudo dscl localhost -create /NetInfo/root/Groups/system\_groupname gid group\_id
sudo dscl localhost -create /NetInfo/root/Users/system\_username
sudo dscl localhost -create /NetInfo/root/Users/system\_username uid user\_id
sudo dscl localhost -create /NetInfo/root/Users/system\_username gid primary\_group\_id
sudo dscl localhost -create /NetInfo/root/Users/system\_username shell user\_shell
sudo dscl localhost -create /NetInfo/root/Users/system\_username home user\_home
sudo dscl localhost -create /NetInfo/root/Users/system\_username passwd “∗”
Where,
system\_groupname is a unique group name. By convention on Mac OS X, it is the same name as the username. Examples: tomcat, postfix, amavis, sendmail, etc.
group\_id is the unique numeric id for the primary group used by the system service agent. Typically on Mac OS X (probably on other UNIX as well) this is going to be a number below 500. Best practice requires that it be unique, so you have to see what’s already been assigned and consult with documentation of the service you’re installing. Below is a dump of the groups that come on Mac OS X (Tiger). You can see that there are already pre-existing groups which could be used for many services which aren’t included on Mac OS X client.
system\_username is a unique name of the system service agent. Examples: tomcat, postfix, amavis, sendmail, etc. Note: some of these names are traditional, like www, tomcat, postfix, etc. Others are up to you to come up with a naming convention. I recommend using the traditional name whenever possible.
user\_id is the unique numeric primary number of the user agent under which the service will run. As Tim Parker points out this is a number below 500, but not a number already assigned to another agent account. Below is a dump of the accounts that come on Mac OS X (Tiger).
primary\_group\_id is the primary group which the system agent will belong to. This is the same number which was created in group\_id.
user\_shell is the shell under which the service agent will operate. In most cases this can be set to /usr/bin/false.
user\_home by convention is set to a benign directory. In case the system agent account or its service has a vulnerability you don’t want the agent having access to sensitive directories. Typically these are /var/empty, or /var/service\_directory. Service directory is a directory which you would create for exclusive use by the service.
passwd for system agents this is set to “∗”, or no password.
System groups in Mac OS X (Tiger)
nidump group .
nobody:∗:-2:
nogroup:∗:-1:
wheel:∗:0:root
daemon:∗:1:root
kmem:∗:2:root
sys:∗:3:root
tty:∗:4:root
operator:∗:5:root
mail:∗:6:
bin:∗:7:
procview:∗:8:root
procmod:∗:9:root
staff:∗:20:root
lp:∗:26:
postfix:∗:27:
postdrop:∗:28:
certusers:∗:29:root,jabber,postfix,cyrusimap
utmp:∗:45:
uucp:∗:66:
dialer:∗:68:
network:∗:69:
www:∗:70:
mysql:∗:74:
sshd:∗:75:
qtss:∗:76:
mailman:∗:78:
appserverusr:∗:79:
admin:∗:80:root,
appserveradm:∗:81:
clamav:∗:82:
amavisd:∗:83:
jabber:∗:84:
xgridcontroller:∗:85:
xgridagent:∗:86:
appowner:∗:87:
windowserver:∗:88:
accessibility:∗:90:
tokend:∗:91:
securityagent:∗:92:
unknown:∗:99:
everyone::12:
authedusers::50:
interactusers::51:
netusers::52:
consoleusers::53:
owner::10:
group::16:
smmsp::25:
System users on Mac OS X (Tiger)
nidump passwd .
nobody:∗:-2:-2::0:0:Unprivileged User:/var/empty:/usr/bin/false
root:∗∗∗∗∗∗∗∗:0:0::0:0:System Administrator:/var/root:/bin/tcsh
daemon:∗:1:1::0:0:System Services:/var/root:/usr/bin/false
unknown:∗:99:99::0:0:Unknown User:/var/empty:/usr/bin/false
lp:∗:26:26::0:0:Printing Services:/var/spool/cups:/usr/bin/false
uucp:∗:4:4::0:0:Unix to Unix Copy Protocol:/var/spool/uucp:/usr/sbin/uucico
postfix:∗:27:27::0:0:Postfix User:/var/spool/postfix:/usr/bin/false
www:∗:70:70::0:0:World Wide Web Server:/Library/WebServer:/usr/bin/false
eppc:∗:71:71::0:0:Apple Events User:/var/empty:/usr/bin/false
mysql:∗:74:74::0:0:MySQL Server:/var/empty:/usr/bin/false
sshd:∗:75:75::0:0:sshd Privilege separation:/var/empty:/usr/bin/false
qtss:∗:76:76::0:0:QuickTime Streaming Server:/var/empty:/usr/bin/false
cyrusimap:∗:77:6::0:0:Cyrus IMAP User:/var/imap:/usr/bin/false
mailman:∗:78:78::0:0:Mailman user:/var/empty:/usr/bin/false
appserver:∗:79:79::0:0:Application Server:/var/empty:/usr/bin/false
clamav:∗:82:82::0:0:Clamav User:/var/virusmails:/bin/tcsh
amavisd:∗:83:83::0:0:Amavisd User:/var/virusmails:/bin/tcsh
jabber:∗:84:84::0:0:Jabber User:/var/empty:/usr/bin/false
xgridcontroller:∗:85:85::0:0:Xgrid Controller:/var/xgrid/controller:/usr/bin/false
xgridagent:∗:86:86::0:0:Xgrid Agent:/var/xgrid/agent:/usr/bin/false
appowner:∗:87:87::0:0:Application Owner:/var/empty:/usr/bin/false
windowserver:∗:88:88::0:0:WindowServer:/var/empty:/usr/bin/false
tokend:∗:91:91::0:0:Token Daemon:/var/empty:/usr/bin/false
securityagent:∗:92:92::0:0:SecurityAgent:/var/empty:/usr/bin/false
# Switching between Operating Systems in Mac
## Choose OS while starting up
You can select which operating system to use during startup by holding down the Option key. This displays icons for all available startup disks, and lets you override the default setting for the startup disk in Startup Disk preferences (Mac OS X) or the Startup Disk control panel (Windows) without changing that setting.
## To change the default OS Setting in Windows:
1\. In Windows, choose Start > Control Panel. If you are in Category View, click “Performance and Maintenance†(Windows XP) or “System and Maintenance†(Vista).
2\. Open the Startup Disk control panel.
3\. Select the startup disk with the operating system you want to use by default.
4\. If you want to start up that operating system now, click Restart.
## To use Startup Disk preferences in Mac OS X:
1\. In Mac OS X, choose Apple () > System Preferences.
2\. Click Startup Disk.
3\. Select the startup disk with the operating system you want to use by default.
4\. If you want to start up that operating system now, click Restart
# Windows Updates don't work
If Windows Updates download but fail to install, Microsoft knowledgebase 943144 provides a fix:
[http://support.microsoft.com/kb/943144](http://support.microsoft.com/kb/943144)
Cleanest option is to re-register wups2.dll in Windows per KB943144.
---
To register the Wups2.dll file in Windows, follow these steps:
\# Stop the Automatic Updates service. To do this, follow these steps:
a. Click Start, click Run, type *cmd*, and then click OK.
b. At the command prompt, type the following command, and then press ENTER:
net stop wuauserv
\# Register the Wups2.dll file. To do this, follow these steps:
a. At the command prompt, type the following command, and then press ENTER:
*regsvr32 windir\\system32\\wups2.dll*
Note For a computer that is running Windows XP Professional x64 Edition, type the following command, and then press ENTER:
*regsvr32 windir\\syswow64\\wups2.dll*
b. Click OK on each verification message that you receive.
\# Start the Automatic Updates service. To do this, type the following command at the command prompt, and then press ENTER:
*net start wuauserv*
\# Exit the command prompt. To do this type *exit*, and then press ENTER.
-—
Per Hubert’s original recommendation, presumably also based on KB943144:
—
There is a standalone installer for Windows Update, located for download at
[http://download.windowsupdate.com/v7/windowsupdate/redist/standalone/WindowsUpdateAgent30-x86.exe](http://download.windowsupdate.com/v7/windowsupdate/redist/standalone/WindowsUpdateAgent30-x86.exe)
This is a nice tool if you run into trouble with Windows Update failing.
# Checking CPU load on multi-processor machines
If your machine has more than 1 CPU, the “CPU states” shown by the top(1) command shows the states of all CPUs combined. Suppose your machine has 8 CPUs. A program is saturating 1 CPU and there is no other activity (besides top(1), which uses negligible CPU time). Then top(1) will show that program using about 12.5% (not 100%) CPU time and about 87.5% idle.
# Why can't I play ram files on my mac
If you are a Mac user and you are having difficulties playing the videos posted on this site, please do the following steps:
1. Make sure you a version of Real Player installed (you might want to look to install Version 10.0.0 or higher).
2. Open up a Safari web browser and navigate to the page where the videos are posted.
3. Hover over one of the links to the videos and hold down the ctrl button and click on your mouse.
4. A box should pop up next to your mouse, select the option “Save Linked File to the Desktop†(or “Download Linked file†– this just depends on what version of Safari you’re running).
5. Go your Desktop and click on the .ram file that was just saved to your desktop.
Another solution is to download an older version of Real Player, I’d recommend Real Player Version 10.0.0, which you can download here: [http://forms.real.com/real/player/blackjack.html](http://forms.real.com/real/player/blackjack.html)
# X11 on MacBook Pros
As of August 2007, Apple made a real effort to hide X11 on Tiger install disks for MacBook Pros. It doesn’t get installed by default, and it’s not available through the installer. To get it, insert disk 1, open Terminal and run:
open /Volumes/Mac\\ OS\\ X\\ Install\\ Disc\\ 1/System/Installation/Packages/X11User.pkg
**Update**: OS X 10.5 Leopard installs X11 by default and features tighter integration between the two, so the above procedure is no longer necessary. However, X11 on Leopard is broken for all practical purposes. Users are encouraged to install the [updated open source version](http://xquartz.macosforge.org/trac/) (developed outside Apple), or downgrade to a more stable [Tiger version](http://aaroniba.net/articles/x11-leopard.html).
**Update**: If you don’t have the OS X 10.4 disc and are still running 10.4, you may download the X11 installer package from here:
[http://cjmart.in/2006/12/01/install-x11-on-tiger-without-the-tiger-install-dvd/](http://cjmart.in/2006/12/01/install-x11-on-tiger-without-the-tiger-install-dvd/)
# Resetting the System Keychain in Mac OS X
To reset your keychain in Mac OS X 10.4, or Mac OS X 10.5 Leopard, or later:
1. Open Keychain Access, which is in the Utilities folder within the Applications folder.2. From the Keychain Access menu, choose Preferences.3. Click Reset My Keychain, which is under the General pane.4. Authenticate with your account login password.5. Quit Keychain Access.6. Restart your computer.To reset your keychain in Mac OS X 10.3 through 10.3.9:
1. Open Keychain Access, which is in the Utilities folder within the Applications folder.2. From the Window menu, choose Keychain First Aid.3. Click Options…4. Click Reset My Keychain, which is under the General pane.5. Authenticate with your account login password.6. Quit Keychain Access.7. Restart your computer.Reference: [http://docs.info.apple.com/article.html?artnum=305145](http://docs.info.apple.com/article.html?artnum=305145)
# Opening a Unix text file on Windows
Problem: If you save a multiple-line text file on Unix (e.g. Linux) and open it on Windows, the text editor ignores the link breaks and shows the content in one giant line.
Cause: Different operating systems use different characters to mark the end of line (a.k.a. link break). E.g. Mac OS up to version 9 uses CR (ASCII character #13), Unix (e.g. Linux, Mac OS X) uses LF (ASCII character #10) and Windows uses 2 characters: CR followed by LF. See the [Wikipedia page](http://en.wikipedia.org/wiki/Newline) for details.
Some text editors cannot handle “foreign” line breaks. E.g. If Notepad (Windows’ default text editor) opens a text file, it assumes all lines end with CR-LF. If it is given a text file saved in Unix (which contains LF characters but not CR-LF sequences), it would not find any CR-LF and assumes there is no line breaks. Therefore, it displays the whole text file in a single line.
Other editors (e.g. Windows’ WordPad) tries to auto-detect the line break characters used in the text file. Therefore, they can open text files saved in other operating systems correctly.
Solution: On Windows, opening the file with Wordpad instead solves the problem. If you need to do this frequently, consider replacing NotePad with one of its [replacements](https://kb.ucla.edu/link/315).
# Uninstalling Roxio software
Roxio Creator is a common preinstalled application on many OEM systems. You may wish to remove it to reduce system overhead or in favor of your preferred CD burning program, such as Nero, Imgburn, CDRWin, etc.
Uninstallation via Add/Remove Programs in Windows normally works, but to fully clean up any remaining fragments, the following Roxio KB article is helpful:
[http://kb.roxio.com/content/kb/Creator/000086CR](http://kb.roxio.com/content/kb/Creator/000086CR)
Special instructions for Windows Vista:
[http://kb.roxio.com/content/kb/Creator/000127CR](http://kb.roxio.com/content/kb/Creator/000127CR)
# Mac OS X versions (builds) included with Intel-based Macs
It is often confusing to try and figure not only which minimum version
of OS X supports a particular Mac, but what specific BUILD of that OS
version.
Here is the Apple Kbase article that clears it all up:
[http://support.apple.com/kb/HT1159?viewlocale=en\_US](http://support.apple.com/kb/HT1159?viewlocale=en_US)
---
*Quoted from email from Tim Parker, Sr. Systems Engineer, Higher Education Division, Apple to* [http://lists.stat.ucla.edu/mailman/listinfo/osxforum](http://lists.stat.ucla.edu/mailman/listinfo/osxforum)
# Effect of file operations on its own and its parent directory's modification times
\\ File added File modified File renamed File deleted File Y Y N N/A Parent directory Y N Y Y
(Y = mtime updated, N = mtime not updated)
This has been tested under Windows XP and Solaris. I think the effect is the same on other OS but I have not tried.
# Accessing Windows drive letters under cygwin
If a drive does not have an explicit mount point configured Cygwin will default to an imaginary mount point under /cygdrive. So “c:\\windows\\system32” becomes “/cygdrive/c/windows/system32”. (In most cases it’s best to change “\\” into “/”.)
You can also create an alternate mount point and mount the drive there:
$ mkdir /c
$ mount c:/ /c
In this case “c:\\windows\\system32” becomes “/c/windows/system32”. Run “mount” to see the current list of mount points.
- [Cygwin mount table](http://www.cygwin.com/cygwin-ug-net/using.html#mount-table)
- [Using mount](http://www.cygwin.com/cygwin-ug-net/using-utils.html#mount)
# Show/Hide Hidden Files on Mac OSX
How to Show Hidden Files on OSX
1. Launch Terminal
2. Type in “defaults write com.apple.finder AppleShowAllFiles -bool true” (without the quotes, pay attention to the capital letters) at the command prompt, right after the dollar sign.
3. Restart the Finder by typing in “killall Finder” minus the quotes and be sure to capitalize Finder. You can also restart the Mac OS X Finder by clicking the Apple on the upper left of the screen and selecting “Force Quit.” Click on “Finder” and hit the “Relaunch” button.
4. Open up a Finder window by going to the Dock and clicking on the Finder icon.
5. See that there are now files with a dot (or period) in front of them like “.Trash” and others. You can also create hidden files yourself by naming them with a dot in front of the filename.
How to Re-hide Hidden Files
1. Launch Terminal.
2. Type in “defaults write com.apple.finder AppleShowAllFiles -bool false” (without the quotes, this is case sensitive) at the command prompt.
3. Relaunch the finder by typing in “killall Finder” without the quotes and remembering the case sensitivity. Open a new Finder window. Those files that had the dot preceding the file name are hidden again.
# Local System Account(NT AUTHORITY/SYSTEM) and network resource access
There comes time when a service or scheduled job running on windows machine needs access to a folder on the remote system. There are different ways to accomplish the task. Information below describes how to access remote share by mapping drive on the local system.
1\. Login into local machine (do not use remote desktop).
2\. Open command prompt (cmd.exe)
3\. Schedule task to run under NT AUTHORITY/SYSTEM account (at \[TIME\] /interactive cmd.exe) time should be following minute unless you want to camp out for a while.
When scheduled task executes you should get a new prompt window
4\. Map the drive using “net use” command (net use \[Drive\]: \\\\server\\myshare /User:\[\[remote username\]\] \[password\] /persistent:yes)
5\. In order for windows service to access the drive you need to allow it to interact with desktop. Open “Services” mmc and under “Log On” tab check “Allow service to interact with desktop”.
# Amanda backup on OS/X
Amanda backup is a solid FOSS backup solution that’s been around for ages. If you aren’t already using it, I highly recommend it.
It’s gotten easier to deploy for Macs with each new version of OS X, so that now it’s a standard install for any UNIX admin.
I’ve updated the Mac OS X installation guide. Check it out…
[http://wiki.zmanda.com/index.php/Installation/OS\_Specific\_Notes/Installing\_Amanda\_on\_Mac\_OS\_X](http://wiki.zmanda.com/index.php/Installation/OS_Specific_Notes/Installing_Amanda_on_Mac_OS_X)
*From email to [OSXForum](http://lists.stat.ucla.edu/mailman/listinfo/osxforum) by Jose Hales-Garcia.*
# File Sync Services and Software for Mac OSX
*This thread start and summary from [UCSC Mailing List](https://maillists.uci.edu/mailman/listinfo/uccsc) might prove useful to others.*
## On Friday 20 November 2009 Harry Mangalam wrote:
Is there a good, free, OSS, or commercial file synchronizer for the
Mac? Or a verified web app that does the same?
A (surprisingly) data-security-conscious client wants to use a USB
disk to sync his desktop to his laptop at home and has tried a
number of apps that do not work well.
He was very keen on the commercial service Sugar-Sync until it
started to frag his data and required regular manual cleanups via
their tech service. He has since soured on Sugar.
Time machine seems to be a versioning app rather than a synchro
app. I haven’t used it, but he has and claims that it doesn’t do
2way syncs.
He’s tried to use Bombich’s Carbon Copy Cloner, but it does not
(and will not) allow ‘remote to local’ sync’ing bc they don’t trust
users to avoid overwriting critical boot disk files.
I set him up with an crontabbed rsync backup for regular sync’s to
a remote server, which he’s quite happy with, but he’s not a CLI
geek and has already come close to wiping out his archives by
playing with the options, so I’m reluctant to set up such a system
for him to do this with naked rsync.
I tried Unison for him (this is what it was designed to do) and
while the GUI is simple, it works very well and does allow both
local 2-way syncing (as to a USB disk) and remotely (via a number
of protocols). It also has a native Aqua interface, but there’s no
Snow Leper finkable version.
Are there any other obvious-to-a-Mac-user choices that I’ve missed?
Harry Mangalam – Research Computing, UC Irvine
## On Sunday, November 22, 2009 Harry Mangalam wrote:
Thanks very much to all who replied. There’s no clear winner for Snow
Leopard, but I’m leaning towards Unison for the actual sync’ing
process that my client requested, as long as I can get it compiled on
a 10.6 machine.
Here are the answers, compiled into one page. If you have additional
info, I’d be happy to add it.
[http://moo.nac.uci.edu/~hjm/MacOSX\_File\_Sync\_Software.html](http://moo.nac.uci.edu/~hjm/MacOSX_File_Sync_Software.html)
# Target Display Mode
The late 2009 iMac 27" supports “video in” to turn the display into an external monitor for another device through the **Target Display Mode** feature:
**[http://support.apple.com/kb/HT3924](http://support.apple.com/kb/HT3924)**
An iMac in this mode still runs applications. It requires a third part Mini DisplayPort cable to function, as Apple has specifically stated they will not be producing such an adapter.
# KMS Activation for non-domain clients
I found that Windows clients that were not part of our AD domain were not activating despite of pointing them to the correct DNS servers. The solution was to add our domain suffix to the client’s list of suffixes.
To summarize and make this posting more clear, here is the whole procedure:
**On your DNS Server(s)**
- Add KMS DNS entries to your DNS servers.
See instructions here: [http://restricted.ats.ucla.edu/sc/UCLA\_KMS\_Instructions.htm](http://restricted.ats.ucla.edu/sc/UCLA_KMS_Instructions.htm)
**On your Windows Clients**
- Point clients to your DNS servers
- Under TCP/IP settings —> Advance, add you domain suffix to the “Append these DNS suffixes” Section.
Your AD domain suffix does NOT have to be the first on the list.
As long as it is listed it works.
# iTunes for Windows compatibility error
On computers that have been upgraded from Windows Vista to Windows 7, iTunes always launches with an error *iTunes.exe has been set to run in compatibility mode for an older version of Windows. For best results, turn off compatibility mode for iTunes before you open it.*
iTunes was likely installed on Vista, and was retained when upgrading to Windows 7. Uninstalling and reinstalling iTunes at this point does not fix the error.
The compatibility mode checkbox and “run as administrator” are both UNchecked already in iTunes properties.
[http://audible.custhelp.com/app/answers/detail/a\_id/3956](http://audible.custhelp.com/app/answers/detail/a_id/3956)
The key issue is described in steps 7 and 8 of the article above, a Registry key needs to be removed.
1. Exit out of iTunes.
2. Open the Registry Editor by selecting the Windows Start button, typing regedit into the search box, and then pressing Enter.
3. Browse to the following location in the registry editor, HKEY\_CURRENT\_USER\\Software\\Microsoft\\Windows NT\\CurrentVersion\\AppCompatFlags\\Layers, and highlight the Layers folder.
4. Delete the entry for the iTunes application (iTunes or iTunes.exe).
Close regedit and open iTunes. It should now open without error.
# Get quick info from a remote Windows machine with WMI and Powershell 2.0
This post is meant to offer some quick and easy ways to use Powershell and WMI for System Administrators. Many tools are available to find out attributes of machines on your network, but sometimes you need something quick, simple and direct. Below are some one-liners that I find useful.
WMI queries must be allowed on your systems, and you’ll need Powershell 2.0 and administrative privileges.
If you’re completely unfamiliar with Powershell, check out this page first:
[http://technet.microsoft.com/en-us/library/ee221100.aspx](http://technet.microsoft.com/en-us/library/ee221100.aspx)
# Example: Current logged on user
## Long Version
`Get-WmiObject win32_computersystem -Computer remote_computer | Select username`
## Slightly Shorter Version
`gwmi win32_computersystem -comp remote_computer | select username`
## What’s Going On?
Get-WmiObject is querying the data in the **win32\_computersystem** object. It queries the remote computer we specified by using the **-comp** tag, which can be either a machine name or IP address. Otherwise it would get results from the local machine. From the results of that query, we are displaying only the **username** value, which contains the name of the user that is currently logged on in the format *domain\\username*. If no one is logged in, the result will be blank.
# Other Useful WMI Queries
Try them for yourself! Just replace the values in the example with the values listed below.
**WMI Object Name** **Value** win32\_OperatingSystem LastBootUpTime win32\_OperatingSystem Caption win32\_OperatingSystem CSDVersion win32\_LogicalDisk FreeSpace win32\_LogicalDisk Size win32\_BIOS SerialNumber win32\_ComputerSystem TotalPhysicalMemoryOf course there are many, many more…
# Symantec Ghost Solution for Image Deploying
Step by step instructions for automated install
[http://www.microsoft.com/downloads/details.aspx?familyid=696DD665-9F76-4177-A811-39C26D3B3B34&displaylang=en](http://www.microsoft.com/downloads/details.aspx?familyid=696DD665-9F76-4177-A811-39C26D3B3B34&displaylang=en)
Building a standard image of Windows step by step guide
[http://www.microsoft.com/downloads/details.aspx?familyid=901663E1-934F-4793-8EAE-7C0A1CCB83A5&displaylang=en](http://www.microsoft.com/downloads/details.aspx?familyid=901663E1-934F-4793-8EAE-7C0A1CCB83A5&displaylang=en)
Symantec Ghost Solution suite
[http://www.symantec.com/business/ghost-solution-suite](http://www.symantec.com/business/ghost-solution-suite)
# Installing Mac OS X DVD media on CD only Mac
One way of installing Mac OS X DVD media on a Mac that only has a CD drive (like a G3 iBook) is to use a Mac with a DVD drive and connect the CD only Mac via Targeted Disk Mode using a firewire cable. When running the OS X installer, you can choose the drive of the connected Mac as the target of the install.
# Install Windows on a Computer with ICH9R RAID
This solves the problem where the Windows installation will say “Cannot find IAstor.sys” during the file copy process (but sees the hard drive partitions initially).
If you already made a floppy with drivers using utility:
1\. Create folder $OEM$ on a floppy with drivers.
2\. Create folder TEXTMODE in folder $OEM$, so structure will look like $OEM$\\TEXTMODE
3\. Copy files (not move, but copy!)
- iaahci.cat
- iaahci.inf
- iastor.cat
- iastor.inf
- iastor.sys
- txtsetup.oem
to the folder TEXTMODE.
Now Windows Setup will find all files fine.
# Mac Resources
Local **Apple Store**: (Free) *Training sessions* and *Genius Bar* — [http://www.apple.com/buy/locator/](http://www.apple.com/buy/locator/)
The South Bay Mac Users group — [www.sbamug.com](http://www.sbamug.com)
Online videos — [www.lynda.com](http://www.lynda.com) and [www.youtube.com](http://www.youtube.com)
.
**iTunes Podcasts** —
- Apple podcasts
- MacBreak
- The Mac Observer’s Mac Geek Gab
- This Week in Tech
- Search in technical category in iTunes podcasts for new or more specific podcasts
.
Others —
1. Accelerate Your Mac — [http://www.xlr8yourmac.com/](http://www.xlr8yourmac.com/)
2. AppleInsider — [http://www.appleinsider.com/](http://www.appleinsider.com/)
3. Applelinks.com Macintosh News — [http://www.applelinks.com/](http://www.applelinks.com/)
4. Applelinks.com Macintosh Reviews — [http://www.applelinks.com/reviews/](http://www.applelinks.com/reviews/)
5. **Apple Support** — [http://support.apple.com/](http://support.apple.com/) (note *Specs* and *Manuals* sections)
6. Find Mac Stuff — [http://www.findmacstuff.com/](http://www.findmacstuff.com/)
7. Insanely Great Mac — [http://www.insanely-great.com/](http://www.insanely-great.com/)
8. Low End Mac (Profiles) — [http://lowendmac.com/profiles.htm](http://lowendmac.com/profiles.htm)
9. Mac Resource Software Page — [http://www.macresource.com/mrp/software.shtml](http://www.macresource.com/mrp/software.shtml)
10. MacCentral — [http://www.maccentral.com/](http://www.maccentral.com/)
11. MacDirectory — [http://www.macdirectory.com/](http://www.macdirectory.com/)
12. MacFixIt — [http://macfixit.com/](http://macfixit.com/)
13. Macintosh News Network — [http://www.macnn.com/](http://www.macnn.com/)
14. Macintosh Resource Page — [http://www.macresource.com/](http://www.macresource.com/)
15. MacInTouch — [http://www.macintouch.com/](http://www.macintouch.com/)
16. MacKiDo — [http://www.mackido.com/](http://www.mackido.com/)
17. MacOSRumors — [http://www.macosrumors.com/](http://www.macosrumors.com/)
18. Macrank — [http://www.macrank.com/](http://www.macrank.com/)
19. MacReviewZone-Hardware — [http://www.macreviewzone.com/](http://www.macreviewzone.com/)
20. MacReviewZone-Software — [http://www.macreviewzone.com/Software/index.html](http://www.macreviewzone.com/Software/index.html)
21. MacSurfer — [http://www.macsurfer.com/](http://www.macsurfer.com/)
22. MacTimes — [http://www.mactimes.com/](http://www.mactimes.com/)
23. MacWEEK — [http://macweek.zdnet.com/](http://macweek.zdnet.com/)
24. MacWEEK Quicklinks — [http://macweek.zdnet.com/quicklinks/](http://macweek.zdnet.com/quicklinks/)
25. Microsoft Mactopia News — [http://www.microsoft.com/mac/news/industnews.htm](http://www.microsoft.com/mac/news/industnews.htm)
26. Pure Mac Software — [http://www.eskimo.com/~pristine/](http://www.eskimo.com/~pristine/)
27. The Mac Report — [http://www.macreport.com/](http://www.macreport.com/)
28. TidBITS — [http://www.tidbits.com/](http://www.tidbits.com/)
29. Tucow’s Macintosh Software — [http://leasenet.mac.tucows.com/macintosh.html](http://leasenet.mac.tucows.com/macintosh.html)
30. Version Tracker — [http://www.versiontracker.com/](http://www.versiontracker.com/)
# Burn DVD from VIDEO_TS folder (Mac OS X)
To burn a UDF DVD that plays in standalone DVD players, fire up Terminal and type the following:
`hdiutil makehybrid -udf -udf-volume-name -o .iso `
The dvd\_text will be the disc’s title. Make sure to use the path points to the parent folder where VIDEO\_TS resides.
The resulting ISO can be burn to disc by Disk Utility.
*(originally written by gavynj on macosxhints.com)*
# Manually resetting Windows account password
To *reset* account passwords in Windows without an existing administrator account privileges, there are two choices:
1\) Do a repair install of Windows from your installation media, and after the initial reboot and “Installing Windows” screen, wait for *Installing Devices* and then hit *Shift-F10* , then type in *nusrmgr.cpl* and hit enter to access the User Accounts in the Control Panel.
e.g.:
[http://pubs.logicalexpressions.com/pub0009/lpmarticle.asp?id=305](http://pubs.logicalexpressions.com/pub0009/lpmarticle.asp?id=305)
Or
2\) Use a third party password reset utility to create a password reset bootable disk, such as: [http://pogostick.net/~pnh/ntpasswd/](http://pogostick.net/~pnh/ntpasswd/)
The advantage to route #2 is that it is usually faster, however you generally are left best resetting passwords rather than creating a new one. You can then change from a blank password to an actual password once you have restored access to Windows.
# Parallels Desktop for Mac vs. VMware Fusion Comparison
Good Article from MacTech comparing Parallels to VMware on several Mac devices. This includes virtualized XP and Windows 7 installations.
[http://www.mactech.com/articles/mactech/Vol.26/26.01/2601-VirtualizationHeadToHead/index-001.html](http://www.mactech.com/articles/mactech/Vol.26/26.01/2601-VirtualizationHeadToHead/index-001.html)
# Hummingbird HostExplorer Full Screen Mode
In Hummingbird HostExplorer for Win32, full-screen mode “hides the title, menu and tool bars, so that the session window occupies the entire screen” \[HostExploer 9.0.0.1 help file\].
To activate full-screen mode, (1) select “View” from the menu and then (2) select “Full Screen”.
To deactivate full-screen mode, press “CTRL+Shift+F”.
# Windows Remote Desktop (RDC) from OSX/Mac
These are two primary clients used to connect to a Windows Terminal Server (Remote Services) or any other Windows machine (7/Vista/XP/2003/2008) that may have remote desktop access enabled over port 3389.
(RDCC) The official Microsoft client for the Mac/OSX is version 2.1.0 at the time of this writing and available here: [http://www.microsoft.com/mac/remote-desktop-client](http://www.microsoft.com/mac/remote-desktop-client)
(CoRD) Many users have complained about the stability and reliability of the MS client, as an alternative there is an open source solution called CoRD with much better reviews: [http://cord.sourceforge.net/](http://cord.sourceforge.net/)
# Why Do Microsoft Products Create Those Temp Files? Everything You Wanted to Know . . .
[See KB Article ID: 211632](http://support.microsoft.com/kb/211632 "http://support.microsoft.com/kb/211632")
This article explains when, where, and how Microsoft Word for Windows creates temporary files. See also KB Article ID: 316951 about \*.asd and AutoRecover files.
# Definition of a temporary file
A temporary file is a file that is created to temporarily store information in order to free memory for other purposes, or to act as a safety net to prevent data loss when a program performs certain functions. For example, Word determines automatically where and when it needs to create temporary files. The temporary files only exist during the current session of Word. When Word is shut down in a normal fashion, all temporary files are first closed and then deleted.
**Why does Word create temporary files?**
Speed
If there is not enough memory available to keep the document with all its edits in memory and still perform manipulations such as sorting, dragging, scrolling, and so on quickly along with any other applications that are running, then Word moves part of its code that is not being used or part of the document that is not being edited from memory to disk. This movement to temporary files on disk frees more memory for text manipulation or storage of the parts of the document that are being actively edited.
Data Integrity
Word uses temporary files as a “safety net” to protect against system errors in its file-saving scheme. By saving to a temporary file first and then renaming the file to the proper name, Word ensures the data integrity of your original file against problems (such as a power failure or lost network connections) that may occur while the file is being written.
Types of temporary files
MS-DOS-Based File
These are standard MS-DOS files.
Document-File-Based File
The difference between this file and a traditional MS-DOS file is that multiple programs can read and write to these files without the original owner knowing about it. Additionally, document files have inherent properties that allow Word to create files and directories within files. At startup, Word creates one temporary (direct) document file called **~wrfxxxx.tmp**. You can determine that it is a document file because the initial size is 1,536 bytes. This temporary document file is used to store all OLE objects that belong to unnamed documents, Undo, the Clipboard, and documents whose native formats are not document format (for example, .txt, .rtf, and Word 2.0 documents). Word can open document files using two different modes: transacted and direct. These modes are discussed later in this article.
Transacted Document Files
Transacted files allow Word to open a file, write to it, and have other programs—such as Microsoft Excel—write to it, but still retain the right to restore the file to the state it was in when Word first opened it.
To do this, the document file creates ghost images (typically ~dftxxxx.tmp) of all the changes made to the file after it was opened; if Word keeps all the changes, the contents of ~dftxxxx.tmp merge with the original file, and then saves a complete version of it. Conversely, if Word discards all changes, then ~dftxxxx.tmp is deleted, and the original file does not change. Word opens all of the Word native files using transacted files, which create ghost images in the Temp directory. When you start Word, Normal.dot is typically opened in transacted mode, and a ghost file is created for it called dftxxxx.tmp. FastSave, for example, merges these two files when a save occurs.
Direct
Word uses direct storage when opening the temporary document file and when performing either a Save As or a Full Save (non-FastSave save). This type of file is a low (if any) consumer of memory and does not create a ghost image when created or opened.
Back to the top
Specific files that Word creates
Back to the top
A simplified view of the scheme used to save an edited file
Create temp file Create ~wrdxxxx.tmp
Write temp file Save example data to ~wrdxxxx.tmp
Delete original file Delete EXAMPLE.DOC
Move temp to target name Move ~wrdxxxx.tmp to Example.doc
**Word gains significant performance speed by placing the temporary file in the same directory as the saved file**. If Word placed the temporary file elsewhere, it would have to use the MS-DOS COPY command to move the temporary file from the other directory to the saved location. By leaving the temporary file in the same directory as the saved document file, Word can use the MS-DOS MOVE command to quickly designate the temporary file as the saved document.
**When and where Word creates temporary files**
The location where Word creates the temporary files is hardcoded information and cannot be edited. Therefore, it is important that NTFS permissions for the user are set accordingly. For more information, click the following article number to view the article in the Microsoft Knowledge Base: 277867 ([http://support.microsoft.com/kb/277867/](http://support.microsoft.com/kb/277867/) ) Windows NTFS permissions are required when you run Word on any NTFS partition that has Windows 2000, Windows XP Professional, Windows Server 2003, or Windows Vista installed
In general, Word creates temporary files for the following types of data.
Embedded Word Objects (Temp Directory)
When Word acts as an OLE server program, the embedded Word objects are stored as temporary files in the Temp directory.
OLE 2.0 requires extra drive storage. When you start OLE programs, Word needs to provide copies of the data to the server. It is not unusual for extensive OLE 2.0 usage in a single session of a program to accumulate a large amount of temporary storage on the hard drive.
Scratch File (Temp Directory)
When Word runs out of internal random access memory (RAM), it always creates a single temporary scratch file in the Temp directory to hold information. This scratch file holds information that is swapped out from the Word internal file cache, which is allocated from global system memory. The scratch file varies in size from 64 kilobytes (KB) to 3.5 megabytes (MB).
The default cache size in Word is 64 KB.
For more information about how to increase the cache size in Word, click the following article number to view the article in the Microsoft Knowledge Base:
212242 ([http://support.microsoft.com/kb/212242/](http://support.microsoft.com/kb/212242/) ) Where settings are stored in the registry for Word 2000
Recorded Macro (Temp Directory)
When you record a macro, Word creates a temporary file in the Windows Temp directory.
Converted Files (Temp Directory)
The word processor converters supplied with Word create temporary files in Rich Text Format (RTF), which Word uses to access specific converters.
Locked Files (Temp Directory)
When you open a file that is locked, either because it is open in another window of Word or because another user on the network has it open, you can work with a copy of the file. Word places this copy in the Windows Temp directory. Likewise, if a template attached to a document is locked, Word automatically makes a copy of the template in the Temp directory. The copy of a locked file does not automatically update the original owner’s file.
Saved Files (Same Directory as the Saved File)
When you click Save on the File menu, the following happens:
Word builds a new temporary file using the edited version of the document.
After Word creates the temporary file, Word deletes the previous version of the document.
Word renames the temporary file to the same name as the previous version of the document.
Text Pasted Between Files (Same Directory as Source File):
When Word copies and pastes between documents, it may create a temporary file in the same directory as the source file. This is especially true if the source file is saved or closed. The temporary file represents the information that was referenced by the Clipboard prior to saving the file. Word creates this temporary file by renaming the old copy of the file to a temporary file name.
Owner File (Same Directory as Source File)
When a previously saved file is opened for editing, for printing, or for review, Word creates a temporary file that has a .doc file name extension. This file name extension begins with a tilde (~) that is followed by a dollar sign ($) that is followed by the remainder of the original file name. This temporary file holds the logon name of person who opens the file. This temporary file is called the “owner file.”
When you try to open a file that is available on a network and that is already opened by someone else, this file supplies the user name for the following error message:
This file is already opened by user name. Would you like to make a copy of this file for your use?
Word may be unable to create an owner file. For example, Word cannot create an owner file when the document is on a read-only share. In this case, the error message changes to the following error message:
This file is already opened by another user. Would you like to make a copy of this file for your use?
Note Word automatically deletes this temporary file from memory when the original file is closed.
When you open a file by using the HTTP or FTP protocol, the file is first copied to the temp directory. Then, the file is opened from the temp directory.
When you open a file on a UNC share with Word 2007, the file is first copied to the temp directory. Then, the file is opened from the temp directory.
Automatic Save
Word Auto Recover Save Directory
The temporary file that is created when Word performs an automatic save is stored in the Temp folder, unless there is not a valid Temp folder. In this case, Word saves the temporary file in the same folder where it saves the document.
Back to the top
The location of temporary files when you close a file
Word may occasionally have to maintain a link to a file after it is closed. This occurs when text has been copied to the Clipboard from the file. When you close a file, Word attempts the following actions:
If the selection that was copied to the Clipboard does not contain multiple sections or a picture, or is not large, Word copies the piece of the document to the scratch file.
If the copied selection does contain pictures or multiple sections, or if the file is on a floppy disk, Word copies the entire file to the Temp directory and moves the pointer there.
# Mac OS Applications folder slow to load / populate
As mentioned in [https://discussions.apple.com/thread/2730568?start=0&tstart=0](https://discussions.apple.com/thread/2730568?start=0&tstart=0 "https://discussions.apple.com/thread/2730568?start=0&tstart=0"), either deleted or rename the .DS\_Store file in Applications.
`mv /Applications/.DS_Store /Applications/.DSStoreold`
The app list should populate much faster on the next folder browse.
# Mac OS X - Energy Saver preferences won't save
Log in as an admin, run the following commands from Terminal:
`sudo rm /Library/Preferences/SystemConfiguration/com.apple.AutoWake.plist`
`sudo rm /Library/Preferences/SystemConfiguration/com.apple.PowerManagement.plist`
`sudo rm //Library/Preferences/com.apple.systemuiserver.plist`
Reboot. The next time you set your Energy Saver preferences, the settings should stick.
# Paste and Match Style on Mac
On the Mac, the paste function associated with the ⌘V (Command + V) keyboard shortcut has a side effect: if you’re writing a document and you paste something from your clipboard, the document’s style won’t be automatically matched.
Here’s a quick way to fix this:
[http://thaweesak.com/2009/06/15/setting-paste-and-match-style-as-default/](http://thaweesak.com/2009/06/15/setting-paste-and-match-style-as-default/)
# Changing column width in Finder (Mac OS X)
To adjust the width of all columns in a Finder window, hold the Alt/Option key down while dragging the resize handle. All future windows will open with this new default column width.
# Mac Word Crashing
Users of Microsoft Word for OS X may notice frequent program crashing and instability. Mac Word’s “track changes” feature has been known to increase the incidence of document corruption. Tips and options for remediation, as well as issue description are described capably at the following link—
- **[http://word.mvps.org/mac/documentcorruption.html](http://word.mvps.org/mac/documentcorruption.html)**
# Files, File Types, File Extensions, and Folders
**File** – A computer file is a way to store information on a computer so it can be used later, and perhaps exchanged with other people. Depending on what you are doing, you might have different types of files. For example if you write an essay for a class, then you would save it in a file. If you take a picture, that is a file.
**File Types** and **File Extensions** – Different programs save their files in different formats. This is so the program won’t get confused and try to use an music file in a photo editing or word processing program. File extensions are the three (or more) characters at the end of a filename, which follow a dot, e.g. essay1.doc, familyphoto.jpg, budget.xls. Here are some examples of different kinds of extensions:
- Microsoft Word create files with extensions like .doc or .docx.
- Photo editing programs create files with extensions like .jpg, .gif, or .png
- Music programs create files with extensions like .mp3 or .wav.
- Microsoft Excel creates spreadsheet files with extensions like .xls or .xlsx.
**Directories** or **Folders** – are used to store groups of files. For example, say you have a couple hundred photos from your last camping trip, and you download them to your laptop to sort and select the best ones. You don’t want them to get mixed in with all the other photos you’ve taken over the years, along with all the other files on your computer, so you create a separate folder to hold them. In this case, you could call it something like CampingTripPhotos.
**Subdirectories** or **Subfolders** – While folders are useful for separating files into different groups, having only one set level of folders could get confusing too. So, you just create a new folder inside another one, to create a subfolder. For example, your CampingTripPhotos could go inside a larger folder called Photos. Generally, this kind of arrangement is up to you, but it’s better to organize your files in advance, instead of waiting till you have thousands of files in one folder.
**Quick visual overview of files, folders, and directories from Lynda.com** (under five minutes) -
- Login into [www.LearnIt.ucla.edu](http://www.LearnIt.ucla.edu/)
- Windows, [http://www.lynda.com/Windows-7-tutorials/computer-literacy-for-windows/68554-2.html](http://www.lynda.com/Windows-7-tutorials/computer-literacy-for-windows/68554-2.html)
- Mac OS X, [http://www.lynda.com/Mac-OS-X-10-6-tutorials/computer-literacy-for-the-mac/68553-2.html](http://www.lynda.com/Mac-OS-X-10-6-tutorials/computer-literacy-for-the-mac/68553-2.html)
- Select “#2. Operating Systems” → “Understanding files, folders, and directories”
# Making Screenshots in Windows
In Windows, most users are at least familiar with the “Print Screen” button, which copies the ENTIRE screen to the pasteboard and can be copied into emails, manuals, etc.
But if you want to capture a selection, you need to use the SNIPPING TOOL. (and have at least Windows 7)
With the snipping tool, you can grab the entire screen, or just a selection. You can then save it, paste it into an email, etc.
To access it, click on the ‘Start Menu’ in Windows 7, type “Snip” in the search box, and windows should find it (tip: add it you your task bar or start menu for easy access later!). In Windows 8, go to the ‘Metro’ interface, and just start typing ‘Snip’ and Windows 8 will find the same application.
Full details can be found here:
[http://windows.microsoft.com/en-us/windows7/use-snipping-tool-to-capture-screen-shots](http://windows.microsoft.com/en-us/windows7/use-snipping-tool-to-capture-screen-shots)
# Missing file extensions causing errors with files opening in OS X
OS X by default hides file extensions on files, so users may be confused when they have files that are not recognized at all by OS X and hence do not open.
One source of the error is the fact that the file in question has no extension at all.
To check for a single file and its missing extension:
1. Right-click a file and select Get Info. If you have a Mac with a one-button mouse, hold the “Control” key and click the file.
2. Click the triangle next to Name & Extension. The text field will display the full file name and extension.
3. Click inside the text field and use the “Delete” key to remove the original file extension.
4. Type the desired new file extension and close the window.
Source:
[http://science.opposingviews.com/add-extension-file-mac-10647.html](http://science.opposingviews.com/add-extension-file-mac-10647.html)
# OS X Mavericks Resources
Here are some useful links to some technical information surrounding today’s OS X Mavericks release:
- **OS X Mavericks Technical Requirements & Specifications**, [http://www.apple.com/osx/specs/](http://www.apple.com/osx/specs/)
- **OS X Mavericks Server Technical Requirements & Specifications**, [http://www.apple.com/osx/server/specs/](http://www.apple.com/osx/server/specs/)
- **Creating a bootable OS X Installer in OS X Mavericks**, [http://support.apple.com/kb/HT5856](http://support.apple.com/kb/HT5856)
- **Apple Remote Desktop v3.7** (Mavericks compatible version), [http://support.apple.com/kb/HT5896](http://support.apple.com/kb/HT5896)
- **OS X Server Mavericks: Advanced Administration**, [https://help.apple.com/advancedserveradmin/mac/3.0/](https://help.apple.com/advancedserveradmin/mac/3.0/)
- **OS X Server Mavericks Profile Manager Documentation**, [https://help.apple.com/profilemanager/mac/3.0/](https://help.apple.com/profilemanager/mac/3.0/)
- Separate manual including information on how to use the new VPP licensing model for iOS & OS X Apps which allows you to provide Apps to users and have the ability to pull the Apps back for re-distribution, [http://www.apple.com/ios/education/](http://www.apple.com/ios/education/)
- **OS X Server Mavericks: Upgrade and migration from Mountain Lion v10.8**, [http://support.apple.com/kb/HT5996](http://support.apple.com/kb/HT5996)
- **Adobe OS Compatibility and FAQs for Mac OS X Mavericks**, [http://helpx.adobe.com/x-productkb/global/mac-os-mavericks-compatability.html](http://helpx.adobe.com/x-productkb/global/mac-os-mavericks-compatability.html)
- **John Siracusa’s annual OS review**, [http://arstechnica.com/apple/2013/10/os-x-10-9/](http://arstechnica.com/apple/2013/10/os-x-10-9/), or as a podcast [https://itunes.apple.com/us/book/os-x-10.9-mavericks-ars-technica/id728112618?mt=11&ign-mpt=uo%3D4](https://itunes.apple.com/us/book/os-x-10.9-mavericks-ars-technica/id728112618?mt=11&ign-mpt=uo%3D4)
*( thanks to UCLA’s Apple technical rep Tim Parker for the links! )*
# OS X installation failure due to incorrect system date
“This copy of the Install OS X Mavericks application can’t be verified. It may have been corrupted or tampered with during downloading.”
May occur with other versions of OS X besides OS X 10.9 Mavericks as well, when attempting to install OS X from USB flash drive.
If the installation media is known good, the system date may be too far off for OS X to verify.
If the system time and date is too far off, within the OS X installation this may be fixed within the terminal window, using the command:
*date* to show current system date.
*date mmddhhmmyyyy* to set the date (month day hour minutes year).
# Managing OS X
OS X Server’s SUS (update server) can manage OS X workstation’s updates (e.g, [http://support.apple.com/kb/ht4069](http://support.apple.com/kb/ht4069)). Some may desire additional options and functionality.
Other programs include—
- JAMF Software’s **Casper Suite**, [http://www.jamfsoftware.com/products/casper-suite/](http://www.jamfsoftware.com/products/casper-suite/)
- **Simian**, [http://code.google.com/p/simian/](http://code.google.com/p/simian/)
- **Munki**, [http://code.google.com/p/munki/](http://code.google.com/p/munki/)
See also—
- ***Managing Macs at Google Scale***, [https://www.usenix.org/conference/lisa13/managing-macs-google-scale](https://www.usenix.org/conference/lisa13/managing-macs-google-scale) (~40min video)
# Chkdsk ("Check Disk") in Windows 8
Windows 8 has redesigned the venerable “chkdsk” tool. The tool has a new approach to disk health, speed optimizations in recognition of modern large disks, and support for ReFS (“Resilient File System”).
The following Microsoft MSDN Blog article covers the tools features and operational approach—
- **Redesigning chkdsk and the new NTFS health model**, [http://blogs.msdn.com/b/b8/archive/2012/05/09/redesigning-chkdsk-and-the-new-ntfs-health-model.aspx](http://blogs.msdn.com/b/b8/archive/2012/05/09/redesigning-chkdsk-and-the-new-ntfs-health-model.aspx)
# HostExplorer Hummingbird crashes when opening
If you receive an error message “HostExplorer for Win32 (or Win64) has stopped working”
Download the Hummingbird patch and install the correct 32bit or 64bit version for your computer:
[https://ucla.box.com/s/or6eir4a04pr7x1bz4gi](https://ucla.box.com/s/or6eir4a04pr7x1bz4gi)
# How to Change your Windows Domain Password
This document provides a step-by-step set of instructions on how to change your domain password on a Windows 7 computer. This password is used to log into departmental Windows computers and resources.
*Your new password must meet password complexity standards as defined by your department.*
Once you are successfully logged onto your computer press ***Ctrl-Alt-Del*** on your keyboard. You will be presented with a screen similar to the one shown below.
Click on “Change a password…”
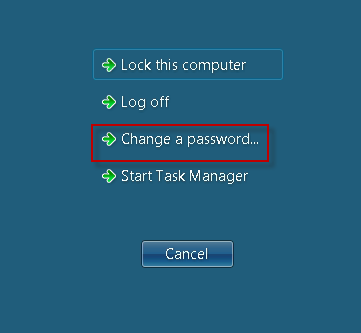
After selecting to “Change a password..” you will be prompted to enter:
- Your user name (this field may be prepopulated with *domain\\user name*)
- The “Old password” for your account (please note, the “Old password” is the current password for your account)
- The “New password” you want to set for your account (following IT’s standards for “Choosing a Good Password”)
- Retype your “New password” in the “Confirm password” field
- Then click the Arrow button to apply the changes you have just made to your account.
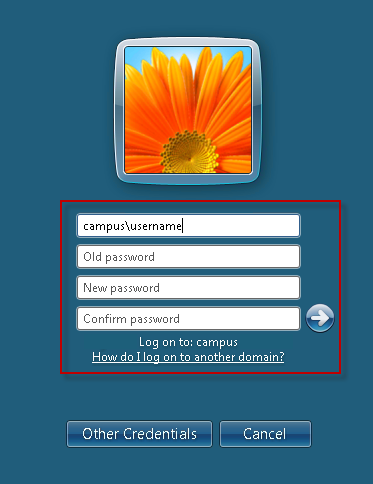
If your password change was successful, you will see the following message:
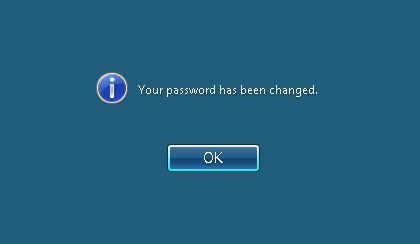
**Common Errors**:
- In order for the password change to be successful, you must ensure that what you are typing in the “New password” field matches your entry in the “Confirm password” field. If these entries do not match, you will see the following error (clicking the OK button will take you back to the Change Password screen).

- Your new password MUST meet password standards. If your password does not meet minimum security standards, you will see the error below and your new password will not be accepted (clicking OK will direct you back to the Change Password screen to enter a new password).

# Windows Password Expiration
Your Windows domain password will expire on a regular basis, as defined by your department’s password policy. Once logged on to your computer, you are notified by a notification balloon in the system tray.
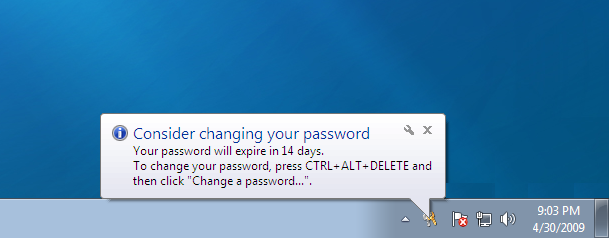
You will begin to receive this notification (by default) 14 days prior to your password expiration. The notification is repeated every day until your password expires.
Instructions on How to Change Your Windows Domain Password can be found here: [https://kb.ucla.edu/link/1743](https://kb.ucla.edu/link/1743).
# How to Change your Windows Domain Password on Citrix
This document provides a step-by-step set of instructions on how to change your domain password online using the Citrix webpage. This password is used to log into departmental Windows computers and resources.
*Your new password must meet password complexity standards as defined by your department.*
Using the web browser of your choice, navigate to the EA Citrix homepage at [https://access.support.ucla.edu](https://access.support.ucla.edu). You will be presented with a screen similar to the one shown below.
Do NOT click Install, click on “Skip to Log on”

After selecting to “Skip to Log on” you will be prompted to enter:
- Your user name
- Your password (please note, this is the current password for your account)
- Then click Log On

Once you are logged on, click on the “Settings” icon at the top of the page.

Click the “Change Password” icon near the middle of the page.

After selecting “Change Password” you will be prompted to enter:
- The “Old password” for your account (please note, the “Old password” is the current password for your account)
- The “New password” you want to set for your account (following IT’s standards for “Choosing a Good Password”)
- Retype your “New password” in the “Confirm password” field
- Then click “OK” to apply the changes you have just made to your account.
If your password change was successful, you will see the following message:

**Common Errors**:
- If you do not enter your Old (current) Password correctly, you will receive the following error (clicking the OK button will take you back to the Change Password screen).

- In order for the password change to be successful, you must ensure that what you are typing in the “New password” field matches your entry in the “Confirm password” field. If these entries do not match, you will see the following error (clicking OK will take you back to the Change Password screen).

- Your new password MUST meet password standards. If your password does not meet minimum security standards, you will see the error below and your new password will not be accepted (clicking OK will direct you back to the Change Password screen to enter a new password).

# How do I find the host name of my computer?
Windows Machines (using the command prompt):
- From the Start menu, select All Programs or Programs, then Accessories, and then Command Prompt.
- In the window that opens, at the prompt, enter hostname. The result on the next line of the command prompt window will display the hostname of the machine without the domain.
Linux Machines:
\*Use the linux command – hostname
# macOS High Sierra
Apple’s High Sierra is coming. Below are some links to help prepare for it—
**Upgrade to macOS High Sierra**
- Model specific firmware updates are required (via the internet) for each system. Monolithic system imaging is therefore only supported to re-install macOS High Sierra. Please see this article for upgrade methods and supported APFS creation tools:
\*[https://support.apple.com/en-us/HT208020](https://support.apple.com/en-us/HT208020)
**Secure Kernel Extension Loading (SKEL)**
- Administrator or standard user approval is required before loading new third-party kernel extensions. A future version of macOS High Sierra will be able to use MDM to enable or disable SKEL:
- [https://support.apple.com/en-us/HT208019](https://support.apple.com/en-us/HT208019)
**Apple File System (APFS)**
- Upgrading to macOS High Sierra converts flash storage-based systems from HFS+ to APFS automatically. Systems with hard disk drives (HDD) and Fusion drives won’t be converted to APFS, but will support macOS High Sierra on HFS+ file systems. Apple File Protocol (AFP) is no longer supported from APFS volumes. SMB or NFS are supported file sharing solutions:
- [https://support.apple.com/en-us/HT208018](https://support.apple.com/en-us/HT208018)
**What’s New in macOS High Sierra:**
- [https://developer.apple.com/macos/](https://developer.apple.com/macos/)
**What’s New in iOS 11:**
- [https://developer.apple.com/ios/](https://developer.apple.com/ios/)
**What’s New in tvOS (11):**
- [https://developer.apple.com/videos/play/wwdc2017/209/](https://developer.apple.com/videos/play/wwdc2017/209/)
**Prepare your institution for iOS 11, macOS High Sierra, or macOS Server 5.4:**
- [https://support.apple.com/en-us/HT207828](https://support.apple.com/en-us/HT207828)
**Upgrade macOS on a Mac at your institution:**
- [https://support.apple.com/en-us/HT208020](https://support.apple.com/en-us/HT208020)
**Prepare for changes to kernel extensions in macOS High Sierra:**
- [https://support.apple.com/en-us/HT208019](https://support.apple.com/en-us/HT208019)
**Prepare for APFS in macOS High Sierra:**
- [https://support.apple.com/en-us/HT208018](https://support.apple.com/en-us/HT208018)
**Create a bootable installer for macOS:**
- [https://support.apple.com/en-us/HT201372](https://support.apple.com/en-us/HT201372)
**Move to SHA-256 signed certificates to avoid connection failures:**
- [https://support.apple.com/en-us/HT207459](https://support.apple.com/en-us/HT207459)
**Prepare for changes to Content Caching in macOS High Sierra:**
- [https://support.apple.com/en-us/HT208025](https://support.apple.com/en-us/HT208025)
Many thanks to Apple’s Tim Parker for the links!
# Direct IP Printing from Windows
This document provides a step-by-step set of instructions on how to add a printer to Microsoft Windows 10 using direct IP Printing.
Click the Windows Start button.

Select Settings.

Select Devices.

Select Printers & scanners, then click on the + button to Add a printer or scanner.
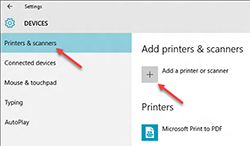
Select The printer that I want isn’t listed.
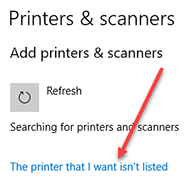
Select Add a printer using a TCP/IP address or hostname.
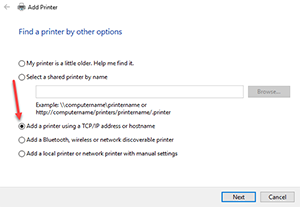
Enter the IP address you collected above in the *Hostname or IP Address* field.
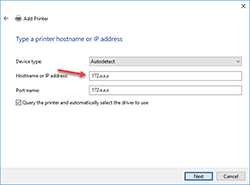
Windows should find the printer if the printer is on and configured correctly. You may have to specify more information. If prompted, Select the type of network adapter installed in the printer in the “Device Type” drop-down list. You can also click “Custom” to specify custom settings for the network printer. Select “Next“. Windows will now walk you through installing the drivers for the printer.
When prompted, enter a friendly name for the printer.
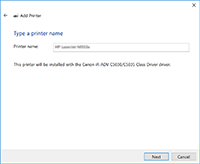
Do not share the printer.
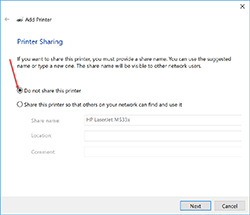
Click Finish. Your IP printer is now installed.
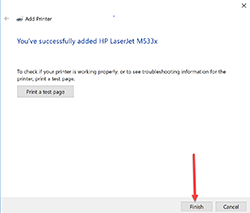
# Direct IP Printing from OS X
This document provides a step-by-step set of instructions on how to add a printer toApple OS X using direct IP Printing.
Open System Preferences and click on Printers & Scanners.
On the Printers & Scanners dialog box, click the + sign to add a new printer.
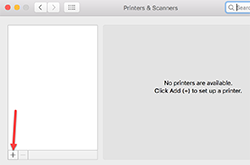
Click IP, enter the IP address of the printer, change the protocol to IP Printing Protocol. Click on the Add button when it becomes available.
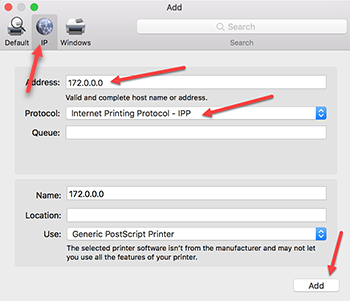
Your computer is now connected to the printer
# Bulk print multiple files at a time
If you want to bulk print a bunch of files on your computer, you can do this on Windows 7 and up. The files need to be in the same file type (all PDFs or all Word docs) and you can only print 15 files at a time. To bulk print, open the folder that contains the files. Select 15 files (you can hold Shift and click on the files, or Ctrl and click if you want to select certain files to print). Then right click on your mouse and select Print. You will not be prompted with the printer settings, it will print to the last printer you printed from (so it might be best to do a test print and print out one first). Then repeat for the next batch of 15 files.
For a Mac, open the System Preferences app, then open “Printers & Scanners.” Select the printer you are going to use in the Printers list, then click on the “Open Print Queue” button. Drag all of the files you wish to print into the queue box. Your print job will start immediately, so you can continue to drag all of the files into the queue.
# HP Elitedesk 800 G4 WDF_VIOLATION error
HP EliteDesk 800 G4 systems may experience a BSOD upon startup after the installation of Windows 10 October 2018 updates.
Update 12 October:
Microsoft fix posted, KB 4468304.
[https://support.microsoft.com/en-us/help/4468304](https://support.microsoft.com/en-us/help/4468304)
If you are seeing a BSOD, please go to “Scenario 2”:
[https://support.microsoft.com/en-us/help/4468372/hp-devices-may-experience-blue-screen-error-wdf-violation-after-instal](https://support.microsoft.com/en-us/help/4468372/hp-devices-may-experience-blue-screen-error-wdf-violation-after-instal)
Original article:
To resolve this issue, in Windows 10 Startup Repair, enter a command prompt, go to \\windows\\system32\\drivers , and delete hpqkbfiltr.sys .
Reboot and the system should roll back the latest updated attempted. You will then need to run Windows Updates again to re-apply the latest updates, which should install successfully.
Source:
[https://h30434.www3.hp.com/t5/Desktop-Operating-Systems-and-Recovery/HP-Elitedesk-800-G4-Bloatware-and-bluescreen-issue/m-p/6857912](https://h30434.www3.hp.com/t5/Desktop-Operating-Systems-and-Recovery/HP-Elitedesk-800-G4-Bloatware-and-bluescreen-issue/m-p/6857912)