Windows 7 Backup and Restore
Windows 7 Backup
Draft v0.1 — 6 April 2011
Brian J. Won brian@ssc.ucla.edu
UCLA Social Sciences Computing
Guide to basic setup and restore using Windows 7’s built-in backup.
Setup:
Start → Control Panel → System and Security → Backup and Restore

Backup → Set up backup.

Starting Windows Backup will take a while. On a reasonably fresh Windows 7 installation with a new HP 8100 Elite CMT, it took several minutes.
Next, pick a drive to back up to. Windows 7 will automatically recommend external harddisks, although you may choose an internal one if your computer has multiple physical internal harddisks.
SSC recommends that you use an external harddisk that you have dedicated solely for backup. Unplug the drive entirely when not using it to backup your system (if you are doing only periodic backups). If you are doing continuous backup as some programs permit then please leave the drive constantly connected.
In this example we will be using an external WD MyBook 3.0 (connected as J:) for backup.

Windows Backup in Windows 7 offers two choices on what to back up—“Let Windows choose”, which backs up selected folders such as Documents, Pictures, the desktop, and creates a system image. This option is fine for most users.
The second choice, “Let me choose”, is for users who do not use Windows’ default storage locations for their data. SSC has found some users store things in legacy areas such as “C:\research” or other folders. This option will let the user select them manually.

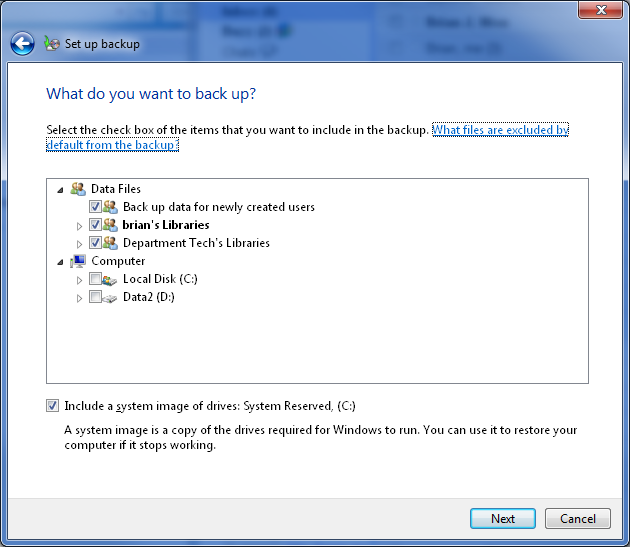
When selecting “Let me choose”, Windows will give you a folder tree of the computer with checkboxes next to each folder. Expand the tree as needed and check the desired folders to backup. By default, a separate folder tree for “Data Files” will be included for user data and will be checked by default. Also included by default, a system image of the boot drive will be performed.
Windows Backup by default backups almost all files, unlike some other programs that do not do certain file types (such as video) by default.
The next screen will review the backup settings chosen before running the backup.
The backup schedule settings may be changed from this screen, or they may be changed later. The computer and backup drive must be both be on and connected for backup to occur, so the default time provided by Windows—in this case, every Sunday at 7:00pm—may not be ideal.

The “change schedule” is fairly simple. Backup frequency, time, and date may all be adjusted.

Hit “ok” or if you did not need to change the backup schedule, skip that. Instead, go ahead to “Save settings and run backup.”
We will create a system repair disc later.
This will close the “Set up backup” window and go back to the main Backup and Restore window in Control Panel, where you can then view your backup progress. If this is your first backup, this may take some time depending on the amount of data involved.

After completion, the screen will look slightly different to show that at least one completed backup has been done.

You may then create a System Repair disc from the same screen, on the left side under “Create a system repair disc.”
Restore
Starting from Control Panel → System and Security → Backup
Go to “restore my files” for the basic restore of missing/damaged user files.

This may take a while to load, depending on the size of your backup.
You may then search or browse for the files you wish to restore from backup.

To search for a file, hit “search” and then type in all or part of the file name or folder name to search for it, then check the box for the desired file or folder, and hit ok.

To browse for files or browse for folders, the navigation screen is similar—it shows previous backup occurrences as folders with the date/time of the backup, and you may navigate inside to find the one you wish.
Select the files or folders you wish to add, then hit “add file” or “add folder” as needed to add to the restore.

Once all of the files and folders to restore have been selected, hit “next.” If some of the files or folders selected are unwanted, select them and hit “remove.”

Restore files will then ask where do you wish to restore them—to the original location, or to a different location.
The “In the original location” will overwrite the existing file in that location, which is what you may wish to do if the original file was overwritten, damaged, or corrupted and you wish to restore it immediately.
The “In the following location” will restore the backup file to a folder or drive of your choice. This is useful if you wish to compare the current version of the file with the restored version from the previous backup.

After hitting “restore”, if you have picked a location where the file already exists, the standard Windows file copy and “warning, this file already exists” dialog will pop up. Hit “copy and replace” to restore the version from backup, “don’t copy” to skip copying, or “copy, but keep both files” to change the name of the restored file to the name shown by Windows.
This is a standard Windows copy dialog, if you are unfamiliar with it, please consult other sources as an extensive explanation is beyond the scope of this document.
After restoration is complete, Restore Files will report it and give you an option to see which files were restored.

The “View restored files” is a standard Windows Explorer view of the locations files were restored to.
After viewing the restored files, you may close the Explorer window, then hit “finish” in the Restore Files to complete the process.